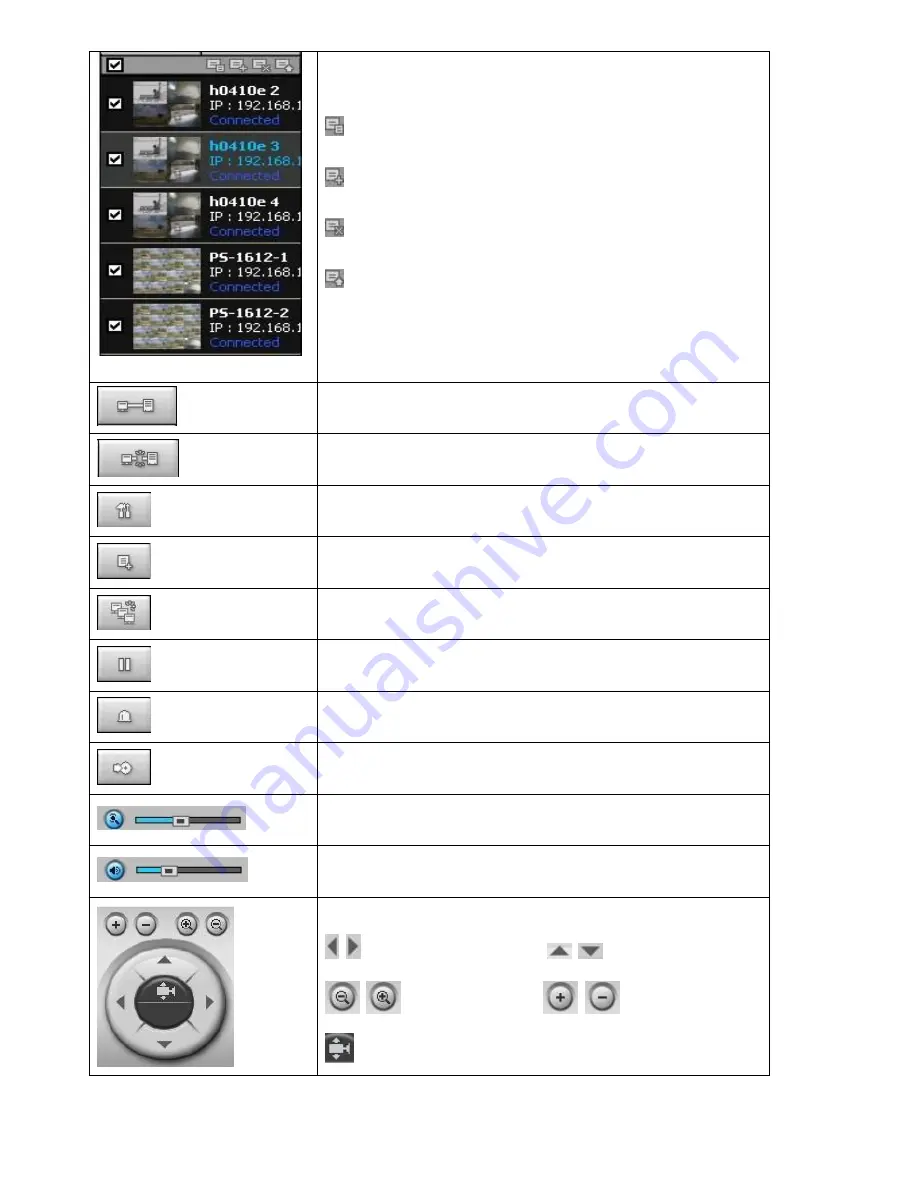
Speco 4HD Скачать руководство пользователя страница 57


57 


SITE MANAGEMENT   

  THUMBNAIL  REFRESH:  Click  this  icon  to  refresh  and 

renew thumbnail image of every connected site.   

  SITE  ADDITION:  Click  this  icon  to  open 

„Site  Addition‟ 

window.   

  SITE DELETE: Click this icon to delete site from the index 

window, after disconnect a site.   

  SITE  MODIFY:  Select  the  site  from  the  index  window  and 

click this icon to open 

„Site Modify‟ window. 

CONNECT 

Click this icon to connect the selected site/sites. 

DISCONNECT 

Click this icon to disconnect the selected site/sites. 

  SETUP 

Click this icon to setup configuration of UMS MULTI CLIENT. 

  CAPTURE 

Click this icon to capture a still image 

  EVENT LIST 


  PAUSE 

Click this icon to play/pause live video. 

  ALARM ON   


  RECORD ON 

Enable or disable recording of live video to local disk which has 

set in setup menu. 

  AUDIO 

Use the volume control bar to set the audio level. 

  MIC   

Use the micro phone volume control bar to set the micro phone 

level. 


User can control PAN/TILT & ZOON/FOCUS. 


  PAN left /right                     


  TILT up/down 


  ZOOM in/out           


  FOCUS in/out 

  Preset 

Содержание 4HD

Страница 1: ...User Guide Ver 1 3 Model DVR4HD 4 Channel HDcctv Digital Video Recorder About This User Guide Prior to installation carefully read the user guide Be sure to keep it handy for future reference...

Страница 2: ...battery is replaced by an incorrect type Replace only with the same or equivalent type recommended by the manufacturer Discard used batteries according to the manufacturer s instructions This symbol...

Страница 3: ...o not expose to shock or vibration Do not use this unit in areas where it is exposed to the possibility of explosion Caution Do not pull on the power cable when removing the power plug from the outlet...

Страница 4: ...ly opening the DVR for examination or attempting to fix the unit The manufacturer may not be held liable for any issues with the unit if the warranty seal is removed Product Components The package con...

Страница 5: ...5 Basic Function of the MOUSE Left button SELECT function Right button Go to Sub Menu Double click Change Full Screen or Split Screen Mounting the Hard Disk 1 Unfasten the cover of the unit...

Страница 6: ...acket screws 3 Insert the HDD bracket to the hole and fix the screw 4 Connect the supplied SATA cable and power cable to the hard disk NOTE HDD should be connected in the following order HDD1 ODD HDD3...

Страница 7: ...econds Auto Recording Compression H 264 Resolution 1280x720 640x360 selectable per channel Recoding Quality Grade 4 Levels Recording Mode Continuous Schedule Motion Sensor Manual Motion Detection Setu...

Страница 8: ...Search Playback Backup PTZF Camera Control Features DST Daylight Saving Time Yes Internal Beep By Alarm Motion Video Loss HDD Error Multi Language Yes Software Upgrade By USB Network Remote Upgrade T...

Страница 9: ...27 3 8 Setup Network Mode 28 3 8 1 Ports 29 3 8 2 Network Types 29 3 8 2 1 STATIC 29 3 8 2 2 DHCP 30 3 8 2 3 DDNS 30 3 9 Setup CONFIG Mode 31 3 10 Setup QUICK SETUP Mode 32 4 Saving Setup 32 5 Live Se...

Страница 10: ...e 56 10 2 2 Control buttons 56 10 3 Search and Playback Window 58 10 3 1 Main user interface 58 10 3 2 Main control panel 59 10 4 Setup 61 10 4 1 General 62 10 4 2 Event 63 10 4 3 Record 64 10 4 4 OSD...

Страница 11: ...rded Table 2 1 2 Front panel buttons Name Description DISPLAY Press to toggle the screen mode Full or Quad SEQ Press to start auto sequencing of the screen in full screen mode Toggle AUDIO Press to se...

Страница 12: ...is also used to select desired menu item or to store the setup value in the menu PLAY PAUSE Press to play or to pause the footage in playback mode Press to rewind the footage at 1x 2x 4x 8x 16x and 3...

Страница 13: ...nector for audio output 4 VIDEO OUT Spot output 5 VGA Connector for VGA monitor 6 RS 232 POS Interface 7 HDMI OUT Main video output 8 USB Port Connector for mouse or backup 9 RSV Reserved PIN for addi...

Страница 14: ...tup of a DVR 3 1 Setup Main Screen To enter the setup menu select MENU and SETUP on the screen using the mouse or press the SETUP button on the front panel Then select a user type User can select one...

Страница 15: ...SOLUTION FRAME RATE QUALITY RECORDING SENSOR RECORDING PRE RECORD POST EVENT RECORD AUDIO SCHEDULE DEVICE ALARM OUT PTZ CHANNEL MOTION ZONE MOTION SENSITIVITY KEY TONE REMOTE CONTROL ID SENSOR TYPE ST...

Страница 16: ...ITY USER AUTHENTICATION USER PASSOWRD NETWORK PORT WEB PORT NETWORK TYPE DHCP STATIC DNS DDNS CLIENT ACCESS NETWORK STREAM CONFIG SAVE SETUP TO A USB LOAD SETUP FROM A USB LOAD DEFAULT LOAD FACTORY DE...

Страница 17: ...e SEQ DWELL TIME Set the dwell time of each single channel display in sequential display mode 3 60seconds Quad or 9 channels display in sequential display mode 1 60seconds OSD CONTRAST Set the visibil...

Страница 18: ...then press SEL to set value for all channels Use virtual keyboard for all setting on one screen as you want as bellow picture FRAME RATE Set the frame rate for the specified channel The sum of the fr...

Страница 19: ...g schedule Press SEL to go to schedule setup screen RESOLUTION Set the resolution to 1280X720 640X360 3 3 1 Recording Schedules To setup a recording schedule select SCHEDULE in the RECORD menu Navigat...

Страница 20: ...To return to setup menu screen press the ESC button 3 4 Setup Device Mode Press the SETUP button and enter the password The setup menu is displayed as picture below Select DEVICE icon and press SEL b...

Страница 21: ...m Out Figure 3 4 2 ALARM OUT Setup Screen Table 3 4 2 Menu Item in ALARM OUT Setup Screen Item Description ALARM OUT Select an alarm out number Available NO 4CH 1 SENSOR IN Enable setting up to 4 came...

Страница 22: ...is the same as the one installed on the site If the camera has a specific camera ID select the camera ID using the control button The following options are available on the PTZ setup screen CHANNEL ch...

Страница 23: ...ress ESC button to return to the DEVICE setup menu Figure 3 4 4 Motion Zone Selection Screen 3 5 Setup Storage Mode Press the SETUP button and enter the password The setup menu is displayed as picture...

Страница 24: ...ing recorded data once the hard drive is full When disabled recording will stop once the hard drive is full DISK FORMAT In order to use HDD format DISK INFO Hard drive information RECORDING LIMIT Enab...

Страница 25: ...Item Description DVR ID Press the SEL button and select DVR ID using the control button and press SEL button Press OK to apply the selected DVR ID SPACE Caps Lock Select either Capital or Lower lette...

Страница 26: ...set OFF for normal use NTP NTP is an abbreviation for Network Time Protocol which is for synchronizing the clocks of computer systems over variable latency data networks SEND MAIL PRIMARY SNTP SERVER...

Страница 27: ...1 SECURITY Setup Screen Table 3 7 1 Menu Items in SECURITY Setup Screen Item Description USER AUTHENTICATION PASSWORD CHECK Check either V or blank for the functions such as Setup Playback PB PTZ Rec...

Страница 28: ...item Navigate through the menu items using the control button and change the value of the menu item using the control button To return to setup menu screen press the ESC button Figure 3 8 1 NETWORK Se...

Страница 29: ...xed IP See your network administrator if you do not have this information 2 When DVR is installed in IP sharer that is connected with ADSL a user can assign fixed IP to DVR from IP sharer itself using...

Страница 30: ...is used as a way to automatically get IP address 3 8 2 3 DDNS User can use the function to connect to a network with a domain name When it selects a Sever 1 user can select one type among three DDNS...

Страница 31: ...current configuration Setting values of DVR to the USB flash drive Put the USB stick on the front panel and press SEL to start the saving process LOAD SETUP FROM A USB User can upload the configuratio...

Страница 32: ...SETUP Mode User can easily recording setup just select desired day days to record then DVR will automatically calculate recording setting value 4 Saving Setup To preserve the setup values that you hav...

Страница 33: ...Indicator Icons in Live Screen Icon Description Displays the current date and time R C ALL Remote control ID display If no remote ID is set the message ALL is displayed Displays the amount of recordin...

Страница 34: ...ged value or to return to the previous menu screen 5 2 Search Screen To enter the search screen select MENU and SEARCH on the screen using the mouse or press SEARCH button on the front panel in live m...

Страница 35: ...hour moving 1 hour time bar Mouse F REW and F ADV button Front key 5 minute moving 12 00 00 Mouse control button Front key 5 2 1 Time Line Search The TIME LINE search window is used to find the store...

Страница 36: ...2 2 Event Search The Event Search window is used to find stored video Three categories of search filters can be applied DATE CHANNEL and TYPE Press SEL to select a value and move down to the next cate...

Страница 37: ...ance by setting the date and time in the GO TO search window Use the control button to move through the date and time values in this menu Use the control button to change the date and time value Move...

Страница 38: ...playback speed is shown as REW 1x 2x 4x 8x 16x and 32x at the bottom right of the screen Jump Step backward The playback position moves 60 seconds backward PLAY PAUSE Press to play or pause recorded v...

Страница 39: ...P DOWN focus LEFT RIGHT position using the control button INITIALIZE Initialize the PTZ settings of the selected camera PRESET Select the PRESET and press the left key on the control button Then numbe...

Страница 40: ...menu AUTOSCAN Press the right key on the control button to start auto scan Press the left key on the control button to stop auto scan PTZ Press the PTZ button to escape from the OSD menu ESC Press th...

Страница 41: ...take for archiving 3 Once you select the media the system will start to archive the data to the selected media 7 2 Video Backup onto USB Flash Drive Video can be captured and archived onto the USB fl...

Страница 42: ...the control button 2 Once you have selected the date press SEL to open the list of stored data 3 Use the control button to scroll through the on screen listings 4 Select a list of stored events that h...

Страница 43: ...43 Figure 7 4 1 HD Player...

Страница 44: ...t be named upgrade After the firmware upgrade file is copied into the USB flash drive connect the USB flash drive to the USB port on the front panel and do the followings 1 Extra the Firmware Files in...

Страница 45: ...rk it is recommended that only one user access the DVR at a time 9 1 PC Requirements CPU Intel Pentium 1 4Ghz or higher Memory 512MB 1G or higher is recommended VGA memory 16MB 64MB or higher is recom...

Страница 46: ...46 4 The setup status screen is displayed After the installation is completed SpecoTech Client icon is displayed on the desktop 9 3 Live Monitoring Mode and Functions...

Страница 47: ...ve screen PLAY PAUSE Play pause live video ALARM The ON OFF button of the alarm output of the DVR When an alarm of the DVR is output this button becomes Red SETUP Display the setup screen of the netwo...

Страница 48: ...lay only screen and hidden the operation panel Image Capture of Live Screen Still image of live screen can be captured and saved as BMP or JPEG file 1 Click the channel to be captured Then the channel...

Страница 49: ...ill need to connect a microphone to the audio in connection and a pair of amplified speakers to the audio out connection 9 5 Remote Search Mode and Functions Button Function Description DATE TIME Disp...

Страница 50: ...nnel and screen display mode CHANNEL SELECT Show on the screen that you select SPECIFIC TIME Select Specific Time with Hour or Minute Searching and Playing Video in the Remote DVR Video recorded in th...

Страница 51: ...ed up on the PC HDD as AVI format 1 Connect the network to the remote DVR and play the video recorded in the remote DVR 2 Drag the slid on the time scale and drop to the start time for video backup an...

Страница 52: ...l Set the Security Option Save Path and Miscellaneous Security Option Set a password for security options When you access any of the selected functions you will need to enter the password Save Path Sp...

Страница 53: ...are displays the time Setting Site The remote DVRs can be added modified and removed Setting Event Set the record path and the size of local disk space for the log files LOG Select to save event log i...

Страница 54: ...54 Setting Record Set the recording conditions and select channels to record Select the local disk to use and the amount of disk space you want to allow the program to use for recording...

Страница 55: ...0 1 Installing the Network Software 1 Insert the provided CD in the CD drive and double click SpecoTech_HDcctv_Multi_Client XXXX exe 2 Select a destination folder and click Next 3 Select the program f...

Страница 56: ...e SpecoTech Multi Client icon on your desktop to start the program 10 2 1 Main user interface 10 2 2 Control buttons Button Description LOCAL PLAYBACK Click this icon to run a playback window to searc...

Страница 57: ...ct the selected site sites DISCONNECT Click this icon to disconnect the selected site sites SETUP Click this icon to setup configuration of UMS MULTI CLIENT CAPTURE Click this icon to capture a still...

Страница 58: ...0 3 Search and Playback Window 10 3 1 Main user interface You can access to search window by clicking the search icon Local Playback Remote Playback on the upper left of Live Window If the software pr...

Страница 59: ...escription LOCAL PLAYBACK Click this icon to run a playback window to search and play videos that are recorded in local PC REMOTE PLAYBACK Click this icon to run a playback window to search and play v...

Страница 60: ...the beginning time for backup of the recorded video in AVI format MARK OUT Click this icon to set the ending time for backup of the recorded video in AVI format BACKUP Click this icon to backup the r...

Страница 61: ...cale from 24 hours to 60 minutes or vise versa The timeline shows recorded data in color on the bar You can adjust the time line scale and move it to the time you wish to playback Then click the play...

Страница 62: ...o set the save path for capturing and backup 10 4 1 2 Save Path Specify the location to save captured still image for Capture and Backup data 10 4 1 3 Miscellaneous Automatic reconnection If a user se...

Страница 63: ...nt Event log can be archived and searched 10 4 2 1 Archiving Event Log Specify the location to save event logs and select event to archive 10 4 2 2 Archiving Event Log Event log can be searched from s...

Страница 64: ...ls When you set the recording condition to event you can set event for motion or alarm with duration 10 4 3 2 Record Local Storage Setup You can select the local disk to use and the amount of disk spa...

Страница 65: ...65 10 4 4 OSD You can select the OSD to be display 10 4 5 About About provides network client version information...

Страница 66: ...he site and press the right Then the following window is displayed Select the Remote Setup Then the setup window is displayed The specified menu screen is displayed on the upper left of the screen Mem...

Страница 67: ...mber on the screen Sequence Setting for automatically switching the displayed video Seq Dwell Time Sets the interval for automatically switching the screens OSD Contrast Adjust the character contrast...

Страница 68: ...to the specified channel only Channel Designation Frame Rate Sets the recording rate Quality Sets the image quality in 5 levels Recording Sets the recording mode Electronic Light control Sets whether...

Страница 69: ...otion Zone Sensitivity Select the zone where the motion sensor is active It is necessary to set a detection frame when PARTIAL ZONE is selected Select the level of detection sensitivity of the motion...

Страница 70: ...whether to output or not an alarm signal when the error condition occurs Options are OFF ALL HDD ERROR and VIDEO LOSS Remote Controller Sets an ID number on the supplied remote control for its identif...

Страница 71: ...the video of a sensor recording to spot while it is being recorded Spot Event Dwell Time Sets the output duration of the sensor recording video Sequence Sets whether to automatically switch or not the...

Страница 72: ...the hard disk and the storage period for the recording data Overwrite To continue recording by overwriting when the hard disk becomes full check the checkbox Record Limit Sets whether to limit or not...

Страница 73: ...g the checkbox Live videos advance frame by frame At the rate of 1 frame per second DVR ID Sets individual designation to DVRs Date Format Sets the date display format Language Sets the display langua...

Страница 74: ...Begin End Memo A confirmation dialog is displayed when Apply or ok is clicked if the date and or time settings have been changed The DVR is restarted and the date and time updated when YES is clicked...

Страница 75: ...e mail when the DVR IP address is changed check the checkbox Transmission Mode Enables sending image of the channel that triggered the alarm when an alarm event is triggered Event Alarm Sets whether t...

Страница 76: ...rimary SNTP Server Input the NTP primary server address Secondary SNTP Server Input the NTP secondary server address Time Zone Select the time zone Connection Mode Select the connection mode to NTP ti...

Страница 77: ...password check for user authentication for the specific functions such as SETUP PLAYBACK PTZ control RECORD OFF PLAYBACK ON OFF and NETWROK connection Checking the checkbox Ask for a password when the...

Страница 78: ...DVRs to the network set a unique port number to each DVR Web Port Set a web server port number Network Type LAN The address setting mode is manual Input IP Gateway Subnet Mask and DNS server IP DHCP T...

Страница 79: ...the following values NTSC PAL 4ch Frame Rate 1 2 3 7 10 12 and 15fps 1 2 3 6 8 9 and 12fps Quality Standard High Ultra Standard High Ultra 8ch Frame Rate 1 2 3 and 7fps 1 2 3 and 6fps Quality Standar...

Страница 80: ...Site Name Input a name that properly describes a site o IP Address Input IP address Public IP address of a router that DVR is connected or Domain name that is registered at www ddnscenter com o Port N...

Страница 81: ...2 Click SITE DELETE button And then the selected site sites is are deleted 10 6 1 3 Modify of Sites 1 Select the site sites to modify from the directory window 2 Click SITE MODIFY button And then the...

Страница 82: ...82 10 6 2 Connect and Disconnect 10 62 1 Connect 1 Select site sites to connect from the directory window 2 Click CONNECT button and then site sites displays display as connected...

Страница 83: ...83 10 6 2 2 Disconnect 1 Select site sites to disconnect from the directory window 2 Click DISCONNECT button and then selected site sites disconnected...

Страница 84: ...a channel to capture from the display screen Otherwise all channels will be captured 2 Click CAPTURE button And then a Capture window displays 3 Set Save path File Name and File Format And then click...

Страница 85: ...setup window display 2 Select Record and set the values 3 Select Disk and set the values 4 Click RECORD ON button And the color of button is changed 5 Live video data is recorded as set in Record and...

Страница 86: ...n And then Playback Window display over Live Window 2 Select site sites to connect from the directory window 3 Click CONNECT button And then Green bar displays on Search calendar and slide window 4 Mo...

Страница 87: ...87 10 6 5 2 Playback of Recorded Video on Remote DVR 1 Click REMOTE PLAYBACK button And then Playback Window display over Live Window...

Страница 88: ...the directory window 3 Click CONNECT button And then Green bar displays on Search calendar and slide window 4 Move scroll bar on where there is video data and Play button 5 Video data that is recorde...

Страница 89: ...ar 3 Click MARK IN button when the scale of the timeline is located on the target time as the beginning time of backup 4 Set the ending time on the blue timeline by dragging the scale on the target ti...

Страница 90: ...he OK button The backup will begin 7 AVI video data is recorded as set in AVI Backup window AVI format video can be played back by Window Media Player or other media player that is compatible with AVI...

Страница 91: ...e 3G App Viewer 1 Enter the Apple App Store For Apple iPhone Users or the Android Market For Android Phone users 2 Search Speco Viewer in the App Store or the Android Market 3 Install the Speco Viewer...

Страница 92: ...rner for Site Information 3 Input the Site Information and select to save the Site Information 4 Select the saved site from My Site List 5 Select a channel to view 6 After selecting a channel the app...

Страница 93: ...93 Notice 3G Data Usage applied without Wi Fi connection Please check with your Phone Carrier...

Отзывы: