10
9
5
x2
x4
Turn clockwise tolock into place
Note: These instructions depict the TALK-Rconfiguration. Panels will be mirrored for theTALK-L version
5/32
"
Страница 1: ...TALKZONE INS 0117 R7 09 24 2021 Assembly instructions For Privacy Booth Note These instructions depict the TALK R configuration Panels will be mirrored for the TALK L version...
Страница 2: ...not use attachments not recommended by the manufacturer 4 Never operate this product if it has a damaged cord or plug if it is not working properly if it has been dropped or damaged or dropped into w...
Страница 3: ...en gap on the top and bottom of the door there should be at least 3 16 clearance between the bottom of the door and the frame 5 Check the door for any signs of cracking or chipping THE DOOR IS MADE FR...
Страница 4: ...pull it down to release it from the top of the booth 9 Rest the upper trough face down on the covered table brackets 10 Using an air duster or other purpose made electronics cleaner blow the dust off...
Страница 5: ...hannel with gasket 29 1 2 long aluminum angle 26 1 4 long aluminum angle 3 long aluminum angle x2 x1 x1 x1 x1 x1 x1 Non hydraulic Hinge Hydraulic Hinge 5 32 M3 M5 x1 Note These instructions depict the...
Страница 6: ...30 2 Upper Rear Panel 2 Push out for light before installing only remove center cutout for adding fire suppression 2 1 3 3 4 6 5 8 7 9 10 11 8 9 10 11 Note The ceiling panel has a centre cut out that...
Страница 7: ...2 3 4 5 6 7 Push out for light before installing only remove center cutout for adding fire suppression iii 2 1 3 4 6 5 8 7 9 10 11 30 2 41 5 8 9 10 11 Note The ceiling panel has a centre cut out that...
Страница 8: ...HDW 1099 Thumb screws x4 GLD 0131 Slotted glides x8 HDW 0729 6 2 1 4 screw Note Floor mounting hardware not provided by Spec HARDWARE Note These instructions depict the TALK R configuration Panels wil...
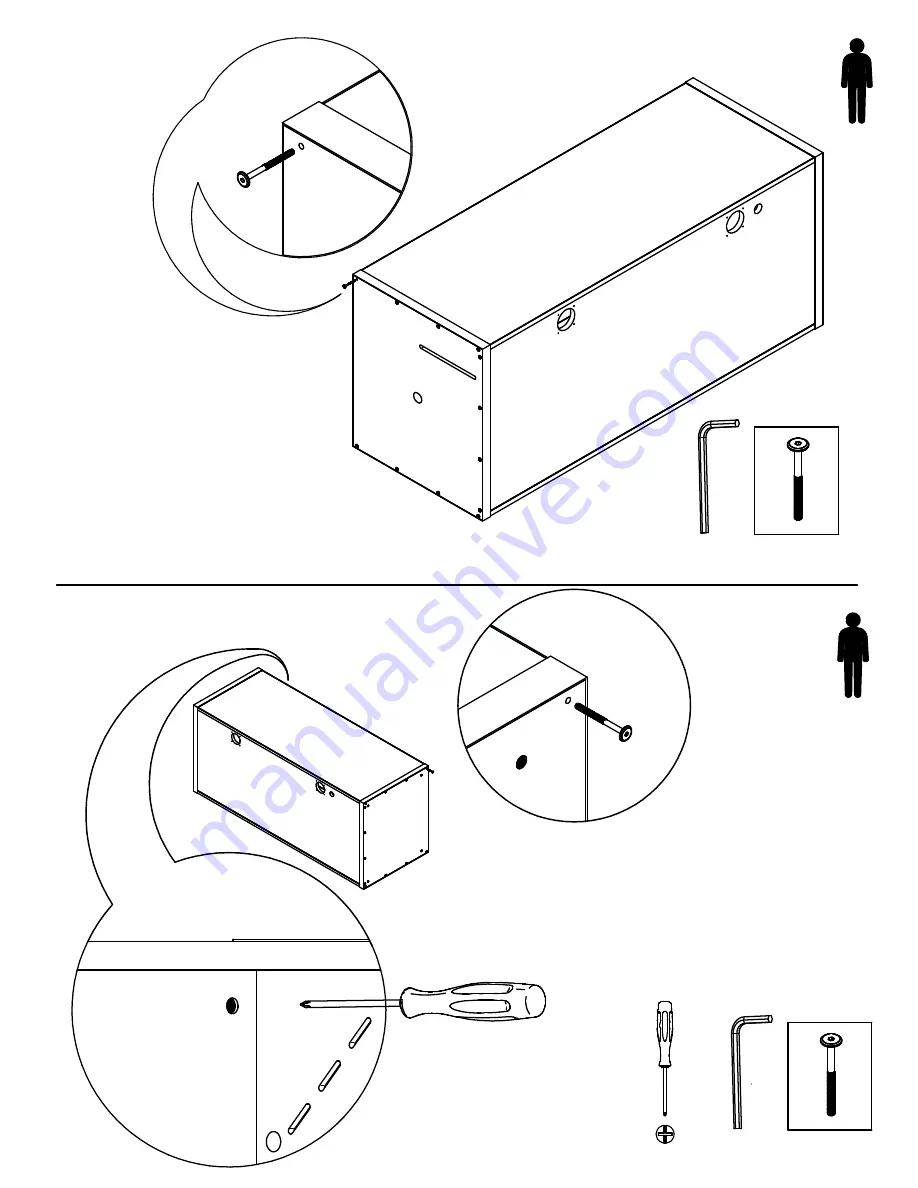
Страница 9: ...2 1 1 x4 x7 x6 x2 Note Do not over tighten fasteners Note These instructions depict the TALK R configuration Panels will be mirrored for the TALK L version 5 32...
Страница 10: ...4 3 2 x14 x2 Note Ensure arrow is pointing outwards Turn clockwise to lock into place Note These instructions depict the TALK R configuration Panels will be mirrored for the TALK L version...
Страница 11: ...els will be mirrored for the TALK L version 5 32 5 32 Note The ceiling panel has a centre cut out that can be used for sprinkler installation The building and fire marshal must be contacted before ins...
Страница 12: ...x7 x6 Note Do not over tighten fasteners Note Ensure arrows are pointing outwards before positioning x2 Note These instructions depict the TALK R configuration Panels will be mirrored for the TALK L v...
Страница 13: ...10 9 5 x2 x2 x4 x4 Turn clockwise to lock into place Note These instructions depict the TALK R configuration Panels will be mirrored for the TALK L version 5 32...
Страница 14: ...12 11 6 x3 x4 ADJUST GLIDES TO LEVEL BEFORE NEXT STEP...
Страница 15: ...ure the bulb seal is positioned facing out of the door way Note Ensure the bulb seal is positioned facing out of the door way Note These instructions depict the TALK R configuration Panels will be mir...
Страница 16: ...16 8 15 x8 x3 x17 BOTTOM VIEW OF REAR PANEL 26 1 4 29 1 2 3 USE THIS ORIENTATION FLOOR Install the back piece first...
Страница 17: ...FAN EXHAUST FAN Note These instructions depict the TALK R configuration Panels will be mirrored for the TALK L version USE PAGE ii TALK R or iii TALK L FOR INSTALLATION SEQUENCE x8 FAN GRILLS TO BE I...
Страница 18: ...THE KIT USING SCREWS SUPPLIED IN THE KIT PLUG IN LIGHT AND SECURE LIGHT IN THE HOUSING USE THE 2 SIDED TAPE TO SECURE THE CORD OUT OF SIGHT LIGHT KIT CORD PLUG 3 WAY SPLITTER INTO SENSOR THEN CLIP INT...
Страница 19: ...AY SPLITTER Note These instructions depict the TALK R configuration Panels will be mirrored for the TALK L version Note These are designed to fit tight If too snug squeeze the hem with pliers Note Ens...
Страница 20: ...the TALK R configuration Panels will be mirrored for the TALK L version x2 x2 Use the two clips to affix the power supply cord to the booth before feeding the plug through the panel Please orient the...
Страница 21: ...13 25 x2 x6 WATCH BRACKET CORNERS FOR SHARP POINTS x6 Note These instructions depict the TALK R configuration Panels will be mirrored for the TALK L version If too snug squeeze the hems together Table...
Страница 22: ...NDED WATCH FOR ALIGNEMNT Hardware to attach to door included in Hinge kit 3 5 7 8 SEPERATE HANDLES REMOVE PARTS AND STORE IN A SAFE PLACE TIGHTEN THE TWO MOUNTING POST SET SCREW AND THEN INSTALL THE I...
Страница 23: ...15 29 30 14 x2 x6 USE SUPPLIED INSTRUCTIONS FROM THE HINGE KIT TO SET THE RESISTANCE OF THE HYDRAULIC HINGE S CLOSING MECHANISM SHIM x2 USE PROVIDED SHIM TO ALIGN THE HINGES WITH THE INSERTS...
Страница 24: ...Spec Furniture Inc 165 City View Drive Toronto ON M9W 5B1 P 416 246 5540 F 416 246 5547 E specit specfurniture com specfurniture com...