


BassX-W10 Owner’s Manual
Page 5
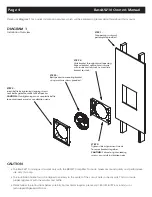
SYSTEM COMPONENTS
• Included in this Carton:
• BassX-W10 Subwoofer
• Baffle
• Mounting Hardware
• BBXW10 Amplifier
• Grille
• Installation Bracket
• Paint Mask
• System Options:
• BassX-W10 Enclosure (ASMX3102) for New Construction installations
• BassX-W10 AcoustaCell (ASMX3101) for Retrofit Installations
SYSTEM DESIGN CONSIDERATIONS
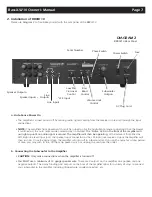
• The BassX-W10 System provides accurate bass to any audio system, and is designed so that it will work in conjunction
with your other audio components. The BBXW10 amplifier can be connected to any preamplifier or receiver that has low
level (line out), speaker (high level) or LFE outputs. The BBXW10 has a pass-through feature that allows the input signals
to be fed out of the unit to other amplifiers or system components.
• The Subwoofer should be mounted low on the wall, free from obstructions. The lower you mount it, the more bass there
will be.
•
Every practical effort should be made to eliminate possible noise on or inside the wall surrounding this
subwoofer. Steps must be taken to ensure that the wall and anything attached to the wall into which the
BassX-W10 is mounted is secure.
We recommend using acoustical spray foam instead of insulation in the bays that surround the BassX-W10.
The foam will be able to get into all those small gaps and will absorb most of the vibration from the subwoofer.
If foam is not available, stuff the wall with as much insulation as possible. Using adhesive foam strips between
the stud and drywall is also an option that could be used to keep the drywall from resonating on the studs. In
addition, extra drywall screws can be used to mount the drywall to the studs.
To reduce vibration even more, we recommend not hanging anything directly over the BassX-W10. If there
is no way around it, steps will need to be taken to ensure that pictures, mirrors, shelves, etc. do not vibrate
on the wall. The use of rubber grommets, adhesive tape, extra mounting screws, foam padding will help in
these types of applications.
• Once connected, use the controls described under
“Installation and Operation of the BBXW10 Amplifier”
to adjust the
system so that it will blend seamlessly with the other speakers in your system.
INSTALLATION
1. Mounting Bracket Installation - New Construction
• Mounting the BassX-W10 subwoofer requires that you first install the Mounting Bracket and speaker wire that is to be run
to the BBXW10 amplifier's location.
NOTE:
It is critical to insure that the drywall (or any wall material) is well damp-
ened and tight to avoid resonance.
• The Mounting Bracket has been designed so that it can be screwed between two studs in the wall. As with any in-wall
speaker, be sure the subwoofer does not share any stud bays with electrical outlets or switches. Attach the bracket with
the included drywall screws so that it aligns flush with the front of the studs.
• After installing the mounting bracket and pulling the speaker wire from the BBXW10 amplifier location, you can now
hang the drywall. Keep in mind that the mounting bracket is not a "Pre-Construction Bracket" or drywall ring. Carefully
mark and cut out the hole for the subwoofer before mounting the drywall.
NOTE:
It is very important that the mounting bracket aligns exactly in the center of the cut out hole in the drywall,
or the speaker and baffle cannot be connected to the bracket!