background image

25

EN

5. Once cleaning is finished, put the filter back on the dust container. Then insert the dust 
container back into the vacuum. 

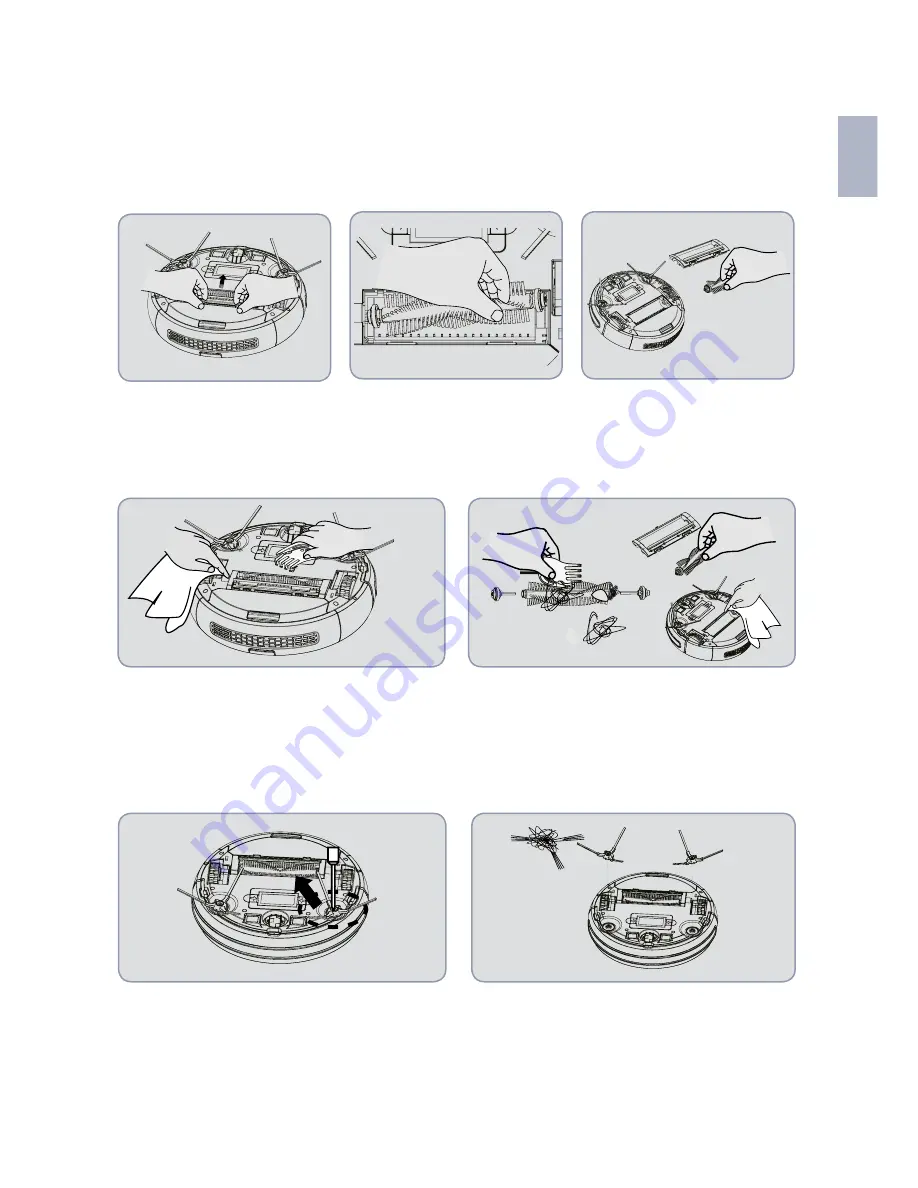
5.4 Cleaning the main brush 

TAKE OFF THE MAIN BRUSH

CLEANING THE MAIN BRUSH AND THE RUBBER BRUSH

5.5 Cleaning the side brushes

1. Press and lift the locking 
mechanism. 

1. Clean the main brush and the rubber brush 
regularly with the cleaning brush.

1. Remove the screws for the side brushes 
with a screwdriver.

2. Remove the side brushes and remove any 
hair and remaining dirt from the brushes and 
the inside of the hole.

2. Remove any hair and remaining dirt from 
the main brush regularly.

2. Hold and then lift the main 
brush.

3. Remove the main brushes 
and the scraper. 

Содержание BAAMBA

Страница 1: ...Robot Vacuum Cleaner BAAMBA BAAMBA GYRO 4 0 USER GUIDE ...

Страница 2: ...upervised to ensure they do not play with the smart robot vacuum cleaner Only the power supply cable provided with the smart robot vacuum cleaner may be used This smart robot vacuum cleaner is only for domestic use TABLE OF CONTENTS 1 Safety instructions 1 1 Recommendations for use 1 2 Safety measures 1 3 Child safety 1 4 Battery information 1 5 Usage areas 1 6 Exception clause 2 Product component...

Страница 3: ...hnical support section That s SPC A universe in technology SPC IOT an app for your Smart Home products At SPC we believe in practicality and convenience which is why we ve worked hard to create a new app for controlling ALL of your SPC IoT Smart Home devices INTERACTION BETWEEN DIFFERENT DEVICES AND MORE FUNCTIONALITY Via our SPC IOT app you ll be able to get your SPC IOT devices to interact creat...

Страница 4: ...ner and could cause a fire due to electrical shock and high voltage If you find that the main body or the accessories are damaged don t use the smart robot vacuum cleaner and get in touch with the after sales service It is forbidden to disassemble repair or reassemble the smart robot vacuum cleaner Unplug the smart robot vacuum cleaner before performing maintenance tasks Don t touch the battery so...

Страница 5: ...r in the wheels WARNING The smart robot is only for indoor use Clean the chords and other components on the floor in case they are tangled in the wheels or brushes The charging base and the space isolator must be placed against the wall and on a flat surface Otherwise its operation will be affected Avoid water oil or other liquids getting into the smart robot Remove fragile objects Turn off the sm...

Страница 6: ...les service Placing the wrong battery in the smart robot can cause damage 5 If the battery leaks do not touch the liquid Clean the liquid with a dry cloth and take the battery to a recycling bin or a green point Do not throw it out in just any given location Unplug the smart robot if you re not going to use it for a long period of time Do not vacuum up sharp objects with this smart robot i e glass...

Страница 7: ... our manual B The smart robot and its components are out of warranty C The product failure has been caused by disassembly performed by a technician who hasn t been sent or authorised by our company D A valid receipt of purchase is not provided E The warranty card model does not correspond with the product to be repaired or it has been modified F The product failure is due to causes outside the sph...

Страница 8: ...accessories NOTES A battery two side brushes and a filter are mounted on the main body and two other side brushes and a filter are located inside Main body Adaptor Side brush Charging base User manual Filter Cleaning brush Battery Screwdriver ...

Страница 9: ...ONT IMPACT AREA FRONT WHEEL LEFT WHEEL CENTRAL BRUSH BATTERY TOP COVER 2 2 Introduction to the accessories Top view Bottom view INDICATOR LIGHT ON CHARGING CONTAINER BUTTON SIDE BRUSH RIGHT WHEEL RUBBER BRUSH ...

Страница 10: ...ace designed for it 2 Place the charging base on a smooth surface on the floor against the wall Clean the dust and remove any objects from the area stick the charging based to the floor Then insert the adaptor into the mains outlet TIPS Insert it into the smart robot during installation Pull it out in the opposite direction to remove CHARGING BASE PLUG ADAPTOR 1M 1M 3M Danger Electrical shock ...

Страница 11: ... PRODUCT USE 4 1 Use of main body INTRODUCTION TO THE CONTROL BUTTONS Ref SKU 6401N BAAMBA Ref SKU 6402S BAAMBA GYRO 4 0 OPERATING MODES Manual mode Ref SKU 6401N BAAMBA AUTOMATIC CLEANING Briefly press the button The indicator lights will turn on and the smart robot vacuum cleaner will go into standby mode Then press the button again and the smart robot vacuum cleaner will automatically start to ...

Страница 12: ...AN button two times The indicator light will turn green and it will start to flash ths means that the smart robot vacuum cleaner has gone into automatic charging mode INDICATOR LIGHT OPERATING GUIDE Ref SKU 6401N BAAMBA No State Display Operation 1 Power off POWER and HOME light turned off Press POWER for 4 seconds to turn the device off 2 In sleep mode if the state of the battery is low or the el...

Страница 13: ...o into sleep mode 2 In sleep mode if the state of the battery is low or the elapsed time is greater than 8 hours the robot will turn off 2 Power On Red light on Press CLEAN briefly and go into standby mode 3 Cleaning Green light on Press CLEAN briefly and go into automatic mode 4 Recharge Flashing green Double click on CLEAN and it will go into recharge mode 5 Charging Flashing red 6 Error Flashin...

Страница 14: ...ght of the icon indicating the charge will flash when charging The blue indicator light will stay on once the smart robot vacuum cleaner has been charged AUTOMATIC CHARGE When the smart robot vacuum cleaner has almost run out of battery the indicator light will flash and the smart robot vacuum cleaner will go into automatic charging mode 2 In the app click on CHARGE The vacuum will look automatica...

Страница 15: ...it guarantee Installation of the SPC IoT APP Your device must have the Android 4 0 or IOS 7 0 operating system or higher Look in the market for the SPC IoT app download and install it Or if you prefer scan the QR code to access our website where you ll find the links to your market Download and install the app Preparation 1 Press the POWER button on the main unit to go into standby mode 2 Click on...

Страница 16: ...lephone number or email address Then add your password in order to login You can also click on Create a new account to register Since you haven t registered yet you have to sign up Add your telephone number or email address on the screen shown below and click on Next Add the verification code and a password of your choice to complete registration Click on Confirmar to access the start page ...

Страница 17: ...r password to recover your password FORGOTTEN PASSWORD If you have forgotten your password click on Have you forgotten your password to recover your it On the You ve forgotten your password screen add your telephone number or email address and click on Next to verify your identity On the screen shown below add the verification code and the new password Click on Confirm If you are not able to login...

Страница 18: ... ADD DEVICE Click on Add device Select the device you wish to connect In this case the robot vacuum Press and hold the power on off button for 6 seconds until the indicator light flashes Click on Confirm ...

Страница 19: ...9 EN Add your WiFi network s password and click on Confirm Wait for the mobile to connect to the internet as shown below When you ve added the device successfully click on Done on the screen shown below ...

Страница 20: ...l screen shown below On the operation control screen click on Manual to open the control panel The smart robot vacuum cleaner will exit standby mode Click on any arrow for the robot vacuum to go into operation Click on the Timer function to adjust the time ...

Страница 21: ... timer to set the cleaning schedule Add the settings related to the operating schedule for the robot vacuum cleaner and click on Save on the screen shown below Click on SPOT so the vacuum goes into cleaning mode as shown on the screen below ...

Страница 22: ...harging SHARE THE DEVICE If you want to share one of the SPC IoT devices with a family member Go to the control panel of the device you wish to share from the added devices panel Select the option more settings and the options in the upper right hand corner of the control panel Select the function Share device ...

Страница 23: ... not going to use the vacuum for a long period of time first charge the battery and store it in a dry place 5 2 Cleaning the charging contacts 1 Before starting the task turn off the power button or unplug the chord 2 Clean the charging contacts once a month with a dry cloth 3 Do not use oil to clean the smart robot vacuum cleaner Charging contacts ...

Страница 24: ...e container CLEANING THE CONTAINER 1 Open the lid to empty the dust container We recommend periodically cleaning the container 3 Once you have removed the filter clean the dust with the cleaning brush 4 The container can be washed Note the dust container must be completely dry before being reinserted 2 Clean the dust container with a cleaning brush Air Cold Hot ...

Страница 25: ...side brushes 1 Press and lift the locking mechanism 1 Clean the main brush and the rubber brush regularly with the cleaning brush 1 Remove the screws for the side brushes with a screwdriver 2 Remove the side brushes and remove any hair and remaining dirt from the brushes and the inside of the hole 2 Remove any hair and remaining dirt from the main brush regularly 2 Hold and then lift the main brus...

Страница 26: ... The indicator light flashes 3 times and the device makes a sound Right wheel failure The right wheel is overloaded and isn t turning Check if there are any foreign materials in the right wheel The indicator light flashes 4 times and the device makes a sound Power on failure The device starts to operate and stops after 1 second Place the device on the floor again Do not hold it up in the air Clean...

Страница 27: ... light flashes 9 times and the device makes a sound Main brush failure The main brush is overloaded Check if there are any foreign materials in the main brush The indicator light flashes 10 times and the device makes a sound Side brush failure The side brush is overloaded Check if any foreign materials are in the side brush The indicator light flashes 11 times and the device makes a sound Failure ...

Страница 28: ...g humidity range 80 RH Sound 70 dB Net weight 4 6Kg Dimensions Φ326 79mm Copyright 2018 SPC www spc universe com The information contained in this manual cannot be transferred reproduced or distributed under any circumstances without written permission from SPC TRADEMARKS SPC is a registered trademark of Smart Products Connection S A NOTE SPC reserves the right to modify the information in this ma...

Страница 29: ...29 EN ...

Страница 30: ...spc universe com SPC 18 07 1c ...

Отзывы: