Spatz DXS-44 Скачать руководство пользователя страница 9


3


Operating instructions 


3.1


Powering on/off, Standby-operation 


When DXS-XX is connected to a hot wall socket, it will start and boot automatically. All button LEDs will flash for 
a short period of time and the text display will show a short welcome message (from the bootloader). After that, 

the unit trys to reach a TCP/IP network (if cable connected). 
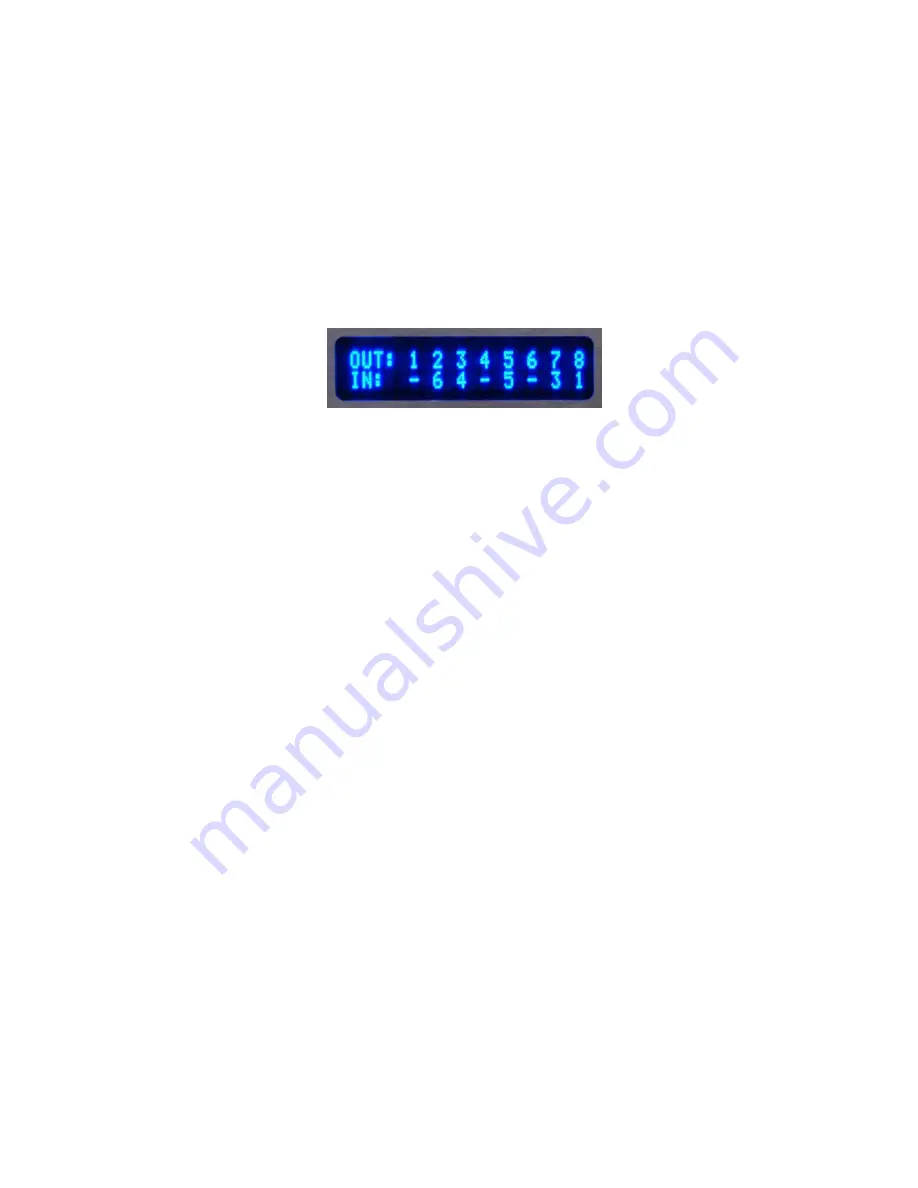
After 10 seconds max., the unit is up and ready for operation. The text display will switch to a “status display” 

mode (see figure 3). You can read all active routing connections from that status display. All outputs available are 

written in the top row, starting with “OUT:”. The lower row displays the number of the input connected to the 

output above. A minus sign says, that the output has NO connection to any input. Reading a number gives the 
number of the input channel, that is actually connected to the output. 


Figure 4: Routing status display (example) 

The example in figure 5 reads: 


Outputs # 1,4 and 6 are off 


Output #2 shows video connected to input #6 


Output #3 shows video connected to input #4 


Output #5 shows video connected to input #5 


Output #7 shows video connected to input #3 


Output #8 shows video connected to input #1 


By pressing the “O/I”-button on froint panel longer than 3 seconds, the DXS-XX will quit active mode and go to a 
standby mode of operation. All active connctions break and the unit will turn off most of its internal functions. 


If the unit is in standby, you can activate it by pressing the “O/I”-button longer than about 1 second. Then, all 

previous routing connections are re-established (both video and EDID-connections). 


3.2


Outline of operation 

As mentioned shortly in chapter 1, the DXS-XX can be operated by different methods. These methods differ in 

complexity and level of control, so rookies and professional users will find their appropriate control method. 


To ease handling of the DXS-XX and have a quick start, let’s outline the next sections: 


make and break video routing connections 


save and recall setups scenarions with “presets” 


control system’s menu tree 


control system’s features through remote interfaces like console or web interface 


3.3


Set up video connections between inputs and outputs 


3.3.1


Making a connection 

First, select the output number of the connection you intend to make by pressing one of the numeric buttons “1” 

to “8” (resp. „1“ to „4“, if you only licensed 4 Outputs). Now, the LED of the selected output will flash slowly. And 

the cursor in the text display will flashg the number of the selected output channel. 


Now pressing one of the numeric buttons “1” to “8” (resp. “1” to “4”, if you licensed only 4 inputs) will make the 
connection to the selected input number. The former flashing LED will blank and the status text display will show 

the newly established connection. 


3.3.2


Modifying or breaking an existing connection 

An existing connection can be modified by re-establisting a new connection/routing, just like described in the 

previous section. If you intend to break an existing connection, just press the number of the output you want to 
turn off (break connection), after the LED light flashing, press the “P”-button. This will break the connection and 

Содержание DXS-44

Страница 1: ...beamers LCD monitors or other displaying units This manual will describe the installation procedure and give operating instructions The explanations will help you to understand the usage of the unit a...

Страница 2: ...Saving a preset 10 3 4 2 Recalling a preset setup 10 3 5 MENU FUNCTIONS 11 3 5 1 Menu system 11 3 5 2 Menu tree 12 3 6 CONSOLE AND TELNET ACCESS 13 3 6 1 Introduction to Console Telnet 13 3 6 2 Conso...

Страница 3: ...ceplates 26 8 TECHNICAL DATA 28 8 1 DXS XX 28 8 1 1 Mechanical data 28 8 1 2 Electrical data 28 8 1 3 Approvals 28 8 1 4 Supported input signals 29 8 1 5 RS232 connector 29 8 1 6 TCP IP connector 29 8...

Страница 4: ...remote control not included remotely using the build in webserver and your preferred internet browser remotely using a telnet console The DXS XX has a blue character display in the frontside faceplate...

Страница 5: ...lternatively you can mount the DXS XX into a 19 inch rack using the brackets supplied The mounting of the brackets is simple you just need a screwdriver size PH2 Start on the left hand side of the uni...

Страница 6: ...ly identical Complete your written notes by denoting the output assignement i e which output goes to which of your dis playing devices Use no DVI cables longer than 5 m as output cables when using max...

Страница 7: ......

Страница 8: ...2 5 6 Checking your cabeling After doing all connections you overall system containing the DXS XX should look like this Figure 2 DXS XX cabeling...

Страница 9: ...onger than about 1 second Then all previous routing connections are re established both video and EDID connections 3 2 Outline of operation As mentioned shortly in chapter 1 the DXS XX can be operated...

Страница 10: ...lecting a preset bank the text display will return to the status display of figure 8 and all flashing LEDs will stop flashing If you like to cancel saving instead just press the P button instead of on...

Страница 11: ...play After pressing the right or the enter button the active menu function is exectuted or a submenu is opened depending on the menu item Using the left button you can close a submenu or quit a functi...

Страница 12: ...isplays connected unavailable output ports Overcurrent Displays overcurrent status of output supply 5V Network Status IF TCP IP network current network interface state IP TCP IP network current IP add...

Страница 13: ...the windows command line telnet aaa bbb ccc ddd while using the unit s IP adress as aaa bbb ccc ddd in dotted numerical format i e tel net 192 168 0 100 Both access methods serial or telnet will open...

Страница 14: ...any input of the unit will behave like static see below to be DVI compliant S STATIC a static EDID data set is pre sented at the input Hotplug signal is always ON A video source is able to read EDID...

Страница 15: ...utput N and saves this data to internal bank manager bank M if read back data is valid i e checksum is OK Caution If bank M is already use the new data will overwrite the old information with user req...

Страница 16: ...ate type H W addr 0 10 0 1 61 10 0 1 2 UP Ethernet 0 60 35 6 26 29 Please read it Parameter Interpretation IF number of network interface Reads always 0 with this unit IP addr actual IP adress of the...

Страница 17: ...eters must be entered in IPv4 dotted format decimal i e 192 168 0 1 The unit is not sup porting name resolution DNS domain name services so only dotted nomerical format is available For netmask use st...

Страница 18: ...ypical output pre_load Preset bank status PRE 1 2 3 4 5 6 7 8 STAT OK Row PRE displays the numbers of all routing preset banks available here one to eight All routing presets used read an asterisk the...

Страница 19: ...Parameter year 2000 2199 month 1 12 day 1 28 to 1 31 depending on moth DayOfWeek 0 6 0 sunday 1 monday etc hours 0 23 Caution european 24 hours notation NOT 1PM etc minutes 0 59 seconds 0 59 Sets the...

Страница 20: ...s user management If user is connected to the unit while deleting it s re cord existing connections won t break but the user can not open any new connections If user name is unknown to the unit an er...

Страница 21: ...t with it Sensor 1 is located near the unit s internal power supply Remark Reading values up to 70 C for Temp 0 are OK 3 6 2 22 www_lang Format www_lang N Parameter N 0 1 see table 4 Sets the unit s w...

Страница 22: ...P network you can query the current IP adress using the menu tree unter STATUS NETWORK STATUS IP Because DXS XX uses Javascript as http extension your browser must support Javascript Manufacturer qual...

Страница 23: ...Operation of this equipment in a residential area is likely to cause harmful interference in which case the user will be required to correct the interference at his own expense 6 Maintenance repair a...

Страница 24: ...dard defines that every DVI video source has to be able to find out the video features of a DVI compliant displaying device The idea behind is that the source will find out what resolutions in size an...

Страница 25: ...oint including the current input then the first routed connection will con tinue direct connection but the additional display will show no video info or only white noise be cause on the addition outpu...

Страница 26: ...tton Enter key acceptance functionality in menu and value entry Preset button P Button used for save and recall of presets Channel buttons 1 to 8 Buttons for quick make or break of routing connections...

Страница 27: ...TCP IP TCP IP interface for control via ethernet 10 100MBit s RS232 Serial interface for control of DXS XX via RS 232 INPUT 1 INPUT 8 DVI input ports for up to 8 DVI video sources OUTPUT 1 OUTPUT 8 DV...

Страница 28: ...ctor rear side operation indicator blue LED integrated in power pushbutton labeled O I DVI inputs DVI 1 0 compliant resolutions 640x480 to 1920x1200 and HDTV 720p 1080i 1080p DVI outputs DVI 1 0 compl...

Страница 29: ...pplication User remote control Manufacturer system maintenance updates Pin connection Pin Usage 2 Transmitting data TXD 3 Receiving data RXD 5 System s ground 8 1 6 TCP IP connector Connector RJ45 8 p...

Страница 30: ...ditions Parameter Valid range Temperature 0 C to 65 C Relative Humidity 20 to 80 Air pressure 700hPa to 1060hPa 8 2 2 Operation confitions DXS XX and each of it s parts can be operated following these...

Страница 31: ...ity Part Part code 1 DXS XX unit 19 inch 1 power cord IEC 320 to your local wall outlet 2m 1 serial cord DSUB9 female to DSUB9 male connected 1 1 1 19 inch mounting bracket set constist ing of two bra...

Отзывы: