Spagna Vetro Professional 200PS Скачать руководство пользователя страница 11

Page 9

Advanced Preparations:

1.  Read the entire installation guide and users manual thoroughly, understand instructions and warnings.

2.  Be familiar with the controls of the range hood by reading through 

Range Hood Operations

,

 Page 12.

3.  Place the range hood on a flat, stable surface. Connect the range hood to a designated standard outlet (please 

refer the product label for the suitable voltage of this unit) and verify no debris has entered the vent openings, 

then turn on the range hood. Verify all operations of the range hood by referring to 

Range Hood Operations

Page 12.

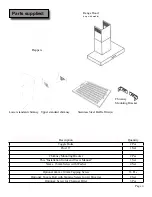
4.  Place all supplied parts and required hardware on a flat, stable surface and verify the existence of all supplied 

parts listed on Page 4.

5.  Carefully remove the white plastic protective coat from the chimney covers and range hood if any.

Preparations:

NOTE: To avoid damage to your hood, prevent debris from entering the vent opening.

1.  Determine and mark the center line on the ceiling where the range hood will be installed. Make sure there is 

proper clearance within the ceiling or wall for exhaust vent.

2.  Due to the weight and size of this unit, please make sure that the support system or framework being used is 

stable and secure in the ceiling.

3.  Put a thick, protective covering over counter top, cook top or range to protect from damage or dirt. Remove 

any hazardous objects around the area when installing.

4.  Mark the locations of the support mounting bracket holes, vent cutout (if used) and power supply cable cutout 

on the ceiling. Use drill and saber saw or keyhole saw to cut openings for power supply cable and vent (see 

Venting Methods

 and 

Electrical requirements

, Pages 7-8).

5.  If venting to the outside install vent system (see 

Venting Methods

, Page 7). Use caulking to seal exterior wall 

or roof openings.

6.  Disconnect main electrical supply, prepare and run electrical wiring through ceiling. Leave approximately 

12” of electrical cord hanging from the ceiling. Do not restore power until wiring is completed.

7.  Disconnect power cord, remove the stainless steel baffle filter (see 

Figure 9

, Page 11) and grease tunnel.

8.  If charcoal filter is present, unscrew the screws and remove the filter.

9.  Set aside the stainless steel baffle filters, grease tunnel and charcoal filter until the range hood is properly 

installed.

10. 

If the range hood comes with a glass canopy and has not already been mounted to the hood, loosen the four 

canopy screws and washers from the hood top, carefully place the canopy on the hood top, and loosely tighten 

the four canopy screws along with washers. DO NOT put excessive pressure against the glass.

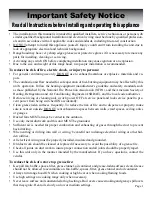
WARNING

Severe Injury

Rotating fan can cause se-

vere injury. Stay clear of 

fan when motor is running.

WARNING

Severe Injury

Hood may have very shape edges. Please wear 

protective gloves if it is necessary to remove 

any parts for installing, cleaning or servicing.

Preparation

WARNING

Excessive Weight

Require three or more person to move and 

install this range hood. Spinal or other bodi-

ly injuries could occur if it is not followed.

Содержание Professional 200PS

Страница 1: ...Manual Wall Mount Range Hood IMPORTANT Read and save these instructions NOTICE Installer Leave this guide with the homeowner Homeowner Keep this guide for future reference SPAGNA VETRO 200PS Professional Series www KitchenHoods ca ...

Страница 2: ......

Страница 3: ...rities Before servicing or cleaning unit switch power OFF at service panel and lock service panel to pre vent power from being switched ON accidentally Clean grease laden surfaces frequently To reduce the risk of fire and to disperse air properly make sure to vent air outside DO NOT vent exhaust into spaces between walls crawl spaces ceiling attics or garages Ducted fans MUST always be vented to t...

Страница 4: ...go out immediately EVACUATE AND CALL THE FIRE DEPARTMENT or dial your local emergency service immediately DO NOT USE WATER including wet dishcloths or towels a violent steam explosion will result Use an extinguisher ONLY if You know you have a Class A B C extinguisher and you already know how to operate it The fire is small and contained in the area where it is started The fire department is being...

Страница 5: ...t heights clearance 5 6 Calculating vent system length 6 Venting methods ductless conversion 7 Charcoal filters electrical requirements 8 Preparation 9 Installation 10 11 Range hood operations 12 13 Wiring diagram measurements 14 16 USE AND CARE Troubleshooting 17 Use and care information 18 Specifications 18 MAINTENANCE Cleaning 19 Replacing filter light bulb 19 WARRANTY Coverage exceptions 20 Di...

Страница 6: ...et 5mm x 16mm Screw with Washer 4 Set Optional 4mm x 10mm Tapping Screw 16 Pcs Optional Toggle Bolt with Tapping Screw for Air Diverter 2 Set Optional Screw for Charcoal Filter 3 Pcs Lower standard chimney Upper standard chimney Flappers Parts supplied Range Hood vary with model Stainless Steel Baffle Filter s Chimney Mounting Bracket ...

Страница 7: ...he coun tertop stove recommend 28 to 31 3 Distance between the countertop stove to the range hood 4 Height of hood and duct cover For the most efficient quiet operation A distance of 28 to 31 is recommended between stove top and the bottom of range hood It is recommended that the range hood be vented vertically through the roof through 8 15 2 cm or bigger round metal aluminum vent work The size of...

Страница 8: ...d be no higher than 36 inch It is important to install the hood at the proper mounting height Hoods mounted too low could result in heat damage and fire hazard while hoods mounted too high will be hard to reach and will loose its performance and efficiency If available also refer to stove top manufacturer s height clearance requirements and recommended hood mounting height above range Due to diffe...

Страница 9: ...version is intended for applications where an exhaust duct work is not possible to be installed When converted the hood functions as a purifying hood rather than an exhaust hood Fumes and exhaust from cooking is drawn and filtered by a set of charcoal filters The air is then purified and re circulated back within the home We recommend to ALWAYS exhaust air outside of the home by employing existing...

Страница 10: ...it breaker box through flexible armored or non metallic sheathed copper cable A U L or C S A listed strain relief must be provided at each end of the power supply cable Do not use extension cord or adapter plug with this appliance The range hood must be connected with copper wire plug only Always use plug provided If not possible connect three wires ac cording to its color black to hot white to ne...

Страница 11: ...support mounting bracket holes vent cutout if used and power supply cable cutout on the ceiling Use drill and saber saw or keyhole saw to cut openings for power supply cable and vent see Venting Methods and Electrical requirements Pages 7 8 5 If venting to the outside install vent system see Venting Methods Page 7 Use caulking to seal exterior wall or roof openings 6 Disconnect main electrical sup...

Страница 12: ...ended 3 Attach the hood mounting bracket to the back of the hood with four screws as shown in Figure 1 4 Align hood mounting bracket to the screws on the wall and hook hood into place as shown in Figure 2 and Figure 3 Tighten screws to secure hood to the wall CAUTION Make certain the range hood is secure before releasing 5 For safety purpose pre drilled mounting holes are provided through the back...

Страница 13: ... cap with wire connectors Con nect according to colors i e black to black white to white and green to green 8 Store excess wires in the wiring box 9 Install both chimneys and tighten screws to secure the lower chimney to the range hood as shown in Figure 4 10 To avoid scratching the chimney extend the upper chimney slowly and carefully to the chimney mounting bracket and tigten screws as shown in ...

Страница 14: ...er value decrease and enter timer mode Increase Value Blower motor speed increase timer value increase and cumulative timer reset Blower Power Indicator Lights up when blower motor is running Blower Speed Indicator Shows current blower motor speed 1 3 Light Power Indicator Lights up when lights turned on Light Turns ON OFF Controls Adjusting the blower motor speed Press Power button once to turn o...

Страница 15: ...Page 13 Wiring Diagram Back Side Picture Six Speed with Type GU10 Bulb ...

Страница 16: ...Page 14 Measurements and Diagrams ...

Страница 17: ...ar flapper is not installed correctly or opening properly A tight mesh on a side wall cap unit might also cause restriction to the air flow 4 The lights work but the blower is not spinning at all is stuck or is rattling The blower might be jammed or scraping the bot tom due to shipping damage Please contact us im mediately 5 The hood is not venting out properly Make sure the distance between the s...

Страница 18: ...st be cleaned periodically and free from accumulation of cooking residue see cleaning instructions on Page 19 Old and worn filters must be replaced immediately Do not operate blowers when filters are removed Never disassemble parts to clean without proper instruc tions Disassembly is recommended to be performed by qualified personnel only Read and understand all instructions and warnings in this m...

Страница 19: ...e surface and cause rusting DO NOT allow salt solutions disinfectants bleaches or cleaning compounds to remain in contact with stainless steel for extended periods Many of these compounds contain chemicals which may be harmful Rinse with water after ex posure and wipe dry with a clean cloth Cleaning Stainless Steel Baffle Filters IMPORTANT Drain oil from oil containers before oil and residue overf...

Страница 20: ...nsumable parts such as light bulbs metal and charcoal filters The natural wear of finish and wear due to improper maintenance use of corrosive and abrasive cleaning products pads and oven cleaner products Chips dents or cracks due to abuse misuse freight damage or improper installation Damage of product caused by accident fire floods or act of God The manufacturer and or distributor reseller is no...

Страница 21: ...e of 15 will be charged for all approved return s Exchanges or returns may not be accepted if any packaging is missing Make sure to inspect the hood for damages and defects before installation Appearance flaws of the hood found after installation and not affecting hood performance is not covered under our warranty for returns or exchang es Service visits not covered under warranty will carry a ser...

Страница 22: ...Spagna Vetro Appliances 7272 Buller Ave Burnaby BC Canada www KitchenHoods ca ...

Отзывы: