SoundStudio STG-1608 Скачать руководство пользователя страница 9


SoundStudio STG-1608 / User Guide


Download and Install Software 

I

NSTALLING A 

N

EW 

S

OUND

G

RID 

H

OST 

S

YSTEM


Installing the Waves SoundGrid host application will also install the SoundGrid ASIO/Core Audio driver and applicable 
device drivers. Your devices will appear in the Inventory of your host system. If a device is not visible in the Inventory, 
you may need to install a specific driver from 

Waves Central

—please see below. First, however, check the device’s 

connections and power. 

A

DDING AN 

I/O


D

EVICE TO AN 

E

XISTING 

S

OUND

G

RID 

H

OST 

S

YSTEM


If you are already using a Waves SoundGrid host application and your device does not appear in the Network Devices 
list, use Waves Central to update the host application, which also updates the device drivers—or install just the missing 
device driver from Waves Central.
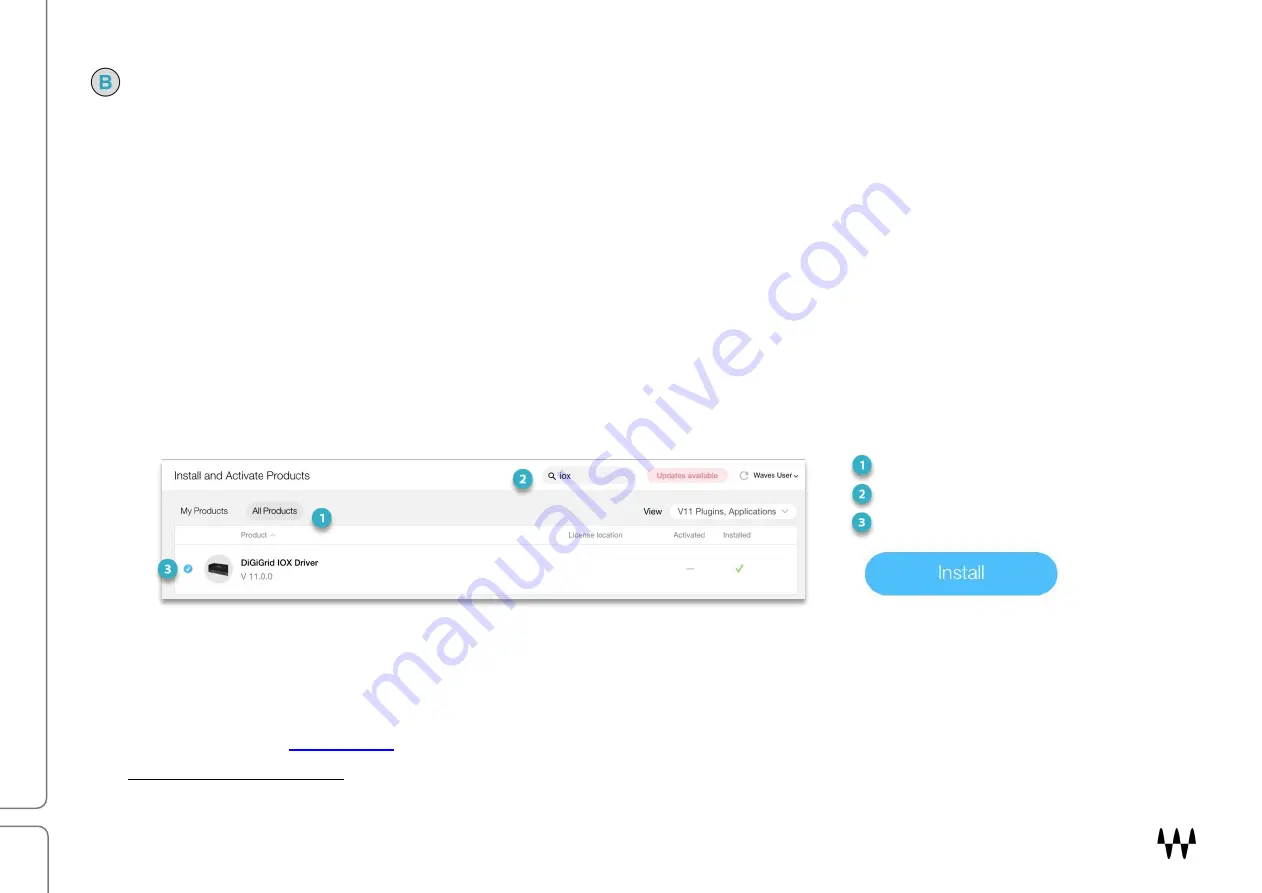
1


Waves Central  

All Waves software is downloaded and installed via the Waves Central application. To install a specific device driver, 

launch Waves Central and follow these steps:


Choose 

All Products


Search for the driver by name 
Choose the driver and click 

Install


If you are new to Waves products, begin by downloading the Waves Central installer from the Waves Download Page. 

See the Waves Central User Guide for instructions on how to install drivers, plugins, and applications. 

L

ICENSES


You do not need a license to use this device. However, many hosts or specific host configurations do require a license. 
Refer to your host’s 

product page

 for details.  


1

 The SoundGrid QRec host is installed with any I/O. 

Содержание STG-1608

Страница 1: ...SoundStudio STG 1608 User Guide...

Страница 2: ...nal ventilation fans 7 Do not use or store near any heat sources such as radiators heat registers stoves or other heat producing appliances 8 Protect the power cord from being walked on or otherwise d...

Страница 3: ...anual Device Configuration 11 Automatic Device Configuration 11 Device Firmware 12 Identify a Device on the SoundGrid Network 12 STG 1608 CONTROL PANEL 13 Input Page 14 Output Page 15 Clock Tab 16 Sys...

Страница 4: ...ween I O devices themselves A SoundGrid host manages the network and assigns servers and I O devices to mix process and record depending on the host All SoundGrid devices connect to the host with stan...

Страница 5: ...Hardware and Connections The SoundStudio STG 1608 has one Ethernet port and can be connected directly to a SoundGrid host computer with Cat 5e Ethernet cable or better Additional devices require a Sou...

Страница 6: ...SoundStudio STG 1608 User Guide 6 Rear Panel...

Страница 7: ...oundGrid host computer using a Cat 5e Ethernet cable or better The SoundGrid ASIO Core Audio driver is used for plugin processing and or DAW playback recording SoundGrid Host computer SoundGrid I O de...

Страница 8: ...up to 16 SoundGrid I O devices to the network depending on the SoundGrid host application All SoundGrid I O devices hosts and servers are connected through the Ethernet switch You can also add more co...

Страница 9: ...st use Waves Central to update the host application which also updates the device drivers or install just the missing device driver from Waves Central 1 Waves Central All Waves software is downloaded...

Страница 10: ...rk will be available for assignment This collection of devices is called the Inventory Setup is similar with all hosts identify the host s LAN port select a device slot and use the drop down menu to c...

Страница 11: ...in SoundGrid hosts including SoundGrid Studio eMotion LV1 or SuperRack SoundGrid offer an Auto Config tool Once your devices are connected and powered up click Auto Config to start the configuration A...

Страница 12: ...t disconnect the device or turn off the computer before Done appears Once the update is ready turn the device off and on to reset Identify a Device on the SoundGrid Network Click the ID button to acti...

Страница 13: ...click the Hardware Control Panel button The driver control panel is located here in the host computer PC C Program Files x86 Waves SoundGrid Driver Control Panel Mac System HD Applications Waves Soun...

Страница 14: ...SoundStudio STG 1608 User Guide 14 Input Page The Input tab is used to configure the mic line inputs The STG 1608 has 16 analog inputs and 2 digital inputs...

Страница 15: ...o STG 1608 User Guide 15 Output Page The Output tab is used to set the output headroom pre channel There are 8 analog outputs and 2 digital outputs HEADROOM SELECT Choose between 18 dB and 24 dB mixer...

Страница 16: ...the clock relationship between the STG 1608 and the SoundGrid network The following image shows the STG 1608 locked to the network via Sync Over Ethernet SOE This is the most common configuration You...

Страница 17: ...description of the device The System Info page contains technical details about the device including MAC address Firmware version and Module version This information is useful for troubleshooting Ple...

Страница 18: ...ers in the Clock and Control panels Save STG 1608 presets to use on future sessions or copy them to another computer to duplicate a configuration Click the ID button to indicate which STG 1608 hardwar...

Страница 19: ...etermines the default patching order Please refer to your SoundGrid host s user guide for details CONFIGURE THE DAW FOR SOUNDGRID 1 Set the DAW playback engine to Waves SoundGrid The SoundGrid driver...

Страница 20: ...THD N Measured at 1 kHz 4 dBu Gain 20 0 0019 Phase Response 10 Deg 20 Hz to 20 kHz Input impedance 2 kiloohms 48V phantom power available TRS Input Input Gain Adjustable from 0 dB to 60 dB in steps o...

Страница 21: ...Hz Gain 0 0 0015 Phase Response 10 Deg 20 Hz to 20 kHz Output impedance 40 ohms Headphones output 1 watt per channel into 32 Ohm headphones Digital I O AES 3 AES EBU Stereo Output Output sample rate 4...

Страница 22: ...ow these steps to reset the unit 1 Turn off the unit 2 Press and hold the Reset button 3 Restart the unit while holding the button 4 Release the Reset button once the device has fully booted The unit...

Отзывы: