background image

55

ITALIANO

manuale d’uso REALKIT-HOME

9. LISTA DELLE VOCI

Содержание Realkit-home

Страница 1: ...USER S MANUAL MANUALE D USO Please read this manual carefully and proper take care of this manual Leggete per intero questo manuale e conservatelo per future consultazioni REALKIT HOME DIGIT AL DRUM ...

Страница 2: ...tem and if you want to collaborate we are looking for a feedback from you about the operation of the product and possible improvements to introduce in the next future Go to our website www soundsationmusic com and send an e mail with your opinion this will help us to build instruments ever closer to customer s real requirements One last thing read this manual before using the instrument an incorre...

Страница 3: ...aning 6 Servicing 6 Warning 6 1 INSTALLATION 7 RACK SYSTEM 8 RACK INSTALLATION 9 COMPONENTS INSTALLATION 10 2 SOUND MODULE 12 2 1 CONTROL PANEL 12 2 2 BOTTOM PANEL 13 3 PLAY PAD 14 TURN ON THE POWER 14 PLAYING PADS 14 MASTER VOLUME 15 4 DRUM KIT 16 KIT SELECT 16 KIT EDIT 17 5 PATTERN 19 PLAY THE PATTERN 19 EXERCISE WITH THE PATTERN 20 6 METRONOME 21 7 RECORD 22 RECORD STANDBY 22 RECORDING 23 STOP ...

Страница 4: ...4 ENGLISH 8 USB MIDI 25 USB 25 MIDI APPLICATION CHART 25 9 VOICE LIST 26 10 SPECIFICATIONS 28 11 WARRANTY AND SERVICE 29 12 WARNING 30 ...

Страница 5: ... terminal Denotes the apparatus is turned on Denotes the apparatus is turned off WARNING Describes precautions that should be observed to prevent the danger of injury or death to the operator CAUTION Describes precautions that should be observed to prevent dan ger of the apparatus IMPORTANT SAFETY INSTRUCTIONS f f Read these instructions f f Keep these instructions f f Heed all warning f f Follow ...

Страница 6: ... be connected to the power supply only of the type as marked on the apparatus or described in the manual Failure to do could result in damage to the product and possibly the user Unplug this apparatus during lightning storms or when unused for long periods of time Fuse To prevent the risk of fire and damaging the unit please use only of the rec ommended fuse type as described in the manual Before ...

Страница 7: ...ICK PEDAL Fig 1 The drawing shows a complete drum kit after installation Each drum pad cymbal pad and Hi Hat control pedal has its part number underneath the component name for your reference in installation The part number is also printed on the part packing box Power adaptor and connection cables are not shown in the drawing ...

Страница 8: ...8 ENGLISH REALKIT HOME User s manual RACK SYSTEM Fig 2 Folded rack in package Fig 3 Cymbal Holders are contained separately in the package ...

Страница 9: ...9 ENGLISH REALKIT HOME User s manual RACK INSTALLATION ...

Страница 10: ... into the rod along with parts removed in step 1 Tighten the wing nut modertly to give the pad a little bit wobbling like the real acoustic cymbal Note Crash and Ride have different part na mes Please refer to indication on page 7 3 Adjust the angle of the rod then tighten the wing nut Tom Installation 1 Insert the tom into support arm then adjust its position and angle Tighten the screw with the ...

Страница 11: ...the SOUND MODULE Chapter for electronic connection Snare Installation 1 Insert the snare into the L Rod then tighten the wing nut 2 Adjust the angle of the L Rod then tighten the wing nut in the clamp Sound module Installation 1 Align holes in supporting board with these in sound module then fasten them with screws 2 Insert rod of the supporting board into the clamp then tighten the wing nut ...

Страница 12: ...attern playing 4 MASTER VOLUME Knob Rotate the knob clockwise to increase the ma ster volume and counter clockwise to decrease the master volume 5 KIT Button Enter the Drum kit selection mode 6 PATTERN Button Enter the Pattern play mode 7 VOICE Buttons Enter the voice assignment mode 8 VOLUME Button Enter the volume adjustment mode 9 DRUM OFF Button Mute drum sound in the pattern 10 STOP Buttons S...

Страница 13: ...d and Hi Hat control pedal have labeled cables All cables are merged into a single connector Plug the cable into the jack of the corresponding component and then plug in the connector here 5 Headphone Jack The drum has a stereo headphone jack You can play in total silence without disturbing others in the room by plugging a set of headphones into the socket 6 Line Out Jack There is no built in spea...

Страница 14: ...d and adjust the volume to a proper level PLAYING PADS All pads have striking force sensitivity feature Strike the pad harder to make a higher volume and strike the pad softer to make a lower volume Playing Tom Drum Strike the central position to create a sound Playing Cymbal Strike rubber area of the crash and ride pad to create a cymbal sound The crash has choke feature Strike the crash pad its ...

Страница 15: ...lly pressing the Hi Hat control pedal to make a close Hi Hat sound 3 Strike the Hi Hat pad while pressing the Hi Hat control pedal gradually the consecutive open sound changes to close sound 4 Press the Hi Hat pedal down quickly to make Hi Hat pedal sound Playing Kick Drum Press the Kick drum pedal to make a kick drum sound MASTER VOLUME Rotate the MASTER VOLUME knob to turn the master volume up d...

Страница 16: ...d and saved After the power is turned on the kit mode is engaged automatically the KIT but ton is lit and the kit number is shown on the display In other operation modes you could press the KIT button to enter the kit mode directly KIT SELECT Press the or button to select the kit you desire from the kit list below ranging 01 20 The default kit num ber is 01 When you re enter the kit mode the kit n...

Страница 17: ...ume The pressed button will light up and blink Before editing you should se lect a pad by pressing the pad select button The selected pad button will light up and blink and then you can hear its voice Please note that the snare has head and rim parts Hi Hat has open and close voices Press the correspon ding button twice to select an alter native part of this pad and the light color of the button b...

Страница 18: ...iking the pad or pressing the pad button f f Tip Press and hold down the or button the data will change consecutively It is helpful for you to change the number in large range You can change the voice of another pad by pressing another button Or you can adjust the volume of this pad by pressing the VOLUME button and the VOLUME button will light up and blink The display shows current volume Then us...

Страница 19: ...for your enjoyment and exercise PLAY THE PATTERN Press the PATTERN button to enga ge the pattern mode and its indicator will light up The pattern number with P in front will appear and blink on the display Use the or button to select a pattern Press the PLAY but ton to start playing and the display will show measure number Pad select buttons will flash to indicate which pad is performed When the p...

Страница 20: ...TERN During the pattern playing you can also play pads All patterns consist of drum pattern and orchestral back ground music You can mute the drum sound and play by yourself ac companied with background music Press the DRUM OFF button to mute the drum sound and the button will light up The volume of the pattern is adjustable Press the VOLUME button the button will light up and blink while the curr...

Страница 21: ...metronome is determined by tempo value It is adjustable Press the TEMPO button Its indicator will light up and blink The current tempo will appear on the display and blink Use the or button to change the tempo ranging 40 240 Press both and but ton simultaneously the tempo will restore the default value 120 Wait 3 seconds or press the TEMPO button again the display will turn back to the previous wi...

Страница 22: ...icate the recorder is standby The PATTERN button will light up automatically so that you can record your performance with a pattern The display shows the cur rent pattern number you can select another pattern by the or button The volume and tempo of the pattern is adjustable please refer to the PATTERN section of this manual If you do not want drum sound in the pattern press the DRUM OFF button to...

Страница 23: ...r beats count in the record will start immediately no matter you strike the drum pad or not Synchro Start The record will start as soon as you strike any pad When record started the RECORD button stops blinking and remains lit The metronome will sound as soon as record starts if the metronome is engaged The recording measure will appear on the display Press the RECORD button again or press the STO...

Страница 24: ...olatile even when you turn off the power When the RECORD button blinks press the STOP button to discard the current record The RECORD button turns off and the PATTERN button keeps lit The display shows the pattern number you selected before the recording Please note that your current record will be lost PLAYBACK Enter the Pattern mode select P51 press the PLAY button to play back your recording Pl...

Страница 25: ...ter versatility and control than that is available with isolated instruments Whether you inter face with computers sequencers expanders or other equipments your musical horizons will be greatly enhanced For instance you can edit your playing in computer or play back MIDI song from computer while play the drum USB The USB connector allows you to connect the drum directly to your computer It can con...

Страница 26: ...26 ENGLISH REALKIT HOME User s manual 9 VOICE LIST ...

Страница 27: ...27 ENGLISH REALKIT HOME User s manual ...

Страница 28: ...Voice 184 Drum Kit 20 preset kits Pattern 50 Full and Mute drum mode Pad Button play drum sound with led blink Pad Edit Voice Volume Tempo default 120 range 40 240 Metro On Off Record 1 editable song in overwrite mode Easy Reset holding button and button when power on Display 3x7LED Power 9V DC Aux Socket Headphone Line In Out USB Power In DC9V All specifications are subject to change without noti...

Страница 29: ...ge at SOUNDSATION s discretion either by repair or by exchanging individual parts or the entire appliance Any defective parts removed from a product during the course of a warranty claim shall become the property of SOUNDSATION While under warranty period defective products may be returned to your local SOUNDSATION dealer together with original proof of purchase To avoid any damages in transit ple...

Страница 30: ...EEE Improper handling of this type of waste could have a possible negative impact on the environment and human health due to potentially hazardous substanc es that are generally associated with EEE At the same time your cooperation in the correct disposal of this product will contribute to the effective usage of natural resources For more information about where you can drop off your waste equipme...

Страница 31: ... se voleste collaborare saremmo lieti di ricevere un vostro feedback sulla qualità del prodotto al fine di migliorare costantemente la nostra produzione Visitate il nostro sito www soundsationmusic com ed inviateci una mail con la vostra opinione questo ci aiuterà a sviluppare nuovi prodotti quanto più vicini alle vostre esigenze Un ultima cosa leggete il presente manuale al fine di evitare danni ...

Страница 32: ...ione 35 Avviso 35 1 INSTALLAZIONE 36 Sistema di Supporto 37 Montaggio del Supporto 38 Montaggio dei Componenti 39 2 MODULO SONORO 41 2 1 Pannello Di Controllo 41 2 2 Pannello Inferiore 42 3 SUONARE I PAD 43 Accensione 43 Suonare i Pad 43 Volume Generale 44 4 DRUM KIT 45 Selezione del kit 45 Modifica del KIT 46 5 PATTERN 48 RIPRODURRE IL PATTERN 48 ESERCITARSI CON I PATTERN 49 6 METRONOMO 50 7 REGI...

Страница 33: ...33 ITALIANO 8 USB MIDI 54 USB 54 TABELLA DI IMPLEMENTAZIONE MIDI 54 9 LISTA DELLE VOCI 55 10 SPECIFICHE 57 11 GARANZIA E ASSISTENZA 58 12 AVVISO 59 ...

Страница 34: ... Terminale in tensione pericoloso Indica che l apparato è acceso Indica che l apparato è spento WARNING Precauzioni da osservare per evitare il pericolo di ferimento o di morte per l utilizzatore CAUTION Precauzioni da osservare per evitare danni all apparecchio IMPORTANTI ISTRUZIONI DI SICUREZZA f f Leggete queste istruzioni f f Conservate queste istruzioni f f Rispettate tutte le avvertenze f f ...

Страница 35: ...ntazione elettrica del tipo indicato sull apparecchio o descritto nel manuale In caso contrario si potrebbero provocare danni al prodotto ed eventualmente all utente Staccate la spina in caso di temporali o quando non viene utilizzato per lunghi periodi di tempo Fusibile Per evitare il rischio di incendi e di danni all unità utilizzate solo il tipo di fusibi le descritto nel manuale Prima di sosti...

Страница 36: ... RIDE HI HAT PEDALE CASSA Fig 1 Il disegno mostra un drum kit completo dopo il montaggio Ogni pad piatto e pedale di controllo dell Hi Hat ha il suo numero sotto al nome del com ponente a cui fare riferimento per il montaggio Il numero è anche stampato sull imballo di ogni pezzo Trasformatore e cavi di connessione non appaiono nel disegno ...

Страница 37: ...37 ITALIANO manuale d uso REALKIT HOME Sistema di Supporto Fig 2 Supporto ripiegato nell imballo Fig 3 I supporti dei piatti sono contenuti separatamente nell imballo ...

Страница 38: ...rto 3 Inserite i supporti dei piatti e regolate la posizione 2 Muovete e ruotate i bracci in questa posizione 4 Muovete e ruo tate il supporto del rullante in posizione 5 Aprite e allungate le gambe del sup porto come illustrato Poi stringete i dadi a farfalla ...

Страница 39: ...eme alle parti rimosse al punto 1 Riavvitate il dado a farfalla moderatamente per lasciare oscil lare il pad un poco come un vero piatto acustico Nota Crash e Ride hanno nomi delle parti differenti Fate riferimento all indicazione a pagina 36 3 Regolate l inclinazione dell asta quando stringete il dado a farfalla Montaggio dei Tom 1 Inserite il tom nel braccio del suppor to poi regolatene posizion...

Страница 40: ...O per le connessioni elettroni che Montaggio del Rullante 1 Inserite il rullante nella barra a L poi stringete il dado a farfalla 2 Regolate l inclinazione della barra a L poi stringete il dado a farfalla del morsetto Montaggio del modulo Sonoro 1 Allineate i fori della piastra di supporto a quelli del modulo sonoro poi fissate lo con le viti 2 Inserite la barra della piastra di supporto nel morse...

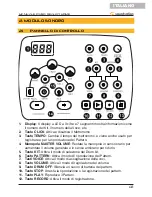
Страница 41: ... Manopola MASTER VOLUME Ruotate la manopola in senso orario per aumentare il volume generale e in senso antiorario per ridurlo 5 Tasto KIT Attiva il modo di selezione del Drum kit 6 Tasto PATTERN Attiva il modo di riproduzione dei Pattern 7 Tasti VOICE Attiva il modo di assegnazione delle voci 8 Tasto VOLUME Attiva il modo di regolazione del volume 9 Tasto DRUM OFF Silenzia un suono di batteria de...

Страница 42: ...igger Ogni pad e pedale di controllo dell Hi Hat ha cavi eti chettati Tutti i cavi si uniscono in un singolo connettore Infilate il cavo nella presa del rispettivo componente e poi collegate qui il connettore 5 Presa Headphone La batteria ha una presa stereo per le cuffie Potete suonare in totale silenzio senza disturbare gli altri collegando delle cuffie a questa presa 6 Presa Line Out La batteri...

Страница 43: ...l volume ad un livello appropriato Suonare i PAD Tutti i pad sono sensibili alla forza con cui vengono percossi Colpite più forte il pad per aumentare il volume e colpitelo più piano per un volume inferiore Suonare i Tom Colpite la posizione centrale per produrre un suono Suonare i Piatti Colpite l area in gomma dei pad del crash e del ride per produrre un suono dei piatti Il crash ha una funzione...

Страница 44: ...do completamente il pedale di controllo dell Hi Hat per creare un suono di Hi Hat chiuso 3 Colpite il pad dell Hi Hat premendo il pedale di controllo dell Hi Hat gra dualmente il suono aperto cambia nel suono chiuso 4 Premete rapidamente il pedale dell Hi Hat per creare il suono del pedale dell Hi Hat Suonare la cassa Premete il pedale della cassa Kick drum per produrre il suono della cassa VOLUME...

Страница 45: ...do kit si attiva automaticamente il tasto KIT si accende e il numero del kit appare nel display In altri modi operativi potete preme re il tasto KIT per accedere diretta mente al modo kit Selezione del kit Premete il tasto o per selezionare il kit che desiderate dalla lista dei kit sotto numerati 01 20 Il numero di default del kit è 01 Rientrando nel modo kit il numero del kit è quello che avete s...

Страница 46: ... Prima di modificare dovreste selezionare un pad pre mendo un tasto di selezione dei pad Il tasto del pad selezionato si accen de e lampeggia e poi potete sentire la sua voce Sappiate che il rullante ha suoni della pelle e del cerchio l Hi Hat ha la voce aperta e chiusa Premete due volte il tasto corrispondente per selezionare una parte alternativa di questo pad il colore del tasto diviene blu Il ...

Страница 47: ...ad o premendo il tasto Pad f f Prova Tenendo premuto il tasto o i dati cambiano consecuti vamente Utile per cambiare il nu mero in grandi intervalli Potete cambiare la voce di un altro pad premendo un altro tasto O po tete regolare il volume di questo pad premendo il tasto VOLUME per farlo accendere e lampeggiare Il display mostra il volume corrente Poi usate il tasto per cambiare il volume nell i...

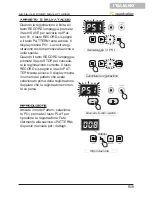
Страница 48: ...mete il tasto PATTERN per atti vare il modo pattern e il suo indicato re si accende Il numero del pattern con davanti P appare e lampeggia nel display Usate il tasto o per selezionare un pattern Premete il tasto PLAY per avviare la riproduzio ne e il display mostra il numero della battuta I tasti Pad select lampeggia no per indicare quale pad suona Terminata la riproduzione del pat tern riparte da...

Страница 49: ...e suonare i pad Tutti i pattern consistono di un pattern di batteria e di un accompagnamen to orchestrale Potete silenziare il suono della batteria e suonare voi stessi accompagnati dalla musica di sottofondo Premete il tasto DRUM OFF per silenziare il suono di bat teria e il tasto si accende Il volume del pattern è regolabile Premete il tasto VOLUME il tasto si accende e lampeggia mentre appare i...

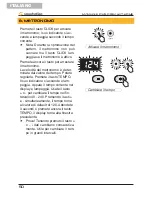
Страница 50: ...onomo è deter minata dal valore del tempo Potete regolarla Premete il tasto TEMPO Il suo indicatore si accende e lam peggia Appare il tempo corrente nel display e lampeggia Usate il tasto o per cambiare il tempo nell in tervallo 40 240 Premendo i tasti e simultaneamente il tempo torna al valore di default di 120 Attendete 3 secondi o premete ancora il tasto TEMPO il display torna alla finestra pre...

Страница 51: ...ggia per indicare che il registratore è in standby Il ta sto PATTERN si accende automati camente così che possiate registrare la vostra esecuzione con un pattern Il display mostra il numero del pat tern corrente potete selezionare un altro pattern col tasto o Il volume e il tempo del pattern sono regolabili fate riferimento alla sezione PAT TERN di questo manuale Se non volete il suono di batteria...

Страница 52: ...la registrazione inizia im mediatamente anche se non suonate un pad Synchro Start La registrazione inizia non appena colpite un pad Durante la registrazione il tasto RE CORD smette di lampeggiare e resta acceso Il metronomo suona se è attivo non appena si avvia la registrazione La battuta registrata appare nel display Premete ancora il tasto RECORD o premete il tasto STOP per terminare la registra...

Страница 53: ...eggia premete il tasto STOP per cancella re la registrazione corrente Il tasto RECORD si spegne e il tasto PAT TERN resta acceso Il display mostra il numero del pattern che avete selezionato prima della registrazione Sappiate che la registrazione corren te va persa RIPRODUZIONE Attivate il modo Pattern seleziona te P51 premete il tasto PLAY per riprodurre la registrazione Fate rifermento alla sezi...

Страница 54: ...petto agli strumenti isolati Sia che vi interfacciate a computer sequencer expander o ad altri dispositivi i vostri orizzonti musicali si allargano grandemente Per esempio potete modi ficare le vostre esecuzioni sul computer o riprodurre song MIDI dal computer mentre suonate la batteria USB Il connettore USB consente di collegare la batteria direttamente al vostro computer La connessione avviene s...

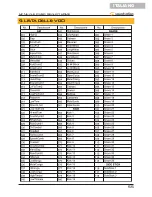
Страница 55: ...55 ITALIANO manuale d uso REALKIT HOME 9 LISTA DELLE VOCI ...

Страница 56: ...56 ITALIANO manuale d uso REALKIT HOME ...

Страница 57: ... kit preset Pattern 50 modo drum Full e Mute Tasto Pad Riproduce il suono dello strumento col LED lam peggiante Modifiche Pad Voce Volume Tempo Default 120 intervallo 40 240 Metronomo On Off Registrazione 1 song modificabile in modo overwrite Reset rapido Tenere premuti i tasti e all accensione Display LED 3x7 caratteri Alimentazione 9V CC Prese Aux Cuffie Line In Out USB Alimentazione CC 9V Tutte...

Страница 58: ...SOUNDSATION sia mediante riparazione o sostituendo singole parti o l intero apparecchio Eventuali parti difettose rimosse da un prodotto durante il corso di una richiesta di garanzia diventano di proprietà di SOUND SATION Durante il periodo di garanzia i prodotti difettosi possono essere restituiti al rivenditore SOUNDSATION locale con prova di acquisto originale Per evitare danni durante il trasp...

Страница 59: ...vere un impatto negativo sull am biente e sulla salute umana a causa di sostanze potenzialmente pericolose che sono generalmente associate alle apparecchiature elettriche ed elettroni che Allo stesso tempo la vostra collaborazione per il corretto smaltimento di questo prodotto contribuirà a un utilizzo efficace delle risorse naturali Per ulteriori informazioni sui punti di raccolta delle apparecch...

Страница 60: ...www soundsa tionmusic com Ver 1 0 July 2015 ...

Отзывы: