manualshive.com logo in svg
background image

7

Menu operation

1.  Press MENU button on the unit or RC to display the on-screen menu.

Press P+/P- buttons on the RC or CH+/CH- buttons on the panel to select
menu pages: Picture, Audio, Tune, Setup, Advanced, PC.

2.  Press VOL+ button or PLAY/PAUSE button to go to parameter list on the

selected page.

3.  Press P+/P- buttons on the RC or CH+/CH- buttons on the panel to select

a parameter to be adjusted. Press VOL+/VOL- buttons to adjust the

selected parameter.

4.  Press MENU button to exit from the on-screen menu.
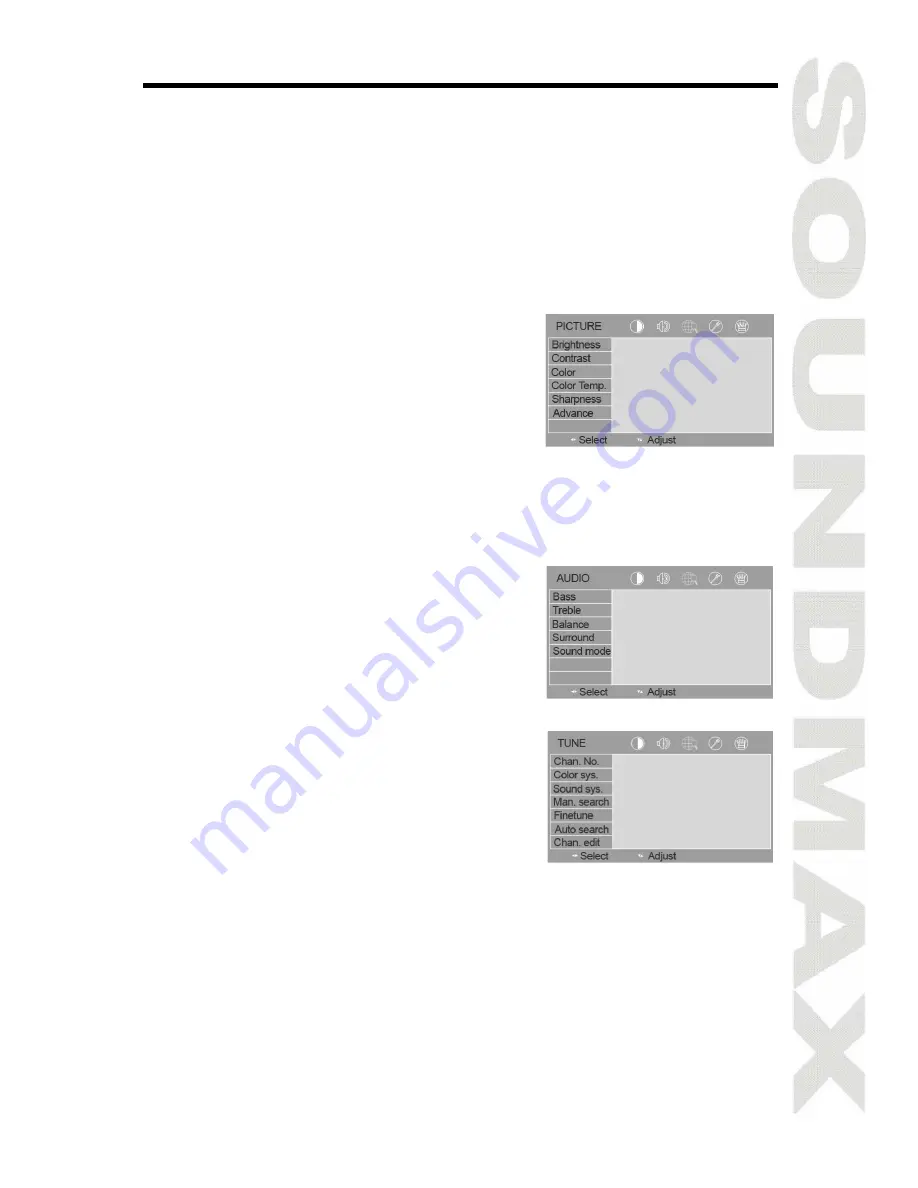
Menu “Picture”

In this menu page you can choose following
items to adjust: brightness, contrast, color

(available in NTSC color system), color
temperature and sharpness.

Advance:

CTI (available in AV mode): color transient
improvement.

ACE (available in TV/AV/SVHS/YPbPr): select ON to enhance brightness.
LR turn: select ON to flip the picture horizontally.

UD turn: select ON to flip the picture vertically.
Picture mode: select a picture mode (User/Standard/Vivid/Gentle)

Menu “Audio”

Bass: adjust bass frequencies.
Treble: adjust treble frequencies.

Balance: adjust the balance between right
and left channels.

Surround: switch on/off Surround effect.
Sound mode: select a sound mode

(Standard/News/Music/User).

Menu “Tune”

Channel number: change the channel

number.
Color system: select color system (PAL/

NTSC/Auto).
Sound Sys: select sound system (D/K, M,

B/G, I).
Manual search: press VOL+ button; the unit will find the nearest channel

with strong signal.
Finetune: perform the fine tuning of the frequency.

Auto search: automatic search and saving of available programs.
Channel edit:

Channel skip: select ON to skip the current channel while selecting channels.
Channel swap: set a new number for the current channel.

Содержание SM-LCD811

Страница 1: ...SM LCD811 Portable LCD TV Instruction manual...

Страница 2: ...the manual for reference in the future Contents Contents 2 Important safeguards 3 Earphone operation precautions 3 Accessories 3 Control elements 4 Front panel 4 Side panel 4 Remote control RC 4 Butt...

Страница 3: ...OFF when not in use and unplug the adaptor Avoid dropping and strong impact For your safety the driver should not watch TV or operate the controls while driving Please note that watching and operating...

Страница 4: ...5 5V DC Power jack No indicated VGA input back panel Remote control RC 1 POWER button 2 TIMER button 3 SOUND SYSTEM button 4 Number buttons 5 CALENDAR button 6 Button invalid for this unit 7 MODE butt...

Страница 5: ...ce mode POWER button Press this button to turn on the TV set press it again to turn off the unit MENU button Press this button to display the on screen menu MUTE button Press this button sound disappe...

Страница 6: ...arphone connection Connect the earphone plug to the phone line in jack of the unit Note If earphone is applied the sound only transmits through the earphone and no sound is available from the speaker...

Страница 7: ...in TV AV SVHS YPbPr select ON to enhance brightness LR turn select ON to flip the picture horizontally UD turn select ON to flip the picture vertically Picture mode select a picture mode User Standar...

Страница 8: ...after which the unit goes to standby mode if no signal is available Child lock switch on off the function of child lock When set on no buttons are functional Screen saver switch on off the function of...

Страница 9: ...icture Check if the brightness and contrast are set correctly Check if the environmental is too low Vague picture or unstable picture Check if the antenna is correctly adjusted Snowflake interference...

Страница 10: ...10 10 11 11 11 12 12 12 12 13 14 14 15 15 15 15 16 16 PC VGA 16 17 17...

Страница 11: ...11 20 60 0 40 VGA...

Страница 12: ...4 MENU 5 VOL VOL 6 CH CH 7 8 9 1 2 3 MMI 4 Line in 5 VGA 1 POWER 2 TIMER 3 SOUND SYSTEM 4 5 CALENDAR 6 7 MODE 8 P P 9 10 MUTE 11 INFO 12 SCREEN 13 14 RETURN 15 BROWSE 16 17 MENU 18 PLAY PAUSE 19 VOL...

Страница 13: ...13 1 2 3 2 CH CH P P VOL VOL VOL MODE P P POWER MENU MUTE VOL VOL BROWSE TIMER 180 CALENDAR P P VOL VOL RETURN PLAY PAUSE SCREEN 16 9 4 3 SOUND SYSTEM INFO PICTURE MODE...

Страница 14: ...14 1 AC 220 2 line in MMI VCD DVD...

Страница 15: ...15 1 MENU P P CH CH 2 VOL PLAY PAUSE 3 P P CH CH VOL VOL 4 MENU NTSC CTI AV ACE TV AV SVHS YPbPr PAL NTSC D K M B G I VOL...

Страница 16: ...16 5 VGA 15 1 2 OSD out time PC VGA H V...

Страница 17: ...17 8 TFT 16 9 4 3 PAL SECAM NTSC D K I B G 800 x 600 250 400 1 255 12 6 192 x 167 x 30 0 365...

Отзывы: