background image

9

Ø

Mount the amplifier in such a way you have access to the connectors;

Ø

Install  the  power  cables  in  the  vehicle  properly,  starting  from  the  battery  to  the  fuse 
holder or circuit breaker, use the cable with the appropriate size. Make all connections, 
install fuse holders or circuit breakers, but without placing the fuses or with the circuit 
breakers in the "Off" position.

Ø

Connect  the  power  cables  in  to  the  amplifier,  observing  the  polarity.  Connect  all  the 
positive cables from the fuse holder or circuit breaker to the positive conector of the 
amplifier and all the negative power cables from the batteries to the negative connector 
of the amplifier;

Ø

The ground cable must be as short as possible and must be connected to the vehicle 
chassis and the battery negative;

Ø

Install the signal input cables in a proper way, distant from the power cables;

Ø

Connect the RCA or the high signal input cables to the head unit and amplifiers;

Ø

Install the audio output cables with the appropriate section , distant from the power and 
audio input cables;

Ø

Connect the audio output cables to the amplifier and speakers respecting the positive 
(+) and negative (-) polarities;

Ø

Install the remote cable with the power cables, using 1.5mm² (15 AWG) cable or thicker;

Ø

Connect  the  remote  power  cable  to  the  amplifier's  "REM"  terminal  at  the  main  unit's 
remote power output (when not using the high level signal inputs);

Ø

Before  powering  the  system,  verify  all  the  connections  and  make  sure  there  are  no 
mistakes or short-circuits on the power and ground cables;

Ø

;

Reconnect the ground of the batteries

Ø

Check if the headunit is turned off and then place the fuses in the fuse holders or switch 
the circuit breakers on;

Ø

Turn on the main unit and the amplifier will turn on the "On" LED indicating that it is in 
operation.

INSTALLATION SEQUENCE

Warning!

Warning!

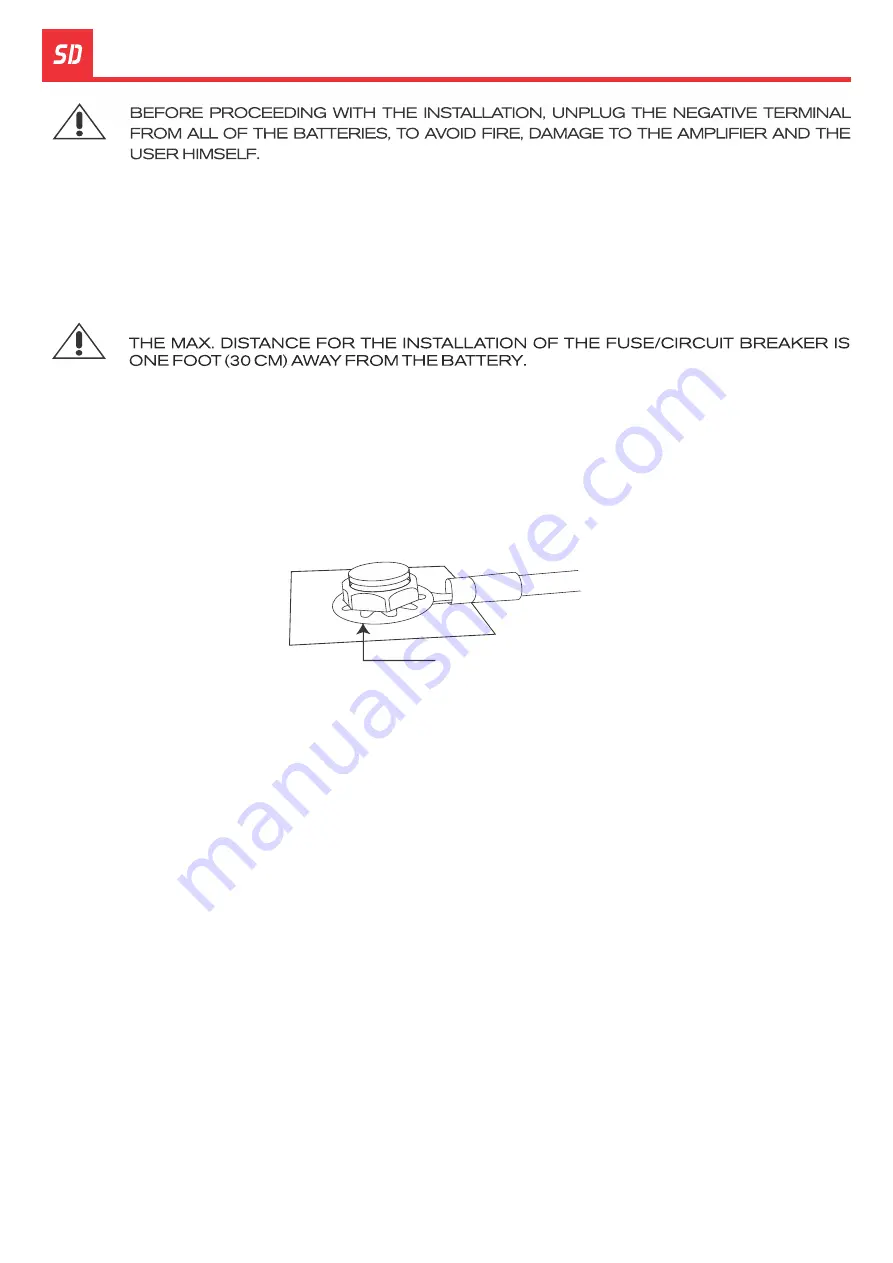
Remove the paint between
the terminal and chassis

9

Содержание 600.4 EVO 4.0

Страница 1: ...1 OWNERS MANUAL 600 4 ...

Страница 2: ...ts and controls Power inputs and audio outputs Electrical Dimensioning Audio inputs Installation sequence Wiring diagram Four channels wiring diagram Three channels wiring diagram Two channels wiring diagram Procedure for setting the gain Crossovers set up Technical specs Parameters Dimensional data 3 3 4 5 6 7 8 8 9 10 10 11 11 12 13 13 ...

Страница 3: ...oundigital Class D amplifiers have a total efficiency power source output higher than 70 assuring a battery consumption and a heating lower than the expected Versatility of uses The flat response of all the frequencies of Soundigital amplifiers allows them to be used in all the kinds of systems SPL Sound Quality Trio Eletrico and Pancadao meeting the needs with extreme quality Compact design The h...

Страница 4: ...tage of the batteries Do not install the amplifier in places exposed to water dirt or humidity Choose a ventilated place to install the amplifier and avoid blocking the side ventilation windows Mount the amplifier in a secure way Avoid mounting it on metallic parts of the vehicle because it may cause ground looping noise Make sure that the location chosen for the amplifier installation does not ef...

Страница 5: ...the top of plastic cover to release the upside latches as shown in the picture 1 2 Slide up the plastic cover in a continuous movement to remove it 1 To fit the plastic cover back carefully insert the point A of the plastic cover into point B of the amplifier slowly sliding it down 2 Gently press the sides of the top of the plastic cover towards the bottom of the amplifier until you hear a clickin...

Страница 6: ...6 Crossover Switch Low Pass Full High Pass Variable Gain Control Audio input RCA connector 2 4 6 8 1 3 5 7 CH1 CH2 CH1 CH2 CH1 CH3 CH3 CH4 CH3 CH4 CH2 CH4 PANELS DESCRIPTION 7 5 4 1 3 2 8 6 ...

Страница 7: ...y connector 12v Positive audio output connector Negative speaker connector Shared connector between channels 4 and 3 Shared connector between channels 2 and 1 Negative speaker connector Positive speaker connector 10 11 12 14 16 18 9 13 15 17 CH2 CH1 CH4 CH3 CH1 CH4 CH3 CH2 PANELS DESCRIPTION 9 10 11 12 13 14 15 16 17 18 ...

Страница 8: ...S ELECTRICAL DIMENSIONING AND AUDIO INPUTS ELECTRICAL DIMENSIONING For proper operation of your SounDigital amplifier you need the proper dimensioning of the electrical system and the cables used The table below shows the minimum section of GND cables 12VDC cables and speaker output cables according to the power generated by the amplifier POWER CABLE GROUND CABLE SPEAKER CABLE 10mm 7 AWG ...

Страница 9: ...ower cables Ø Connect the RCA or the high signal input cables to the head unit and amplifiers Ø Install the audio output cables with the appropriate section distant from the power and audio input cables Ø Connect the audio output cables to the amplifier and speakers respecting the positive and negative polarities Ø Install the remote cable with the power cables using 1 5mm 15 AWG cable or thicker ...

Страница 10: ...10 WIRING DIAGRAM 4 CHANNEL WIRING DIAGRAM È See Audio Inputs on page 8 È See Audio Inputs on page 8 3 CHANNEL WIRING DIAGRAM ...

Страница 11: ...full volume Ø Set the source unit s fader control to center position Ø Set the crossover selector switch in F Ø Use a 60 Hz sine wave Ø Connect the AC voltmeter to the speaker output connectors of the amplifier Make sure you test the voltage at the correct connectors and Ø Increase the gain control until the target voltage is observed with the voltmeter see the chart below Ø Once you have adjusted...

Страница 12: ...osition Low Pass Frequencies below 80Hz will be reproduced 3dB c ƒ 80Hz 0dB dB Hz 3dB 0dB 15dB 80 Hz c ƒ dB Hz F All the frequencies are reproduced LP Frequencies below 80Hz will be reproduced HP Frequencies above 80Hz will be reproduced CROSSOVER SET UP Ø Switch Key to F position Full Range All the frequencies are reproduced ...

Страница 13: ...nal impedance Stereo Minimum Impedance Bridge Minimum Impedance Fuse music Recommended batery Current Draw Max High Pass filter 12Db oct Power at 12 6V 60Hz with a maximum THD of 1 PARAMETERS DIMENSIONAL DATA TECHNICAL SPECS 4 4 113mm 4 101mm 2 X 198W 2 X 300W 4 X 100W 4 X 150W 10Hz 20kHz 8V 16V 88dB 0 2 4V 29A 58A 82 200 2Ω 4Ω 35A 35Ah 80Hz 80Hz 600 4 Net Weight 1 45lb 0 66 kg Gross Weight 1 60lb...

Страница 14: ...14 ...

Отзывы: