Sound Devices PIX-E7 Скачать руководство пользователя страница 5

PIX-E7 

Quick Start Guide

6. Attach and Format Storage

PIX-E monitors can accept a SpeedDrive

 and a high-capacity SD memory card. PIX-E7 records Apple

®


ProRes video files to SpeedDrive media. The SpeedDrive and/or SD card may be used to save and load 

custom settings.

Note: The drive(s) must be formatted by the PIX-E7 before using with the monitor.

 
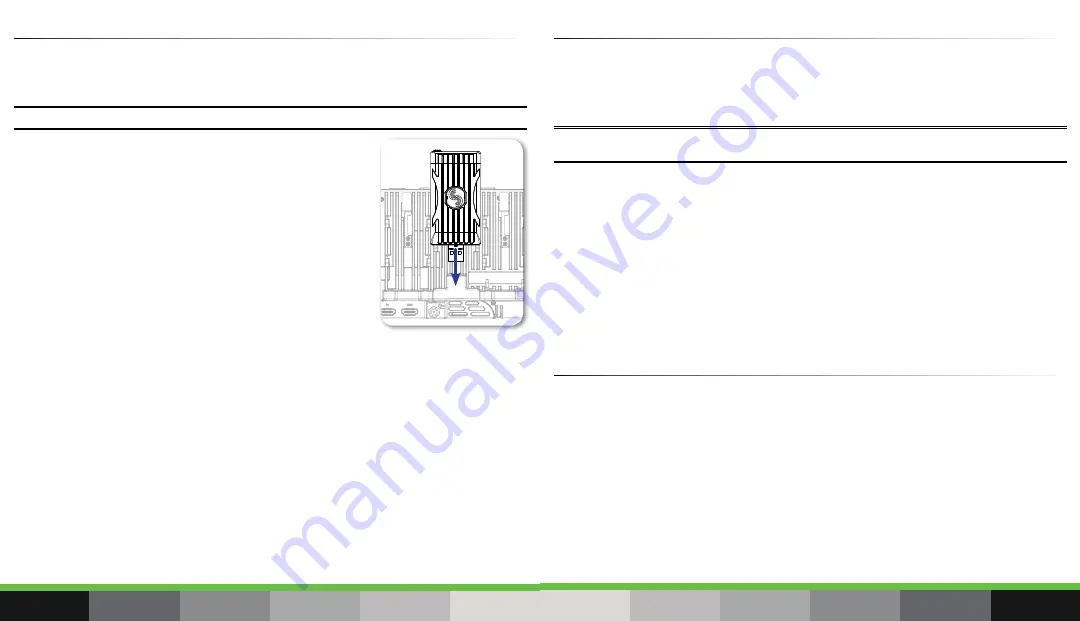
To attach a SpeedDrive:

1.  Position the SpeedDrive so that the USB plug lines up to the USB 

connector on the back of the monitor. 

2.  Depress  the  spring-loaded  retainer  clip  and  slide  the  SpeedDrive 

into the USB connector. The retainer clip will spring up with a click 

to let you know when the SpeedDrive is secure.

To install an SD card:


Slide the SD card into the SD Memory Card slot on the left panel of 

the monitor.

To format a drive:

1.  Connect the drive to be formatted; ensure the SD card is inserted or the SpeedDrive is attached.
2.  Press the MENU button.
3.  Turn and press the Control knob to select Recorder & Drives > Erase/Re-format Drive.
4.  Turn and press the Control knob to select the sub-option associated with the preferred drive. 


Sub-options include: SpeedDrive, SD Card, or Both drives.

5.  A confirmation dialog will appear on screen asking if you want to continue.


Turn and press the Control knob to select Yes to continue. An on-screen keyboard appears.

6.  Either accept the default volume name (PIX-E) or use the keyboard to enter a new volume name.
7.  Select OK to continue.

7. Recording and Playback

PIX-E monitors record edit-ready Apple ProRes QuickTime (.mov) files to SpeedDrive mSATA SSD media.

To begin recording:


Press the Record (REC) soft key button. 

Note: If the transport controls (REC, STOP, PLAY) are not visible, press ALT to switch the soft keys to their alternative 

functionality.


While recording, the REC soft key label appears red as does the timecode, file name, and absolute 

time—all three of which are located in the Information bar. Also, the LED on the SpeedDrive illuminates 

amber while files are being written to the drive. 


Do not remove the SpeedDrive while its LED is illuminated.

To play recorded video files:

1.  Press the Files soft key button and use the Control knob to select a file.
2.  Press the Play soft key button. While playing, the Play soft key button switches to Pause. You can 

also press the Stop soft key button to stop playback.

8. Using the Monitoring Tools

To activate a monitoring tool:


Press the soft key button for the chosen monitoring tool, such as PEAK for peaking. Each soft key 

label appears green when the monitoring tool is activated.

Each monitoring tool has settings associated with it, which may be viewed and adjusted via a menu 

that appears superimposed over the image, covering only the lower portion of the screen.

To view or adjust a monitoring tool’s settings:

1.  Press and hold the soft key button associated with the monitoring tool.
2.  Use the touch screen or Control knob to select and modify settings accordingly.

8

9

Содержание PIX-E7

Страница 1: ...Field Recording Monitor VIDEO PRODUCTION TOOLS BY QUICK START GUIDE PIX E7 ...

Страница 2: ...sing your monitor right out of the box It also provides a brief overview of features warranties and licensing information Read Register Sound Devices LLC strongly encourages you to register your product Registration ensures you will receive timely product updates For a full description of all product features user based procedures specifications and any safety information please refer to the produ...

Страница 3: ...e Power switch the green power LED will illuminate and the Video Devices splash screen will appear on the 7 inch LCD Note PIX E monitors have a very powerful processor and operating system so it takes up to 45 seconds to boot the first time However the QuickBoot feature reduces subsequent boot times throughout the rest of the day to just a few seconds To use QuickBoot keep a power source connected...

Страница 4: ...alternate soft key function Use the Display soft key button to hide or reveal OSD elements such as soft key labels or information bars 5 Set up Audio The PIX E7 monitor can record up to eight channels of audio via Line In HDMI and SDI to QuickTime mov files You may customize your audio setup by adjusting which channels are armed modifying their names configuring input sources and setting gain leve...

Страница 5: ... use the keyboard to enter a new volume name 7 Select OK to continue 7 Recording and Playback PIX E monitors record edit ready Apple ProRes QuickTime mov files to SpeedDrive mSATA SSD media To begin recording Press the Record REC soft key button Note If the transport controls REC STOP PLAY are not visible press ALT to switch the soft keys to their alternative functionality While recording the REC ...

Страница 6: ... designed to take the beating so your monitor is protected during transport The PIX E7 KIT also comes packaged in the case and includes additional accessories such as adapters cables drives etc This table is not an all inclusive list of accessories available for use with the PIX E monitors For the most up to date product accessory information visit the Video Devices website at www videodevices com...

Страница 7: ... distribute copies of the SOFTWARE or accompanying materials to others Licensee may not modify adapt translate reverse engineer decompile disassemble or create derivative works based on the SOFTWARE or its accompanying printed or written materials Transfer restrictions Licensee shall not assign rent lease sell sublicense or otherwise transfer the SOFTWARE to another party without prior written con...

Страница 8: ...oses such as selling copies or providing educational services or support This document is supplied as a technical guide Special care has been taken in preparing the information for publication however since product specifications are subject to change this document might contain omissions and technical or typographical inaccuracies Sound Devices LLC does not accept responsibility for any losses du...

Страница 9: ...www videodevices com Part 5877 001 ...

Отзывы: