


PIX 250i User Guide and Technical Information
3
Panel Descr
ip
tions
10)
Fast Forward Button
When Stopped, press to cue up the next
file for Playback. During Playback or
Pause, press once to jump to the next Cue
Marker, press and hold to increase play-
back speed. Continue to hold for faster
speeds.
11)
REC Button
Begins recording.
Optional
: Splits the
recording and begins writing a new
file when pressed while recording.
[System - Rec Button File Split]
.
12)
Rewind Button
When Stopped, press to cue up the previ-
ous file for Playback. During Playback
and Pause, press once to jump to the
previous Cue Marker or beginning of the
file, press and hold to reverse playback
speed. Continue to hold for faster reverse
speeds.
13)
Headphone Volume Knob
Adjusts the overall volume of the head-
phones. NOTE: the headphone output is
capable of ear-damaging levels. Take care
when adjusting among signal sources.
14)
Headphone Output 1/4”
TRS stereo headphone connector. Can
drive headphones from 8 to 100 ohms to
very high headphone levels.
15)
USB Keyboard Input
USB A female connector to connect a
USB keyboard. Keyboards can be used to
navigate and control the PIX 250i. Key-
boards with integrated USB hubs are not
compatible.
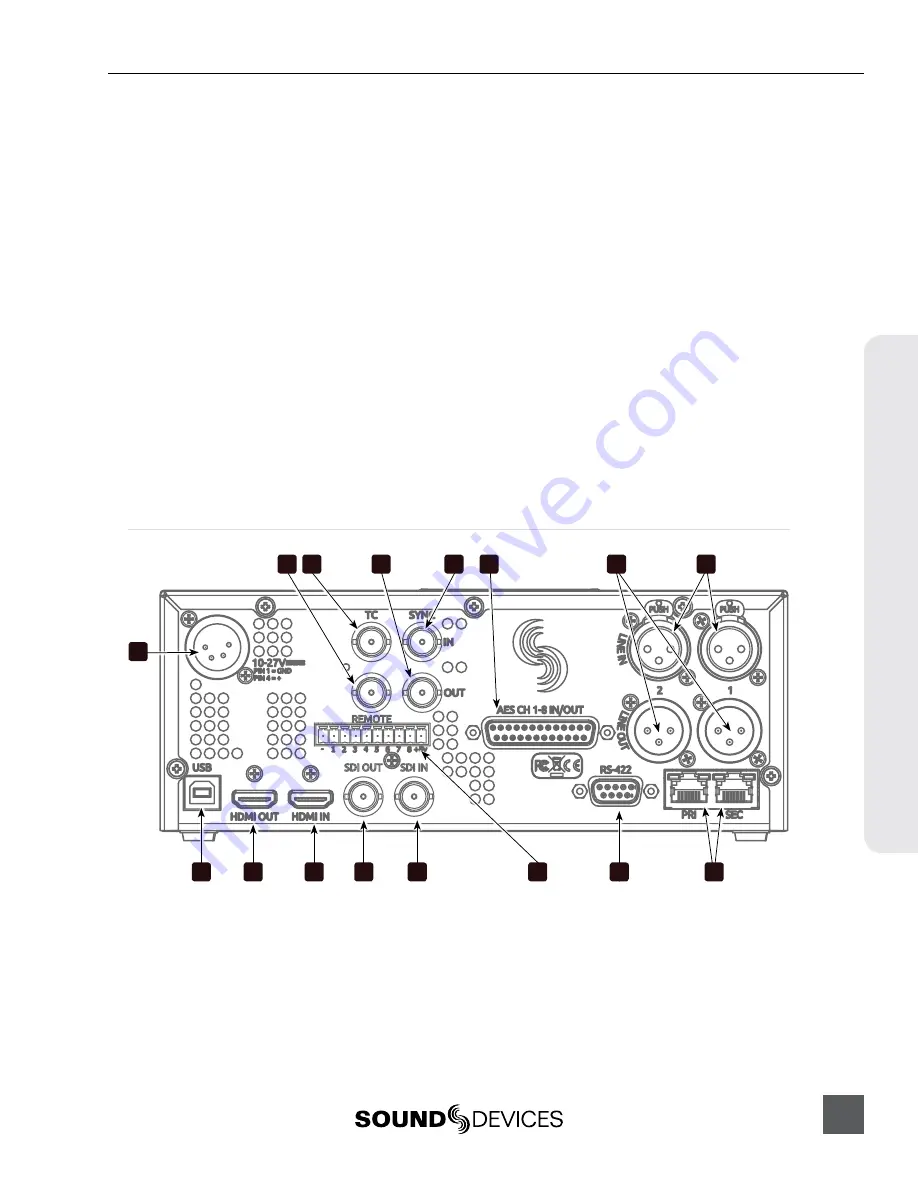
Rear Panel
4
2
3
11
1
6
12
13
14
15
16
9
10
8
7
5
1)
DC Power Input (XLR 4-pin)
Accepts 10–27 volts DC. XLR 4-pin con-
nector is wired pin-1 ground, pin-4 posi-
tive (+). (
2)
Timecode Output (BNC)
SMPTE timecode output.
3)
Timecode Input (BNC)
SMPTE timecode input.
4)
SYNC Output (BNC)
Selectable Genlock or Wordclock output.
Configured with Setup Menu option
[
Timecode/Sync - Sync Out]
.
5)
SYNC Input (BNC)
Selectable Genlock or Wordclock input.
Configured with Setup Menu options
[
Timecode/Sync - Sync Ref]
Содержание PIX 250i
Страница 2: ......
Страница 84: ...PIX 250i v 2 00 Printed in U S A ...


