Sound Choice PCK4000 Скачать руководство пользователя страница 11

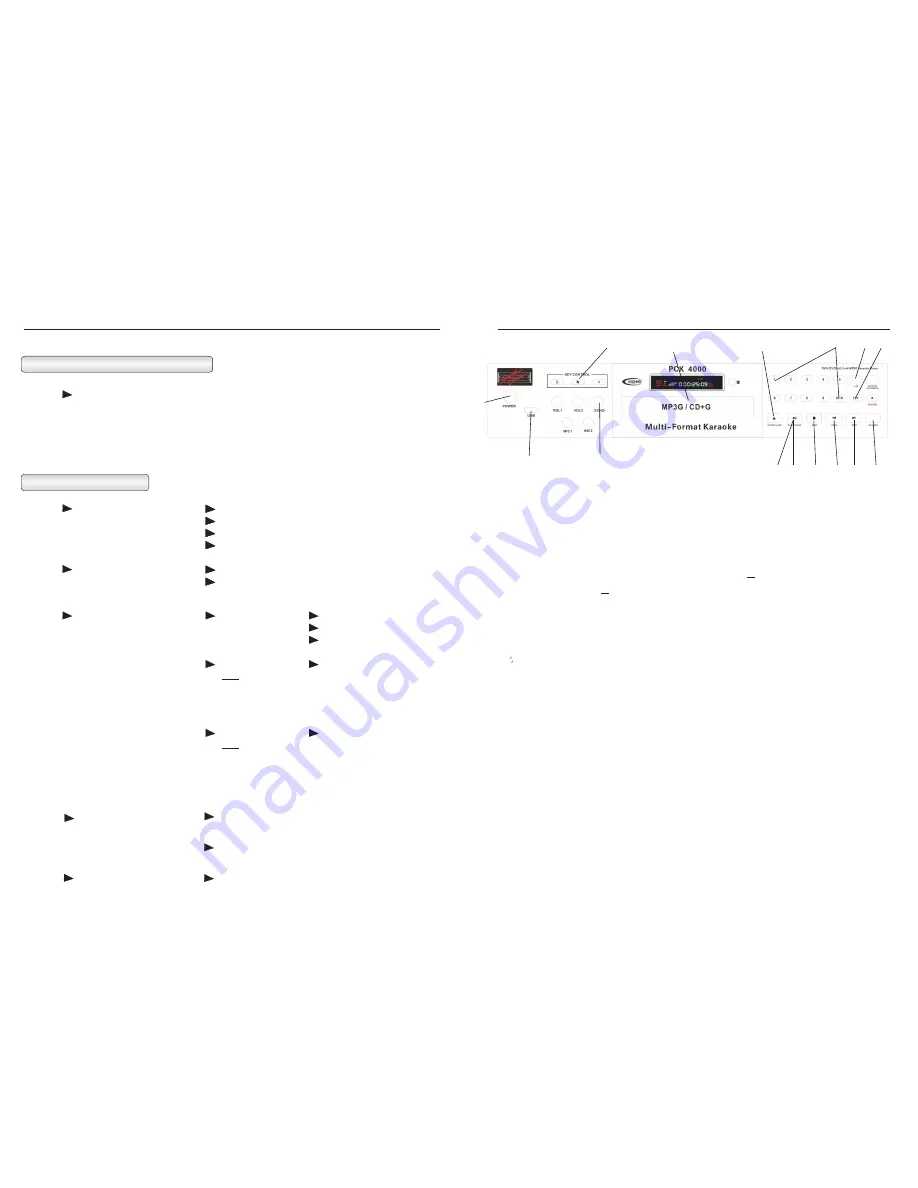
Front Panel Operation

1.  Power      

Press to turn the power ON or OFF.

2.  Direct Track/Title Access

For Turbo Load place your disc in the tray, then without closing the tray, press your desired track # on the front panel.  The tray    will  
close, and the player will directly play the selected track.]  For tracks above 10, press the 10+ button, followed by the desired                     
number:      e.g. for 12 press 10+ then 2.  If your disc has greater than 20 tracks, then press 10+ twice followed by the desired single digit.  
E.g. for 26, press 10+, 10+, 6, and for 36 press 10+ 3 times followed by 6 etc.


3.  Disc Tray

Insert discs here

4.  10+

This allows the user to have direct track or title access above 10.  Press once and the (1    ) will appear; then press the desired single     
digit number to access the track. For example, to access track/title 14, press the (10+) button once and then press 4.  To access      
track/title 22, press (10+) twice and (2     ) will appear on the screen. Then press 2.

5.  Open/Close

This button opens and closes the disc tray.

6.  Digital Echo Control
 

This function allows the user to add echo effects to the microphone input when singing.  Adjust the control from left to right to add or 

remove echo.

7.  Digital Key Control

These buttons allow the user to adjust the pitch (sharp-#, or flat-b) of the audio track during playback. There are a total of 6 steps 
up (sharp) and 6 steps down (flat). Press the reset- 

 button to return to “zero” adjustment. When any track finishes, the key 

change will automatically revert to the natural setting. 

NOTE: 

The first time you press any of the key change buttons, the player 

displays the current setting. It then takes another button input to actually change the key.

8.  L /R

This will switch the audio output of the player from right channel, left channel, mono and stereo.

9.  Play

Press this button to play the disc.

10. Pause

Press this button to pause the disc.

11.  Stop

Press this button once to stop the disc. The player will hold the place on the disc where it was stopped. Press play to continue.
Press twice to completely stop the disc.

12.  Previous (PREV)

Press this button to skip to the previous track/title. (This function may not work with certain discs, depending on their structure.)

13.  Next 

Press this button to skip to the next track/title. (This function may not work with certain discs, depending on their structure.)

14. Single Play / Continuous Play (momentarily displays on your TV or monitor when pressed)

Pressing this button before you insert a disc will cause the disc to load and pause at the first track, or if you select a track number on 
any disc other than a DVD the player will close the drawer and cue the selected track. If the setting is Continuous Play and you start a 
track playing, then select Single Play, the player will go into Pause at the end of the track from any format. DVDs will go directly to 
track one and pause if Single Play is selected prior to loading the disc, then you may select your desired track, and the player will load 
that track and pause again at the start. You can select or de-select the single play mode at any time during play from discs, USB or SD 
Cards.


9

1

2

3

4

5

6

8

AUDIO SETUP PAGE CONTINUED

(Note:  At any time you may exit the menu by pressing the SETUP button.)

Features Setup

To Return, Press Setup

VIDEO SETUP PAGE

COMPONENT

S-VIDEO

YUV  

(Most televisions use YUV)

RGB  

(Progressive Scan)

VGA  

(Progressive Scan)

TV MODE

INTERLACED

P-SCAN  

(Progressive Scan)

QUALITY

POWER RESUME

DEFAULT

(Press the ENTER button for access
to the editing options.)

SHARPNESS

HIGH

MEDIUM

LOW

BRIGHTNESS

0

Note:


 1) Press the RIGHT ARROW 
button to change the brightness setting.  
2) Use the UP & DOWN ARROW 
buttons to adjust the brightness level.  
3) Press the LEFT  ARROW button to 
return to the Quality Menu.

CONTRAST

ON (DEFAULT)

OFF

RESTORE

0

Note:


 1) Press the RIGHT ARROW 
button to change the brightness setting.  
2) Use the UP & DOWN ARROW 
buttons to adjust the brightness level.  
3) Press the LEFT  ARROW button to 
return to the Quality Menu.

24

7

12 13

9

10

11

14

15

In this position, if there is a power failure then it comes back,
the player will restart automatically.

If the power fails, the player will shut down and has to 
be restarted manually.

Resets factory settings.

Содержание PCK4000

Страница 1: ... OWNER S MANUAL Please review this manual before playing the machine This manual refers to models PCK4000 US and PCK4000 AU DVD CD G MP3G Xvid CD USB SD Card DVD R DVD R RW CD DA CD R CD RW MP3 MP3G VCD SVCD JPEG Kodak Picture CD This manual is also available as a PDF file at www soundchoice com ...

Страница 2: ...ice 888 389 9648 Australia Sound Choice Distr Aust Pty Ltd Attn Service Dept P O Box 50 KLEMZIG SA 5087 AUSTRALIA Customer Service 61 8 8261 0566 IF THIS UNIT IS OUTSIDE OF THE WARRANTY PERIOD please call the appropriate number below for repair Note The unit must be shipped in the original carton and placed inside another carton with added padding for extra protection during shipment All original ...

Страница 3: ...n of liability All implied warranties are limited to the duration of the warranty This is the complete warranty and no other expressed warranty is valid Some states countries provinces do not allow limitations on how long an implied warranty lasts or exclusions or limitations of incidental or consequential damages so the above limitations or exclusions may not apply This warranty gives you the own...

Страница 4: ...ncluding amplifiers that produce heat 9 Do not defeat the safety purpose of the polarized or grounding type plug A polarized plug has two blades with one wider than the other A grounding type plug has two blades and a third grounding prong The wide blade or the third prong are provided for your safety When the provided plug does not fit into your outlet consult an electrician for replacement of th...

Страница 5: ... player Lens warning Cleaning and adjustment of the lens or other components should only be done by a qualified technician To obtain a clear picture The player is a high technology precision driven device If the optical lens and drive parts are dirty or worn down the picture quality may become poor To obtain a clear picture we recommend regular inspection and maintenance cleaning or parts replacem...

Страница 6: ... standard used in the United States is NTSC Throughout the world the most widely used format is PAL 4 Interlaced Video Output Televisions have used interlaced video output since their inception in the 1940 s Interlaced Video Output takes the odd number of lines in a picture and combines them into a frame Then the even numbered lines are combined into a second frame The process begins by displaying...

Страница 7: ...AL AUDIO GRAPHICS 5 Playable Discs This DVD player will play the following formats Digital Video Discs DVD Compact Disc Graphics CD G Compact Disc CD Digital Video Disc Recordable DVD R Digital Video Disc Re Writable DVD RW Super Video Compact Disc SVCD Video Compact Disc VCD Compact Disc Recordable CD R Compact Disc Re Writable CD RW MPEG 3 MP3 Compact Disc Digital Audio CD DA MP3G Mp3 with Graph...

Страница 8: ...y No disc is inserted The disc is placed upside down The disc is not placed within the guide The disc is dirty or scratched There is a menu pictured on the TV screen The parental lock function is set The remote control is not pointed at the remote sensor on the DVD video player The remote control is too far from the DVD video player There is an obstacle between the remote sensor on the player and ...

Страница 9: ... the Stereo Red White inputs of your TV or Stereo 7 Note At any time you may exit the menu by pressing the SETUP button PREFERENCE PAGE CONTINUED PARENTAL KID SAFE G PG PG 13 PGR R Note Password mode must be turned on for the Parental Menu to work To change the parental function the user must turn off the password protection and adjust the parental level setting Once this is completed turn the pas...

Страница 10: ...ack may damage speakers To avoid feedback noise do not place your hands near the top of the microphone and do not point the microphone directly at the output speakers If feedback occurs lower the volume control 8 Note At any time you may exit the menu by pressing the SETUP button PREFERENCE PAGE Note In order to access the Preference Page the player must come to a complete stop To completely stop ...

Страница 11: ...twice to completely stop the disc 12 Previous PREV Press this button to skip to the previous track title This function may not work with certain discs depending on their structure 13 Next Press this button to skip to the next track title This function may not work with certain discs depending on their structure 14 Single Play Continuous Play momentarily displays on your TV or monitor when pressed ...

Страница 12: ...mmediately under running water Remote Control Setup 30 30 Operation of the remote control Instructions for using the remote control Distance within 20ft 6m from the front of the remote control sensor on the player o Angle within 30 in each direction of the front of the remote sensor on the player Do not expose the remote sensor of the DVD video player to a strong light source such as direct sunlig...

Страница 13: ...ote control to close the tray or for Turbo Load press desired track number or 1 to start playing a movie 11 AUDIO SETUP PAGE CONTINUED SPDIF SETUP DIGITAL OUTPUT SETUP SPDIF OUTPUT DIGITAL OUTPUT SPDIF OFF Turns off the digital outputs of player SPDIF RAW Activates the optical outputs of the player SPDIF PCM Activates the coaxial outputs of the player Note At any time you may exit the menu by pres...

Страница 14: ...EO NORMAL V SURR VIRTUAL SURROUND Note At any time you may exit the menu by pressing the SETUP button Features Setup GENERAL SETUP PAGE CONTINUED LAST MEMORY OFF Permanent factory setting 5 1 CH 21 7 Press buttons to select Move these arrow buttons to the desired menu or picture 8 Press ENTER to confirm the desired menu The next set of submenus will appear The player will automatically play the se...

Страница 15: ... 5 Skip to the previous chapter track During playback press the PREV button 13 This section will instruct you on how to navigate the setup features of the DVD player There are many features that are built into this player that can be accessed by the user Please review this section of the manual before attempting to adjust any of the features NOTE While navigating through the menu you must use the ...

Страница 16: ...play the demonstration vocal on the right channel only so that you will not hear the lead vocal in stereo Press this button to turn On Off the demonstration lead vocal track during playback The default setting is off you will need to turn this function on for each track selection except for playback in Repeat modes 25 PAUSE While the player is in the playback mode including slow fast forward fast ...

Страница 17: ...cs 13 REVERSE FR Press this button to reverse the playback Each time it is pressed the speed will change a level Continually pressing this will return the audio video to the normal playback 14 SLOW Press this button to play in slow speed without sound It can play slowly forward or backward Each time it is pressed the slow motion speed will change Continually pressing this will return the audio vid...

Страница 18: ...ress this button the third time to finish the repetition 2 PLAY During the mode of stop pause slow motion fast forward or fast reverse etc press this button to return to the normal playback 3 SUBTITLE 4 PROGRAM Press this button to change the playback order It varies according to the different discs 5 OPEN CLOSE Press this button once to eject the disc tray press it again to close the disc tray Us...

Отзывы: