background image

19

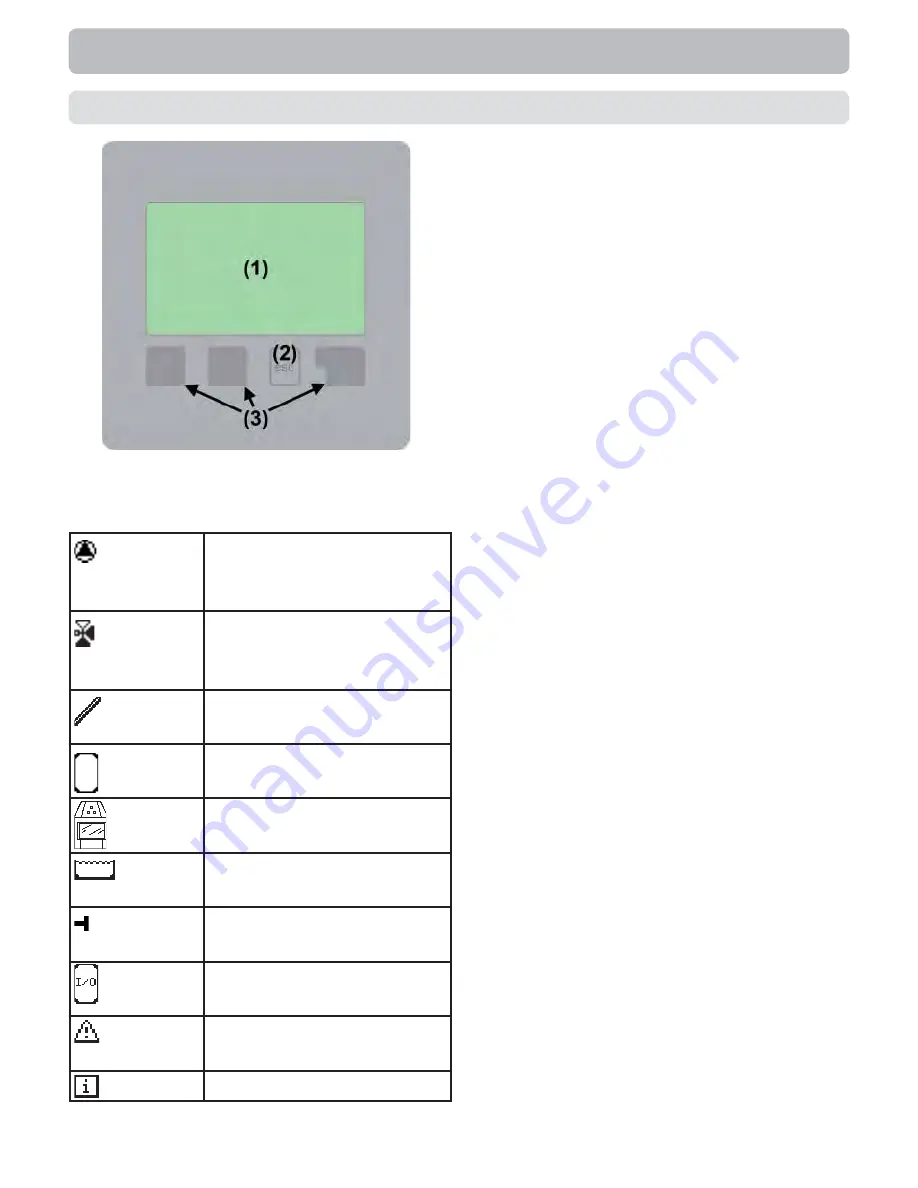
The display (1), with its extensive text and 
graphics mode, is almost self-explanatory, 
allowing easy operation of the controller.

Entries are made using four keys (2+3), 
which are assigned to different functions 
depending on the situation. The “esc” key 
(3) is used to cancel an entry or to exit a 
menu.

If applicable there will be a request for 
confi rmation as to whether the changes 
which have been made should be saved.

The function of each of the other three 
keys (3) is shown in the display line di-
rectly above the keys; the right-hand key 
generally has a confi rmation and selection 
function.

Examples of key functions:
+/-  

= increase/reduce values

/


= scroll menu down/up

yes/no   = approve/reject
Info  

= additional information

Back   = to previous screen
ok  

= confi rm selection

Confi rm = confi rm setting

Operation

E.1 

Display and Input

Display symbols:

Pump 
(rotates in operation)

Valve 
(direction of fl ow black)

Collector

Storage tank

Solid fuel boiler

Swimming pool

Temperature sensor

Thermostat On / Off

Warning / error message

New information available

Содержание STDC V1

Страница 1: ...Read carefully before installation commissioning and operation Temperature Difference Controller STDC Installation and operating instructions applies to STDC versions V1 V2 V3 V4...

Страница 2: ...odes 25 4 1 Automatic 25 4 2 Manual 25 4 3 Off 25 5 Settings 26 6 Protective functions 29 6 1 Seizing protection 29 6 2 Frost protection 29 6 3 System protection 30 6 4 Collector protection 30 6 5 Col...

Страница 3: ...output 230AC on off 1 PWM 0 10V output for speed control of high efficiency pumps STDC Version 4 3 temperature sensor inputs 1 electronic relay output 230AC for speed control of standard pumps 1 PWM...

Страница 4: ...oning and operation of the unit The valid accident prevention regulations the regulations of the local power utility the applicable standards and the installation and operating instructions of the add...

Страница 5: ...cessories Use of the device for other than its intended purpose Operation above or below the limit values listed in the specifications Force majeure Changes additions to or conversion of the unit are...

Страница 6: ...nge 40 C to 300 C 3 3 3 3 Permissible cable length of sensors and appliances sensor S1 e g collector sensor 30m sensors S2 and S3 e g storage sensor 10m PWM 0 10V 3m electronic relay 3m mechanichal re...

Страница 7: ...toring of the system by means of statistical graphics etc Extensive setting menus with explanations Menu block can be activated to prevent unintentional changes of settings Resetting to factory settin...

Страница 8: ...ensors and immersion sleeves Additionally available Pt1000 temperature sensors immersion sleeves overvoltage protection B 6 Disposal and pollutants The unit conforms to the European RoHS directive 200...
Страница 9: ...under any circumstances Depending on the specific application additional system components and safety components may be mandatory such as check valves non return valves safety temperature limiters sca...

Страница 10: ...ng so 4 Hold the lower part of the housing C 1 2 up to the selected position and mark the 2 mounting holes Make sure that the wall surface is as even as pos sible so that the housing does not become d...

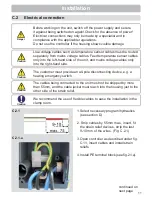
Страница 11: ...ins voltage cables only into the right hand side The customer must provide an all pole disconnecting device e g a heating emergency switch The cables being connected to the unit must not be stripped b...

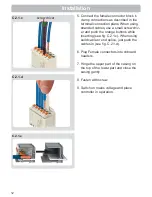
Страница 12: ...ons while inserting see fig C 2 1 c When using solid cable or end splice just push the cables in see fig C 2 1 d 6 Plug Female connectors into onboard headers 7 Hinge the upper part of the casing on t...

Страница 13: ...e temperature range Caution The line of S1 can be extended if needed to a maximum of 30m using a cable with a cross section of at least 0 75mm The lines of S2 and S3 can be extended if needed to a max...

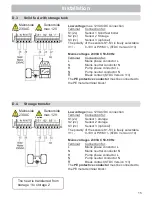
Страница 14: ...Version 1 3 The PE protective conductor must be connected to the PE metal terminal block Low voltage max 12VAC DC connection Terminal Connection for S1 2x Sensor 1 collector S2 2x Sensor 2 pool S3 2x...

Страница 15: ...must be connected to the PE metal terminal block Low voltage max 12VAC DC connection Terminal Connection for S1 2x Sensor 1 storage S2 2x Sensor 2 storage S3 2x Sensor 3 optional The polarity of the s...

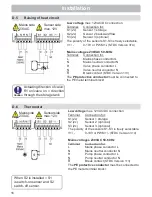
Страница 16: ...f sensor Installation Low voltage max 12VAC DC connection Terminal Connection for S1 2x Sensor 1 storage S2 2x Sensor 2 backward flow S3 2x Sensor 3 optional The polarity of the sensors S1 S3 is freel...

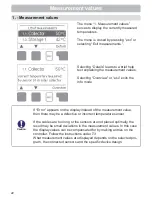
Страница 17: ...r 1 control S2 2x Sensor 2 reference S3 2x Sensor 3 optional The polarity of the sensors S1 S3 is freely selectable V1 0 10V or PWM STDC Version 3 4 Mains voltages 230VAC 50 60Hz Terminal Connection f...

Страница 18: ...ectable V1 0 10V or PWM STDC Version 3 4 Mains voltages 230VAC 50 60Hz Terminal Connection for L Mains phase conductor L N Mains neutral conductor N R Pump phase conductor L N Pump neutral conductor N...

Страница 19: ...ved The function of each of the other three keys 3 is shown in the display line di rectly above the keys the right hand key generally has a confirmation and selection function Examples of key function...

Страница 20: ...k step by step to the selection mode thus cancelling the commissioning help Finally under operating mode menu 4 2 Manual should be used to test the switch outputs with the consumers connected and to c...

Страница 21: ...ontrol of the system with operating hours etc Select graphics mode or overview mode Automatic mode manual mode or switch unit off Set parameters needed for normal operation Solar and frost protection...

Страница 22: ...ay instead of the measurement value then there may be a defective or incorrect temperature sensor If the cables are too long or the sensors are not placed optimally the result may be small deviations...

Страница 23: ...the controller various time ranges day year are available 2 2 Average temperature difference T Display of the average temperature difference between the reference sensors of the solar system with the...
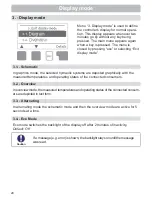
Страница 24: ...lic systems are depicted graphically with the measured temperatures and operating states of the connected consumers 3 2 Overview In overview mode the measured temperatures and operating states of the...

Страница 25: ...us the connected consumer are switched on and off by pressing a key with no regard to the current temperatures and the parameters which have been set The measured temperatures are also shown to provid...

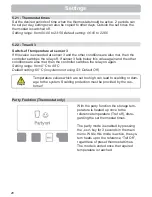
Страница 26: ...lue by 5K then the pump and or valve is switched off again Setting range from 0 C to 99 C default setting 20 C solid fuel boiler 60 C 5 4 Tmax S2 Switch off temperature at sensor 2 If this value is ex...

Страница 27: ...he temperature reaches Tref Off 2 value Cooling 1st value higher than the 2nd value If the temperature exceeds Tref On 1 value at sensor 1 and the thermostat function is enabled see 5 5 the relay for...

Страница 28: ...econds in the main menu While this mode is active the sys tem heats up to the reference Tref Off regardless of preset thermostat times The mode is ended once the required temperature is reached 5 22 T...

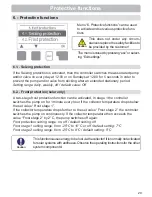
Страница 29: ...ion solar only A two stage frost protection function can be activated In stage 1 the controller switches the pump on for 1 minute every hour if the collector temperature drops below the set value Fros...

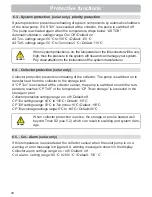
Страница 30: ...ly If this temperature is exceeded at the collector sensor when the solar pump is on a warning or error message is triggered A warning message is shown in the display Collector alarm settings range on...

Страница 31: ...cool Tsetpoint and the collector is at least 20 C cooler than the storage tank and until the storage tank temperature has dropped below the value Recool Tsetpoint Recooling settings range on off Defau...

Страница 32: ...ge tank is heated up over the set value Tmax S2 which can lead to scalding and damage to the system This anti Legionella function does not provide complete protection against Legionella because the co...

Страница 33: ...ted and set here see section D Hydraulic variants The associated diagram can be displayed by pressing info Setting range 1 9 default value 1 Caution Normally the program selection is made only once du...

Страница 34: ...pumps via output V1 e g High efficiency pumps by means of a PWM signal Relay output R1 230AC is switched on for power supply when output V1 is switched on 7 2 2 Profile In this menu preconfigured prof...

Страница 35: ...t setting 100 Heating 0 to 50 Default setting 0 When Output signal PWM is selected When Output signal 0 10V is selected 7 2 4 0 10V off This voltage is put out when the pump is turned off Pumps that c...

Страница 36: ...lculated and displayed speed of the pump If e g 30 is set here and the signal set in PWM on 0 10V on is put out 30 speed is displayed When the signal set in PWM max 0 10V max is put out 100 speed is d...

Страница 37: ...8 b Technical data PWM and 0 10V PWM 20 to 100 1kHz Designed for a load of 10K Ohm Technical data PWM Technical data 0 10V 0 10V 2V to 10V 20 to 100 Designed for a load of 10K Ohm 10V 100 Speed 5V 50...

Страница 38: ...erence sensors is greater than the set value Switch on temperature difference T R1 then the speed is increased If the controller has adjusted the speed of the pump down to the smallest stage and the T...

Страница 39: ...e flow rate can be determined Settings range 70 to 100 Default setting 100 Caution Caution The indicated percentages are guide values that may vary to a greater or lesser extent depending on the syste...

Страница 40: ...ues can lead to unpredictable errors 7 6 Commissioning Starting the commissioning help guides you in the correct order through the basic set tings necessary for commissioning and provides brief descri...

Страница 41: ...g data is only approximate value for function control 7 8 2 AF type Adjust the type of glycol that is being used in the system Settings range Ethylene Propylene default setting Ethylene 7 8 3 Glycol p...

Страница 42: ...urging time so that the medium to be measured can be moved to the collector sensor If this still does not result in a normal switch on condition then the start help function is subject to a 5 minute l...

Страница 43: ...listed below remain completely accessible despite the menu lock being activated and can be used to make adjustments if necessary 1 Measurement values 2 Analysis 3 Display mode 7 2 Time date 8 Menu lo...

Страница 44: ...he error occurs e g in the table The menu can be closed at any time by pressing esc Service values Menu 10 Language can be used to se lect the language for the menu guidance This is queried automatica...

Страница 45: ...or info symbol Do not try to deal with this yourself Consult a specialist in the event of an error Malfunctions Error messages Notes for the specialist Sensor x defective Either the sensor the sensor...

Страница 46: ...al source of the error e g pump and exchange it Then first recommission the controller and check the function of the switch outputs in manual mode as described under 4 2 Repairs and maintenance may on...

Страница 47: ...tenance Performing maintenance Check the date and time see 7 4 Time and Date on page 40 Assess check plausibility of analyses see 2 Statistics on page 23 Check the message log see 2 5 Message log on p...

Страница 48: ...test possible care the possibility of incorrect or incomplete information cannot be excluded Subject as a basic principle to errors and technical changes Manufacturer SOREL GmbH Mikroelektronik Jahnst...

Отзывы: