background image

8VHUJXLGH

;SHULDŒ;

Important information

Please read the 

Important information

 leaflet before you

use your mobile phone.

Experience more. Discover

how.

Fill it with pop and let it rock. Share your life in pictures. Or

why not go online for the latest updates? Your new phone is

the key to a wider world. And it's just around the corner.

Get started with this User guide. And join us online to get the

full picture. Music, games, apps, updates, downloads,

support and more. All in one place:

www.sonyericsson.com/X2

Don't forget


 to update your phone software. See

Update Service

 on page 33.

User guide in the phone

An extended User guide and a help function are available in

your phone.

To access the Xperia™ X2 phone User guide

Select   > 

Help

 > 

X2 Help

.

To use the help function in the phone

Tap   > 

Help

.

2

Getting started

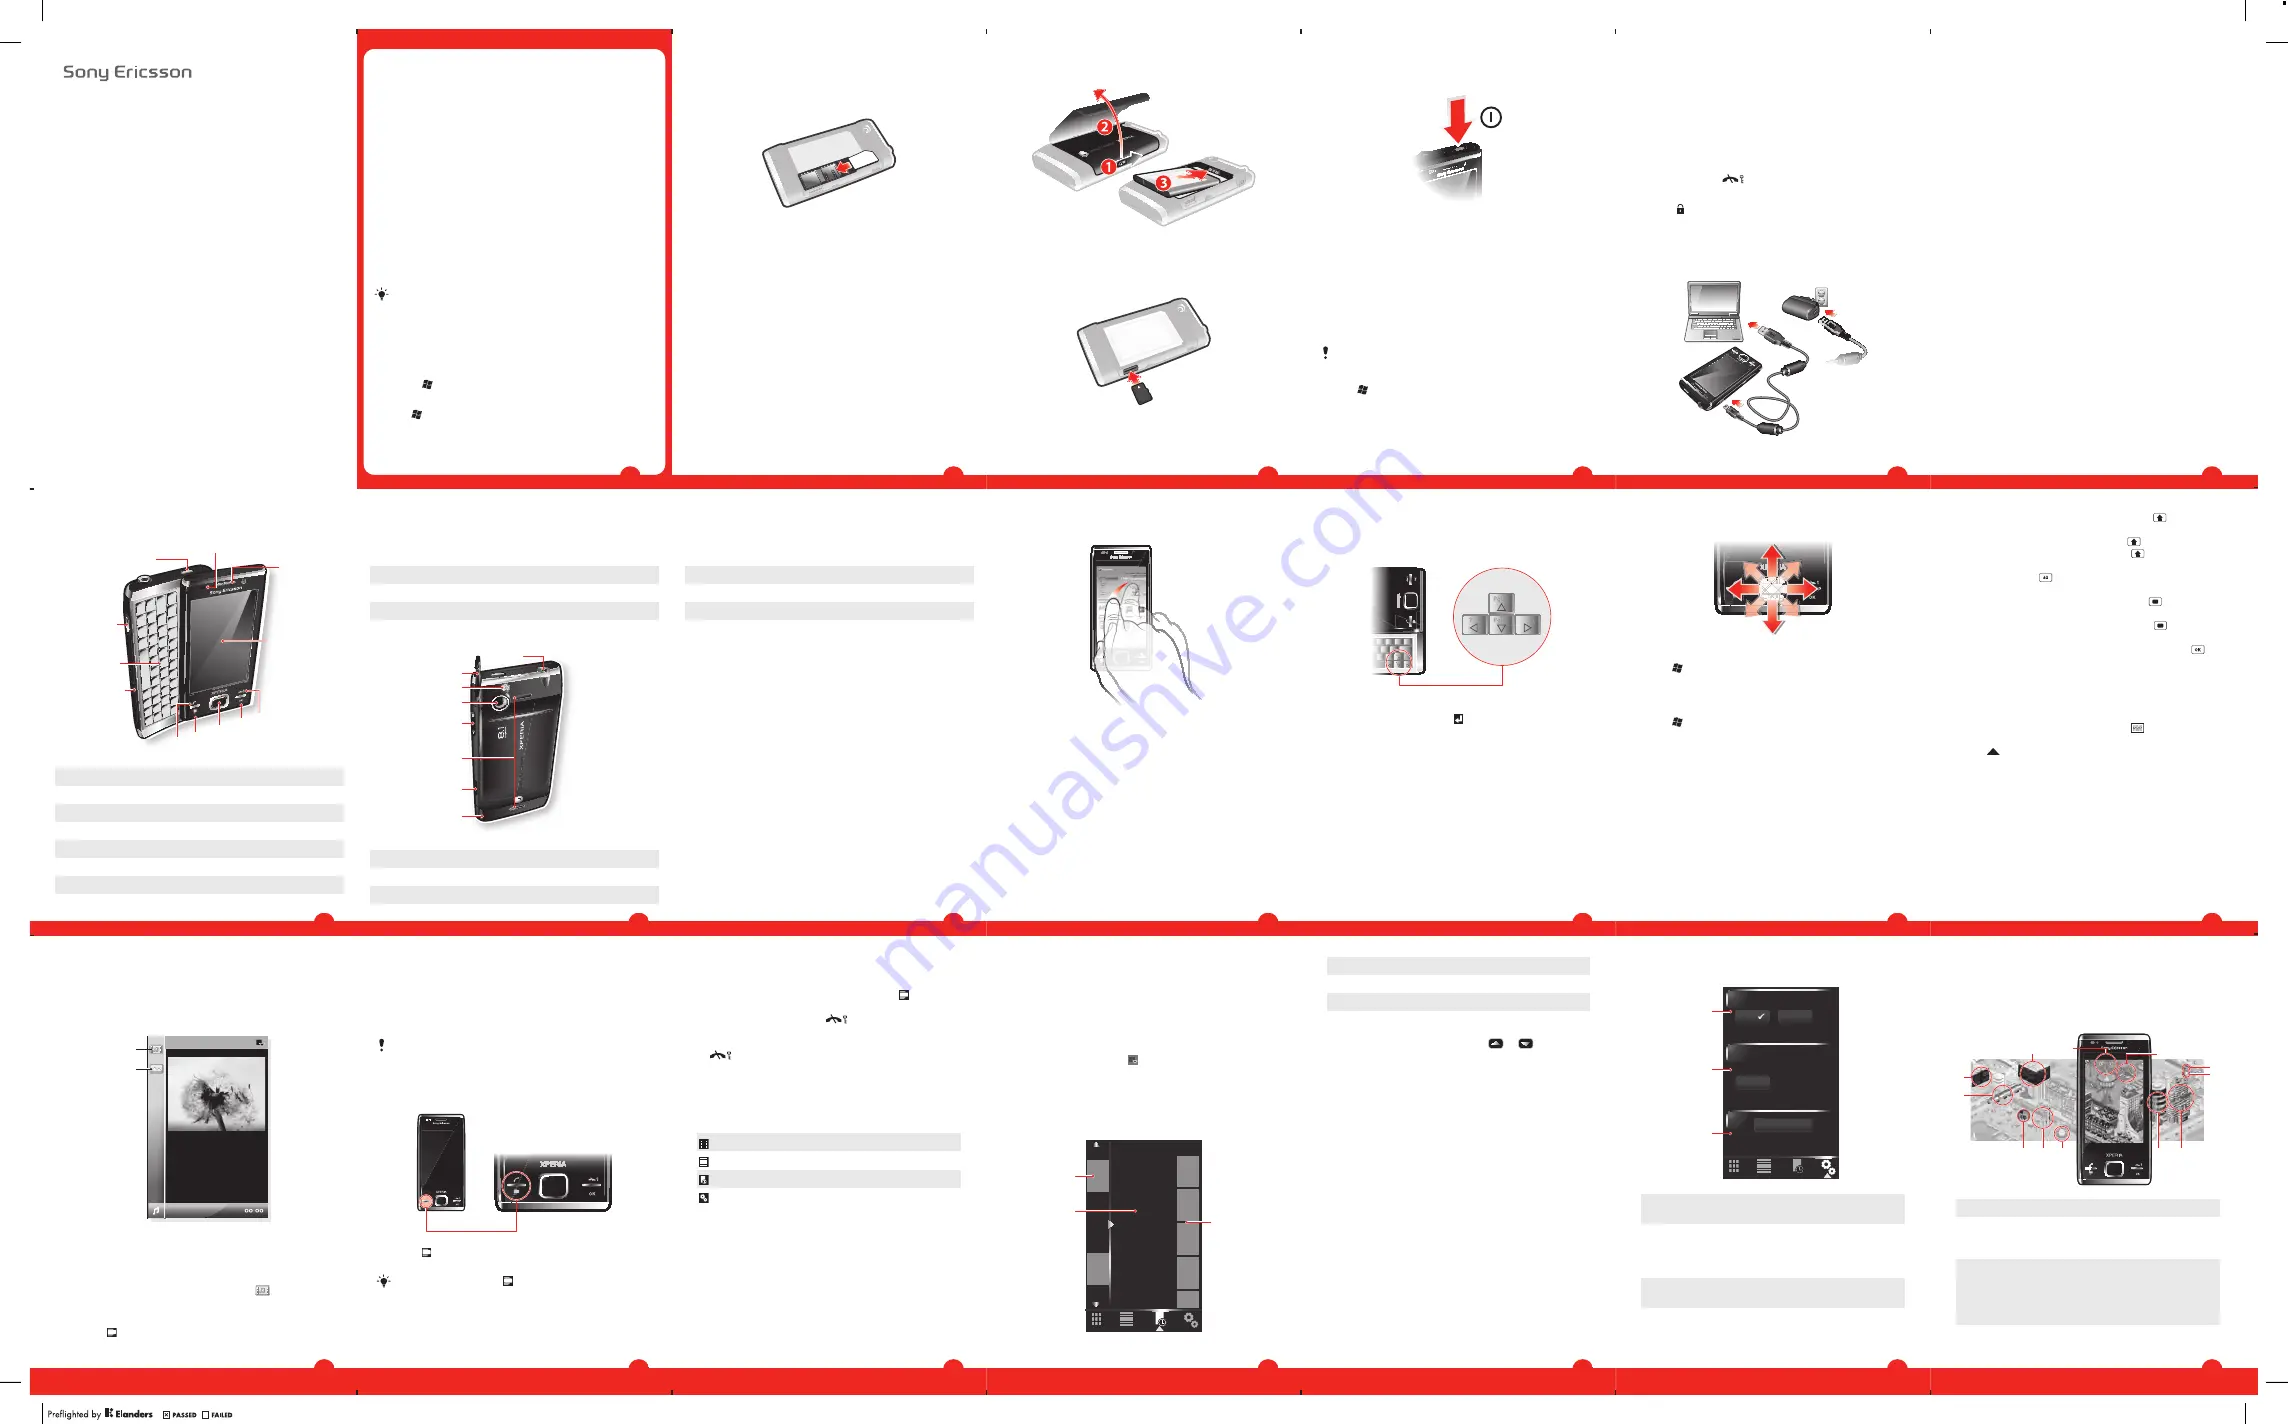
To insert the SIM card

1

Remove the battery cover.

2

Slide the SIM card into its holder with the gold-colored

contacts facing down.

3

To insert the battery

Insert the battery with the Sony Ericsson hologram side

up and the connectors facing each other.

To insert a memory card

1

Remove the battery cover.

2

Insert the memory card with the gold-colored contacts

facing down.

4

To turn on the phone

1

Press and hold down the power key until the phone

starts.

2

At first startup, a Quick Start wizard guides you through

the initial settings.

Aligning the screen

The first time you turn on the phone, you need to align the

screen. You can also re-align your screen, if necessary.

You need to use the stylus to align the screen.

To align the screen

1

Tap   > 

Settings

 > 

System

 > 

Screen

 > 

Align Screen

.

2

Use the stylus and tap each target firmly and accurately.

To turn on sleep mode

To turn off the screen temporarily and switch the phone

to sleep mode, press the power key.

5

To turn off sleep mode

To activate the screen, briefly press the power key. The

phone is also activated when you slide open the phone,

or when you receive a call or a message.

Screen lock

To lock the screen

Press and hold 

.

To unlock the screen

Slide   to the left or right on the screen.

Charging the battery

The phone battery is partly charged when you buy it.

6

To charge the phone using the power adapter

Connect the phone to a power outlet using the USB cable

provided and the power adapter.

To charge the phone using a computer

Connect the phone to a USB port on a computer using

the included USB cable provided.

7

To type a single upper-case letter, press 

 and then

press the relevant letter key.

To use all upper-case letters, press   twice. To change

back to all lower-case letters, press 

 twice again.

To type accented characters, press the letter key first,

and then press 

 until the required character appears.

To enter a number or a symbol (in blue or red on the

upper right corner of some keys), press 

 and then

press the relevant key.

To use all number or symbol keys, press 

 twice and

enter the relevant numbers or symbols.

To verify entries or exit the program in use, press 

.

Using the on-screen keyboard

You can use the on-screen keyboard to enter text. The on-

screen keyboard uses a built-in dictionary.

To enter text using the on-screen keyboard

1

In a program, tap the text input icon 

 at the bottom of

the screen.

2

Tap 

, then tap 

Keyboard

.

3

To enter text, tap the letters on the on-screen keyboard.

4

To select a suggestion, press the space key.

SlideView

Slideview provides you with quick access to frequently used

phone activities. It also gives you an overview of missed

incoming activity, notifying you of any missed calls, emails,

and text messages.

Slideview includes access to:

Messaging

14

To enable key press simulation

1

Tap   > 

Settings

 > 

System

 > 

Optical joystick

.

2

Mark or unmark the 

Enable key press simulation

 check

box.

To enable mouse simulation

1

Tap   > 

Settings

 >

System

 > 

Optical joystick

.

2

Mark or unmark the 

Enable mouse simulation

 check

box.

Entering text

To enter text and characters, you can use:

The slideout keyboard.

The on-screen keyboard.

Handwriting recognition features such as 

Block

Recognizer

Letter Recognizer

 or 

Transcriber

.

Using the slideout keyboard

To type lower-case letters, press the relevant letter keys.

13

Using the arrow keys

To use the arrow keys

Press the arrow keys left, right, up or down to move

around the screen. Press   to select an item.

Using the optical joystick

You can move the highlighted marker in any direction by

letting your finger glide over the navigation key. In

Microsoft® Internet Explorer®, Messaging and Contacts,

you can use the optical joystick to scroll instead.

12

Using the touch screen

To highlight or open an item, tap the item.

To copy, rename or send a file, tap and hold down the

file or folder. Select the preferred action from the options

dialog.

To scroll, tap the screen and slide up or down. On some

pages you can also slide to the side.

To stop the screen from scrolling, tap the screen.

To pan a page, touch and hold on the screen, then drag

your finger.

To pan continuously, drag your finger towards the outer

limits of a page and hold. Release your finger to stop

panning.

11

8 OK key
9 End call key

10 Touch screen
11 Ear speaker
12 Light sensor

14

15

16

17

18

19

20

13

13 3.5 mm headset/TV-out cable connector
14 Stylus
15 Camera light

9

Phone overview

1

2

4

5

3

6

7

8

9

10

11

12

1 Power key
2 Connector for charger/USB cable
3 Keyboard
4 Battery cover lock
5 Call key
6 SlideView key
7 Optical joystick/Selection key

8

16 Camera lens
17 Volume key
18 Loudspeaker
19 Camera key
20 Strap holder

Navigating

You can use the following means to navigate around the

screen:

The stylus, or your finger, on the touch screen

The arrow keys on the keyboard

The optical joystick

10

Call history

Calendar

Media

Panel Manager

To navigate SlideView

1

2

1

To select or open an item in the list, tap the item.

2

To go back to the previous view, tap the downmost icon

in the bar on the left hand side (item number 2 in the

image).

3

To go back to the 

Media

 view, tap the 

 in the bar on

the left hand side (item number 1 in the image).

To open SlideView

Press  .

15

Panels

The Panels interface lets you personalize your standby

screen. You can view your chosen panels in different views,

set panels to switch automatically, and download new

panels.

Some panels described in this User guide are not
supported by all networks and/or service providers in
all areas.

To open and close panel views

1

Press  .

2

Tap Panels.

You can double press   to enter the panel view

directly.

16

Switching between panels and

applications

In a panel or an application, double press   to go to

Favorites view.

From a panel view, press 

 to return to the most

recently used panel.

In an application you started from the 

Start

 menu, press

 to return to the most recently used panel.

Panel manager

With the panel manager you can display the panels in

different views, edit settings for the auto panel switching and

download new panels.

Favorites view
List view
Auto Panel switching
Settings

Favorites view

Your nine favorite panels are displayed in this view. You can

set panels as favorites from the List view.

To open a panel from the Favorites view

Tap the panel you want to open.

List view

Here you can set panels as favorites and read information

about some of them. You can also filter the list of displayed

panels.

17

To open a panel from List view

1

Drag the list such that the desired panel is highlighted.

2

Tap 

Activate

.

To add a panel to your Favorites

1

From the List view, select a panel.

2

Tap 

Favorite

.

To filter panels

1

From the List view, tap  .

2

Select a filter.

Auto panel switching

Auto panel switching changes the current panel

automatically at a selected time.

9:00

13:00

17:00

21:00

1

2

3

18

1

Timeline

2

Added panels in timeline

3

Available panel list

To change the time in the timeline

In Auto panel switching view, tap 

 or 

.

To add panels to the timeline

Drag the panels you want from the available panel list to

the timeline.

To remove panels from the timeline

Drag the panels you want to remove from the timeline to

the available panel list.

19

Panel manager settings

1

2

3

1

Auto panel switching

 on/off - Turn 

Auto panel

switching

 on or off.

2

Release information/

Update

 - Download the latest

version of the Panel manager application. If the current

Panel manager application is the latest version the

Update

 is disabled.

3

Get more panels

 - Download new panels for your

device.

20

Pixel City panel

You can access a number of features through the Pixel City

panel. Many details and visual behaviours are connected to

different features. You can discover the whole city by flicking

to the sides.

1

2

8

9

3

4

5

6

10

11

12

7

1

Messages and e-mails.

2

Calendar appointments. When there is a

calendar appointment coming up in the

day, the train will appear.

3

Silent mode. The musicians play music at

the bandstand in the park when the phone

is not in silent mode. The musicians

disappear under the bandstand when

silent mode is on.

21

Содержание Xperia X2

Страница 1: ...irection by letting your finger glide over the navigation key In Microsoft Internet Explorer Messaging and Contacts you can use the optical joystick to scroll instead 12 Using the touch screen To highlight or open an item tap the item To copy rename or send a file tap and hold down the file or folder Select the preferred action from the options dialog To scroll tap the screen and slide up or down ...

Страница 2: ...t available software in your phone Resetting the phone You can reset your phone to factory default settings You can also use Clear Storage to simultaneously reset your 33 2 Computer Click Start All Programs Windows Mobile Device Center 3 Click at the lower left part of the Windows Mobile Device Center window Bluetooth partnership A Bluetooth partnership is a relationship you create between your ph...

Страница 3: ...FCC Statement Declaration of Conformity Sony Ericsson X2 UMTS HSPA Band 1 2 8 GSM GPRS EDGE 850 900 1800 1900 ...

Страница 4: ... Rate SAR Tests for SAR are conducted using standardized methods with the phone transmitting at its highest certified power level in all used frequency bands While there may be differences between the SAR levels of various phone models they are all designed to meet the relevant guidelines for exposure to radio waves For more information on SAR please refer to the safe and efficient use chapter in ...

Страница 5: ...for safe exposure SAR information on this phone model is on file at the FCC and can be found under the Display Grant section of http www fcc gov oet fccid after searching on FCC ID PY7A3880043 Additional information on SAR can be found on the Cellular Telecommunications Internet Association CTIA website at http www phonefacts net In the United States and Canada the SAR limit for mobile phones used...

Страница 6: ...in a residential installation This equipment generates uses and can radiate radio frequency energy and if not installed and used in accordance with the instructions may cause harmful interference to radio communications However there is no guarantee that interference will not occur in a particular installation If this equipment does cause harmful interference to radio or television reception which...

Страница 7: ... two conditions 1 this device may not cause interference and 2 this device must accept any interference including interference that may cause undesired operation of the device This Class B digital apparatus complies with Canadian ICES 003 Cet appareil numérique de la classe B est conforme à la norme NMB 003 du Canada ...

Страница 8: ...00 328 V1 7 1 EN 301 489 7 V1 3 1 EN 301 489 17 V2 1 1 EN 301 489 24 V1 4 1 and EN 60 950 1 2006 following the provisions of Radio Equipment and Telecommunication Terminal Equipment directive 1999 5 EC Lund September 2009 Rikko Sakaguchi Corporate Vice President and Head of Creation Development We fulfil the requirements of the R TTE Directive 1999 5 EC Ce produit est conforme aux directives de R ...

Страница 9: ...www sonyericsson com Sony Ericsson Mobile Communications AB SE 221 88 Lund Sweden 1230 3211 1 ...

Страница 10: ...Important information ...

Страница 11: ...ator specific services and features please contact your network operator You can also contact our Contact Centers If your country region is not represented in the list below please contact your local dealer Calls are charged according to national rates including local taxes unless the phone number is a toll free number If your product needs service please contact the dealer from whom it was purcha...

Страница 12: ... or disable the radio transmitting functionality of the device where required or requested to do so Do not use where a potentially explosive atmosphere exists Do not place the product or install wireless equipment in the area above an air bag in a car Caution Cracked or broken displays may create sharp edges or splinters that could be harmful upon contact Do not use the Bluetooth Headset in positi...

Страница 13: ...ta transmissions Only Sony Ericsson service partners should remove or replace built in batteries Use of batteries that are not Sony Ericsson branded may pose increased safety risks Replace the battery only with another Sony Ericsson battery that has been qualified with the product per the standard IEEE 1725 Use of an unqualified battery may present a risk of fire explosion leakage or other hazard ...

Страница 14: ... or areas adjacent to buildings Caution Do not use GPS functionality in a manner which causes distraction from driving Emergency calls Calls cannot be guaranteed under all conditions Never rely solely upon mobile phones for essential communication Calls may not be possible in all areas on all networks or when certain network services and or phone features are used Antenna Use of antenna devices no...

Страница 15: ... been tested when positioned a minimum of 15 mm from the body without any metal parts in the vicinity of the phone or when properly used with an appropriate Sony Ericsson accessory and worn on the body For more information about SAR and radio frequency exposure go to www sonyericsson com health Flight mode Bluetooth and WLAN functionality if available in the device can be enabled in Flight mode bu...

Страница 16: ...tible Sony Ericsson phones may offer compatibility with TTY terminals with use of necessary accessory For more information call the Sony Ericsson Special Needs Center on 877 878 1996 TTY or 877 207 2056 voice or go to www sonyericsson snc com Disposal of old electrical and electronic equipment Electronic equipment and batteries should not be included as household waste but should be left at an app...

Страница 17: ...e memory card on a PC For details refer to the operating instructions of the device or contact customer support Warning If the device requires an adapter for insertion into the handset or another device do not insert the card directly without the required adapter Precautions on memory card use Do not expose the memory card to moisture Do not touch terminal connections with your hand or any metal o...

Страница 18: ... Sony Ericsson does not warrant against recovery of information and does not assume responsibility for disclosure of any information even after a master reset Loudness warning Avoid volume levels that may be harmful to your hearing End User Licence Agreement Software delivered with this device and its media is owned by Sony Ericsson Mobile Communications AB and or its affiliated companies and its ...

Страница 19: ...ur possession and usage of the Software Export regulations Export regulations This product including any software or technical data contained in or accompanying the product may be subject to import and export regulations of the European Union the United States and other countries The user and any possessor of the product agrees to comply strictly with all such regulations and acknowledges that it ...

Страница 20: ...to get further information Our warranty Subject to the conditions of this Limited Warranty Sony Ericsson warrants this Product to be free from defects in design material and workmanship at the time of its original purchase by a consumer This Limited Warranty will last for a period of two 2 years as from the original date of purchase of the Product for your mobile phone and for a period of one 1 ye...

Страница 21: ...roduct issued by a Sony Ericsson authorised dealer specifying the date of purchase and serial number is presented with the Product to be repaired or replaced Sony Ericsson reserves the right to refuse warranty service if this information has been removed or changed after the original purchase of the Product from the dealer 2 If Sony Ericsson repairs or replaces the Product the repair for the defec...

Страница 22: ...Product is to operate is provided by a carrier independent from Sony Ericsson Sony Ericsson will not be responsible for the operation availability coverage services or range of that system 5 This warranty does not cover Product failures caused by installations modifications or repair or opening of the Product performed by a non Sony Ericsson authorised person 6 The warranty does not cover Product ...

Страница 23: ...of incidental or consequential damages or limitation of the duration of implied warranties so the preceding limitations or exclusions may not apply to you The warranty provided does not affect the consumer s statutory rights under applicable legislation in force nor the consumer s rights against the dealer arising from their sales purchase contract Geographical scope of the warranty If you have pu...

Страница 24: ... requested Trademarks and acknowledgements The Liquid Identity logo and Xperia are trademarks or registered trademarks of Sony Ericsson Mobile Communications AB Sony is a trademark or a registered trademark of Sony Corporation Ericsson is a trademark or registered trademark of Telefonaktiebolaget LM Ericsson Bluetooth is a trademark or a registered trademark of Bluetooth SIG Inc and any use of suc...

Страница 25: ...a 1 800 083 9518 Toll Free questions CO support sonyericsson com Bolivia 800 100 542 número gratuito questions CO support sonyericsson com Brasil 4001 0444 ligação gratuita questions BR support sonyericsson com Canada 1 866 766 9374 Toll Free sans frais questions CA support sonyericsson com Cayman Islands 1 800 084 9518 Toll Free questions CO support sonyericsson com Central and Southern Africa 27...

Страница 26: ...9 32 21 22 Xperia uniquement questions FR support sonyericsson com Guatemala 1 800 300 0057 número gratuito questions CO support sonyericsson com Haïti Ayiti AN 193 PIN 5598 numéro gratuit nimewo gratis questions CO support sonyericsson com Honduras AN 8000122 PIN 5599 número gratuito questions CO support sonyericsson com Hong Kong 香 港 852 8203 8863 questions HK support sonyericsson com Hrvatska 0...

Страница 27: ...úmero gratuito questions CO support sonyericsson com Norge 815 00 840 lokaltakst questions NO support sonyericsson com Österreich 0810 200 245 questions AT support sonyericsson com Pakistan پ ا ک س ت ا ن 021 111 22 55 73 questions PK support sonyericsson com Panamá 00800 787 0009 número gratuito questions CO support sonyericsson com Paraguay 009 800 54 20032 número gratuito questions CO support so...

Страница 28: ...m United States 1 866 766 9374 questions US support sonyericsson com Uruguay 000 401 787 013 número gratuito questions CO support sonyericsson com Venezuela 0 800 1 00 2250 número gratuito questions CO support sonyericsson com Việt Nam 1900 1525 miễn phí questions VN support sonyericsson com Беларусь 8 82 00 361 0001 questions BY support sonyericsson com България 0800 1 8778 questions BG support s...

Страница 29: ...www sonyericsson com Sony Ericsson Mobile Communications AB SE 221 88 Lund Sweden 1222 9269 2 ...

Отзывы: