

XDR-S100CD_
4-127-390-
12
(1)_CEK
XDR-S100CD_
4-127-390-
12
(1)_CEK
Troubleshooting
Should any problem persist after you have made the
following checks, consult your nearest Sony dealer.
Display is dim, or no indication is displayed.
The unit is being used in extremely high or low
temperatures or in a place with excessive moisture.
Very weak or interrupted sound, or unsatisfactory
reception.
If you are in a building, listen near a window.
A station or service cannot be received when a
PRESET
recalls.
The station or service has not been preset.
Another station or service is preset. Preset the station
or service again.
The preset services and stations may be initialized, if a
maintenance service is performed.
Please note down of your settings in case you want to
preset them again.
Specifications
CD player section
System
Compact disc digital audio system
Laser diode properties
Emission duration: Continuous
Laser output: Less than 44.6 µW(This output is the value
measurement at a distance of 200 mm from the objective
lens surface on the optical pick-up block with 7 mm
aperture.)
Number of channels
2
Frequency response
20 - 20 000 Hz +1/–2 dB
Wow and flutter
Below measurable limit
Radio section
Frequency range
Band
Frequency
Channel step
DAB (Band-III) 174.928 - 239.200 MHz
FM
87.5 - 108 MHz
0.05 MHz
DAB (Band-
III
) frequency table
(MHz)
No. Channel Frequency No. Channel Frequency
1
5A
174.928
20
9D
208.064
2
5B
176.640
21
10A
209.936
3
5C
178.352
22
10B
211.648
4
5D
180.064
23
10C
213.360
5
6A
181.936
24
10D
215.072
6
6B
183.648
25
11A
216.928
7
6C
185.360
26
11B
218.640
8
6D
187.072
27
11C
220.352
9
7A
188.928
28
11D
222.064
10
7B
190.640
29
12A
223.936
11
7C
192.352
30
12B
225.648
12
7D
194.064
31
12C
227.360
13
8A
195.936
32
12D
229.072
14
8B
197.648
33
13A
230.784
15
8C
199.360
34
13B
232.496
16
8D
201.072
35
13C
234.208
17
9A
202.928
36
13D
235.776
18
9B
204.640
37
13E
237.488
19
9C
206.352
38
13F
239.200
General
Time display
24-hour system
Speaker:
Approx. 7.7 cm (3
1
⁄
8
in) dia. 6 Ω
Power output:
3W + 3 W (at 10 % harmonic distortion)
Output:
(headphones) jack (ø 3.5mm stereo mini jack)
LINE OUT jack (ø 3.5mm stereo minijack)
Input:
AUDIO IN jack (ø 3.5mm stereo minijack)
Power requirements:
9 V DC, six R14 (size C) batteries
External power source:
DC IN 9 V
Dimensions:
Approx. 339 × 200 × 158 mm (w/h/d)
(Approx. 13
3
⁄
8
× 7
7
⁄
8
× 6
1
⁄
4
in) incl. projecting parts
and controls
Mass:
Approx. 3.8 kg (8 lb 6 oz) not incl. batteries
Supplied accessories:
AC power adaptor (1)
Remote control (1)
Design and specifications are subject to change without
notice.
Other useful functions
for DAB
Changing the display
To change the display mode, press
DISPLAY
during DAB
reception.
The display can be up to 16 characters. Each time you
press
DISPLAY
, the bottom of the display changes as
follows:
: Dynamic
: Signal strength and PTY
: Ensemble
: Frequency and bit rate
: Clock and date
Note
The display mode returns to
after several seconds.
The display mode
will be also displayed when you
turn the unit off and on again, or change to another
function.
Using the GUIDE
This unit downloads the EPG (electronic programme
guide) included in the DAB data and displays it. The unit
also enables you to perform timer operations, using the
downloaded EPG (see “Setting the guide timer”).
To download the EPG
1
Follow steps
1
to
3
in “Operating the radio”
and tune into DAB service.
2
Press
GUIDE
for more than 2 seconds.
“GUIDE DOWNLOAD” appears in the display.
3
Turn
TUNING/SELECT
to select the
“CURRENT” or “ALL.”
“CURRENT”: Only the current station is
downloaded.
“ALL”: All stations are downloaded in order.
4
Press
ENTER
.
“GUIDE DOWNLOADING” flashes in the display
until “%” and current ensemble name appears.
When download is completed, the EPG is displayed as
follows:
Day of the week
Component (or secondary) label
Programme name
Programme start time
(currently broadcast programme is
displayed as “NOWPLAYING”)
Programme end time
To display the EPG:
Press
GUIDE
.
To display the media description in EPG:
Press
DISPLAY
.
To check another station in EPG:
Turn
TUNING/SELECT
.
To check another programme time in EPG:
Press
SCAN
+
or
–
.
To store the guide timer:
Press
ENTER
.
Notes
Set this unit to receive DAB for about 2 minutes so as
to download the EPG data.
If DAB reception is poor, time-out error may occur
while downloading the EPG data.
Perform the above operation where the reception is
good.
If you move into a place with poor reception (in the
building, etc.) after downloading the EPG, EPG may
not be displayed.
If there is no data, or data cannot be displayed, “Not
Available” appears in the display.
The downloaded EPG data will be erased if the either
of the following operations is executed:
–When you operate the power saving mode.
–When you turn off the unit during battery operation.
Pausing and rewinding radio
This unit always stores DAB data and you can pause and
rewind the data. When the memory becomes full, new
audio data will over write from the oldest one.
1
Press
PAUSE & REWIND
during DAB
reception.
The current broadcast mutes and the PAUSE &
REWIND indicator and the rewind time* appear in
the display.
Rewind
time
* Rewind time: delay time from the current broadcast
2
Press
PAUSE & REWIND
again until the
desired rewind time appears.
You can also rewind the current broadcast by holding
down
(
on the remote). You can adjust
the rewind time by holding down
or
(
or
on the remote).
The operation is cancelled when you:
Change channels.
Select ALL on the GUIDE DOWNLOAD menu.
Press
or
POWER
.
Hold down
(
on the remote) until the
rewind time displays “0:00” (current time).
Change a function.
Notes
When EPG is displayed, this operation is disabled. In
this case,
,
can not be operated.
Rewind time is depending on bit rate of broadcast.
128kbps DAB data is storable for about 25 minutes.
If DAB reception is poor, this function may not operate
properly.
When the memory becomes full during pause mode,
this function will be playback automatically.
PTY (Programme type)
This function indicates services by programme type, such
as NEWS, SPORTS, etc., in the PTY list, transmitted as
DAB.
If the received service or station does not transmit the
programme type, “None” appears.
Programme type
Display
Undefined
None
News
News
Current Affairs
Affairs
Information
Info
Sport
Sport
Education
Educate
Drama
Drama
Culture
Culture
Science
Science
Varied
Varied
Pop Music
Pop M
Rock Music
Rock M
Easy Listening Music
Easy M
Light Classical
Light M
Serious Classical
Classics
Other Music
Other M
Weather
Weather
Finance
Finance
Children’s programmes
Children
Social Affairs
Social
Religion
Religion
Phone In
Phone In
Travel
Travel
Leisure
Leisure
Jazz Music
Jazz
Country Music
Country
National Music
National M
Oldies Music
Oldies
Folk Music
Folk M
Documentary
Document
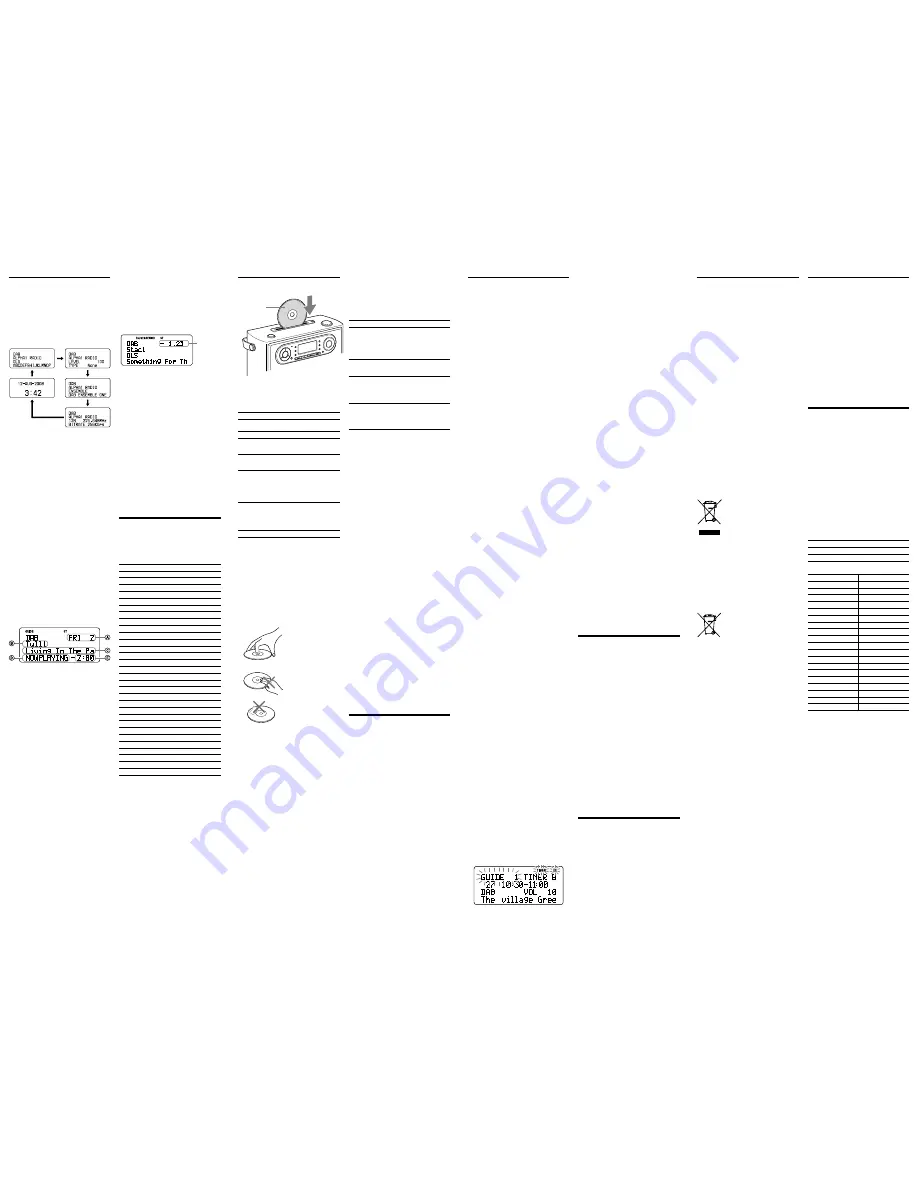
Playing a CD
Insert a disc
with the label
side facing
forward.
1
Press
CD
on the unit.
2
Slot the CD into the unit.
Total tracks and time appear in the display.
3
Press
(
on the remote).
The unit plays all the tracks once.
To
Press
Pause playback
(
or
on the
remote)
Stop playback
Go to the next track
Turn
TUNIG/SELECT
or
press
(
on
the remote)
Go back to the previous
track
Turn
TUNIG/SELECT
or
press
(
on
the remote)
Locate a point while
listening to the sound
(forward) or
(backward)
(
or
on the
remote) while playing and
hold it until you find the
point.
Locate a point while
observing the display
(forward) or
(backward)
(
or
on the
remote) in pause and hold
it until you find the point.
Remove the CD
About CD-Rs/CD-RWs
This unit is compatible with CD-Rs/CD-RWs but
playback capability may vary depending on the quality of
the disc, the recording device and application software.
Music discs encoded with copyright protection
technologies
This product is designed to play back discs that conform
to the Compact Disc (CD) standard.
Recently, various music discs encoded with copyright
protection technologies are marketed by some record
companies. Please be aware that among those discs, there
are some that do not conform to the CD standard and
may not be playable by this product.
To handle compact discs
Correct
Do not touch the surface.
Do not stick paper or
tape on the surface.
Incorrect
Handle the disc by its edge.
Note on DualDiscs
A DualDisc is a two sided disc product which mates DVD
recorded material on one side with digital audio material
on the other side. However, since the audio material side
does not conform to the Compact Disc (CD) standard,
playback on this product is not guaranteed.
Notes
Discs with non-standard shapes (e.g., heart, square,
star) cannot be played on this unit. Attempting to do so
may damage the unit. Do not use such discs.
To prevent a CD from being damaged while inserting/
removing it, set the carrying handle down when
playing a CD.
When you eject a disc, handle the disc by its edge. Do
not touch the surface.
Using the display
To check the total track number and playing time
In stop mode, press
DISPLAY
.
To check the remaining time
Press
DISPLAY
repeatedly while playing a CD.
The display changes as follows:
The current track number and playing time
The current track number and the remaining time of the
current track
The number of tracks left and remaining time on the CD
Clock display (current time)
Playing tracks repeatedly
(repeat play)
You can play tracks repeatedly in normal, shuffle or
program play modes.
1
Follow steps
1
and
2
in “Playing a CD”
2
Proceed as follows:
To repeat
Do this
A single track
1
Press
REPEAT
on the remote until
“REPEAT 1” appears.
2
Press
or
to
select the track that you want to
repeat.
3
Press
(
on the remote).
All tracks on the
CD
1
Press
REPEAT
on the remote until
“REPEAT” appears.
2
Press
(
on the remote).
Tracks in
random order
1
Start shuffle play (see “Playing
tracks in random order”).
2
Press
REPEAT
on the remote until
“REPEAT” appears.
3
Press
(
on the remote).
Programmed
tracks files
1
Program tracks (see “Creating
your own programme”).
2
Press
REPEAT
on the remote until
“REPEAT” appears.
3
Press
(
on the remote).
To cancel repeat play
Press
REPEAT
on the remote until “REPEAT” disappears
from the display.
Playing tracks in random order
(shuffle play)
You can play tracks in random order.
1
Follow steps
1
and
2
in “Playing a CD”
2
Press
MODE
until “SHUFFLE” appears in the
display.
3
Press
(
on the remote) to start shuffle
play.
To cancel Shuffle Play
Stop playing first. Then press
MODE
until “SHUFFLE”
disappears from the display.
Tip
During shuffle play, you cannot select the previous track
by pressing
(
on the remote).
Creating your own programme
(programme play)
You can arrange the playing order of up to 20 tracks on a CD.
1
Follow steps
1
and
2
in “Playing a CD”
2
Press
MODE
until “PROGRAM” appears in
the display.
3
Press
or
or turn
TUNING/SELECT
to select the track and then
press
ENTER
to add it to the programme.
Repeat to programme other tracks in the order that
you want.
After programming the first track, “STEP 1” appears,
followed by selected track.
Each time you add a track, a step number is added.
4
Press
(
on the remote) to start
Programme Play.
To cancel programme play
Stop playing first. Then press
MODE
until “PROGRAM”
disappears from the display.
To clear the programme you set
Press
CLEAR
on the remote.
Stop playback first. Then press
STOP
.
Tip
You can play the same programme again, since the
programme is saved until you eject the CD.
Connecting optional
component
To enhance your system, you can connect optional
components. Be sure to turn off the power of each
component before making any connections. For details, refer
to the instruction manual of the component to be connected.
To listen to the sound from optional
components in the unit
1
Connect the AUDIO IN jack on the unit to
the line output jack of the portable digital
music player or other components using an
audio connecting cable* (not supplied).
* For a PC: use a cable which fills the connector of
your PC. For a TV or VCR: use a cable with a stereo-
mini plug on one end and two phono plugs on the
other end. For a portable digital music player: use a
cable with a stereo-mini plug on both ends.
2
Turn the unit and the connected component on.
3
Press
AUDIO IN
and start playing sound on
the connected component.
The sound from the connected component is output
from the speakers.
To listen to the sound of the unit by optional
components
Connect the LINE OUT jack on the unit to the line in
jack of the other components.
Note
The volume and tone adjusted on this unit does not
affect the sound output from LINE OUT.
Using the timers
The unit offers three timer functions. If you use the
alarm timer or guide timer with the sleep timer, the sleep
timer has priority.
Setting the sleep timer
The sleep timer allows you to fall asleep to the sound of a
CD, the radio, or input from the AUDIO IN function. It
does this by automatically turning off the CD, the radio, or
input from the AUDIO IN function after a preset duration.
1
Press
SLEEP
while the unit is turned on.
“SLEEP” appears in the display.
2
Press
SLEEP
to set the sleep timer duration.
Each time you press
SLEEP
, the duration changes as
follows:
“AUTO*”
“60”
“30”
“20”
“10”
“OFF”.
* When you select “AUTO,” the CD stops playing in
90 minutes at most and the unit goes off
automatically. When you are listening to the radio,
the radio goes off in 90 minutes.
The unit automatically turns off when the duration time
is passed.
4 seconds after you have finished the duration setting
and released
SLEEP
, “SLEEP” appears in the display and
back light will turn off, then the sleep timer starts. The
unit will play for the duration you set, and then shut off.
Note
Even if the duration is passed, the optional component
connected with AUDIO IN is not turned off.
To change the sleep timer setting
Repeat step
2
to select the desired sleep timer setting
even after the sleep timer has been activated.
To deactivate the sleep timer
Press
POWER
. The unit will turn off.
Press
SLEEP
to set the sleep timer “OFF,” only the sleep
timer will be cancelled (the unit stays ON).
Setting the alarm timer
You can set the unit to turn on automatically at a preset time.
The timer sound is selectable from DAB, FM, CD and
BUZZER.
Make sure you have set the clock.
To set the alarm timer
1
Press
MENU
to show the menu display.
2
Turn
TUNING/SELECT
(
or
on the
remote) to select “TIMER SETTING,” then
press
ENTER
.
3
Turn
TUNING/SELECT
(
or
on the
remote) to select “TIMER A,” then press
ENTER
.
4
Turn
TUNING/SELECT
(
or
on the
remote) to select “SETTING,” then press
ENTER
.
5
Turn
TUNING/SELECT
(
or
on the
remote) to set the hour for on time, then press
ENTER
.
The minute flashes. Perform the procedure above to
set the minute.
6
Repeat step
5
to set the time to stop playing.
7
Turn
TUNING/SELECT
(
or
on the
remote) to select the desired sound from DAB,
FM, CD and BUZZER, then press
ENTER
.
8
Turn
TUNING/SELECT
(
or
on the
remote) to adjust the wake-up volume, then
press
ENTER
.
If you select DAB or FM, turn
TUNING/SELECT
(
or
on the remote) to select the desired
preset number, then press
ENTER
.
When you select the preset number “P--” during
DAB service reception, the most recent reception
service is received.
9
Press
POWER
to turn off the unit.
The unit turns on about 15 seconds before the preset
time.
If the unit is on at the preset time, the alarm timer
will not play.
To stop the alarm timer
Press
POWER
.
To deactivate the alarm timer
Perform the same procedure as in step
4
to select “OFF.”
“TIMER” and “A” turn off in the display.
Setting the guide timer
To set the guide timer
You can set up to 10 guide timers using the EPG display
based on the downloaded DAB data.
Make sure you have download the EPG.
1
Follow steps
1
and
2
in “To set the alarm
timer.”
2
Turn
TUNING/SELECT
(
or
on the
remote) to select “GUIDE,” then press
ENTER
.
EPG appears in the display. “TIMER,” “B,” “GUIDE”
and the lowest number of the guide timer on which a
programme is not stored flash in the display.
3
Turn
TUNING/SELECT
(
or
on the
remote) and press
SCAN
+
or
–
to select the
desired programme, then press
ENTER
.
4
Turn
TUNING/SELECT
(
or
on the
remote) to adjust the volume, then press
ENTER
.
If you select the stored number in step
2
, do the
following:
1
Turn
TUNIG/SELECT
(
or
on the
remote) and press
SCAN
+
or
–
to select the
desired programme, then press
ENTER
.
“SETTING” and “CANCEL” appear in the display.
2
Turn
TUNIG/SELECT
(
or
on the
remote) to select “
SETTING
,” then press
ENTER
.
3
Turn
TUNIG/SELECT
(
or
on the
remote) to adjust the volume, then press
ENTER
.
The setting is completed.
To erase the guide timer
1
Perform the same procedure as in steps
1
and
2
in “To set the guide timer,” turn
TUNING/
SELECT
(
or
on the remote) to
select the desired number and then press
ENTER
.
“SETTING” and “CANCEL” appear in the display.
2
Turn
TUNING/SELECT
(
or
on the
remote) to select “CANCEL,” then press
ENTER
.
To set the guide timer directly by EPG.
1
Following “To display the EPG” and display
the desired EPG to setting the timer.
2
Press
ENTER
.
“TIMER,” “B,” “GUIDE” and the lowest number of
the guide timer on which a programme is not stored
flash in the display.
3
Turn
TUNING/SELECT
(
or
on the
remote) to adjust the volume, then press
ENTER
.
Notes
You cannot set the guide timer if the following
indications appear.
– “TIMEOVERLAPPING”: On-time of two or more
guide timers overlap.
– “TIMER NG”: The on-time and off-time are the
same.
– “TIMER FULL”: Maximum numbers of guide timers
have been already set.
If a guide timer activates while the power is turned on,
the power is not turned off when the off-time of the
guide timer passes.
If another guide timer activates while a guide timer
sounds, the latter one has priority.
If the on-time of the alarm timer and guide timer is
same, guide timer has priority.
Other useful functions
Adjusting the tone
1
Press
POWER
to turn on the unit.
2
Press
MENU
to show the menu display.
3
Turn
TUNING/SELECT
to select “TONE
CONTROL,” then press
ENTER
to show the
setting display.
4
Turn
TUNING/SELECT
to adjust “TREBLE,”
then press
ENTER
.
5
Turn
TUNING/SELECT
to adjust “BASS,” then
press
ENTER
.
Tips
The adjustable range of “TREBLE” and “BASS” is from
–4 to +4.
You can adjust “TONE” directly by pressing
TONE
on
the remote control. Press
or
to adjust the
tone, then press
ENTER
.
Using the power saving mode
This unit has a power saving mode in AC operation.
While the AC power adaptor is connected in power off,
press
DISPLAY
for more than 2 seconds.
The following will occur:
Time display is turned off
Remote control does not work
EPG is all erased
To reset the unit
If the radio fails to function properly, do the following:
Press and hold
STOP
,
ENTER
and
POWER
at the same
time for a few seconds.
“RESET” appears in the display and the unit will revert
to the factory preset.
Precautions
Operate the unit only on the power sources specified in
“Specifications”. For battery operation, use six R14 (size
C) batteries. For AC operation, use only the supplied
AC power adaptor. Do not use any other type of AC
power adaptor.
The unit is not disconnected from the AC power
source (mains) as long as it is connected to the wall
outlet, even if the unit itself has been turned off.
Use the unit within a temperature range of 0°C to 40°C
(32°F to 104°F). If it is used in temperatures higher
than this range, numbers may appear in the display
which have nothing to do with the frequency being
received. If it is used in temperatures lower than this
range, the numbers displayed may change very slowly.
(These irregularities will disappear and there will be no
damage to the unit when the unit is used in the
recommended temperature range.)
Avoid exposure to temperature extremes, direct
sunlight, moisture, sand, dust or mechanical shock.
Never leave in a car parked in the sun.
Should any solid object or liquid fall into the unit,
disconnect the AC power adaptor and remove the
batteries, and have the unit checked by a qualified
personnel before operating it any further.
Do not drop objects such as clips or coins into the CD
slot. If this happens, disconnect the AC power adaptor
and remove the batteries, and have the unit checked by
a qualified personnel before operating it any further.
Be careful of objects/people around you when carrying
the unit by its handle.
In vehicles or buildings, radio reception may be
difficult or noisy. Try listening near a window.
Since a strong magnet is used for the speakers, keep
away personal credit cards using magnetic coding or
spring-wound watches from the unit to prevent
possible damage from the magnet.
To clean the casing, use a soft cloth dampened with a
mild detergent solution.
Disposal of Old Electrical & Electronic
Equipment (Applicable in the
European Union and other European
countries with separate collection
systems)
This symbol on the product or on its
packaging indicates that this product
shall not be treated as household waste. Instead it shall be
handed over to the applicable collection point for the
recycling of electrical and electronic equipment. By
ensuring this product is disposed of correctly, you will
help prevent potential negative consequences for the
environment and human health, which could otherwise
be caused by inappropriate waste handling of this
product. The recycling of materials will help to conserve
natural resources. For more detailed information about
recycling of this product, please contact your local Civic
Office, your household waste disposal service or the shop
where you purchased the product.
Applicable accessories: Remote control
Disposal of waste batteries
(applicable in the European Union
and other European countries with
separate collection systems)
This symbol on the battery or on the
packaging indicates that the battery provided with this
product shall not be treated as household waste. By
ensuring these batteries are disposed of correctly, you
will help prevent potentially negative consequences for
the environment and human health which could
otherwise be caused by inappropriate waste handling of
the battery. The recycling of the materials will help to
conserve natural resources.
In case of products that for safety, performance or data
integrity reasons require a permanent connection with
an incorporated battery, this battery should be replaced
by qualified service staff only. To ensure that the battery
will be treated properly, hand over the product at end-of-
life to the applicable collection point for the recycling of
electrical and electronic equipment.
For all other batteries, please view the section on how to
remove the battery from the product safely. Hand the
battery over to the applicable collection point for the
recycling of waste batteries.
For more detailed information about recycling of this
product or battery, please contact your local Civic Office,
your household waste disposal service or the shop where
you purchased the product.
If you have any questions or problems concerning
your unit, please consult your nearest Sony dealer.


