background image

Clip Operations

108

P

la

y

bac

k

The Clip Operation menu pops up.

3

Select “SHOT MARK,” “SHOT 
MARK1,” or “SHOT MARK2.”

SHOT MARK:

 To display thumbnails only 

of the frames marked with shot mark 1 
and/or shot mark 2 recorded

SHOT MARK1:

 To display thumbnails only 

of the frames marked with shot mark 1

SHOT MARK2:

 To display thumbnails only 

of the frames marked with shot mark 2

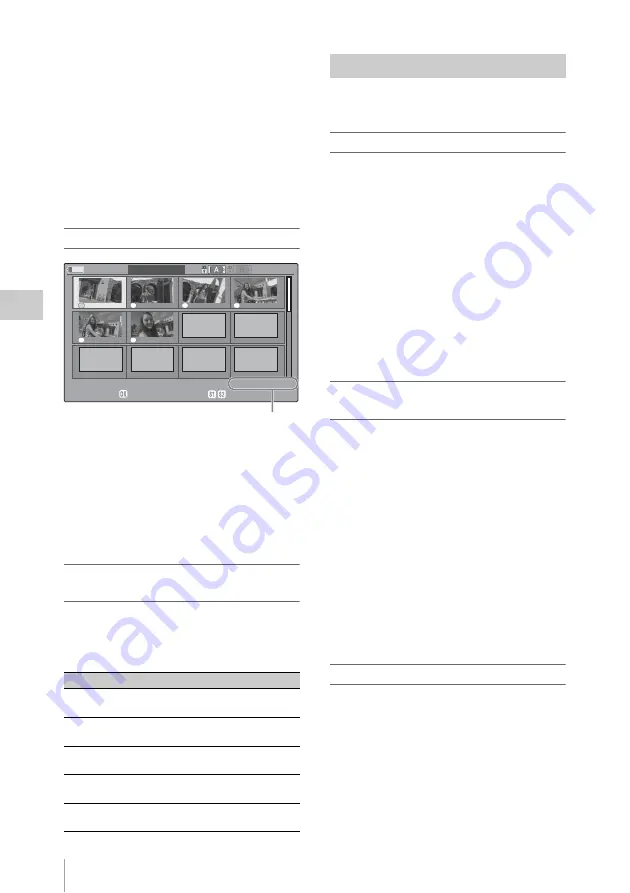
SHOT MARK screen example

The detailed information of the clip is displayed 
at the bottom of the screen.
The items other than the following are the same as 
those on the EXPAND CLIP screen:

1.

Timecode indication

The timecode of the frame at the cursor on the 
SHOT MARK screen is displayed.

Clip Operation menu on the SHOT MARK 
screen

When you select a frame on the SHOT MARK 
screen and press the joystick or the jog dial, the 
Clip Operation menu pops up to permit you 
further operations.

You can add shot marks to the clips after 
recording or delete the recorded shot marks.

Adding a shot mark in Pause mode

1

Pause the playback at the frame to 
which you wish to add a shot mark then 
press the joystick or the jog dial.

The Clip Operation menu pops up.

2

Select “SHOT MARK1 ADD” or 
“SHOT MARK2 ADD” from the Clip 
Operation menu.

The information screen for the selected frame 
appears, and a confirmation message is 
displayed below the image.

3

Select “Execute.”

Adding a shot mark on the EXPAND CLIP 
screen

1

Select the frame to which you wish to 
add a shot mark on the EXPAND CLIP 
screen then press the joystick or the jog 
dial.

The Clip Operation menu pops up.

2

Select “SHOT MARK1 ADD” or 
“SHOT MARK2 ADD” from the Clip 
Operation menu.

The information screen for the selected frame 
appears, and a confirmation message is 
displayed below the image.

3

Select “Execute.”

Deleting a shot mark

You can delete shot marks on the EXPAND CLIP 
screen 

(page 106)

 or on the SHOT MARK screen 

(page 107)

.

1

Select a frame from which you wish to 
delete the shot mark on the EXPAND 
CLIP screen or the SHOT MARK 
screen then press the joystick or the jog 
dial.

Item

Function

PAUSE

To set to Pause mode at the selected 
frame

SET INDEX PIC To specify the selected frame for the 

index frame of the clip 

(page 109)

SHOT MARK1 
DEL

To delete the shot mark 1 from the 
selected frame 

(page 108)

SHOT MARK2 
DEL

To delete the shot mark 2 from the 
selected frame 

(page 108)

DIVIDE CLIP

To divide the clip into two clips at 
the selected frame 

(page 109)

S1

S2

S2

S1

S1

S1

120min

SHOT MARK

01 : 10 : 20 : 00

01 : 10 : 30 : 00

01 : 10 : 40 : 00

01 : 10 : 50 : 00

01 : 11 : 00 : 00

01 : 11 : 10 : 00

- - -    

- - -    

- - -    

- - -    

- - -    

- - -    

0031 / 0031

01 / JAN / 2007 10 : 53 S&Q Mot i on 29 / 24 f p s
JPAN0011(1)       HQ 1080 / 24 p

TCR 01 : 12: 00 : 00

DUR 00 : 03 : 19 : 23

1

Adding/Deleting Shot Marks

Содержание XDCAM EX PMW-EX3

Страница 1: ... 3 878 038 15 1 Solid State Memory Camcorder PMW EX3 2008 Sony Corporation Operating Instructions Before operating the unit please read this manual thoroughly and retan it for future reference Printed in Japan ...

Страница 2: ... interference at his own expense You are cautioned that any changes or modifications not expressly approved in this manual could void your authority to operate this equipment All interface cables used to connect peripherals must be shielded in order to comply with the limits for a digital device pursuant to Subpart B of Part 15 of FCC Rules This device complies with Part 15 of the FCC Rules Operat...

Страница 3: ...tar possíveis danos na eventualidade de ocorrer vazamento As pilhas devem ser armazenadas em local seco e ventilado No caso de vazamento da pilha evite o contato com a mesma Lave qualquer parte do corpo afetado com água abundante Ocorrendo irritação procure auxílio médico Não remova o invólucro da pilha Mantenha fora do alcance das crianças Em caso de ingestão procure auxílio médico imediatamente ...

Страница 4: ...ctive sur les basses tensions émises par la Commission de la Communauté Européenne La conformité à ces directives implique la conformité aux normes européennes suivantes EN60065 Sécurité des produits Adaptateur secteur EN55103 1 Interférences électromagnétiques émission EN55103 2 Sensibilité électromagnétique immunité Ce produit est prévu pour être utilisé dans les environnements électromagnétique...

Страница 5: ...tzt die CE Kennzeichnung und erfüllt die EMV Richtlinie sowie die Niederspannungsrichtlinie der EG Kommission Angewandte Normen EN60065 Sicherheitsbestimmungen Netzgerät EN55103 1 Elektromagnetische Verträglichkeit Störaussendung EN55103 2 Elektromagnetische Verträglichkeit Störfestigkeit Für die folgenden elektromagnetischen Umgebungen E1 Wohnbereich E2 kommerzieller und in beschränktem Maße indu...

Страница 6: ... AC Power DC IN Power 28 Turning Power On 29 Turning Power Off 29 Setting the Clock 30 Adjusting the Viewfinder 31 Adjusting the Lens 34 Adjusting the Flange Focal Length 34 Replacing the Lens 35 Retrieving the Lens File 37 Adjusting the Grip 38 Using the Cheek Pad 38 Using the IR Remote Commander 40 Handling SxS Memory Cards 42 About SxS Memory Cards 42 Inserting Removing an SxS Memory Card 43 Sw...

Страница 7: ...e 55 Selecting the Adjustment Mode 55 Executing Auto White Balance 56 Adjusting the Black Balance 57 Displaying the Markers and Zebra Patterns 57 Displaying the Markers 57 Displaying the Zebra Patterns 58 Setting the Gain 59 Recording With Fixed Gain 59 Recording in AGC Mode 60 Setting the Electronic Shutter 60 Shooting in a Fixed Shutter Mode 60 Shooting in EX Slow Shutter Mode 62 Shooting in Aut...

Страница 8: ...nd Reference Tone 74 Recording Shot Marks 75 Rec Review 75 Changing Functions of the Assignable Buttons 76 Interval Recording 77 Preparatory Settings 77 Performing Interval Recording 78 Frame Recording 79 Preparatory Settings 79 Performing Frame Recording 79 Slow Quick Motion Recording 80 Preparatory Settings 81 Recording in Slow Quick Motion Mode 81 Freeze Mix Image Alignment 82 Shot Transition 8...

Страница 9: ...ations 103 Clip Operation Menus 103 Basic Operations of the Clip Operation Menus 104 Displaying the Detailed Information of a Clip 105 Adding the OK Mark to a Clip 105 Copying a Clip 106 Deleting a Clip 106 Displaying the EXPAND CLIP Screen 106 Displaying the SHOT MARK Screen 107 Adding Deleting Shot Marks 108 Changing the Index Frame 109 Dividing a Clip 109 Status Displays Showing the Status Scre...

Страница 10: ... 136 Connecting an External Device i LINK Connection 138 Recording the Camcorder Picture on an External Device 138 Nonlinear Editing 138 Recording External Input Signals 139 About i LINK 140 External Synchronization 141 Operating via the REMOTE Connector 142 Operating the Menus of the Camcorder 143 Functions Operable via the REMOTE Connector Camera Mode 145 Appendixes Important Notes on Operation ...

Страница 11: ...ndications 158 Error Indications 158 Warning Indications 158 MPEG 2 Video Patent Portfolio License 160 Specifications 160 General 160 Camera Block 161 Audio Block 161 Viewfinder 161 Inputs Outputs 161 Supplied Lens VCL 614B2X 162 Optional Accessories 162 Index 164 ...

Страница 12: ...t the factory Lens adaptor 1 For a lens of 2 kg 4 lb 6 oz or less Infrared Remote Commander 1 Eyepiece 1 Eyecup 1 It is attached to the eyepiece at the factory 8 5 6 4 2 8 1 9 16 C mm ft MANU AF Full MF MACRO STEADY SHOT ON AUTO OFF FOCUS AUT O IRIS 30 10 15 5 10 3 7 2 1 2 ZOOM PUSH SET SHOTMARK THUMBNAIL PLAY PAUSE STOP W m z M X x u T SUB CLIP PUSH AF REC PAUSE REC FFWD FREV PREV NEXT USB cable ...

Страница 13: ...ong recording time By utilizing an efficient compression format the PMW EX3 records high quality HD images for long recording time of approx 100 minutes in HQ mode 35 Mbps VBR or approx 140 minutes in SP mode 25 Mbps CBR on a single 32 GB SxS memory card Equipped with two SxS memory card slots the PMW EX3 makes transition seamless without any frame loss when recording is done across two cards Mult...

Страница 14: ...he PMW EX3 is equipped with three newly developed 1 2 inch Exmor CMOS Sensors which deliver excellent picture performance with full HD resolution Newly developed lens mount The PMW EX3 employs a new lens mount 1 2 inch EX Mount of superior optical characteristics in a compact size which permits the supplied standard zoom lens and an optionally available lens specifically designed for the PMW EX3 t...

Страница 15: ...ty Color viewfinder incorporated with a 3 5 inch color LCD inside Flipping up the eyepiece you can also operate the camcorder while directly viewing the LCD Expanded Focus Peaking Depth of field indicator Brightness level display Histogram indicator Four assignable buttons Zoom and recording start stop operations enabled both on the handle and the grip Long operating time with a battery pack Wide ...

Страница 16: ... computer in order to read the documents contained on the CD ROM Adobe Reader Version 6 0 or higher Memo If Adobe Reader is not installed you can download it from the following URL http www adobe com Adobe and Adobe Reader are trademarks of Adobe Systems Incorporated in the United States and or other countries To read the documents Do the following 1 Insert the CD ROM in your CD ROM drive A cover ...

Страница 17: ...MF MACRO OFF ON SDIOUT GENLOCKIN REMOTE TCOUT TCIN HDV OFF 2 1 ND FILTER FRAME GAIN STATUS MENU SEL SET CAN CEL PICTURE PRO FILE CAM ERA OFF MED IA B A PRST L ATW M H WHITE BAL BARS CA M FULL AUTO PMW EX3 CH 1 AUT O MANUAL IN EXT AUT O MANUAL IN EXT CH 2 AUDIO LEVEL SLOT SELECT AUDIO SELECT AUDIO IN A B OPEN ACCESS 1 2 3 ASS IGN LENS INFO BRT DISP HISTOGRAM A SHO T TRA NSIT ION B TC U BIT DUR ATIO...

Страница 18: ...ng knob page 31 26 Eyepiece page 33 27 Viewfinder page 31 28 Built in microphones page 72 29 REC TALLY lamp page 52 page 158 30 IR remote control receptor 31 AUDIO IN CH 1 CH 2 connectors XLR and input selection switches page 72 MIR RORIMA GE OFF ON DIS PLA Y BATT INFO ZEBRA PEAKING CO NTRAST BRIGH T LOCK RELEASE BA TT ER Y RE LE AS E COM PONENT OUT D C IN M O N IT O R O U T S V ID E O AUDIO OUT C...

Страница 19: ...ART STOP button page 52 14 REC HOLD lever page 52 Rear connector panel The connectors are located under the respective caps 1 i LINK HDV connector 4 pin S400 conforming to IEEE1394 page 138 2 TC IN timecode input connector BNC type page 141 3 TC OUT timecode output connector BNC type page 142 4 SDI OUT connector BNC type page 135 5 GENLOCK IN connector BNC type page 141 6 REMOTE connector 8 pin pa...

Страница 20: ...al Jog dial page 116 It functions accordingly when you turn it up or down or you push it horizontally It is called the jog dial in the subsequent operating instructions 9 MENU menu display ON OFF button page 116 10 STATUS button page 110 11 ND filter select switch page 54 Card slot block 1 SLOT SELECT SxS memory card select button page 44 2 ACCESS lamps page 43 3 EJECT buttons page 44 4 SxS memory...

Страница 21: ... of the tripod If they do not match the camcorder cannot be attached to the tripod securely When attaching to a tripod Use the supplied bottom plate to stabilize the camcorder Remove two screws from the bottom of the camcorder and attach the bottom plate using the two supplied screws M2 6 When attaching to the optional VCT SP2BP Insert provided spacer into the tripod receptacles near the lens moun...

Страница 22: ...e grip 1 RELEASE grip release button page 38 2 REC START STOP button page 52 Zoom Lens VCL 614B2X Supplied 15 25 40 81 2 10 3 10 mm 5 10 30 ft 15 5 8 8 5 6 4 2 8 1 9 16 C MAN U AUTO MANU AUTO PUSH AF FOC US IRIS STEADY SHOT AF Full MF MACRO OFF ON IRIS EXP AND ED FOC US REC REV IEW REL EAS E STA RT STO P MANU SERVO ZOOM LENS REMOTE 1 2 3 4 Cover of the lens control block See Note below Controls on...

Страница 23: ...gether with the unmarked button safety button to start recording 8 REC PAUSE buttons Press the X button together with the unmarked button safety button to pause recording 9 PUSH SET button four way arrow key It functions the same as the SEL SET button joystick on the camcorder 10 NEXT button 11 STOP button 12 F FWD fast forward button 13 PUSH AF button Note The SUB CLIP button does not function wi...

Страница 24: ...page 25 1 Battery remaining DC IN voltage indication M page 27 2 i LINK status indication Only when an external device is connected to the i LINK connector page 138 the status zREC or STBY of the device is displayed 3 Special recording operation status indication 4 Media status indication 5 Time data indication M page 71 On Screen Indications Indications in Camera Mode TCG 00 00 00 00 HQ 1080 24P ...

Страница 25: ...itch setting When the Direct mode is set to All the GAIN SHUTTER and WHITE BAL switches are disabled Note When the indicator of the FULL AUTO button is lit the Direct Menu operation is disabled for the functions that are forcibly set to the automatic mode in Full Auto mode page 52 To operate the Direct menu Use the joystick on the handle or the jog dial on the side operation panel 1 Press the joys...

Страница 26: ...ems appears 3 Tilt the joystick or rotate the jog dial to select the setting then press the joystick or the jog dial The menu disappears and the new setting is displayed TLCS 7 On MF ATW 4300K PPOFF ND1 F1 9 18dB SHT 1 2000 1 1 5 2 3 4 5 7 10 15 20 30 oo m 74 TLCS TLCS TLCS 7 On MF ATW 4300K PPOFF ND1 F1 9 18dB SHT 1 200 1 1 5 2 3 4 5 7 10 15 20 30 oo Example Direct menu for TLCS mode selection ...

Страница 27: ...BP U30 or BP U60 or connect a power to the DC IN connector after removing the battery pack Removing the battery pack Hold the BATTERY RELEASE button pressed slide the battery pack upward to unlock then pull it out Checking battery charge remaining To check during operation When recording or playback is in progress on the battery pack an icon to show the current battery charge level and usage time ...

Страница 28: ...ty level is set to 3 of full charge at the factory These settings can be changed with Battery Alarm page 131 of the OTHERS menu You can connect an AC power source to this camcorder by using the supplied BC U1 or an optional BC U2 Battery Charger for BP U30 U60 as an AC adaptor as shown below 1 Connect the DC power output cable of the BC U1 U2 to the DC IN connector of the camcorder 70 to 51 50 to ...

Страница 29: ...es This camcorder uses a little standby power even when the power switch is set to OFF Remove the battery pack if the camcorder will not be used for a prolonged period Set power to OFF and after 10 seconds or more remove the battery pack DC IN power Damage and malfunction to the camcorder SxS memory card may result if not powered off or the battery pack DC IN power is removed soon after powering o...

Страница 30: ... can be changed using Time Zone page 129 and Clock Set page 129 of the OTHERS menu Notes If the clock setting is cleared because of exhaustion of the backup battery while no operation power was being supplied no battery pack and no DC IN connection the Initial Setting display will be displayed when you turn the camcorder on at the next opportunity While the Initial Setting display is shown no othe...

Страница 31: ...ases the level and counterclockwise rotation decreases it Adjusting the color These adjustments can be made using the VF SET menu Adjusting the Viewfinder Caution A C C E S S S LO T S E LE C T C H 1 AU TO M AN UA L C H 2 A U D IO L E V E L A U D IO S E L E C T A B 1 2 3 LENS INFO BRT DISP HISTOGRAM ASSIG N SH O T TR AN SI TI O N A B TC U B IT D U R AT IO N 8 1 9 STEADY SHOT R E C S TA R T S TO P H...

Страница 32: ...le of the viewfinder varies simultaneously Adjust the angle for your best position after tightening the fixing lever Adjusting the angle You can adjust the angle of the viewfinder Note If the fixing lever below the handle is loose the position may vary when you adjust the angle Be sure to tighten the lever in advance To reverse the image The viewfinder can be rotated as much as 180 degrees toward ...

Страница 33: ...IS EXP AND ED FOC US REC REV IEW RELE ASE STA RT STO P MIRROR IMAGE OFF ON DISPLAY BATT INFO ZEBRA PEAKING CONTRAST BRIGHT MIRROR IMAGE switch 81 2 STEADY SHOT AF Full MF A SHO T TRA NSIT ION B T H U M N A IL F R E V P R E V S E L S E T P LA Y P A U S E S TO P C A N C E L F F W D N E X T R E C S TA R T S T O P H O L D l s L j G S J M O N IT O R V O L H L O F F 16 9 WIDE SCREEN 16 9 WIDE SCREEN LCD...

Страница 34: ... from telephoto to wide angle during zoom operations Repeated adjustment is not necessary as long as the same lens is used Adjusting the Lens Caution Adjusting the Flange Focal Length MIRR OR IMAG E OFF ON DISP LAY B ATT INFO ZEBR A PEAK ING CON TRAS T BRIG HT BAT TER Y REL EAS E COMP ONENT OUT DC IN MO NI TO R OU T S VI DE O AUDIO OUT CH 1 CH 2 A SHOT TRANS ITION B TC U B IT DUR ATION TH UM NA IL...

Страница 35: ...et the camcorder to Menu mode and select the LENS menu then Auto FB ADJ from the menu 6 Move the cursor to Execute then press the joystick or the jog dial The adjustment begins During adjustment The in progress message is displayed When the adjustment finished The completion message is displayed If the adjustment fails Check the conditions of the subject and lighting then perform the adjustment ag...

Страница 36: ...TI O N A B TC U B IT D U R AT IO N R E C S TA R T S TO P H O LD T H U M N A IL F R E V P R E V S E L S E T P LA Y P A U S E S T O P C A N C E L F F W D N E X T l s L j G S J M O N IT O R V O L H L O F F MIRR OR IMAG E OFF ON DISPLAY B ATT INFO ZEBRA PEAKING CON TRAST BRIG HT 8 5 6 4 2 8 1 9 16 C mm ft MANU AF MF Full MF MACRO STEADY SHOT ON AUTO OFF FOCUS AUT O IRIS 30 10 15 5 10 3 7 2 T W LOCK RE...

Страница 37: ... see Lens File Operations on page 153 When you mount a serial lens The corresponding file is automatically retrieved When you mount a non serial lens Retrieve the corresponding lens file using the LENS menu 1 Press the MENU button to set the camcorder to Menu mode and select the LENS menu 2 Select Recall from File then the corresponding lens file from the list 3 When the confirmation message is di...

Страница 38: ...houlder pad 1 While holding the knob depressed pull the shoulder pad outward until it stops 2 Remove the fixing plate from the bottom of the camcorder after loosening the screw 3 Pull the shoulder pad to remove 2 Remove the cable clamp for optional accessories Adjusting the Grip LOCK RELEASE S H O T T R A N S IT IO N B A T C U AUDIOIN CH 1 MIC LINE MIC 48V MIC LINE MIC 48V RELEASE EXPANDED FOCUS R...

Страница 39: ...f the camcorder To attach the DC cable clamp The supplied DC cable clamp can be attached to the frame of the cheek pad at one of the accessory screw holes on the opposite side of the pad The DC power output cable page 28 of the BC U1 U2 connected to the DC IN connector can be tied down with the clamp RA OFF MEDIA SLO T SEL ECT CH 1 AUTO MANU AL INT EXT AUTO MANU AL INT EXT CH 2 AUD IO LEV EL AUD I...

Страница 40: ...ivating the remote control function can be achieved using the Setup menu or an assignable button To activate using the menu Press the MENU button to set the camcorder to Menu mode select the OTHERS menu and set IR Remote to On For details on menu operations see Basic Menu Operations on page 116 To activate using an assignable button Assigning IR Remote to one of the assignable buttons permits you ...

Страница 41: ...attery holder with the symbol facing upward 1 then push the battery holder into the IR Remote Commander until it clicks 2 Battery may explode if mistreated Do not recharge disassemble or dispose of in fire Danger of explosion if battery is incorrectly replaced Replace only with the same or equivalent type recommended by the manufacturer When you dispose of the battery you must obey the law in the ...

Страница 42: ...car in summer or in strong sunshine under direct sunlight near a heater etc Humid or corrosive location Verify the correct direction of insertion before use When storing or carrying this media put this media in the carrying case and lock it firmly We recommend that you make a backup copy of important data Sony accepts no responsibility for any damage or loss of data you recorded Do not apply a lab...

Страница 43: ...I OUT GEN LOC KIN REM OTE TCOUT TCIN HDV OFF 2 1 ND FILTE R FRAM E GAIN STAT US MEN U SEL S ET CANC EL PICTU RE PROF ILE CAME RA OFF MEDIA B A PRST L ATW M H WHITE BAL BARS CAM FULL AUTO PM W EX3 CH 1 AUTO MANU AL IN EXT AUTO MANU AL IN EXT CH 2 AUD IO LEV EL SLO T SEL ECT AUD IO SEL ECT AUD IO IN A B OPEN ACC ESS 1 2 3 ASSIG N LENS INFO BRT DISP HISTOG RAM B TC U BI T DURA TION TH UM NA IL F RE V...

Страница 44: ...n The button is enabled on the thumbnail screen page 98 The SLOT SELECT button becomes temporarily inoperable after you press it to use another slot with an optional SxS memory card PHU 220R Professional Hard Disk Unit or MEAD MS01 SD01 Media Adaptor inside To switch the slot again wait several seconds before you press the SLOT SELECT button Formatting may be required before using an SxS memory ca...

Страница 45: ...ed using the format function of this camcorder Any card formatted with other device must be formatted again with this camcorder In Camera mode you can check the time remaining for the SxS memory cards loaded in the card slots in the viewfinder The available time for recording with the current video format recording bit rate is calculated according to the remaining space of each card and displayed ...

Страница 46: ...ration may restore an SxS memory card for which the message Could not Restore Some Clips is repeatedly displayed each time you try the restoration process 1 Copy necessary clips to another SxS memory card using the copy function page 106 of the camcorder or dedicated application software supplied 2 Format the problem SxS memory card using the format function of this camcorder 3 Return the necessar...

Страница 47: ...n 2 Open the cover of the card slot and plug the PHU connection cable into the slot 3 Pass the cable through the cable guide slot above the card slot B and close the cover 4 Secure the cable at the cable clamp 5 Turn on the PHU 220R Using an External Hard Disk Connecting Removing the PHU 220R SDIOUT GE TCIN HDV EL PICTURE PROFILE CAMERA OFF MEDIA AM TO PMW EX3 CH 1 AUTO MANUAL IN EXT AUTO MANUAL I...

Страница 48: ...e PHU 220R to be used with this camcorder must be formatted using the format function of this camcorder Any PHU 220R formatted with another device must be formatted again with this camcorder In Camera mode the remaining capacity in minutes of the PHU 220R connected via a card slot is displayed in the viewfinder The available time for recording with the current video format recording bit rate is ca...

Страница 49: ...ted a completion message is displayed for three seconds Note When formatting all data in an XQD memory card including protected images are erased and cannot be restored Connection between the camcorder and a PC To use an XQD memory card in which data have been recorded with an XDCAM EX series product insert it into the slot of the camcorder and connect between the PC and this camcorder using a USB...

Страница 50: ...red When formatting is completed a completion message is displayed for three seconds Note In formatting all data in a Memory Stick or an SDHC card including protected images are erased and cannot be restored Connection between the camcorder and a PC To use a Memory Stick or an SDHC card in which data have been recorded with an XDCAM EX series product insert it into the slot of the camcorder and co...

Страница 51: ... page 40 Note When you hold the camcorder by the grip support it from underneath with your left hand Recording Basic Operation Procedure 1 2 3 7 8 9 5 6 15 25 40 81 2 10 3 10 mm 5 10 30 ft 15 5 8 8 5 6 4 2 8 1 9 16 C MANU AUTO MAN U AUTO PUS H AF FOC US IRIS STEADY SHOT AF Full MF MACRO OFF ON SDIOUT GENLOCKIN REMOTE TCOUT TCIN HDV OFF 2 1 ND FILTER FRAME GAIN STATUS MENU SEL SET CAN CEL PICTURE P...

Страница 52: ...are using the IR Remote Commander press the REC PAUSE button simultaneously with the unmarked button Recording stops and the camcorder enters STBY recording standby mode Note Recording cannot be restarted after you stop recording until the ACCESS lamp lights in green To prevent a switching error The REC START STOP button on the handle is incorporated with the REC HOLD lever If the REC START STOP b...

Страница 53: ...hanumerics and the second four numerics is automatically generated Example ABCD0001 The first four alphanumerics can be specified as desired using Clip page 132 of the OTHERS menu before you start recording It cannot be changed after recording The second four digit number is automatically counted up in sequence Notes on Clips The XDCAM EX series products employ the FAT32 File System Thus recorded ...

Страница 54: ...e HQ 720 24P Format Indication on this camcorder HQ 1920 1080 50 interlace HQ 1080 50i SP 1440 1080 50 interlace SP 1080 50i HQ 1920 1080 25 Progressive HQ 1080 25P HQ 1280 720 50 Progressive HQ 720 50P HQ 1280 720 25 Progressive HQ 720 25P Changing the Format Note on recording format in SP 1080 24P mode Format Indication on this camcorder 00 00 OTHERS Genlock Di rect Menu i LINK I O Tr i gger Mod...

Страница 55: ...ng the camcorder to Full Auto mode page 52 forcibly activates ATW mode Assigning the ATW on off function to an assignable button permits you to independently activate deactivate ATW when Full Auto mode is off For details on the assignable buttons see Changing Functions of the Assignable Buttons on page 76 Using the Direct menu When you press the DISPLAY BATT INFO button the current adjustment mode...

Страница 56: ...nt in a memory mode the adjusted value is stored in memory A or B selected in step 1 When you execute the adjustment in ATW mode adjustment in ATW is resumed If auto white balance adjustment fails An error message is displayed on the screen for approximately three seconds If the error message is displayed try auto white balance adjustment again If the error message continues to be displayed after ...

Страница 57: ...ton to set the camcorder to Menu mode display the VF SET menu with and select Marker from the menu Activating the marker indications Set Setting to On then turn the markers on off independently No marker is displayed when Setting is Off Assigning the Marker on off function to one of the assignable buttons permits you to operate Setting On Off by pressing the button For the assignable buttons see C...

Страница 58: ...ttern indication on off Changing the zebra pattern Using Zebra of the VF SET menu you can change the zebra pattern to be displayed Press the MENU button to set the camcorder to Menu mode display the VF SET menu with and select Zebra from the menu TCG 00 00 00 00 120min STBY Example 95 TCG 00 00 00 00 120min STBY TCG 00 00 00 00 120min STBY Example 4 3 TCG 00 00 00 00 120min STBY Displaying the Zeb...

Страница 59: ...the GAIN switch Note When AGC mode is on the fixed gain cannot be selected The gain value at each of the switch positions are set at the factory are as follows L 0 dB M 9 dB H 18 dB These values can be changed in the range of 3 dB to 18 dB using the CAMERA SET menu 00 00 VF Peaking Marker Zebra Display On Of f VF SET Zebra Select Zebra1 Level 1 70 B B B B B Setting the Gain Recording With Fixed Ga...

Страница 60: ... manually as required Fixed Shutter manual adjustment modes Recording is made with a specified shutter speed accumulation time Standard modes Speed mode Angle mode These modes may be especially effective when you wish to record a quick moving subject with little blurring You can select Speed mode or Angle mode In Angle mode you can specify the shutter speed by setting the shutter angle ECS Extende...

Страница 61: ...on off with the Direct menu if the SHUTTER switch is set to ON If the SHUTTER switch is set to OFF only switching between Auto Shutter and Shutter OFF The Direct menu cannot be selected when the camcorder is in Full Auto mode page 52 or when the EX Slow Shutter mode is set to On Frame rate Shutter speed sec 60i 60P 50i 50P 1 60 1 100 1 120 1 125 1 250 1 500 1 1000 1 2000 24P 1 32 1 48 1 50 1 60 1 ...

Страница 62: ...en Full Auto mode is off you can turn it on by setting the IRIS switch to AUTO You can select the target level to make the picture brighter or darker of the Auto Iris control The gain control in AGC mode and the shutter speed control in Auto Shutter mode are adjusted in synchronization To adjust the target level with the Setup menu Set Level of TLCS page 122 of the CAMERA SET menu Shooting in EX S...

Страница 63: ...ower Zoom Servo mode You can adjust the zoom by pressing the power zoom lever or zoom button on the handle The supplied IR Remote Commander and optional lens remote controller can also be used The current zoom position is displayed on the screen in the range of 0 Wide to 99 Tele when you press the DISPLAY BATT INFO button The numerical indication can be changed to that in a bar by changing the Zoo...

Страница 64: ...MO NIT OR VO L H L OF F AUDIO IN CH 1 MIC LINE MIC 4 8V MIC LINE MIC 4 8V CH 2 IRIS EXP AND ED FOC US REC REV IEW RELE ASE STA RT STO P MANU SERVO ZOOM ZOOM switch 15 25 40 81 2 10 3 10 mm 5 10 30 ft 15 5 8 8 5 6 4 2 8 1 9 16 C MANU AUTO MANU AUTO PUSH AF FOCU S IRIS STEA DY SHOT AF Full MF MACR O OFF ON SDI OUT GEN LOC KIN REM OTE TCOUT TCIN HDV OFF 2 1 ND FILTE R FRAM E GAIN STAT US MEN U SEL S ...

Страница 65: ... Full MF Full Manual Focus mode Only adjustment with the focus ring is effective in this mode You can adjust the focus from to the minimum length by rotating the ring The ring rotates endlessly in the both directions MF Manual Focus mode In this mode auto focus can be temporarily activated by pushing the PUSH AF button The MF Assist function can be used for assistance AF Auto Focus mode Auto focus...

Страница 66: ...R FRAM E GAIN STAT US MEN U SEL S ET CANC EL PICTU RE PROF ILE CAME RA OFF MEDIA B A PRST L ATW M H WHITE BAL BARS CAM FULL AUTO PM W EX3 CH 1 AUTO MANU AL IN EXT AUTO MANU AL IN EXT CH 2 AUD IO LEV EL SLO T SEL ECT AUD IO SEL ECT AUD IO IN A B OPEN ACC ESS 1 2 3 ASSIG N LENS INFO BRT DISP HISTOG RAM A SHOT TRANS ITION B TC U BI T DURA TION 16 9 WIDE SCREEN AF FULL MF 15 25 40 81 2 10 3 10 mm 5 10...

Страница 67: ...he FOCUS switch to AUTO to set the camcorder to AF mode In this mode focus is always adjusted automatically The range index of the ring is invalid in AF mode Focusing in AF mode In AF mode the camcorder continuously checks changes of images and activates auto focusing each time it detects a change The auto focus adjustment is terminated when the subject comes into focus and the camcorder stands by...

Страница 68: ...t function ON or OFF The setting of the Steady Shot function is displayed in the viewfinder Note If the camcorder is fixed to a tripod for stable condition deactivate the Steady Shot function Using Macro Mode AF FULL MF 15 25 40 81 2 10 3 10 mm 5 10 30 ft 15 5 8 C MANU AUTO MANU AUTO MACRO FOCUS PUSH AF IRIS STEADY SHOT OFF ON 8 5 6 4 2 8 1 9 16 MACRO switch Eliminating Picture Blurring Steady Sho...

Страница 69: ...ou activate the flicker reduction function In such cases use the electronic shutter Recommended settings for flicker reduction Frequency Alway set Frequency to the power supply frequency value appropriate for the shooting area Mode It is recommended to set Mode to Off when shooting outdoors or under lighting that does not cause flicker It can be also Auto but the compensation may not be done prope...

Страница 70: ...ardless of the Run setting if you set Mode of Timecode to Preset with the TC UB SET menu If you set it to Clock the timecode advances in Regen mode Specify the timecode to be recorded with Timecode and TC Format of the TC UB SET menu For details on menu operations see Basic Menu Operations on page 116 Setting the timecode to a desired value 1 Set Mode of Timecode to Preset 2 Specify the timecode v...

Страница 71: ...t digits as desired 1 Set Mode of Users Bit to Fix 2 Specify the values on the Setting line and select SET You can set hexadecimal digits A to F with the corresponding alphabetics Recording the current date as the user bits Set Mode of Users Bit to Date The current date is displayed on the Setting line In Camera mode pressing the DISPLAY BATT INFO button displays the time data on the screen The in...

Страница 72: ... KIN REM OTE TCOUT TCIN HDV OFF 2 1 ND FILTE R FRAM E GAIN STAT US MEN U SEL S ET CANC EL PICTU RE PROF ILE CAME RA OFF MEDIA B A PRST L ATW M H WHITE BAL BARS CAM FULL AUTO PM W EX3 CH 1 AUTO MANU AL IN EXT AUTO MANU AL IN EXT CH 2 AUD IO LEV EL SLO T SEL ECT AUD IO SEL ECT AUD IO IN A B OPEN ACC ESS 1 2 3 ASSIG N LENS INFO BRT DISP HISTOG RAM B TC U BI T DURA TION TH UM NA IL F RE V PR EV SE L S...

Страница 73: ...s set to a value different from the playback frame rate You can monitor the sounds being recorded with the headphones connected to the headphone connector stereo mini jack Note The built in speaker is disabled in Camera mode To adjust the audio monitoring volume Use the MONITOR VOL buttons Pressing the button increases the volume and pressing the button decreases it To muffle the sound set it to t...

Страница 74: ...ss it cannot be switched to the color bar picture even if you press the BARS CAM button You can switch the color bar picture to the camera picture The color bar mode cannot be selected in Slow Quick Motion mode and EX Slow Shutter mode Outputting the Color Bars and Reference Tone 15 25 40 10 3 10 mm 5 10 30 ft 15 5 8 8 5 6 4 2 8 1 9 16 C MANU AUTO MANU AUTO PUSH AF FOCU S IRIS MACR O OFF ON SDI OU...

Страница 75: ...er recording is finished press the REC REVIEW button or the assignable button to which you assigned the Rec Review function Playback of the specified block of the clip begins In Rec Review the last 3 seconds 10 seconds or the entire part of the clip is displayed depending on the Rec Review setting page 121 of the CAMERA SET menu It is set to 3 seconds at the factory Rec Review is terminated at the...

Страница 76: ...from the OTHERS menu Changing Functions of the Assignable Buttons T W OP EN ASSIG N 4 OFF ON SHUT TER WHT BAL AC CE SS SL OT SE LE CT CH 1 AU TO MA NU AL INT EX T AU TO MA NU AL INT EX T CH 2 AU DI O LE VE L AU DI O SE LE CT AU DI O IN A B 1 2 3 LENS INFO BRT DISP HISTOG RAM ASSIGN OFF 2 1 ND FILTER FRAM E GAIN STATU S MENU SEL S ET CANC EL PICTU RE PROF ILE CAME RA OFF MEDIA B A PAST L ATW M H WH...

Страница 77: ... the OTHERS menu Interval Recording cannot be performed if Video Format of the OTHERS menu is set to SP 1080 24P Before starting Interval Recording make the necessary settings on the CAMERA SET menu in advance Function Contents Marker All marker indications safety zone marker center marker aspect marker guide frames on off Last Clip DEL Last clip delete ATW ATW function on off Rec Review Rec Revie...

Страница 78: ...The flashing Interval Rec on the screen is now steadily lit Notes You cannot change the Interval Time and Number of Frames settings while Interval Recording is in progress To change them pause recording The Freeze Mix function and Rec Review function cannot be used in Interval Recording mode The timecode is recorded in Rec Run mode page 70 during Interval Recording Some extra frames may be recorde...

Страница 79: ...the Number of Frames value for one recording session You can select from among 2 6 and 12 when Video Format page 53 is set to 720 60P or 720 50P With other video formats you can select from among 1 3 6 and 9 4 Exit the menu When the preparatory settings are completed you can start recording 1 Press the REC START STOP button Recording in Frame Rec mode begins The Frame Rec indication stops flashing...

Страница 80: ... a quick motion effect in playback and recording with the frame rate between 25 and 60 fps provides a slow motion effect in playback Notes Slow Quick Motion cannot be activated simultaneously with Frame Recording or Interval Recording When you activate Slow Quick Motion Frame Recording and Interval Recording are forcibly set to Off No audio recording is made if the recording frame rate is set to a...

Страница 81: ...u cannot change the frame rate setting while Slow Quick Motion recording is in progress To change it pause the recording The timecode is recorded in Rec Run mode during Slow Quick Motion recording page 70 Stopping recording Press the REC START STOP button Slow Quick Motion recording stops Note When recording at a low speed frame rate it may take time until recording stops after you press the REC S...

Страница 82: ... image with which you want align The image where you pressed the ASSIGN button in step 3 is displayed as a still picture over the current camera picture Canceling Freeze Mix status You can cancel it with the ASSIGN button to which you assigned Freeze Mix or the REC START STOP button When you cancel Freeze Mix status by pressing the ASSIGN button the normal camera picture is restored When you cance...

Страница 83: ...n set the ZOOM switch to SERVO see page 63 The zoom will not be shifted with the MANU setting If you register a focus position in a macro area with the MACRO switch ON the focus may not be shifted to the registered position if a shot transition is executed with the MACRO switch set to OFF Shot transition operation buttons and indications For shot transition operations use the three TRANSITION oper...

Страница 84: ...for the zoom moving from the TELE end to the WIDE end at a certain speed The setting range is from 1 to 10 The larger the number you set the higher speed Time Speed Set whether to specify the duration of a transition by time or by speed of zoom transition Trans Curve Select the transition pattern The corresponding icon is displayed in the shot transition information area Preparatory Settings TCG 0...

Страница 85: ...ered to the pressed button The registered camera settings are maintained until you register them next Checking the registered settings Shot 1 Press the MODE button to display Check in the shot transition operation area 2 Press the A or B button whichever you assigned to the shot you wish to check The selected shot camera settings or conditions takes effect on the picture on the screen With this op...

Страница 86: ...he B button when you wish to start the shot transition When Rec Link is Shot B the camcorder automatically performs the shot transition to the camera settings registered for Shot B It is not necessary to press the B button Making a transition from Shot B to Shot A When Rec Link is set to Off or Shot A a shot transition from Shot B to Shot A is possible 1 Press the MODE button to display Check in t...

Страница 87: ...assignable button it is not necessary to set Fade In to On with the menu Fade In Type Select the initial status of the fade in White To fade in from a white screen Black To fade in from a black screen Fade In Time Set the duration 1 2 3 5 10 sec of fade in 3 Specify the fade out conditions Fade Out Set this to On to end recording with fade out When you operate the function using an assignable butt...

Страница 88: ...de Out to On with the menu the camcorder automatically enters Fade out standby status when it is set to Recording mode When you press the ASSIGN button to which you assigned the Fader function after starting recording the camcorder enters fade out standby status Press the REC START STOP button to start fading out of the camera picture The fading out process begins When the fading out process you s...

Страница 89: ...layed 3 Operating the jog dial or the joystick select SEL from the PICTURE PROFILE menu then select the picture profile number PP1 to PP6 to operate 4 Operating the jog dial or the joystick select SET and make the settings of the picture profile items Picture Profiles Registering the Customized Settings as a Picture Profile 15 25 40 10 3 10 mm 5 10 30 ft 15 5 8 8 5 6 4 2 8 1 9 16 C MANU AUTO MANU ...

Страница 90: ...erating the joystick or the jog dial For details on the Direct menu see Direct Menu Operation on page 25 You can copy the settings of a selected picture profile to another picture profile 1 Select the source picture profile by proceeding from step 1 to 3 of Selecting a Picture Profile using the PICTURE PROFILE menu on page 90 2 Select Copy from SET of the PICTURE PROFILE menu The picture profile n...

Страница 91: ...Picture Profiles 91 Recording 3 Select Execute Resetting begins When resetting ends the completion message is displayed for three seconds and the original screen display is restored ...

Страница 92: ...G B B R B G 99 to 99 0 Finely adjust the color phase for the entire picture area by independently setting each of the factors Color Correction Adjusting the color phase in a specific area Setting On Off Set to On to enable the color phase adjustment for a specific area Simultaneous adjustment of multiple areas is not allowed You can adjust it for one area only Area Detection1 Execute Cancel Execut...

Страница 93: ...details to be applied to the picture Setting On Off Set to On to apply the details to the video signal Level 99 to 99 0 Adjust the detail level Frequency 99 to 99 0 Set the center frequency of the details Setting the center frequency higher decreases the details and setting it lower increases the details Crispening 99 to 99 0 Adjust the noise suppression level When you set it to a higher level les...

Страница 94: ...Note When Area Detection is executed this setting is automatically changed to the value equivalent to that of the detected color Width 0 to 90 40 Adjust the width of the color phase of the target area for Skin Tone Detail control Note When Area Detection is executed the Width setting automatically returns to 40 Knee Adjusting the knee level Setting On Off Set to On to compress the high luminance a...

Страница 95: ...et effect CINE2 This gives almost the same results as CINE1 Select this when you wish to obtain 100 video signals for editing or other purposes CINE3 This emphasizes the contrast between light and dark more than CINE1 and CINE2 and also accentuates gradation changes on the black side CINE4 This emphasizes the contrast in dark areas more than CINE3 Contrast in dark areas is weaker and contrast in b...

Страница 96: ...card To delete using the Setup menu 1 Select Last Clip DEL from Clip of the OTHERS menu 2 Select Execute The confirmation message is displayed 3 Select Execute again The last recorded clip is deleted from the memory card For details on menu operations see Basic Menu Operations on page 116 Using the Setup menu you can delete all recorded clips from the memory card in the selected card slot 1 Select...

Страница 97: ... to overwrite the file is displayed If there is not sufficient space on the memory card an error message is displayed When you retrieve the stored setup file the camcorder settings are changed according to the file 1 Insert the memory card on which you stored the setup file into a card slot Check that the corresponding memory card icon is displayed on the screen If a memory card in the other slot ...

Страница 98: ...ata for the clip at the cursor are displayed in 1 to 8 1 Date and starting time of recording 2 Clip name 3 OK mark Displayed only if the selected clip is marked OK page 105 4 AV independent file icon Displayed if the selected clip is an AV independent file This indicates that the clip is an AV independent file such as those added to the memory card using a computer Not all operations and indicatio...

Страница 99: ...2 Press the PLAY PAUSE button Playback starts from the beginning of the selected clip The clips after the selected clips are played back in sequence When playback of the last clip ends the camcorder enters PAUSE still picture mode at the last frame of the last clip 15 25 40 10 3 10 mm 5 10 30 ft 15 5 8 8 5 6 4 2 8 1 9 16 C MANU AUTO MANU AUTO PUSH AF FOCU S IRIS MACR O OFF ON SDI OUT GEN LOC KIN R...

Страница 100: ...ition are displayed Display example Playback mode 7 Audio levels The audio levels in recording are displayed Pausing the playback Press the PLAY PAUSE button The playback is restarted by pressing the button again Switching to high speed playback The camcorder permits you to play clips at 4 times or 15 times normal speed in the forward or reverse direction Audio is muffled in high speed playback To...

Страница 101: ...recorded audio signals through the built in speaker or connected headphones With the headphones connected to the headphone jack the built in speaker is turned off Press the MONITOR VOL buttons to adjust the sound volume The level bar is displayed during adjustment You can select audio channel s to be monitored with Audio Output page 123 of the AUDIO SET menu Adding shot marks during playback In th...

Страница 102: ...Playing Back Clips 102 Playback Press the STOP button Playback mode is canceled showing any external input or a blue screen To display the thumbnail screen press the THUMBNAIL button ...

Страница 103: ... page 104 Still picture in Pause mode page 104 CANCEL CANCEL DISP CLIP INFO DISP CLIP INFO OK MARK ADD OK MARK ADD OK MARK DEL SHOT MARK1 ADD COPY CLIP SHOT MARK2 ADD DELETE CLIP EXPAND CLIP SHOT MARK SHOT MARK1 SHOT MARK2 EXPAND CLIP EXPAND CLIP screen page 107 SHOT MARK screen page 108 CANCEL CANCEL EXPAND COARSE PAUSE EXPAND FINE SET INDEX PIC PAUSE SHOT MARK1 DEL SET INDEX PIC SHOT MARK2 DEL S...

Страница 104: ...or the jog dial with a still picture displayed in Pause mode calls the Clip Operation menu for the clip in Pause mode Basic Operations of the Clip Operation Menus Item Function DISP CLIP INFO To display the CLIP INFO screen for the clip page 105 OK MARK ADD To add the OK mark to the clip page 105 OK MARK DELETE To delete the OK mark from the clip page 105 COPY CLIP To copy the clip to another SxS ...

Страница 105: ...1 Timecode at the recording ending point 12 Duration of the clip 13 Recorded audio channels By adding the OK mark to clips you can obtain a thumbnail screen of only the marked clips when you press the THUMBNAIL button Clips with the OK mark cannot be deleted or divided To delete or devide the clip remove the OK mark Adding the OK mark 1 Select OK MARK ADD from the Clip Operation menu The CLIP INFO...

Страница 106: ...e destination memory card Examples ABCD0002 1 if ABCD0002 exists ABCD0002 2 if ABCD0002 1 exists ABCD0005 4 if ABCD0005 3 exists If parenthetical numbers 1 to 9 already exist as the result of repeated copying copying to that card cannot be done any more A warning message is displayed if there is not sufficient space on the destination SxS memory card Replace the SxS memory card with one with suffi...

Страница 107: ...sor is displayed Clip Operation menu on the EXPAND CLIP screen When you select a frame on the EXPAND CLIP screen and press the joystick or the jog dial the Clip Operation menu pops up to enable further operations When one or more shot marks are recorded for a single clip the SHOT MARK screen permits you to display only the marked frames as the thumbnail images on the screen 1 Select a clip on the ...

Страница 108: ...n screen for the selected frame appears and a confirmation message is displayed below the image 3 Select Execute Adding a shot mark on the EXPAND CLIP screen 1 Select the frame to which you wish to add a shot mark on the EXPAND CLIP screen then press the joystick or the jog dial The Clip Operation menu pops up 2 Select SHOT MARK1 ADD or SHOT MARK2 ADD from the Clip Operation menu The information s...

Страница 109: ... thumbnail screen You can divide a clip into two different clips at the frame you select on the EXPAND CLIP screen page 106 or the SHOT MARK screen page 107 1 Select the frame at which the clip is to be divided on the EXPAND CLIP screen or the SHOT MARK screen then press the joystick or the jog dial The Clip Operation menu pops up 2 Select DIVIDE CLIP from the Clip Operation menu The information s...

Страница 110: ...TATUS button again The status screen display is canceled Also when the S Q Motion dial is pressed or when an external device is connected to the REMOTE connector the status display disappears Status Displays Showing the Status Screens 15 25 40 10 3 10 mm 5 10 30 ft 15 5 8 8 5 6 4 2 8 1 9 16 C MANU AUTO MANU AUTO PUSH AF FOCU S IRIS MACR O OFF ON SDI OUT GEN LOC KIN REM OTE TCOUT TCIN HDV OFF 2 1 N...

Страница 111: ...he color temperature of white memory B is detected stored when you execute the auto white balance operation in Memory B mode A The color temperature stored in white memory A is indicated The color temperature of white memory A is detected stored when you execute the auto white balance operation in Memory A mode PRST The color temperature set as the preset white is indicated The color temperature o...

Страница 112: ...annel indications at the left of the meters are CH 1 and CH 2 regardless of the Output CH setting of the AUDIO SET menu In other conditions the meters do not function Output CH Output channel setting The Output CH setting of the AUDIO SET menu is displayed Headphones Headphone output The output audio channel s for the headphones is are displayed The Monitor CH setting of the AUDIO SET menu is vali...

Страница 113: ...mat NTSC or PAL of the analog composite signal being fed from the MONITOR OUT connector and S VIDEO connector is displayed Down Converter Down converter setting of the SD output The Down Converter setting Squeeze Edge Crop Letterbox of the VIDEO SET menu is displayed i LINK I O i LINK I O status The i LINK I O setting Enable Disable of the OTHERS menu is displayed The functions assigned to the ass...

Страница 114: ...f the batteries of the PHU 220R units connected via the respective card slots are displayed Media A Media B Remaining space and available recording time The remaining space of the SxS memory cards in the respective card slots are indicated on the meters At the right the available time for recording if done at the current bit rate is displayed in minutes The time indication will be min if no SxS me...

Страница 115: ...tting the items related to video outputs page 124 VF SET menu For setting the items related to the displays in the viewfinder page 125 TC UB SET menu For setting the items related to timecodes and user bits page 127 LENS menu For setting the items related to lenses page 127 OTHERS menu For setting the other items page 129 Menu Configuration and Detailed Settings Overview of the Setup Menus Setup M...

Страница 116: ...Button Tally Hours Meter IR Remote Battery Alarm Battery INFO Genlock Direct Menu i LINK I O Trigger Mode Country Video Format Clip Format Media Version Basic Menu Operations 15 25 40 10 3 10 mm 5 10 30 ft 15 5 8 8 5 6 4 2 8 1 9 16 C MANU AUTO MANU AUTO PUSH AF FOCU S IRIS MACR O OFF ON SDI OUT GEN LOC KIN REM OTE TCOUT TCIN HDV OFF 2 1 ND FILTE R FRAM E GAIN STAT US MEN U SEL S ET CANC EL PICTU R...

Страница 117: ...al or tilt the joystick back or forth to set the cursor to the menu item you wish to set then press the dial or the joystick to proceed The setting area appears to the right of the menu item selection area and the cursor moves to the top of its subitems When you select an item that has no subitems and to be only On Off or switched the choices are displayed to the right of the item In this case pro...

Страница 118: ...g function is executed For an item that requires your confirmation When you select an item that you must confirm before execution in step 3 the menu display temporarily disappears and a confirmation message is displayed Following the instructions of message specify whether to execute or cancel Entering a character string When you select an item for which a character string such as a time value or ...

Страница 119: ...gh 3 0 3 6 9 12 18 dB Set the gain level to be used when the switch is set to the H position Shutter Specifying operating conditions of the electrical shutter Mode Speed Angle ECS SLS Select modes of the Electronic Shutter Shutter Speed 1 100 Set the shutter speed when Speed mode is selected The available setting values vary depending on the video format being selected see page 60 Shutter Angle 18...

Страница 120: ...adjust the focus automatically after you roughly adjust it manually Color Bar Type Selecting the types of color bar Multi 75 100 Select the type of color bars displayed when you press the BARS CAM button Multi To output multiformat color bars 75 To output 75 color bars 100 To output 100 color bars Flicker Reduce Setting Flicker Compensation Mode Auto On Off Set the operation of the Flicker Reducti...

Страница 121: ... function on off Frame Rate 1 to 30 1080 size 1 to 60 720 size Set the recording frame rate in Slow Quick Motion recording Rec Review Setting the playback time for Rec Review 3 sec 10 sec Clip Set the time to play the last recorded clip using the Rec Review function 3 sec Last 3 seconds 10 sec Last 10 seconds Clip Entire duration of the clip Fader Setting the fade in fade out functions Fade In On ...

Страница 122: ...18 dB Set the maximum gain in AGC AGC Point F5 6 F4 F2 8 Set the iris point for switching to auto iris and auto shutter control when AGC is on Auto Shutter On Off Turn the Auto Shutter control function on off A SHT Limit 1 100 1 150 1 200 1 250 Set the maximum shutter speed in Auto Shutter control A SHT Point F5 6 F8 F11 F16 Set the iris point for switching auto iris and auto shutter control when ...

Страница 123: ... CH 1 gain and the CH 2 gain independently according to the respective levels 1KHz Tone On Off Turn the 1 kHz reference tone signal on off Wind Filter CH 1 On Off Turn the wind filter for channel 1 on off Wind Filter CH 2 On Off Turn the wind filter for channel 2 on off EXT CH Select CH 1 CH 1 CH 2 CH 1 To record channel 1 audio input on both channels 1 and 2 CH 1 CH 2 To record channel 1 and chan...

Страница 124: ...nd S VIDEO connectors Note On the thumbnail EXPAND CLIP and SHOTMARK screens the same menus and status indications as those in the viewfinder are displayed regardless of the setting of this item Markers or patterns are not displayed regardless of the setting of this item Setup Setting 7 5 setup for the composite signal On Off Set whether to add 7 5 setup to the output signal from the MONITOR OUT a...

Страница 125: ...y Normal High When you select Nornal for Type select the frequency to be detected by the VF DETAIL circuit Marker Setting the markers added to pictures in the viewfinder Setting On Off Turn all marker indications on off in combination Safety Zone On Off Turn the safety marker on off Safety Area 80 90 92 5 95 Select the size ratio to the entire screen of the safety zone marker Center Marker On Off ...

Страница 126: ...cation on off Battery Remain On Off Turn the battery remaining DC input voltage indication on off Media Remain On Off Turn the media remaining indication on off TLCS Mode On Off Turn the TLCS mode indication on off Steady Shot On Off Turn the Steady Shot indication on off only when the exclusive lens is mounted Focus Mode On Off Turn the focus operation mode indication on off only when an auto foc...

Страница 127: ...etting the user bits Mode Fix Date Set the user bit mode Fix To use a desired fixed value as the user bits Date To use the current date Setting Set the user bits to a desired value TC Format Setting the timecode format DF NDF Set the timecode format DF Drop frame NDF Non drop frame LENS Menu LENS Menu items Subitems and setting values Contents Auto FB ADJ Adjusting the flange focal length Execute ...

Страница 128: ... V modulation shading H SAW 99 to 99 0 Compensate the H Saw shading H PARA 99 to 99 0 Compensate the H Para shading V SAW 99 to 99 0 Compensate the V Saw shading V PARA 99 to 99 0 Compensate the V Para shading Shading CH EX R G B Select the target channel for the shading adjustments when an extender is in use M VMOD EX 99 to 99 0 Adjust the master V modulation shading when an extender is in use H ...

Страница 129: ...inutes Note The default setting is different among the sales areas United States and Canada 5 00 Europe area 0 00 Oceania 10 00 Clock Set Setting the built in clock Date Time Set the current time and date 12H 24H 12H 24H Select the display mode of time 12H 12 hour mode 24H 24 hour mode Date Mode YYMMDD MMDDYY DDMMYY Select the display mode of the date YYMMDD In sequence of year month day MMDDYY In...

Страница 130: ...ns Info For turning the depth of field indication on off Off No function 2 Off Marker Last Clip DEL ATW Rec Review Rec Freeze Mix Expanded Focus Spotlight Backlight IR Remote Shot Mark1 Shot Mark2 Fader VF Mode BRT Disp Histogram Lens Info 3 Off Marker Last Clip DEL ATW Rec Review Rec Freeze Mix Expanded Focus Spotlight Backlight IR Remote Shot Mark1 Shot Mark2 Fader VF Mode BRT Disp Histogram Len...

Страница 131: ...etails see Formats and Limitations of Outputs on page 151 GL H Phase 999 to 999 0 Set the H phase phase of the horizontal sync signal for genlock operation H Advance 0H 90H Adjust the output phase with respect to the reference signal 0H The phase of the output signal is to match that of the reference signal 90H When the reference signal is SD the phase of HD output is to advance 90H There will be ...

Страница 132: ...720 25P Select the video format bit rate picture size frame rate and scan system in combination Bit rate HQ or SP Picture size 1080 or 720 Frame rate 24 25 30 50 or 60 Scan system i interlace or P progressive Note The default setting is different among the sales areas United States and Canada HQ 1080 60i Other areas HQ 1080 50i Clip Setting for clip name or deletion Title Prefix nnn_ nnn least thr...

Страница 133: ... 1 If clips cannot be played back updating the managerial file on the card may improve the condition Version Showing the version of this unit Vx xx The current software version of the camcorder is displayed OTHERS Menu items Subitems and setting values Contents ...

Страница 134: ...s down converted for output have the following restrictions Connecting External Devices Connecting External Monitors SDI OUT GEN LOC KIN REM OTE TCOUT TCIN HDV COM PONE NT OUT DC IN MONIT OR OUT SVIDEO AUDI O OUT CH 1 CH 2 LOC K REL EAS E TH UM NA IL F RE V PR EV SE L SE T PL AY PA US E ST OP CA NC EL F FW D NE XT RE C ST AR T ST OP HO LD l s L j G S J M ON IT OR VO L H L OFF SH OT TR AN SI TIO N ...

Страница 135: ...YPbPr SDI Out Select page 124 of the VIDEO SET menu you can change the setting so that it outputs down converted analog component signals for monitoring The HD SD switching becomes valid also on the SDI OUT connector in synchronization Use the supplied component video cable for connection To display the menus and status information on the connected monitor Set YPbPr SDI Out Display page 124 of the...

Страница 136: ...et SxS Support With a Windows computer check that a Removable Disk appears in My Computer This indicates normal status With a Macintosh computer an icon is displayed on the menu bar To connect with a USB cable When you connect the camcorder or the SBAC US10 SxS Memory Card USB Reader Writer optional using the supplied USB cable the memory card in the slot is acknowledged as an extended drive by th...

Страница 137: ...y card icon on the desktop to Trash If the SxS memory card icon is located on Finder click on the eject icon on its side Note Do not select Card Power Off from the SxS memory card icon displayed on the menu bar Using the supplied application software To copy clips to the local disk of a computer the dedicated application software on the supplied CD ROM must be used Install the software to your com...

Страница 138: ...tandby status For operations of the external device refer to the operation manual of that device 3 Set the camcorder to Camera mode by setting the power switch to CAMERA 4 Press the REC START STOP button The external device starts recording in synchronization The status of the external device is displayed in the i LINK status indication area page 24 in the viewfinder Notes Operation may be differe...

Страница 139: ...440 1080 50i can be recorded when set to SP 1080 50i Recording is not allowed with other combinations of Video Format and input signals 2 Set i LINK I O page 131 of the OTHERS menu to Enable 3 Set the camcorder to Media mode 4 Press the STOP button to set the camcorder to STOP mode The input image is displayed in the viewfinder and the monitor connected via the COMPONENT OUT connector or MONITOR O...

Страница 140: ...ed by IEEE the Institute of Electrical and Electronics Engineers Inc Note The camcorder can be connected to one device with the i LINK cable DV cable When you connect with a device that has two or more i LINK connectors refer to the operating instructions supplied with the connected device About data transfer speed of i LINK i LINK defines a maximum data transfer speed of approximately 100 200 and...

Страница 141: ...IN connector and the reference timecode to the TC IN connector Thus the built in timecode generator of your camcorder locks to the reference timecode The message EXT LK is displayed on the screen After about 10 seconds you can disconnect the external timecode without losing the synchronization Notes Check that the reference timecode and the reference video signal are in a phase relation that compl...

Страница 142: ... device connect between the REMOTE connector of the camcorder and the camera connector of the remote control device When you turn on the camcorder after the connection the camcorder enters Remote Control mode Notes Use the RM B750 of serial number 120000 or higher Pulling out the cheek pad may make connection disconnection of the remote cable easier Adjusting the camcorder from the Remote Control ...

Страница 143: ...t and set the menu items using the MENU SELECT knob and the CANCEL ENTER switch 3 When the settings are completed set the DISPLAY switch to ON or OFF to exit the menu For details on operations of the RM B150 B170 refer to the Operation Manual of the RM B150 B170 Operating the menu from the RM B750 Set the camcorder to Camera mode by setting the power switch to the CAMERA position in advance 1 Pres...

Страница 144: ...rame Rate 4 Press the VTR START STOP button Slow Quick Motion recording begins To stop recording Press the VTR START STOP button To cancel Slow Quick Motion mode Set Setting of S Q Motion of the CAMERA SET menu to Off 00 00 PP Set t ing Frame Rate Color Bar Type B F l i cker Reduce Zoom Speed I n ter val Rec Frame Rec S Q Mot i on Rec Review 3sec Of f 30 CAMERA SET B B B B B ...

Страница 145: ... signal output ON OFF CAM BAR button yes yes Shutter ON OFF SHUTTER switch CAMERA SET menu c Shutter yes yes Shutter speed selection CAMERA SET menu c Shutter yes yes ECS ON OFF SHUTTER switch CAMERA SET menu c Shutter yes yes ECS frequency selection CAMERA SET menu c Shutter yes yes Auto white balance AUTO W BAL button yes yes Auto black balance CAMERA SET menu c Auto BLK Balance yes yes White R ...

Страница 146: ...enu ON OFF MENU button yes yes Master gain selection GAIN switch yes Gain adjustment CAMERA SET menu c Gain Setup Step gain selection yes yes Color bar signal output ON OFF CAM BAR button yes yes Shutter ON OFF SHUTTER switch CAMERA SET menu c Shutter yes yes Shutter speed selection CAMERA SET menu c Shutter yes yes ECS ON OFF SHUTTER switch CAMERA SET menu c Shutter yes yes ECS frequency selectio...

Страница 147: ...be changed on the Picture Profile menu RM B150 RM B170 Picture Profile item Operation on the RM B150 Operation on the RM B170 Matrix Setting yes Level yes R G R B G R G B B R B G yes Detail Setting yes Level yes yes Frequency yes Crispening yes H V Ratio yes White Limiter yes Black Limiter yes Knee APT Level yes Skin Tone Detail Setting yes yes Level yes yes Area Indication yes Saturation yes Phas...

Страница 148: ... G B B R B G yes Detail Setting yes Level yes yes Frequency yes Crispening yes H V Ratio yes White Limiter yes Black Limiter yes Knee APT Level yes Skin Tone Detail Setting yes yes Level yes yes Area Indication yes Saturation yes Phase yes Width yes Knee Setting yes Auto Knee yes yes Point yes yes Slope yes yes Knee SAT Level yes yes Gamma Level yes yes Select yes Black yes yes Black Gamma yes Low...

Страница 149: ...ttle neutral detergent then wipe dry Do not use organic solvents such as alcohol or thinner as these may cause discoloration or other damage to the finish of the unit In the event of operating problems If you should experience problems with the unit contact your Sony dealer Note about the battery terminal The battery terminal of this unit the connector for battery packs and AC adaptors is a consum...

Страница 150: ...be seen in the following cases when operating at a high environmental temperature when you have raised the master gain sensitivity when operating in Slow Shutter mode Aliasing When fine patterns stripes or lines are shot they may appear jagged or flicker Flicker If recording is made under lighting produced by discharge tubes such as fluorescent sodium or mercury vapor lamps the screen may flicker ...

Страница 151: ... Select setting HD or SD of the VIDEO SET menu The SDI OUT connector outputs serial digital signals of the same format as that of the analog component signals fed from the COMPONENT OUT connector 1 E E mode Recording standby status 1 It becomes 1080 24PsF if 24P System of Genlock page 131 is set to 24PsF on the OTHERS menu Output formats in clip playback mode Media mode Analog component signals fr...

Страница 152: ...o Camera mode and Media mode Clip format Output format YPbPr Out Select HD YPbPr Out Select SD 1080 59 94i 1080 59 94i 480 59 94i 1080 29 97P 1080 29 97PsF 480 59 94i 1080 23 98P 1080 59 94i 480 59 94i 720 59 94P 720 59 94P 480 59 94i 720 29 97P 720 59 94P 480 59 94i 720 23 98P 720 59 94P 480 59 94i 1080 50i 1080 59 94i1 2 480 59 94i1 1080 25P 1080 29 97PsF1 2 480 59 94i1 720 50P 720 59 94P1 2 480...

Страница 153: ...ng the power switch to the CAMERA position 3 Adjust the white balance 4 Press the MENU button to set the camcorder to Menu mode and select the LENS menu with 5 Select Flare and set the flare compensation values for R G and B Set the items with EX when a lens extender is in use 6 Select Shading and set the shading compensation values for each channel R G and B First specify the channel R G or B wit...

Страница 154: ...attery low voltage warning appears in the viewfinder If this warning appears replace the battery as soon as possible Battery may explode if mistreated Do not recharge disassemble or dispose of in fire Danger of explosion if battery is incorrectly replaced Replace only with the same or equivalent type recommended by the manufacturer When you dispose of the battery you must obey the law in the relat...

Страница 155: ... battery Be careful not to drop the removed screw into the camcorder 1 Open the cover of the backup battery holder on the bottom by loosening the screw and remove the battery 2 Insert a new backup battery CR2032 with the symbol on the battery facing outside 3 Attach the cover in the original position CR2025 3V CR2025 3V CR2025 3V ...

Страница 156: ...STOP button The power switch is set to OFF or MEDIA Set the power switch to CAMERA The SxS memory card is write protected Release the write protection page 43 or replace the card with a non protected SxS memory card The SxS memory card is full Replace the card with one having sufficient space The SxS memory card needs restoration Restore the memory card page 46 Playback does not start when you pre...

Страница 157: ... as expected for example no picture appears on its screen It sometimes takes time for the connected equipment to recognize the operation Wait for about 15 seconds If the connected equipment still does not react do the following Check the i LINK cable for example by re plugging it Turn the power off and connect the cable again Change the i LINK cable ...

Страница 158: ...ing Free space on the SxS memory card has become insufficient Replace it with another at the earliest opportunity Media Full Continuous Rapidly flashing No space is left on the SxS memory card Recording clip copying and clip division cannot be performed Replace it with another Battery Near End Intermittent Flashing The battery power will be exhausted soon Charge the battery pack at the earliest op...

Страница 159: ...Cannot Record The external signal input via the i LINK connection cannot be recorded as the stream is copy protected Check the input signal Media Error Playback Halted An error occurred in reading data from the memory card and playback cannot be continued If this frequently occurs change the memory card after copying the clips as required Media A 1 Error Recording cannot be done as an error occurr...

Страница 160: ... L L C 250 STEELE STREET SUITE 300 DENVER COLORADO 80206 http www mpegla com Power requirements DC 12 V Power consumption Approx 13 5 W Typical Recording Peak inrush current 1 Power ON current probe method 15 A 240V 2 Hot switching inrush current measured in accordance with European standard EN55103 1 62 A 230V Operating temperature 0ºC to 40ºC 32ºF to 104ºF Storage temperature 20ºC to 60ºC 4ºF to...

Страница 161: ...flection 2000 lx Minimum illumination 0 14 lx F1 9 18 dB 64 frame accumulation Video S N 54 dB Y Typical Horizontal resolution 1000TV lines or more with HQ 1080 HD SDI output Gain 3 0 3 6 9 12 18 dB AGC Shutter speed 1 32 to 1 2000 sec Slow shutter 2 to 8 frames EX Slow Shutter 16 32 64 frames Built in microphones Stereo electret condenser microphones Directivity Omnidirectional Built in speaker M...

Страница 162: ...valent to 31 4 mm to 439 mm on 35 mm lens Zoom Servo Manual selectable Zoom ratio 14 Maximum relative aperture 1 1 9 Iris Auto Manual selectable F1 9 to F16 and C close Focus Auto Manual selectable Ranges 800 mm to Macro OFF 50 mm to Macro ON Wide 735 mm to Macro ON Tele Picture stabilizing function SteadyShot ON OFF possible shift lens system Filter thread M77 mm pitch 0 75 mm Macro ON OFF switch...

Страница 163: ...NU AUTO MANU AUTO MACRO FOCUS PUSH AF IRIS STEADY SHOT OFF ON 8 5 6 4 2 8 1 9 16 210 8 3 8 425 16 3 4 250 9 7 8 Unit mm inches Notes Always make a test recording and verify that it was recorded successfully SONY WILL NOT BE LIABLE FOR DAMAGES OF ANY KIND INCLUDING BUT NOT LIMITED TO COMPENSATION OR REIMBURSEMENT ON ACCOUNT OF FAILURE OF THIS UNIT OR ITS RECORDING MEDIA EXTERNAL STORAGE SYSTEMS OR ...

Страница 164: ...cklight 77 backup battery 154 BARS CAM button 74 Battery Alarm 131 Battery INFO 131 BATTERY INFO display 28 Battery Pack 27 BATTERY RELEASE button 27 BATTERY MEDIA Status 114 Bayonet Mount lens 36 BC U1 U2 27 28 Black 95 black balance 57 Black Gamma 95 BP U30 27 BP U60 27 BRIGHT control 31 BRT DISP 76 BRT Disp 77 built in clock 30 Built in microphones 72 Built in speaker 101 BUTTON REMOTE Status 1...

Страница 165: ...134 External Synchronization 141 eyepiece 31 33 Eyepiece focusing knob 31 F F FWD button 100 F REV button 100 Fade In 87 88 Fade Out 87 88 Fader 77 87 121 File 127 Fixed gain mode 59 Fixed Shutter mode 60 flange focal length 34 Flare 128 Flicker Reduce 69 120 focus 65 Focus ring 66 Format Media 50 132 Formatting 44 Frame Rec 121 Frame Recording 79 Free Run mode 70 Freeze Mix 77 82 FULL AUTO button...

Страница 166: ...trols 116 MF Assist 67 120 MF mode 66 microphone holder 72 MIRROR IMAGE switch 32 MONITOR VOL buttons 73 101 N ND filter switch 54 ND filters 54 NDF 70 NEXT button 101 O OK mark 105 OK MARK ADD 105 OK MARK DEL 106 One Push Auto Focusing 67 One Push Auto Iris 63 OTHERS Menu 129 Output Formats 151 P Peaking 66 125 PEAKING control 66 PHU 220R 47 PICTURE FROFILE menu 89 92 PICTURE PROFILE button 89 Pi...

Страница 167: ...110 status screens 110 Steady Shot 68 STOP button 102 Store 97 SxS Device Driver Software 136 SxS memory card 42 SxS memory cards 42 T Tally 130 Tally lamps 158 TC Format 70 127 TC IN connector 141 TC UB SET Menu 127 TC U BIT DURATION button 71 100 THUMBNAIL button 99 101 Thumbnail Screen 98 Time Zone 30 129 Timecode 127 TLCS 25 52 122 TRANSITION operation buttons 83 Trigger Mode 132 Tripod recept...

Страница 168: ...Index 168 Appendixes zebra patterns 58 Zebra Select 59 Zebra1 Level 59 zoom 63 ZOOM button 64 Zoom Position 63 Zoom ring 64 Zoom Speed 120 Zoom speed switch 64 ZOOM switch 64 ...

Страница 169: ......

Страница 170: ......

Страница 171: ......

Отзывы: