background image

22

Additional Information

Sony KV-FA29M83 Group A25 (

GB

)_2-898-277-11 (1)

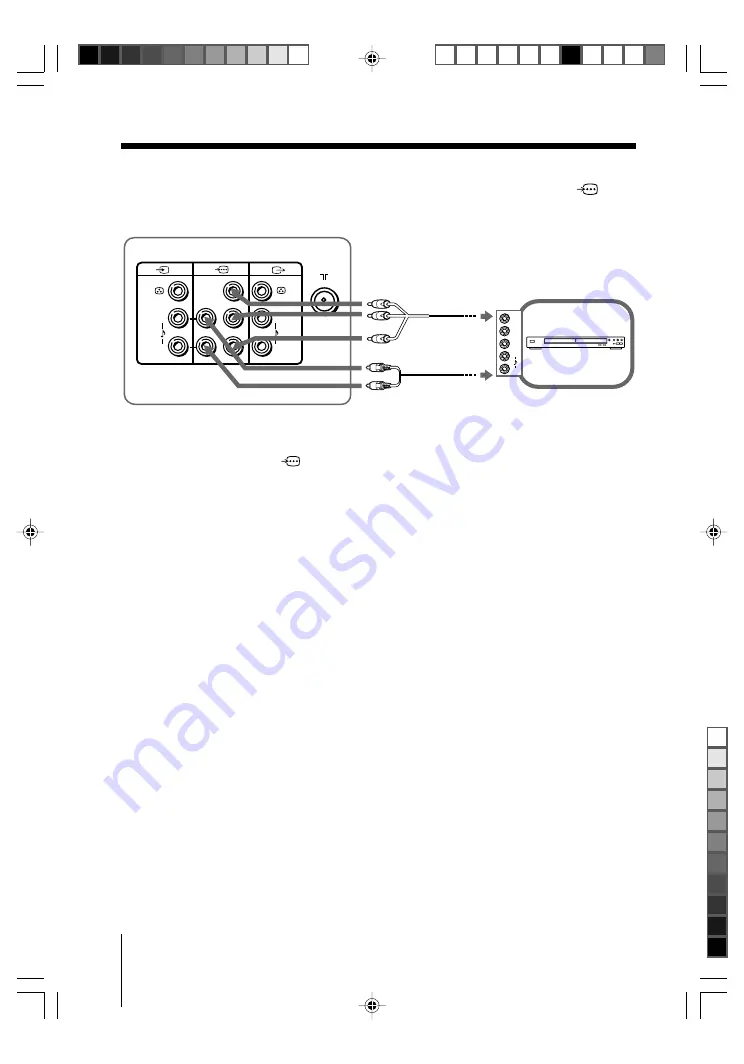
DVD player

TV rear panel

Component

video cable

(not supplied)

Audio cable

 (not supplied)

L

R

R

1

Y

C

B

(MONO)

(MONO)

R

C

L

Y

R

L

C

R

C

B

Connecting to the component video input terminal ( 


)

Notes

• If your DVD player can output interlace and progressive mode signals, select the interlace

output when connecting to 

 (component video input) on your TV. Your TV can receive

either 525i/60Hz or 625i/50Hz interlace signals.

• The component video terminals on your DVD player are sometimes labeled Y/C

B

/C

R,

 Y/P

B

/

P

R, 

Y/C

b

/C

r

  or Y/B-Y/R-Y.

• If you select “DVD” on your TV screen, the signal from the 

T

 (monitor output) jacks will not

be output properly. This does not indicate a malfunction.

continued

01GB07ADJ-STTInd.p65

11/10/06, 8:52 AM

22

Black

Содержание WEGA KV-FA29

Страница 1: ...1 1 Trinitron Color TV 2006 Sony Corporation KV FA29 2 898 277 11 1 Operating Instructions Before operating the unit please read this manual thoroughly and retain it for future reference M83 M53 GB 01GB01COV STTInd p65 11 10 06 8 44 AM 1 Black ...

Страница 2: ... the TV Do not allow children to climb onto it For your own safety do not touch any part of the TV the power cord and the antenna cable during lightning storms Do not place any objects on the TV The apparatus shall not be exposed to dripping or splashing and that no objects filled with liquids such as vases shall be placed on the apparatus Do not operate the TV if any liquid or solid object falls ...

Страница 3: ...erations Selecting the picture and sound modes 11 Menu Adjustment Introducing the WEGA GATE navigator 12 Settings Adjustment 13 Changing the Picture setting 14 Changing the Sound setting 16 Changing the Channel Setup setting 17 Changing the Setup setting 19 Additional Information Connecting the 3D WOOFER TWEETER and CENTER SPEAKER 20 Connecting optional components 21 Troubleshooting 23 Specificati...

Страница 4: ... of your TV 1 Put a cord or chain through the clamps 2 Screw one clamp to a wall or pillar and the other clamp to the provided hole at the rear of your TV 1 Attach each end of a cord or chain to the provided holders at the rear of your TV 2 Securely fix the attached cord or chain to a wall or pillar using an attachment which can support the TV set weight Note Use only the supplied screws Use of ot...

Страница 5: ...wing the instructions of the Initial Setup menu see page 6 Plug in the power cord then press on the TV to turn it on Note The 1 standby indicator flashes green for a few seconds when turning on the TV This does not indicate a malfunction Connect the antenna cable not supplied to 8 antenna input at the rear of the TV Tip You can also connect your TV to other optional components see page 21 x Gettin...

Страница 6: ... channel presetting select No then press If the message No channel found Please connect cable antenna appears check your TV connections then press 3 The Program Sorting Edit menu enables you to sort and edit the channels a If you wish to keep the channels in the current condition press WEGA GATE to exit b Press V or v to select the program number with the channel you wish to change The selected ch...

Страница 7: ... Press WEGA GATE to exit 4 Press B or b to adjust the bars on the top and bottom of the menu if they are slanted then press Picture V Position menu appears 5 If the upper and lower bars are not equally positioned to the top and bottom of the screen press V or v to adjust them then press If no adjustment is necessary then press 6 To prevent this Initial Setup menu from appearing again when you turn...

Страница 8: ...elect program number 5 2 Adjust volume 6 t Select TV or video input 21 WEGA GATE menu operations 4 5 Select and adjust items 12 6 Confirm selected items 12 7 WEGA GATE Display or cancel WEGA GATE menu 12 8 SOUND MODE Select sound mode options with a 5 Band Graphic 11 Equalizer display 9 i Headphone jack 0 t2 Video input terminal 2 21 qa TWEETER TWEETER terminal 20 qs CENTER SPEAKER Center speaker ...

Страница 9: ... quickly press and hold until the desired program number appears 5 2 Adjust volume 8 Change the picture size On 16 9 wide mode Off 9 Select surround mode options 16 0 Display on screen information qa Mute the sound qd t Select TV or video input 21 qf 0 9 Input numbers For program numbers 10 and above enter the second digit within two seconds ql Select sound mode options 11 with a 5 Band Graphic Eq...

Страница 10: ...according to the desired period of time max of one hour and 30 min Teletext operations green label Not function for your TV red green yellow blue PIP operations V v B b Not function for your TV Stereo bilingual operations qs A B Not function for your TV Wake up timer Sleep timer continued Manufactured under license from BBE Sound Inc Licensed by BBE Sound Inc under one or more of the following US ...

Страница 11: ... Sound Adjustment option in the menu see page 16 x Selecting the picture and sound modes You can select picture and sound modes and adjust the setting to your preference in the Custom option Selecting the picture mode Press to select the desired picture mode Select To view Vivid bright contrast and sharp pictures Standard normal pictures Custom the last adjusted picture setting from the Picture Ad...

Страница 12: ...icture Color Temperature Cool Picture Adjustment Picture Mode Vivid VM High Intelligent Picture On Signal Level Indicator On Select watch the preset TV channels see page 6 select the inputs for the connected equipment see page 21 change the settings of your TV see page 13 How to use WEGA GATE 1 Press WEGA GATE to display or cancel the WEGA GATE menu Confirm Select WEGA GATE Settings External Input...

Страница 13: ...ound Sound Adjustment Sound Mode Dynamic Select Balance Intelligent Volume Surround Off Off Sound see page 16 Sound Mode Dynamic Standard Custom Sound Adjustment Adjust Reset Balance Intelligent Volume On Off Surround TruSurround Sports Off Channel Setup see page 17 Auto Program Manual Program Program 00 99 TV System B G I D K M VHF Low VHF High UHF Fine Auto Manual Signal Booster Auto Off Program...

Страница 14: ...tint or Warm red tint VM sharpen the edges of each object Velocity Modulation Choose either High Low or Off Intelligent Picture optimize picture quality Press V or v to select On then press To cancel select Off then press Signal Level Indicator display the signal level when the Intelligent Picture is functioning Intelligent Picture Signal Level indicator will be displayed followed by picture impro...

Страница 15: ...rpness then press Selecting Reset will set your TV to the factory settings 2 Press V v B or b to adjust the setting of your selected item then press 3 Repeat the above steps to adjust other items The adjusted settings will be received when you select Custom Notes Hue can be adjusted for the NTSC color system only Reducing Sharpness can also reduce picture noise 01GB05AVD STTInd p65 11 10 06 8 50 A...

Страница 16: ...rsonal preference in the Sound Adjustment option only when the Custom mode is selected Note Intelligent Volume is not selectable when TruSurround is selected Adjusting the Sound Adjustment items under Custom mode The 5 Band Graphic Equalizer feature allows you to adjust sound frequency settings of Custom mode in the menu 1 Make sure that Adjust is selected then press Selecting Reset will set your ...

Страница 17: ...esired channels and channels that cannot be preset automatically see Presetting channels manually in page 18 Program Sorting Edit change the order in which the channels appear on the screen label the program number skip the program number and block unwanted programs see step 3 of the section Initial Setup in page 6 Notes If you preset a blocked program number that program number will be unblocked ...

Страница 18: ...l then press 4 If you are not satisfied with the picture and sound quality you may be able to improve them by using the Fine tuning feature 1 Press V or v to select Fine then press 2 Press V or v to select Manual then press 3 Press V v B or b until the picture and sound quality are optimal then press The or icon on the menu flashes while tuning 5 If the TV signal is too strong picture distorted pi...

Страница 19: ...ion then press Video Label label the connected equipment 1 Select Video Input and press Press V or v to select the input you want to label then press 2 Select Label and press then press V or v to select the label options Video 1 Video 2 DVD VCR SAT Game or Edit You may edit the video label to your favorite name Press V or v to select alphanumeric characters for the label then press Color System se...

Страница 20: ...minal for CENTER SPEAKER white wire should be connected to the 3 white terminal for left TWEETER and the black wires to the respective black terminals Notes Connect only the supplied 3D WOOFER TWEETER and CENTER SPEAKER otherwise your TV may malfunction Unplug your TV from the wall outlet when connecting the 3D WOOFER TWEETER and CENTER SPEAKER To prevent a malfunction caused by a short circuit of...

Страница 21: ...O R C Audio Video cable not supplied R L L R R 1 L Y CB MONO MONO R C Antenna cable not supplied VCR TV rear panel VCR Audio Video cable not supplied Audio Video cable not supplied Camcorder Note If you connect a VCR to 8 antenna input preset the signal output from the VCR to the program number 0 on the TV see page 18 Connecting to the monitor output terminal T DVD player continue 01GB07ADJ STTInd...

Страница 22: ...ace and progressive mode signals select the interlace output when connecting to component video input on your TV Your TV can receive either 525i 60Hz or 625i 50Hz interlace signals The component video terminals on your DVD player are sometimes labeled Y CB CR Y PB PR Y Cb Cr or Y B Y R Y If you select DVD on your TV screen the signal from the T monitor output jacks will not be output properly This...

Страница 23: ... Booster to Auto from Manual Program see page 18 Try using an external booster Turn off or disconnect the external booster if it is in use Display the Channel Setup menu and set the Signal Booster to Off from Manual Program see page 18 Display the Channel Setup menu and select the appropriate TV System from Manual Program see page 18 Check the power cord antenna and VCR connections see page 21 Pre...

Страница 24: ... the TV screen see page 19 Keep external speakers or other equipment away from the TV Do not move the TV while the TV is turned on Press main power on the TV to turn off the TV for about 15 minutes then turn it on again to demagnetize the TV Count the number of times the 1 standby indicator flashes Press main power to turn off your TV Contact your nearest Sony service center The Signal Booster is ...

Страница 25: ... TV B G I D K M PAL PAL 60 SECAM NTSC3 58 NTSC4 43 VHF E2 to E12 UHF E21 to E69 CATV S01 to S03 S1 to S41 UHF B21 to B68 CATV S01 to S03 S1 to S41 VHF C1 to C12 R1 to R12 UHF C13 to C57 R21 to R60 CATV S01 to S03 S1 to S41 Z1 to Z39 VHF A2 to A13 UHF A14 to A79 CATV A 8 to A 2 A to W 4 W 6 to W 84 75 ohm external terminal 7 W 7 W 7 W 20 W Input 2 Output 1 Phono jacks 1 Vp p 75 ohms Input 3 Output ...

Отзывы: