background image

“Memory Stick”

57

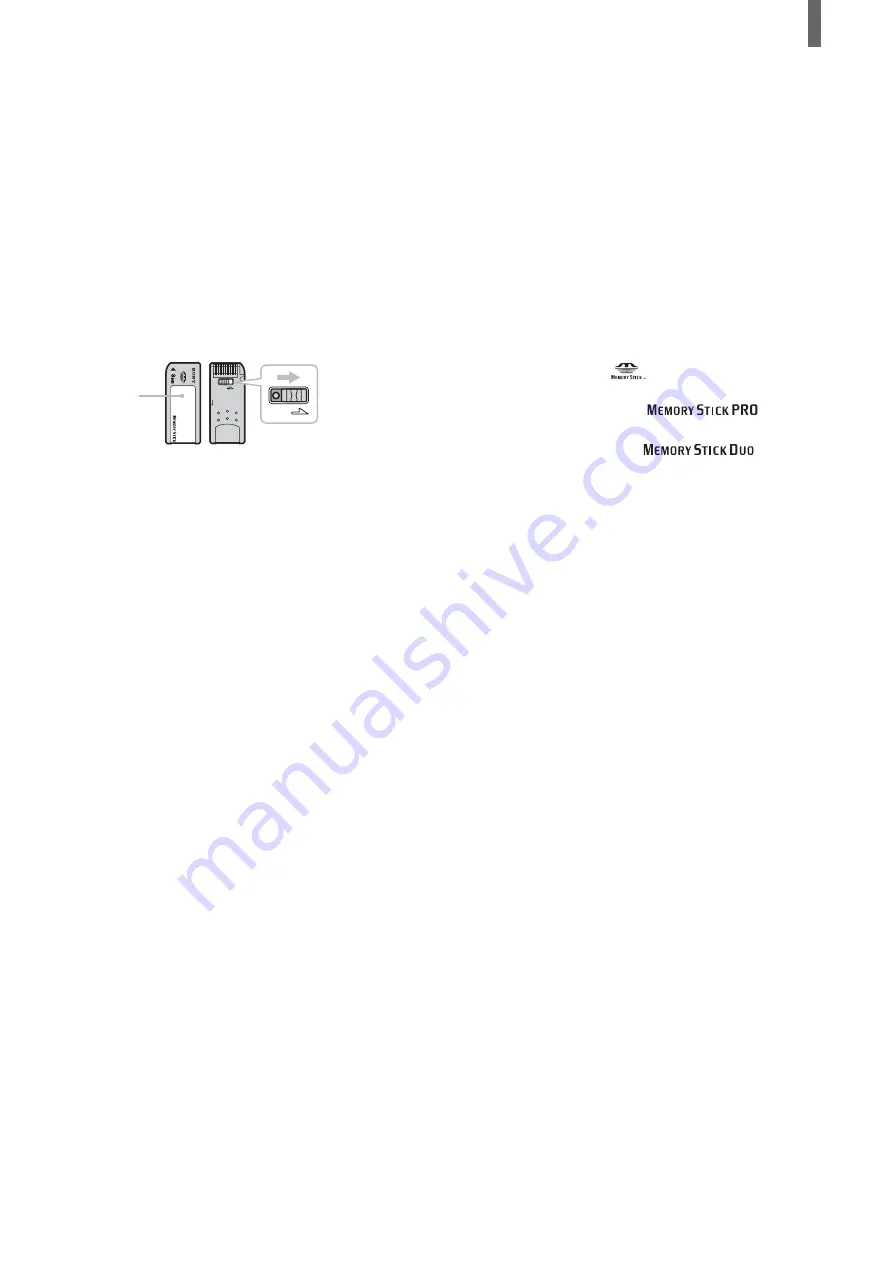
Notes on “Memory Stick Duo”

• To use a “Memory Stick Duo” with this unit,

attach it to the Memory Stick Duo adapter before
inserting it into the unit.

• Make sure that you attach the “Memory Stick

Duo” to the adapter correctly.

• Make sure that you insert the Memory Stick Duo

adapter correctly, otherwise the unit may be
damaged.

• Do not insert the Memory Stick Duo adapter

without a “Memory Stick Duo” attached. Doing so
may result in malfunction of the unit.

On handling the “Memory Stick”

• You cannot record or erase images when the write-

protect switch on the “Memory Stick” is set to
LOCK.

• Image data may be damaged in the following

cases:
– If you remove the “Memory Stick,” or turn the

power off while the access lamp is lit or
flashing.

– If you use the “Memory Stick” near magnets or

magnetic fields, such as speakers.

– If you unplug the AC power cord while the

access lamp is lit or flashing.

• Avoid touching the terminal of “Memory Stick”

media or coming in contact with a metal object.

• Do not drop, bend, or submit “Memory Stick”

media to external shock.

• Do not disassemble or modify “Memory Stick”

media.

• Avoid getting liquid on “Memory Stick” media.
• Apply labels only within the designated label area.
• To avoid permanent damage to digital photo or

movie, do not use or store “Memory Stick” media
in a location subject to:
– High temperature (such as near a heater or

inside a hot car)

– High humidity
– Direct sunlight
– Corrosive substances
– Magnetic fields
– Excessive dust
– Static electricity or electric noise
– Electric surges

• Store and carry “Memory Stick” media in its

original case to ensure protection of stored data.

• Save a backup or stored data.

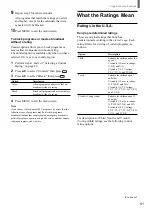
LOCK

LOCK

Label area

Write-protect switch

On formatting the “Memory Stick”

The “Memory Stick” is shipped with an exclusive
standard format.

Note

A “Memory Stick” formatted by a computer does not have a
guaranteed compatibility with this TV.

When the access lamp is lit or flashing

When the access lamp is lit or flashing, the “Memory
Stick” is reading or writing data. In this case, do not
shake or strike the TV, turn the power off, or eject
the “Memory Stick,” otherwise the image data may
be damaged.

• “Memory Stick” and 

 are trademarks of Sony

Corporation.

• “Memory Stick PRO” and 

 are

trademarks of Sony Corporation.

• “Memory Stick Duo” and 

 are

trademarks of Sony Corporation.

Содержание WEGA KLV 23HR2

Страница 1: ...reference KLV 23HR2 Owner s Record The model and serial numbers are located at the rear of the TV on the backside of the rear cover on the sticker and also on the TV box white label Record these numbers in the spaces provided below Refer to them whenever you call upon your Sony dealer regarding this product Model No ________________ Serial No ________________ ...

Страница 2: ...nd to comply with the limits for a Class B digital device pursuant to Part 15 of the FCC Rules These limits are designed to provide reasonable protection against harmful interference in a residential installation This equipment generates uses and can radiate radio frequency energy and if not installed and used in accordance with the instructions may cause harmful interference with radio communicat...

Страница 3: ... it can damage the LCD screen Take care when you place the TV by a window s Do not push on or scratch the LCD screen Do not place a heavy object on the LCD screen This may cause the screen to lose uniformity or cause LCD panel malfunctions s If the TV is used in a cold place a smear may appear on the screen This is not a malfunction The screen returns to normal as the temperature rises to a normal...

Страница 4: ...the Channels 21 Selecting the On screen Menu Language 23 Watching the TV Watching the TV 24 Watching with closed caption 25 Selecting the Picture Mode 25 Selecting the Effect Mode 26 Using the Wide Screen Mode 27 Changing the Wide Screen Mode 27 Changing the Wide Screen Mode using the menu 29 Using the Freeze Function 31 Setting the Video Inputs 32 Using the Video Label Feature 33 Operating Video ...

Страница 5: ... at full screen size 64 Rotating and viewing your digital photos 65 Playing Movies Movie Player 66 Protecting Deleting the files 67 Protecting digital photos or movies 67 Deleting digital photos or movies 69 About the Memory Stick Home menu options 70 Selecting a folder and viewing digital photos or movies 71 Sorting image files 72 Selectively displaying digital photos or movies 73 Caution icons a...

Страница 6: ... it getting it wet or placing it in direct sunlight near a heater or where the humidity is high Your remote control can be programmed to operate most video equipment See Operating Video Equipment with Your TV Remote Control on page 34 AC power cord 1 Connector Types You may find it necessary to use some of the following connector types during set up Supplied 75 ohm coaxial cable Screw on type S VI...

Страница 7: ...to the component video connectors Y CB CR Y B Y R Y or Y PB PR of your DVD player or other video equipment such as a Digital Satellite Receiver and Digital TV Receiver AUDIO L R input jacks pages 16 18 19 Connects to the audio output jacks of your DVD player or other video equipment such as a Digital Satellite Receiver and Digital TV Receiver 0 VIDEO 4 IN AUDIO L R input jacks page 20 Connects to ...

Страница 8: ...able to get optimum picture quality A 300 ohm twin lead cable can be easily affected by radio noise and the like resulting in signal deterioration If you use a 300 ohm twin lead cable keep it away as far as possible from the TV Cable box connections Use this hookup if You subscribe to a cable TV system that uses scrambled or encoded signals requiring a cable box to view all channels and You do not...

Страница 9: ...ng the Power Cord Complete other connections prior to connecting the power cord 1 Connect the power cord to the AC IN connector of the TV 2 Connect the other plug of the power cord to a wall outlet Wall outlet For 120 V AC AC power cord supplied ...

Страница 10: ... through the grooves Be sure to place the cables inside the tabs at the bottom of the TV Note If all the cables cannot be stored inside you may leave some of them hanging down on both sides of the TV 3 Gather the cables from both sides together and secure them with the clip at the bottom Note It may not be possible to fasten with clips if cables are too thick Note If the cables are not neatly stor...

Страница 11: ...ith your hand to prevent the TV from becoming separated from the stand Be careful not to get your fingers caught between the TV and the stand Carrying the TV When carrying the TV hold it as shown in the diagram below Do not hold only by the rear cover As the rear cover is designed to come off doing so may cause you to drop the TV resulting in damage to the TV or cause injury Backward direction Hor...

Страница 12: ...S VIDEO use a VIDEO cable yellow instead of the S VIDEO cable When connecting both VIDEO OUT and S VIDEO OUT YoucanselectthejacktheTVreceivestheinputsignalfromonthemenuscreen You can set it for each video input VIDEO 1 IN and VIDEO 2 IN separately The TV is factory set to receive S VIDEO input signals 1 Press TV VIDEO repeatedly until the desired video input appears 2 Press MENU 3 Press V v to sel...

Страница 13: ...upplied75 ohmcoaxialcablefromyourcableorantennatothe TV s VHF UHF jack VIDEO yellow AUDIO L white AUDIO R red S VIDEO Rear of TV 75 ohm coaxial cable supplied Note To watch the pictures input from the S VIDEO input jack set Auto YC to On in the Setup menu See page 12 Tips You can also use the VIDEO 2 IN jacks to connect your satellite receiver If your satellite receiver is not equipped with S VIDE...

Страница 14: ...d S VIDEO OUT jacks to the TV s AUDIO and S VIDEO IN jacks Note To watch the pictures input from the S VIDEO input jack set Auto YC to On in the Setup menu See page 12 Tips You can also use the VIDEO 2 IN jacks to connect your VCR Be sure your VCR s video input is set correctly Consult your VCR s operating manual for instructions Use TV VIDEO on the remote control to select VIDEO 1 IN or VIDEO 2 I...

Страница 15: ...dio system set Audio Out to Fixed Notes The video signal is not output through the AUDIO OUT jacks When Audio Out in the Audio menu is set to Variable Speaker is to Off check if the speaker volume is moderate before switching Speaker from Off to On Otherwise the speaker volume may get too loud Connecting an Audio Receiver Disconnect all power sources before making any connections Using an AUDIO ca...

Страница 16: ...PB and PR If so connect the cables to the matching colors 2 Using an AUDIO cable connect the DVD player s AUDIO OUT jacks to the TV s AUDIO IN jacks Note The Y B Y and R Y jacks do not provide audio so audio cables must be connected to provide sound Tips To take advantage of the Wide Screen Modes set the TV s aspect ratio to 16 9 on your DVD player For details refer to the operating instructions s...

Страница 17: ... VIDEO jack to the TV s S VIDEO jack Note To watch the pictures input from the S VIDEO input jack set Auto YC to On in the Setup menu See page 12 Tips You can also use the VIDEO 2 IN jacks to connect your DVD player To take advantage of the Wide Screen Modes set the TV s aspect ratio to 16 9 on your DVD player For details refer to the operating instructions supplied with your DVD player Use TV VID...

Страница 18: ...Note that this TV displays all format types of picture in a resolution of 1 280 dots 768 lines 2 Using an AUDIO cable connect the Digital Satellite Receiver s AUDIO OUT jacks to the TV s AUDIO IN jacks Note The Y PB and PR jacks do not provide audio so audio cables must be connected to provide sound VIDEO OUT TYPE 1 L1 L2 Y Pb Pr R1 AUDIO OUT OPTICAL DIGITAL AUDIO OUT R2 2 COMPONENT OUT 1080i 720p...

Страница 19: ... video Y PB PR connection is necessary to view 480p 720p and 1080i formats Note that this TV displays all format types of picture in a resolution of 1 280 dots 768 lines 2 Using an AUDIO cable connect the Digital TV receiver s AUDIO OUT jacks to the TV s AUDIO IN jacks Note The Y PB and PR jacks do not provide audio so audio cables must be connected to provide sound Component video cable not suppl...

Страница 20: ...ital Satellite Receiver s DVI HDTV connector to the TV s DVI HDTV connector Use the VIDEO 4 IN connections Note The DVI HDTV VIDEO connector does not provide audio so audio cables must be connected to provide sound 2 Using an AUDIO cable connect the Digital Satellite Receiver s AUDIO OUT jacks to the TV s AUDIO IN jacks DVI D single link cable not supplied AUDIO L white AUDIO cable not supplied Di...

Страница 21: ...rt skipping unwanted channels See To skip channels on page 22 5 Press MENU to exit the menu screen To cancel Auto Program While Auto Program is displayed in step 3 press MENU on the remote control Note To watch cable TV channels you have to subscribe to a cable TV company Note that cable TV cannot be received in some areas This TV receives 1 125 cable TV channels For details on cable TV subscripti...

Страница 22: ...V v to select Skip then press If you want to re enter the skipped channel select Add 6 Press MENU to exit the menu screen Example Select this to skip channel 5 Channel TV v Channel Skip Add Select Back Exit Set Return 1 Skip 2 Add 3 Add 4 Skip 5 Add 6 Skip 7 Skip 8 Add 9 Add 10 Add Channel TV v Channel Skip Add Select Back Exit Set Return 1 Skip 2 Add 3 Add 4 Skip 5 Add 6 Skip 7 Skip 8 Add 9 Add 1...

Страница 23: ... all menus Setup TV Select Back Exit Set Return Caption Vision Off Video Label Language English Auto YC Menu Color White Setup TV Select Back Exit Set Return Caption Vision Off Video Label Language English Auto YC Menu Color Black English Español Français Return Caption Vision Off Video Label Language English Auto YC Menu Color White Setup TV Select Back Exit Set Video Exit Set Select Return Mode ...

Страница 24: ...CH or the channel number will change rapidly 3 Adjust the volume using the VOL buttons Other button operations Press To MUTING SYSTEM OFF DISPLAY JUMP Tip You can adjust the volume by referring to the value beside the volume indicator on screen Mute the sound Press again or press VOL to restore sound Turn off the TV and all other Sony equipment Display the current channel number When the channel d...

Страница 25: ...n select the desired Caption Vision To Turn off Caption Vision Display a printed version of the dialogue or sound effects of a program The mode should be set to CC1 for most programs Display network station information presented using either half or the whole screen Selecting the Picture Mode You can select one of three different Picture Modes that best suits the program you are watching Furthermo...

Страница 26: ... SRS Labs Inc WOW SRS and symbol are trademarks of SRS Labs Inc WOW technology is incorporated under license from SRS Labs Inc 2 4 1 5 Press PICTURE MODE repeatedly until the desired mode appears Each time you press the button the Picture Mode changes as follows Picture Mode Description Vivid Standard Pro Tip You can adjust the picture quality options such as Picture Brightness and Color for each ...

Страница 27: ...RS WOW MTS Stereo Speaker On Audio Out Audio TV Select Back Exit Set Select Back Exit Set Return Treble 0 Bass 0 Balance 0 Effect WOW MTS Auto SAP Speaker On Audio Out Audio TV SRS WOW Off Exit Return Treble 0 Bass 0 Balance 0 Effect Off MTS Stereo Speaker On Audio Out Audio TV Select Back Set Video Exit Set Select Return Mode Vivid Picture 50 Brightness 50 Color 25 Hue 0 Sharpness 3 Backlight 5 C...

Страница 28: ... 4 3 aspect ratio picture DTV 4 3 aspect ratio picture Full Full stretches the 4 3 picture horizontally only to fill the 16 9 screen Full Original Picture Widescreen video camera or DVD picture DTV 16 9 aspect ratio picture Tip You can also access the Wide Screen Mode settings in the Screen menu For details see page 30 Zoom Original Picture Letterbox movie of a video tape or a DVD disc Zoom Zoom e...

Страница 29: ...n Video Exit Set Select Return Mode Vivid Picture 50 Brightness 50 Color 25 Hue 0 Sharpness 3 Backlight 5 Color Temp Cool CineMotion Dynamic Picture On TV Return Wide Mode Wide Zoom 4 3 Default Wide Zoom Vertical Center 0 Screen Select Back Exit Set TV Return Wide Mode Normal 4 3 Default Zoom Vertical Center Screen Select Back Exit Set TV Wide Zoom Normal Full Zoom Return Wide Mode Normal 4 3 Defa...

Страница 30: ... aspect ratio that fills the 16 9 screen Useful for watching Letterbox movies Select to enlarge the 4 3 picture to fill the 16 9 screen keeping the original image as much as possible Select to return the 4 3 picture to its original size Select to enlarge the 4 3 picture horizontally only to fill the 16 9 screen Select to enlarge the 4 3 picture horizontally and vertically to an equal aspect ratio ...

Страница 31: ...rs recipes etc When the program information you want to capture is displayed press FREEZE The picture freezes Press FREEZE again and the frozen picture is released and the picture begins to move again Tip While the picture is frozen the sound continues to be output normally Frozen picture FREEZE Call 555 1234 Freeze ...

Страница 32: ...use S VIDEO input and if Auto YC in the Setup menu is set to On page 12 The type of picture signal 480i 480p 720p or 1080i appears under Video 3 or Video 4 Tips You can also select the inputs by using the TV VIDEO button on the TV When you have preset a label for each video input using Video Label in the Setup menu the label will be displayed see page 33 2 Operate the selected optional equipment F...

Страница 33: ...ta Video 3 4 DVD Satellite Cable Box DTV HD 7 Press MENU to exit the menu screen 2 6 1 7 Video Label Return Video 1 Video 1 Video 2 Video 2 Video 3 Video 3 Video 4 Video 4 Setup TV Select Back Exit Set Video Label Return Video 1 Video1 Video 2 Video2 Video 3 Video3 Video 4 Video4 Setup TV Select Back Exit Set Video 1 VHS DVD Receiver Satellite Cable Box 8mm DTV Game LD Web Beta Video Label Return ...

Страница 34: ...edure 1 Press CODE SET 2 Press the function button you want to program To program a cable box or a satellite receiver Press SAT CABLE FUNCTION To program video equipment Press VCR DVD FUNCTION 3 Enter the three digit manufacturer s code number using the 0 9 buttons 4 Press ENT enter 5 To check if the code number works aim the TV s remote control at the equipment and press the VCR DVD and or SAT CA...

Страница 35: ...m 216 217 Zenith 212 213 Satellite Receivers Manufacturer Code Sony 801 General Electric 802 Hitachi 805 Hughes 804 Panasonic 803 RCA PROSCAN 802 808 Toshiba 806 807 Manufacturer s codes VCRs Manufacturer Code Sony 301 Admiral M Ward 327 Aiwa 338 344 Audio Dynamic 314 337 Broksonic 319 317 Canon 309 308 Citizen 332 Craig 302 332 Criterion 315 Curtis Mathes 304 338 309 Daewoo 341 312 309 DBX 314 33...

Страница 36: ...ep through different chapters of a video disc Select a track directly Display the menu Setup Operate the DVD menu Operating a cable box To Turn on off Control a cable box Select a channel Change channels Go to the previous channel Operating a satellite receiver To Turn on off Control a satellite receiver Select a channel Change channels Go to the previous channel Display the channel number Display...

Страница 37: ...xit Set 3 Press V v to select Favorite Channels then press Channel TV Return CH 1 2 2 3 3 4 4 5 5 6 6 7 7 8 8 9 Favorite Channels Select Back Exit Set Tip If you cannot select Favorite Channels change the input to TV by pressing the TV VIDEO button 4 Press V v to select the position you want to change then press Channel TV Return CH 1 2 2 3 3 4 4 5 5 5 6 7 7 8 8 9 Favorite Channels Select Back Exi...

Страница 38: ...layed Tip If you make an optional label using Channel Label in the Channel menu that label will be displayed on the screen Using the Channel Label Feature If you have set an optional label for the channel display or for Favorite Channels you can have that label displayed on the screen 1 Press MENU Video Exit Set Select Return Mode Vivid Picture 50 Brightness 50 Color 25 Hue 0 Sharpness 3 Backlight...

Страница 39: ...eps 4 8 to assign labels to more channels 10 Press MENU to exit the menu screen Return Favorite Channels Cable On Channel Fix Off Auto Program OK Channel Skip Add Channel Label Channel TV Select Back Exit Set Channel Label Return Channel 1 Label _ _ _ _ _ Channel TV Select Back Exit Set Channel Label Return Channel 30 Label _ _ _ _ _ Channel TV Select Back Exit Set 1 Channel Label Return Channel 3...

Страница 40: ...ot select items which appear in pale color Video Exit Set Select Return Mode Vivid Picture 50 Brightness 50 Color 25 Hue 0 Sharpness 3 Backlight 5 Color Temp Cool CineMotion Dynamic Picture On TV Video Return Mode Vivid Picture 50 Brightness 50 Color 25 Hue 0 Sharpness 3 Backlight 5 Color Temp Cool CineMotion Dynamic Picture On Vivid Standard Pro Select Back Exit Set TV To open the menu screen and...

Страница 41: ...sition of the picture up and down for each Wide Screen Mode page 27 in the following cases To move the position of the picture in Wide Zoom and Zoom modes When subtitles may not fit in the screen 1 5 2 4 Moves up Moves up Moves down Moves down Return Wide Mode Wide Zoom 4 3 Default Wide Zoom Vertical Center 0 Screen Select Back Exit Set TV Vertical Center 0 Video Exit Set Select Return Mode Vivid ...

Страница 42: ...ry 1 8 2 7 Picture 50 TV Video Return Mode Vivid Picture 50 Brightness 50 Color 25 Hue 0 Sharpness 3 Backlight 5 Color Temp Cool CineMotion Dynamic Picture On Select Back Exit Set Video Return Mode Vivid Picture 50 Brightness 50 Color 25 Hue 0 Sharpness 3 Backlight 5 Color Temp Cool CineMotion Dynamic Picture On Vivid Standard Pro Select Back Exit Set TV Video Return Mode Vivid Picture 50 Brightne...

Страница 43: ...color intensity To decrease the green tones To soften the picture To darken the screen Press V b To enhance picture contrast To brighten the picture To increase color intensity To increase the green tones To sharpen the picture To brighten the screen Description Select to give bright colors a red tint Select to provide an optimized display by automatically detecting film content Moving pictures wi...

Страница 44: ...beside each option indicator Press v B To decrease higher pitched sounds To decrease lower pitched sounds To emphasize the left speaker See page 26 Exit Return Treble 0 Bass 0 Balance 0 Effect Off MTS Stereo Speaker On Audio Out Audio TV Select Back Set Treble 0 Exit Return Treble 0 Bass 0 Balance 0 Effect Off MTS Stereo Speaker On Audio Out Audio TV Select Back Set Video Exit Set Select Return Mo...

Страница 45: ...ingual and mono programs MTS SAP Press MTS SAP repeatedly until the desired sound indication appears Each time you press the button the sound indication changes as follows Sound indication Stereo Auto SAP Mono This is available only for TV broadcasting 1 5 2 4 Description Select for stereo reception when viewing a program broadcast in stereo Select to automatically switch the TV to second audio pr...

Страница 46: ...cription of the ratings The TV s Parental Control feature functions by receiving the rating signal from your local broadcasting station or cable service provider 1 Press MENU 2 Press V v to select Audio then press 3 Press V v to select MTS then press 4 Press V v to select the desired reception then press 5 Press MENU to exit the menu screen Selecting stereo or bilingual programs using the menu Exi...

Страница 47: ... Do not enter 4357 corresponding to HELP on a phone number pad See page 48 Tips You need to enter the password here for any further access into the Parent menu If you lose your password see Tip on page 48 If you want to change the password see page 48 4 Press V v to select Select Country then press 5 Press V v to select your country region U S A or Canada then press Parent TV Return Lock Off Selec...

Страница 48: ...57 See Viewing blocked programs on page 48 6 Press V v to select Lock then press 7 Press V v to select a desired rating then press If you select Child Youth or Y Adult Young Adult the Parental Control is activated automatically Tip If you are not familiar with the Parental Guideline rating system you should select Child Youth or Y Adult to help simplify the rating selection To set more restrictive...

Страница 49: ...ating TV Rating Unrated Allow Custom Parent TV Select Back Exit Set In U S A Return Movie Rating TV Rating Unrated Allow Parent TV Select Back Exit Set Custom Parent TV Movie Rating Select Back Exit Set Return G PG PG 13 R NC 17 X Parent TV Movie Rating Select Back Exit Set Return G PG PG 13 R NC 17 X Parent TV Movie Rating Select Back Exit Set Return G PG PG 13 R NC 17 X 3 Press V v to select Mov...

Страница 50: ...t U S A Rating 7 Press V v to select the TV rating to be blocked then press The indication automatically appears beside the selected rating and all ratings below it indicating that the programs that match the ratings will be blocked To unlock a rating select then press The indication changes into and all ratings above it are unlocked Some U S TV ratings have additional content ratings called exten...

Страница 51: ...ock unrated TV programs be aware that the following types of programs may be blocked programs broadcast from another country region emergency broadcasts political programs sports news public service announcements religious programs and weather What the Ratings Mean Ratings in the U S A Sony s predetermined ratings These are original ratings that Sony has predetermined according to the viewer s age...

Страница 52: ...specifically designed to be viewed by adults and therefore may be unsuitable for children under the age of 17 U S movie ratings U S movie ratings are for movies including those shown on TV rated according to the Motion Picture Association of America MPAA Guidelines Option G General Audiences All Ages Admitted PG Parental Guidance Suggested Some Material May Not Be Suitable For Children PG 13 Paren...

Страница 53: ...re original ratings that Sony has predertmined according to the viewer s age Each rating allows you to view the certain programs as follows Option Child Youth Y Adult Young Adult For descriptions of Child Youth and Y Adult Young Adult ratings see the following custom rating options Description Suitable for children under the age of 8 Viewable Canadian English Language ratings C and G Viewable Cana...

Страница 54: ...ed for children under the age of 8 C8 Programming generally considered acceptable for children aged 8 and older to watch on their own G General Audience PG Parental Guidance 14 Programming contains themes or content which may not be suitable for viewers under the age of 14 18 Adult Description There will be no realistic scenes of violence or no offensive language nudity or sexual content Careful a...

Страница 55: ...the period of time changes as follows While the Sleep timer is activated the 1 indicator on the TV lights up in red To cancel the Sleep timer Press SLEEP repeatedly until Sleep Off appears Tips If you turn the TV off and then turn it on again the Sleep timer returns to Off TV will turn off soon appears one minute before the TV shuts off This message may not appear if you perform any operation with...

Страница 56: ... folder and file names Movies MPEG1 files must be recorded on a Sony digital camera and use one of the following MPEG1 compression formats MPEG MOVIE MPEG MOVIE AD MPEG MOVIE EX MPEG MOVIE HQ MPEG MOVIE CV MPEG MOVIE HQX MPEG1 corresponding to VIDEO CD for VAIO Giga Pocket JPEG is a standard technology format for compressing a still image extension jpg JPEG stands for Joint Photographic Experts Gr...

Страница 57: ... shock Do not disassemble or modify Memory Stick media Avoid getting liquid on Memory Stick media Apply labels only within the designated label area To avoid permanent damage to digital photo or movie do not use or store Memory Stick media in a location subject to High temperature such as near a heater or inside a hot car High humidity Direct sunlight Corrosive substances Magnetic fields Excessive...

Страница 58: ...Select a thumbnail And view a digital photo Viewing photos See page 64 View digital photos in order Slide Show Playing Slide Show See page 63 Avoid accidental erasure of your favorite digital photos and movies Protect Protect your digital photos and movies See page 67 Protect full screen digital photos and movies See page 68 Protect full screen Movie Player movies See page 68 Delete unwanted digit...

Страница 59: ...sing the full television screen You can view digital photos Full Screen See page 64 You can watch movies Full Screen See page 67 View digital photos and movies organized into albums and stored in folders on a PC Select Folder Select a folder See page 71 Change the order of your images Sort Sort your images See page 72 Choose just what you want to see digital photos only or movies only Filter Selec...

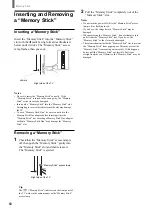
Страница 60: ...Memory Stick access lamp is off then push the Memory Stick gently into the Memory Stick slot and then release it The Memory Stick is ejected Tip The Memory Stick indicator on the front panel of the TV works in the same manner as the Memory Stick access lamp 2 Pull the Memory Stick completely out of the Memory Stick slot Notes Do not turn the power off while the Memory Stick access lamp is lit or f...

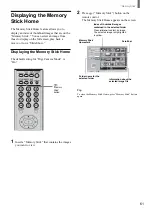
Страница 61: ...efault setting for Digi Camera Mode is On 1 Insert a Memory Stick that contains the images you want to view Memory Stick Home mark Folder name for the selected folder 2 Press Memory Stick button on the remote control The Memory Stick Home appears on the screen Tip To close the Memory Stick Home press Memory Stick button again Memory Stick button Index of thumbnail images contained in the selected ...

Страница 62: ... selected file A yellow frame is displayed and you can move it around using V v B b on the remote control Information bar Provides information on the digital photo or movie currently selected by the cursor No Order Total number of images File File name and file type Size Resolution Date Recorded date Marks indicated in the lower part of an image Icon File status The file indicated with Related fil...

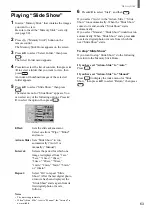
Страница 63: ...for which one image is displayed from 1sec 5sec 10sec 20sec 30sec 40sec 50sec 1min 2min 3min 5min or 10min Repeat Select On to repeat Slide Show After the last digital photo or movie has been displayed the Slide Show starts again from its first digital photo or movie follows Notes The time is approximate When Advan Slds is set to Manual the Interval is not available To stop Slide Show If you want ...

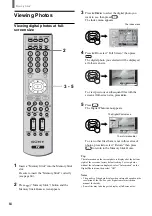
Страница 64: ... previous or subsequent files with the screen at full screen size press B b 5 Press The Digital Photo menu appears To view other files that are not in this series of photos press V to select Return then press to return to the Memory Stick Home Tip The information on the current photo is displayed at the bottom right of the screen as factory default setting To view photos without the information di...

Страница 65: ... direction you selected 6 Press v to select Close then press The photo will be saved in the rotated position shown on the screen Digi Camer Select Folder Sel B Date 2001 FEB 14 5 25PM Rotating a photo shown at full screen size 1 With a photo shown on the TV screen at full screen size see page 64 press The Digital Photo menu appears 2 Press V v to select Rotate then press 3 Press V v to select the ...

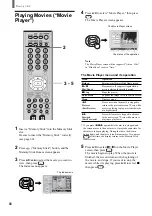
Страница 66: ...turns to the Memory Stick Home screen Plays a movie If you press it again while a movie is playing the movie is paused Stops the movie Expands the image to fill the entire screen Displays menu Press once when the movie is stopped to return to the previous screen Press while movie is playing to play movie backwards at a higher speed Press while movie is stopped to advance to the next screen Press w...

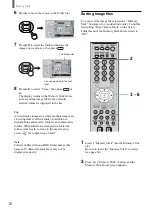
Страница 67: ...tos or movies You can protect the photos and movies from accidental erasure by protecting them You can also remove protection from digital photos or movies that you have previously protected 2 3 5 1 Insert a Memory Stick into the Memory Stick slot Be sure to insert the Memory Stick correctly see page 60 2 Press Memory Stick button and the Memory Stick Home screen appears Items L R L R The items th...

Страница 68: ...To protect a digital photo shown at full screen size 1 While the digital photo is being displayed at full screen size see page 64 press The Digital Photo menu appears 2 Press V v to select Protect then press 3 Press V v to select On then press The Index menu A Protect icon appears To protect a movie from the Movie Player screen 1 With the Movie Player screen displayed see page 66 press V v to sele...

Страница 69: ...When Digi Camera Mode is set to On and the selected image is deleted related files will also be deleted see page 62 Before you delete an image be sure to confirm the information shown on the Information Bar first You cannot delete a protected image see page 67 If the LOCK switch used to prevent accidental erasure is set to LOCK on the Memory Stick you are using you will not be able to delete the i...

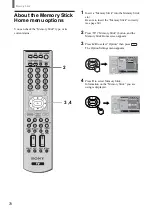
Страница 70: ...lot Be sure to insert the Memory Stick correctly see page 60 2 Press Memory Stick button and the Memory Stick Home screen appears 3 Press V v to select Option then press The Option Settings menu appears 100MSDCF Date Select Folder Sel B 4 Press v to select Memory Stick Information on the Memory Stick you are using is displayed 100MSDCF Date Size Sel Back Select Folder ...

Страница 71: ...isplay more than 2 000 you must set Digi Camera Mode to Off 2 3 8 1 Insert a Memory Stick into the Memory Stick slot Be sure to insert the Memory Stick correctly see page 60 2 Press Memory Stick button and the Memory Stick Home screen appears 3 Press V v to select Select Folder then press The Select Folder menu appears Date Select Folder Sel B 4 Press V v to select Digi Camera Mode then press Date...

Страница 72: ...lder Sel B 7 Press V v to select the folder containing the image you want to see then press Date Select Folder Sel B 8 Press V v to select Close then press or B The display returns to the Memory Stick Home screen and the image files in the currently selected folder are displayed in the list Tip An electronic storage area where multiple images are stored together is called a folder In addition to d...

Страница 73: ...ither digital photos or movies saved on a Memory Stick To do this first set Digi Camera Mode on the Select Folder menu of the Memory Stick Home screen to Off 2 3 6 1 Insert a Memory Stick into the Memory Stick slot Be sure to insert the Memory Stick correctly see page 60 2 Press Memory Stick button and the Memory Stick Home screen appears Items that can be selected Name Order Name Order Date Order...

Страница 74: ...n other equipment compatible with the Memory Stick such as a digital camera etc Memory Stick type error A Memory Stick that is not compatible or cannot be used with the TV has been inserted Format error The Memory Stick has not been formatted correctly File error The selected folder has not been named correctly Re enter the name with fewer than 66 characters including by displaying the Select Fold...

Страница 75: ... Memory Stick 75 Read Only Memory A read only Memory Stick has been inserted You cannot record or delete the data on a read only Memory Stick ...

Страница 76: ...g for 1 second and flashes for 2 seconds 2 Press I on the TV to turn it off and disconnect the power cord then inform qualified Sony personnel or the Direct Response Center Customer Relations Center of how the indicator flashes duration and interval Make sure the power cord is connected securely Turn on the power of the TV Check antenna cable connections Set Cable to Off in the Channel menu page 2...

Страница 77: ...Off sound is not output from the TV s speakers regardless of the TV s volume control Make sure that the antenna is connected using the supplied 75 ohm coaxial cable Keep the antenna cable away from other connecting cords Do not use 300 ohm twin lead cables as interference may occur Press MTS SAP to select Mono page 45 If the option you want to select appears in a pale color you cannot select it Th...

Страница 78: ...s Problem Possible remedies The Memory Stick is not facing in the correct direction Insert the Memory Stick with the b mark facing forward into the Memory Stick slot page 60 The write protect switch on the Memory Stick is set to LOCK Release the lock The image file is protected Release the protection using the index screen Select Option in the Memory Stick Home and select File Then set Filter to S...

Страница 79: ...andard and is not intended for use with PC AUDIO 500 mVrms 100 modulation Impedance 47 kilohms AUDIO OUT 500 mVrms 100 modulation More than 500 mVrms at the maximum volume setting Variable More than 500 mVrms Fixed Headphones Stereo minijack Impedance 16 ohms Speaker Full range ø5 0 cm 1 31 32 inches 2 Woofer ø5 5 cm 2 5 32 inches 2 Speaker output 2 0 W 2 0 W 3 8 W Power requirement 120 V AC 60 Hz...

Страница 80: ...s indicator Standby Sleep indicator page 24 Power indicator Remote Control sensor Power Switch page 21 Channel buttons page 21 Tip The CHANNEL button have a tactile dot Use the tactile dot as a reference when operating the TV Volume buttons page 24 Input Selector button page 32 Headphones jack ...

Страница 81: ...AY button page 24 0 9 buttons page 24 JUMP button page 24 ENT enter button page 34 FAVORITES button page 38 MENU button page 23 V v B b select page 23 SLEEP button page 55 RESET button page 42 MTS SAP button page 45 GUIDE button page 36 button page 25 VOL buttons page 24 CODE SET button page 34 CH buttons page 21 FREEZE button page 31 TV VIDEO button page 32 x button page 36 SYSTEM OFF button page...

Страница 82: ...Cable TV 21 Channel setting 21 Channel Fix 22 Channel Skip Add 22 Closed caption 25 Component Video connectors 16 18 19 Connecting 6 antenna 8 audio receiver 15 cable box 8 digital satellite receiver 18 digital TV receiver 19 DVD player 16 17 power cord 9 satellite receiver 13 14 VCR 12 D Display 24 E Effect 26 R Remote control 6 battery installation 6 operating optional equipment 36 programming 3...

Страница 83: ...Additional Information 83 ...

Страница 84: ...Printed on 100 recycled paper using VOC Volatile Organic Compound free vegetable oil based ink Printed in Japan ...

Отзывы: