25
(GB)
The INPUT SETTING Menu
SCAN CONV (Scan converter)
Converts the signal to display the picture according to
the screen size.
ON: Enlarges the picture according to the screen
aspect. The picture will lose some clarity.
OFF: Displays the picture while matching one pixel of
input picture element to that of the LCD. The picture
will be clear but the picture size will be smaller.
Note
When the XGA or SXGA signal is input, this item
will not be displayed.
V SCROLL
Adjusts the vertical position of the picture.
Adjustable range is 0 to +7.
As the setting increases, the picture moves up, and as
the setting decreases, the picture moves down. To
resume the normal position, press the RESET key.
TITLE AREA
Adjusts the subtitle area.
Adjustable range is 0 to +7.
As the setting increases, the subtitle area becomes
wide, and as the setting decreases, the subtitle area
becomes narrow.
To resume the normal area, press the RESET key.
Note
Although the adjustable range displayed is 0 to +7, the
actual range may be limited depending on the V
SCROLL setting.
VIDEO MEMORY
Displays the selected video memory number. There
are 6 memory settings. If you select OFF, the image
is displayed according to the settings stored in each
channel memory.
How to set the VIDEO MEMORY
Using the Remote Commander
1
Press the desired number (1 – 6) of the VIDEO
MEMORY keys.
The selected memory number is displayed in the
menu.
2
From an appropriate menu, select an item to be
adjusted and adjust the setting using the
M
,
m
,
<
or
,
keys.
3
Press the
<
or ENTER key.
The adjusted item (setting) is stored in the selected
memory number. The screen returns to the previous
screen.
.........................................................................................................................................................................................................
1) The RGB signals of a computer
Using the Control Panel
1
Select a VIDEO MEMORY number (1 – 6) by
pressing the VIDEO MEMORY key.
(You can also set the VIDEO MEMORY with the
menu operation.)
2
From an appropriate menu, select an item to be
adjusted and adjust the setting using the
M
,
m
,
<
or
,
keys.
3
Press the
<
or ENTER key.
The adjusted item (setting) is stored in the selected
memory number. The screen returns to the previous
screen.
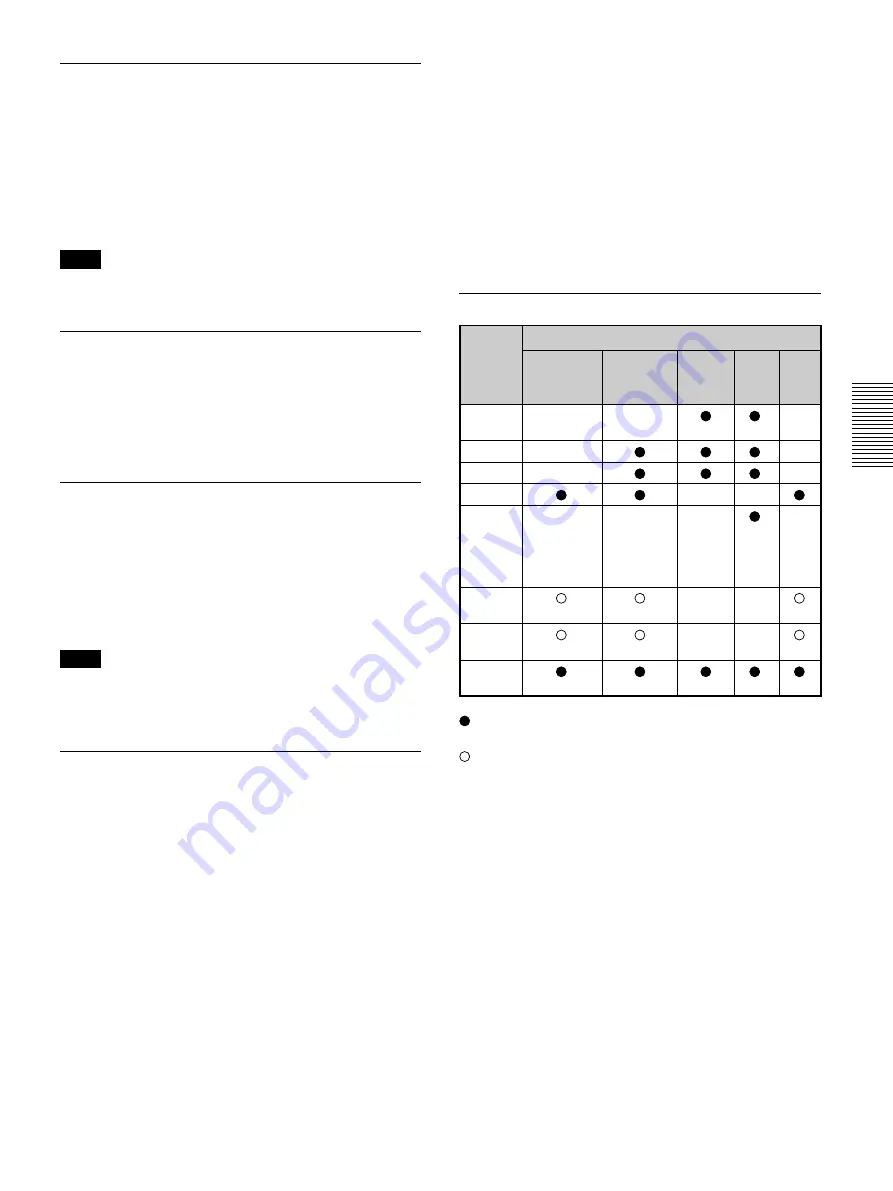
Input signals and adjustable/setting items
Item
Input signal
Video or
15k RGB/
HDTV/
RGB
1)
B&W
S video (Y/C) Progressive
DTV
Component
DOT
–
–
–
PHASE
SIZE H
–
–
SHIFT
–
–
ASPECT
–
–
SCAN
–
–
–
–
CONV
(lower
than
SVGA
only)
V
–
–
SCROLL
TITLE
–
–
AREA
VIDEO
MEMORY
: Adjustable/can be set
– : Not adjustable/can not be set
: Aspect ratio dependent item
About the preset memory
This projector has 43 kinds of preset data for input
signals (the preset memory). When the preset signal is
input, this projector automatically detects the signal
type. When the signal is registered to the preset
memory, a suitable picture is displayed on the screen
according to the signal type. The type of input signal
is displayed in the INPUT SETTING menu. You can
adjust the preset data through the INPUT SETTING
menu.
This projector also has 20 kinds of user memories for
each INPUT-A/B. You can register a new type of
signal that is not preset. When an unpreset signal is
input for the first time, the setting via INPUT-A/B
adjusted in the INPUT SETTING menu is stored.
When more than 20 user memories are registered for
each INPUT-A/B, the newest memory is
automatically stored over the oldest one.
Содержание VPL VW10HT - WXGA LCD Projector
Страница 4: ...4 GB ...
Страница 43: ......
Страница 83: ......
Страница 123: ......
Страница 124: ...Sony Corporation Printed in Japan ...


