background image

S

o

ft

wa

re

 Guide

Using PictureGear Studio

77

n

N

Using the PrintStudio feature
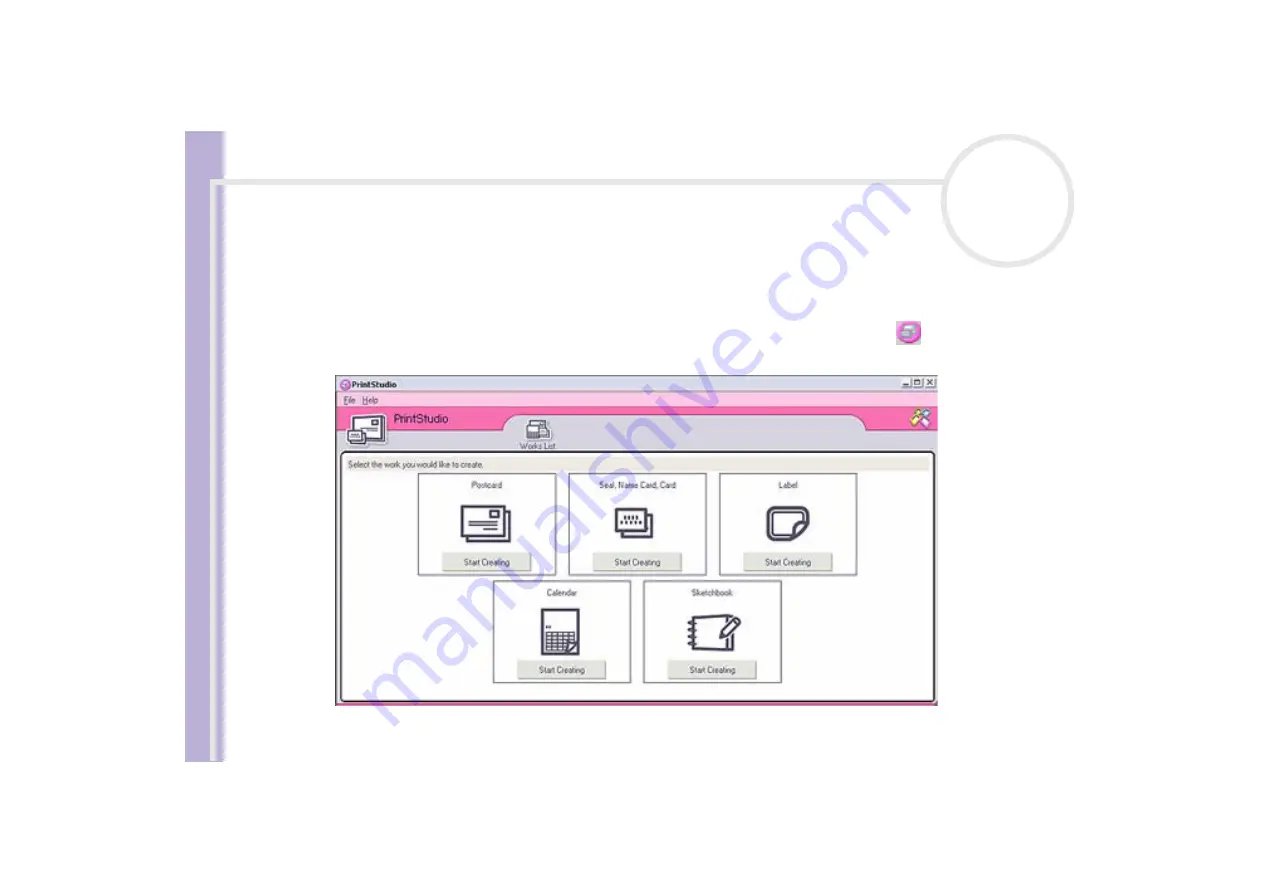
Use 

PrintStudio

 to design and print original postcards, calendars, art, and labels using your favourite 

pictures.

To use PrintStudio, proceed as follows:

1

In the PictureGear Studio main window, click 

PrintStudio

Alternatively, go to 

Start

Programs

PictureGear Studio

Tool

 and then click 


PrintStudio

.

The 

PrintStudio

 window appears.

Содержание VAIO PCG-V505AK

Страница 1: ...N Software Guide P C G V 5 0 5 s e r i e s ...

Страница 2: ...d under Japanese Law the manufacturer of your Sony computer system the SONY HARDWARE Please read this EULA carefully before installing or using the software distributed together with this EULA the SONY SOFTWARE By installing or using the SONY SOFTWARE you agree to be bound by the terms of this EULA You may use the SONY SOFTWARE only in connection with the use of the SONY HARDWARE SONY SOFTWARE is ...

Страница 3: ...media damaged by accident abuse or misapplication The above limited warranty replaces all other representations conditions and warranties whether express or implied by statute or otherwise and Sony expressly disclaims all other warranties and all conditions including but not limited to the implied warranties and or conditions of satisfactory quality and fitness for a particular purpose The terms o...

Страница 4: ...gy saving through the use of computers and their office equipment The program backs the development and dissemination of products with functions that effectively reduce energy consumption It is an open system in which business proprietors can participate voluntarily The targeted products are office equipment such as computers displays printers facsimiles and copiers Their standards and logos are u...

Страница 5: ...s Incorporated WinDVD for VAIO is a trademark or registered trademark of InterVideo Inc QuickTime and the QuickTime logo are trademarks used under licence QuickTime is registered in the U S and other countries RealOne Player is a trademark or registered trademark of RealNetworks Inc in the U S and other countries PowerPanel is a trademark of Phoenix Technologies Ltd Symantec Norton AntiVirus is a ...

Страница 6: ...rmation To register your Sony VAIO computer proceed as follows 1 Set up an Internet connection see also Configuring your modem page 93 2 Double click the VAIO Online Registration icon on the desktop You can also find the link on the Start menu uder Programs 3 Change your language if necessary and click Next 4 Click Register Now and then click Next This brings you to the website https registration ...

Страница 7: ...ograms Sony software DVgate Sony Electronics DVgate is a kit of 3 complementary applications DVgate Motion DVgate Still and DVgate Assemble This collection makes it easy to select and edit digital video clips then bring them together into a professional looking home video Use i LINK to connect your digital video camera and the computer operates as an editing desk that can capture preview cut and a...

Страница 8: ...entified by Windows by using this software Memory Stick Formatter supports Memory Sticks with the following capacities 4 8 16 32 64 and 128 MB When you format Memory Sticks with this software all data on the Memory Stick will be lost If necessary take a backup of your data before formatting MovieShaker Sony Electronics MovieShaker creates personal movies complete with transitions special effects b...

Страница 9: ...e page 40 PictureGear Studio Sony Electronics PictureGear Studio is easy to use software that is designed to help you get the most enjoyment out of your photographs taken with a digital camera With the PictureGear Studio software you can easily load photos into your computer create photo albums and make prints See Using PictureGear Studio page 64 PowerPanel Phoenix Technologies The PowerPanel util...

Страница 10: ...rypts and manages music files either downloaded to a personal computer by using the EMD services or adopted or created from your own CD or the Internet See Managing audio files with SonicStage page 54 Sony Notebook Setup Sony Electronics Use Sony Notebook Setup to consult system information specify preferences for system behaviour and set up a power on password for your Sony computer See Setting u...

Страница 11: ...o the DV device To be able to use the Sony software VAIO Edit Components you must first install Adobe Premiere version 6 0 on your computer available for purchase Product Recovery CD ROMs Sony Corporation The product recovery CD ROMs allow you to reinstall the system the software shipped with your computer and the bundled device drivers if they are corrupted or accidentally erased Reinstalling an ...

Страница 12: ...the best support for older Windows based applications and technologies For questions and technical assistance go online to http support microsoft com directory Internet Explorer 6 0 Microsoft Corporation Internet Explorer is the Microsoft Internet browser allowing you to surf the World Wide Web The Setup Wizard configures your computer to connect automatically to your service provider A full e mai...

Страница 13: ... a PDF file embedded in an HTML file You quickly see the first page while the rest of the document is being downloaded For questions and technical assistance go online to http www adobe com Adobe Photoshop Elements 2 0 Adobe Systems Incorporated Adobe Photoshop Elements introduces the next generation of image editing with powerful new features that offer something for every user Delivering the bro...

Страница 14: ...or questions and technical assistance go online to http www easy co jp dde sony QuickTime 5 0 Apple QuickTime is the Apple technology that makes video sound music 3D and virtual reality come alive for your Internet browser and Windows For further information see the website at http www apple com quicktime RealOne Player RealNetworks RealOne Player is the RealNetworks video and audio player which l...

Страница 15: ...eek and monitor your computer for any activity that might indicate the work of a virus in action It can also scan files you download from the Internet and check floppy disks for boot viruses when you use them You must launch the Norton AntiVirus installation and you will then be prompted to update the virus definitions This is normal as new viruses will have come out since your VAIO left the facto...

Страница 16: ... standard consumer DVD player in addition to some very advanced functionalities full precision video decoding a choice of user interfaces and video display options You can play DVD movies interactive DVD titles MPEG video content video and audio CDs WinDVD for VAIO automatically determines the type of disc in the DVD drive and uses the correct playback method For questions and technical assistance...

Страница 17: ...tware applications are delivered with your VAIO Check the printed Specifications sheet to see whether they are preinstalled Then read the printed Application CD Guide for installation details if applicable Using DVgate page 17 Using MovieShaker page 34 Using Network Smart Capture page 40 ...

Страница 18: ...l for recording on a DV device With DVgate you can easily perform image editing with your computer and a DV device DVgate consists of 3 applications DVgate Motion DVgate Still DVgate Assemble Depending on the computer settings frames may be lost during video capture and frame duplication when recording edited videos Please make sure you configure your computer according to the recommended settings...

Страница 19: ...en choose to save the selected scenes as separate files or as one file Recording edited video on a DV device You can record the edited video on tape using a DV device such as a digital video camera recorder connected to the computer With DVgate you are not limited to recording single clips but you can record a series of clips on the DV device at one time To launch DVgate Motion proceed as follows ...

Страница 20: ... installed DVgate from the application CD if applicable see the printed Specifications sheet and Application CD Guide 2 Launch DVgate Motion 3 Click the down arrow and select Import Auto from the Mode drop down list Use the DVgate camera controls buttons to play rewind or fast forward the tape to the selected time code to begin capturing 4 Press Play to start the video The video begins to play in ...

Страница 21: ...s a file window appears 7 Select the location to save the file 8 Click the Save button DVgate captures the segments The Capturing complete message appears 9 Click OK in the DVgate Motion window to finish Information about the capturing process is displayed in the Report window 10 Click OK 11 Exit DVgate Motion The Dvmotion2 window appears on the screen You can then save the In Out list which allow...

Страница 22: ...ave them automatically adjusted by using the automatic calibration feature The values generated by the automatic calibration feature are usually correct To automatically adjust the recording correction values proceed as follows 1 Launch DVgate Motion 2 Click the down arrow and select Export Auto from the Mode drop down list 3 Select Adjust on Recording from the Settings menu The Adjust on Recordin...

Страница 23: ...here the sound modes change You can only add AVI files using DV Codec as video compression MPEG files are not supported When recording a video sequence make sure that all images are saved in the same mode Recording in different modes might cause sound or image distortions during playback After adding the files to the Record List you can still change the order of the files add or delete files To ch...

Страница 24: ...ext File are buttons for moving the preview from one selected file to another They are not designed for navigation purposes within the list Consequently you cannot click them when only one file is selected When you select only one file Previous File and Next File do not function Recording on the DV device You can automatically or manually export videos from your computer to a DV device To automati...

Страница 25: ...ecord List to the connected device Clicking Record will send only the video files selected from the Record List to the connected device Even if you specify not to add blank frames several blank frames are always placed at the end of the recorded segment regardless of the settings This is to prevent image noise from being recorded when recording stops Do not quit or log off from Windows while recor...

Страница 26: ...are two capture modes in DVgate Still the Continuous Capture mode and the Single Frame Capture mode Continuous Capture mode If you capture pictures during Play mode you can capture 30 frames of still pictures in total with respectively 15 frames in the forward and backward directions All still pictures already captured are lost If you capture during Pause mode you can capture only one frame of a s...

Страница 27: ...d Specifications sheet and Application CD Guide 2 Connect the DV device to your computer 3 Launch DVgate Still Start Programs DVgate DVgate Still The DVgate Still window appears 4 Set the DV device to the Play or Pause mode The video image appears in the Monitor window 5 Click the Capture button The video image in the Monitor window is being captured Dragging the slider in the Capture window to th...

Страница 28: ...PG GIF or DVF To save the captured pictures proceed as follows 1 Launch DVgate Still and capture images 2 In the DVgate Still Still window select a still picture you want to save 3 Click the Save button The Save As dialog box appears Use the Location to Save drop down list to select a folder Select a file format from the File Format drop down list 4 Click Save The captured picture is saved ...

Страница 29: ...te Motion and DVgate Still Afterwards you can splice them together to form one single file You can save the resulting spliced video sequences as AVI MPEG1 or MPEG2 format files To launch DVgate Assemble proceed as follows 1 Click Start 2 Point to Programs DVgate and then to DVgate Assemble The DVgate Assemble main window appears Depending on your model ...

Страница 30: ...gate Assemble will add all serial numbered files with the same name to the list Serial numbered files are files that are created when DVgate Motion saves files that are split and applies consecutive numbers to them The numbers of the split files have 4 digits and increase one unit at a time starting with 0001 5 Select a file and click Open The AVI file is added to the list Imported files are added...

Страница 31: ...scenes you want to use proceed as follows 1 Launch DVgate Assemble 2 Select the AVI file you want to edit from the Assemble List 3 Choose Edit a clip from the Edit menu The DVgate Assemble Clip dialog box appears 4 Click the Preview button The video sequence of the selected file is played back You can move the playback position to the Begin point or the End point by clicking the Begin or End point...

Страница 32: ...p dialog box appears 6 Enter the insertion time in seconds or frames 7 Turn the Wide TV mode on or off 8 Select the screen size 9 Adjust the height and width of still images when they are output Full size Enlarges the screen size to the full monitor size The aspect ratio may change with this selection Original Size Retains the original size of the image without reduction or enlargement Full size u...

Страница 33: ...tware Guide Using Video software 32 n N 12 Click OK The Assemble List appears 13 Click OK The still and video images are combined Choosing MPEG1 as the format will reduce the size of the file considerably ...

Страница 34: ...dialog box appears and splicing begins 5 The DVassemble window appears and displays the Exporting Save to an AVI file complete message The set time and the size that the file is split into are displayed when outputting an AVI file 6 Click OK The edited video is saved When you click the Output button only the files on the Assemble List that have been selected are connected and output as a file Clic...

Страница 35: ...ned with special effects still images pictures and music files and then saved in a format most computers can play To open MovieShaker proceed as follows 1 Make sure you have installed MovieShaker from the application CD if applicable see the printed Specifications sheet and Application CD Guide 2 Click the Start button on the Windows taskbar 3 Point to Programs and then MovieShaker 4 Click MovieSh...

Страница 36: ...ly when a MICROMV device has been connected to your computer and MICROMV Device has been selected from the Device menu the Index tray appears while the Capture tray is displayed on the monitor panel The Effect tray contains various effects to be applied to a scene The Text tray provides a tool for creating a text effect to be applied to a scene The Transition tray contains various transition effec...

Страница 37: ... MovieShaker to stop responding To remove a clip from the Clip tray drag it from the Clip tray and drop it on the trash icon This only removes the clip from the tray the original file is not deleted Creating a movie After adding clip s to the Clip tray you can create a short movie using the Shaker feature Shaker randomly selects clips from the Clip tray to create a 30 second scene To create a movi...

Страница 38: ... with Shaker begin with a black frame After processing they are placed in the first available slot on the Product tray Limit the number of scenes in the Product tray to 5 or less MovieShaker may stop responding if there are too many scenes in the Product tray ...

Страница 39: ...d contrast and modifying the length of the clip 1 Shake tab 2 Capture tab 3 Edit tab 4 Speed control slider 5 Volume control slider 6 Effect palette 7 Fade in fade out 8 Trash 9 Full screen preview button 10 Play trimming range 11 Repeat play 12 Play control buttons 13 Trimming range 14 Save as still image button 15 Time adjustment 16 Monitor ...

Страница 40: ... can preview and check them before saving them Your final movie products can be saved as files exported to a DV device MICROMV device To save your movie proceed as follows 1 Click the Export button The Export dialog box appears 2 Select the format in which you want the document to be saved 3 Click Next 4 Select the folder in which you want to save the file 5 Name the file 6 Click Save Your movie i...

Страница 41: ...d disk drive make sure they are compatible with your computer s Microsoft Windows operating system and check the required operating conditions of the devices Launching Network Smart Capture To launch Network Smart Capture proceed as follows 1 Make sure you have installed the software from the application CD if necessary see the printed Application CD Guide 2 In the Start menu select Programs Netwo...

Страница 42: ...Software Guide Using Video software 41 n N Icon Description Function 1 Finder window Displays images in real time 2 Help Displays the online Help documentation ...

Страница 43: ...s captured images in the Finder Window 5 Task bar See Managing your images and movies page 53 for details 6 Select Capture Menu Enables you to customise an image and add effects 7 Change Setting Enables you to set preferences 8 Capture button Records the image in the Finder window This button changes to Record in Movie mode and Start in Web camera mode 9 Web Camera Captures still images according ...

Страница 44: ...t on The viewfinder image appears in the main window 3 Click Still near the top left hand corner of the screen Making settings for Still mode Before you capture a still image you can set your own preferences To make your settings for Still mode proceed as follows 1 Click the Select Capture Menu icon near the bottom of the screen to view capture options for your still image capture For more on the ...

Страница 45: ... tabs Basic Select a folder destination for your images Capturing Format Select the image size in pixels and adjust the image quality Common Enable or disable the shutter and animation sound effects 3 Click each tab to view the options and set preferences 4 Click OK when you have finished If using a web cam a further tab allowing Camera Adjustment is available ...

Страница 46: ...capture 2 When you see the image you want in the Finder window click Capture You can capture a single image or several images at once 3 Your captured images are stored as thumbnail images in the Display List to the right of the Finder window 4 Click the thumbnail images or arrows to the right of the Finder window to view your captured images As each image is captured it appears in the Finder windo...

Страница 47: ...iewfinder image appears in the main window 3 Click Movie to activate Movie mode Making settings for Movie mode Before you capture a moving image you can set your own preferences To make your settings for Movie mode proceed as follows 1 Click the Select Capture Menu icon near the bottom of the screen to view setting options for your moving image capture For more on the Effect option see Applying ef...

Страница 48: ...folder destination for your movies when recording video clips Capturing Format Adjust the image quality reduce noise and set the maximum recording time for your movie capture Common Enable or disable the shutter and animation sound effects 3 Click each tab to view the options and set preferences and click OK when you have finished If using a web cam a further tab allowing Camera Adjustment is avai...

Страница 49: ...n the camcorder s viewfinder click Record to begin recording your movie The Movie Player icon appears Click Stop when you have finished recording your movie The first frame of your movie appears in the data list to the right of the Finder window Network Smart Capture automatically stops recording according to the recording time you set in the Movie Clip Setting window 3 You can preview your movie ...

Страница 50: ...proceed as follows 1 Launch Network Smart Capture 2 Connect your i LINK compatible digital camera or USB Web camera to your computer and turn it on The viewfinder image appears in the main window 3 Click Web camera to activate Web camera mode Making settings for Web camera mode Before you capture a Web camera image you can set your own preferences To make your settings for Web camera mode proceed ...

Страница 51: ...ination to store your images set your maximum observation time and choose your dial up setting Capturing Interval Set your Web camera to capture images at intervals or whenever there is movement Send Set your upload options You can make FTP and Web page settings here too Capturing Format Select the image size in pixels and adjust the image quality Common Enable or disable the shutter and animation...

Страница 52: ...ture an image in Web camera mode proceed as follows 1 Use your digital camera or camcorder to locate the moving image you want to capture 2 When you see the image you want in the Finder window or in the camcorder s viewfinder click Start to begin The Web Camera Reservation Wizard appears guiding you through the initial settings 3 Click Finish in the final screen The automatic function is set up an...

Страница 53: ...r each picture To add effects proceed as follows 1 Click the Select Capture Menu icon at the bottom of the screen 2 Select the Effect option from the list The Effect Selection window appears 3 Choose from the range of effects and animations 4 Click Properties to select the level of each effect To remove an effect select No Effect from the Select Capture Menu list or from the Effect Selection windo...

Страница 54: ... Network Smart Capture see the application s online Help files To view the online help proceed as follows From the Start menu click Programs Network Smart Capture and click Help from the submenu Alternatively Click the Help icon in Network Smart Capture s main window Save As Saves still images in JPEG format and movie images in MPEG format to your required location Send attached Image by E mail La...

Страница 55: ...a can be played on your computer or transferred to external devices or media SonicStage converts your existing MP3 WMA and WAV format audio files into the default ATRAC3 format To open SonicStage proceed as follows 1 Click the Start button on the Windows taskbar 2 Point to Programs SonicStage and then click SonicStage 3 The Please confirm setup dialog box appears You can set SonicStage as the defa...

Страница 56: ...Software Guide Managing audio files with SonicStage 55 n N ...

Страница 57: ...evice 3 Import button Displays the Import window You can use this window to import audio files stored on the computer into the Music Drive and register them to a Playlist 4 Simple Mode button Switches the Main window to Simple Mode You can also switch to Simple Mode by clicking the shortcut key F11 5 Close button Closes SonicStage 6 Help button Displays the help file 7 Operation area The Playback ...

Страница 58: ...ding CDDB2 registration click the Help button Only possible when you have this slot built in on your machine 11 Sound Effect button You have the choice between Vocal Canceller the Vocal Canceller cannot be applied to songs on a MiniDisc Sounds Effects Off 12 Visualizer button The Visualizer window shows various visual effects while playing an audio file 13 Internet button Opens or closes the Inter...

Страница 59: ...for example record songs from audio CDs and import them to playlists in SonicStage To record a CD proceed as follows 1 Insert an audio CD into your system s optical disc drive 2 Click the Recording button 1 3 Click the CD icon as your source 2 4 Click the Music Drive icon as your target 3 ...

Страница 60: ...can select specific tracks on your CD by deselecting the check boxes from the tracks you do not want to record You can clear all selected tracks by selecting the empty Select All check box and then selecting the tracks you want to record For each song you can determine the song title the artist and the genre 9 Click the Rec Selection button to begin recording When you want to record all the songs ...

Страница 61: ...your optical disc drive for the first time the CD Drive Optimization dialog box appears Click Start to verify your optical disc drive Once the verification is performed recording begins You can display the name of the CD and its songs by clicking the CD Info button and after registering with CDDB ...

Страница 62: ...omputer automatically recognises the connected external device or media and the Check In Out window appears 2 Click the Show List button to see which songs you have in the Music Drive 3 In the Tree view on the left select the playlist containing the song s to check out 4 In the List view on the left select the track to check out To check out more than one song at a time hold down the Ctrl key and ...

Страница 63: ...he MagicGate Memory Stick into your computer Your computer automatically recognises the connected external device or media and the Check In Out window appears 2 Click the Show List button to see which songs you have on your Memory Stick 3 Select on the right hand side the track to check in To check in more than one song at a time hold down the Ctrl key and select additional songs 4 If necessary se...

Страница 64: ...ster your imported songs through the Playlist feature of SonicStage You can manage your music by creating your own list of songs categorised by genre or artist displaying your song list in the Playlist feature and arranging your songs in a customised order using the Playlist folders Edit your music by combining multiples songs into a single one or divide one song into two by using the Combine and ...

Страница 65: ...and family To share a PictureGear Studio creation over the Internet or by using another computer use the Export feature See Using the Export feature page 75 Launching PictureGear Studio To launch PictureGear Studio proceed as follows 1 Make sure you have installed the software from the application CD ROM if necessary see the printed Application CD Guide 2 In the Start menu select Programs PictureG...

Страница 66: ...ecognise the device or media In this case an identification window appears in which you have to select the device Using the Import feature with a USB device To use the Import feature with a USB device proceed as follows 1 Connect your digital camera camcorder to your computer or insert the Memory Stick you are using 2 In the PictureGear Studio main window click Import Photo The PhotoCollection Imp...

Страница 67: ...porting devices a scanner for example proceed as follows 1 Make sure the photo capture software delivered with the device is installed on your computer and connect your scanner or other TWAIN device to your computer 2 In the PictureGear Studio main window click Import Photo The PhotoCollection Import window appears and your connected device is displayed in the Select window 3 Click the Camera icon...

Страница 68: ...ove the picture from the photo collection Click Rotate to change the picture s position Click Trim to crop the picture or capture a specific area 7 Click Finish Importing to save the imported pictures in a photo collection see Using the PhotoCollection feature page 68 ...

Страница 69: ...e PhotoCollection feature proceed as follows 1 In the PictureGear Studio main window click PhotoCollection Alternatively go to Start Programs PictureGear Studio Tool and then click PhotoCollection The PhotoCollection window appears with a list of available photo sources displayed on the left and the selected source s contents displayed as thumbnail pictures on the right ...

Страница 70: ...h these additional tools and features Click Rotate to change the picture s position Click View to enlarge a thumbnail view Click Slideshow to place the selected pictures into an organised slideshow Click Print to set up your photos and select paper to make prints Click Create to create an album binder postcard or label for example Click Export to send your collection by e mail or to convert the si...

Страница 71: ...emove or change your designs to create your own unique photo art To use the Binder feature proceed as follows 1 In the PictureGear Studio main window click Binder Alternatively go to Start Programs PictureGear Studio Tool and then click Binder The Binder window appears A list of binder styles is displayed on the left When you add your pictures to a binder they are displayed as thumbnails on the ri...

Страница 72: ...it An information form appears 4 Fill in your information and click OK An art palette window appears 5 To create an original page with art or stamps use the decoration features on the right by clicking on the required feature and applying it to your photo 6 Click Save to add the new page to your binder 7 You can create your own custom binder styles by clicking Create Title ...

Страница 73: ...lectronic photo album to share with friends and family To use the PhotoAlbum feature proceed as follows 1 In the PictureGear Studio main window click PhotoAlbum Alternatively go to Start Programs PictureGear Studio Tool and then click PhotoAlbum The PhotoAlbum window appears 2 Click New Album The Select Photo area appears ...

Страница 74: ...um with the selected photo s after selecting your photos The Select Design window appears 5 Click to select a design layout for your album Use the scroll bar to view all available album designs The Select Layout window appears 6 Click to select a page layout for your album Use the scroll bar to view all available layout designs A preview of your selected design and page layout is displayed ...

Страница 75: ...h your own drawings stamps or other decorations 11 Click Save The Save Album dialog box appears 12 Enter a name for your album and click OK If you want to work on a previously created album do not click Create New Album Instead select the required album from the AlbumCollection view on the right hand side of the window Photo albums can only be viewed or edited using the PictureGear Studio software...

Страница 76: ... Explorer Export as a Light Package to create a compressed file that can be viewed on a computer Export as a Full Package to create an uncompressed file to be saved to recordable media such as a CD R CD RW or a Memory Stick Only Albums exported as Flash Files can be viewed on another computer on which PictureGear Studio is not installed To export a photo album proceed as follows 1 Create a photo a...

Страница 77: ...elect Folder window appears 4 Click Browse and navigate to the destination folder 5 Enter a file name if necessary 6 Click Export A progress window appears briefly An export completion message window appears displaying the file name and file size 7 Click OK 8 Click Return to Edit Album Page ...

Страница 78: ...ign and print original postcards calendars art and labels using your favourite pictures To use PrintStudio proceed as follows 1 In the PictureGear Studio main window click PrintStudio Alternatively go to Start Programs PictureGear Studio Tool and then click PrintStudio The PrintStudio window appears ...

Страница 79: ...which varies depending on the item you are creating 3 Make selections for the picture s design layout and custom decoration for the item you want to create 4 Set the number of copies to be printed and select a connected printer 5 Click Print 6 Make sure you use the appropriate paper when creating items such as postcards labels or business cards ...

Страница 80: ...9 n N Viewing the online Help For more information about PictureGear Studio see the application s online Help files To view the online help proceed as follows Click Help in PictureGear Studio s main window or in each PictureGear Studio element ...

Страница 81: ...modem for use how to use and customise the look of your Sony software and utilities etc Setting up your language page 81 Setting up your notebook with Sony Notebook Setup page 83 Managing power with PowerPanel page 85 Selecting display modes page 92 Configuring your modem page 93 Changing your windows design with the UI Design Selector program page 94 Setting a Sony wallpaper page 95 Selecting a s...

Страница 82: ...Add button in the Installed input locales text box 5 Select your keyboard settings from the Input Locale drop down list in the window that appears 6 Click OK 7 In the Regional Options window click the Set as Default button 8 Click Apply to apply the changes then click OK 9 Continue your Windows setup until it is finished To change the country and language settings into your language as soon as Win...

Страница 83: ...k Yes if the new language must be changed for all users Click OK in the Regional Options window 6 Click Start and select Log Off Administrator 7 Click Yes in the Log Off Windows window The Log On to Windows window appears 8 Enter your password and click OK to log on again All the menus help files and icons are then displayed in your selected language However some parts may remain in English ...

Страница 84: ...Displays system information including memory capacity serial number and BIOS version Initial Setting Selects the drive and device order you wish to use for loading the operating system You can specify the hard drive as well as other drives inserted into your computer You can change the volume of the sounds played while the operating system is loading Power On Password Sets the password to secure y...

Страница 85: ...ou want to change 4 Once finished click OK The item has been changed For more information about each option click Help on the Sony Notebook Setup screen to display the help file If you open Sony Notebook Setup as a limited user then only the About This Computer tab will be visible ...

Страница 86: ...to your own needs with the goal of extended battery life PowerPanel has the following features Automatic Profile Selection APS based on the currently active application Ability to select specific Power Profiles manually from the menu Ability to edit and create new profiles Ability to display detailed battery information It works in harmony with your Windows settings ToolTips to signal Power Profil...

Страница 87: ...es proceed as follows 1 Right click the PowerPanel icon in the taskbar and select Profiles 2 In the Profiles menu select a profile The appropriate power settings are activated When you use the battery pack as power source your system selects the Maximum Battery Life power management profile by default If you select a different power management profile while using battery power the same profile wil...

Страница 88: ...gged in Turns off all power management features such as Standby and Hibernate modes Icon Description Maximum Battery Life Provides power saving features to give you maximum battery life and good performance It reduces the brightness of the display and puts the system into Standby mode after a specified time period Ultimate Battery Life Extends the Maximum Battery Life When you select this profile ...

Страница 89: ...entations You can establish settings for LCD Video Standby Hard Disk Standby and Standby to optimise power management for your system Communications Extends battery life by initiating a quick display time out You can also establish settings for LCD Video Standby Hard Disk Standby and Standby to optimise power management for your system Games Disables the display and the Hard Disk timer DVD Optimis...

Страница 90: ...d changes profiles as you switch between applications Power management lets your system enter energy saving modes by levelling some energy consuming parameters such as LCD brightness or hard disk activity To select automatic profiles proceed as follows 1 Right click the PowerPanel icon in the taskbar and select Profiles 2 Select Automatic Profile Selection The Automatic Profile Selection feature d...

Страница 91: ...ation such as the estimated battery life remaining and charging time Display the Battery Information toolbar on the screen which shows the battery status icon the percentage of remaining capacity and the amount of running time left in the battery To display the Battery Information toolbar right click the PowerPanel icon in the taskbar and select Toolbars then Battery Information from the menu Batt...

Страница 92: ... edit existing profiles Users whose account type is Limited can only open the Power Profile tab in the Power Panel window in view mode To check your user account information select the Users and passwors category in the Control Panel Your account type must be Computer administrator to be able to edit power profile Creating a power profile To create a power profile proceed as follows 1 Right click ...

Страница 93: ...ur notebook and restart To select a display proceed as follows 1 Click the Start button point to Settings and then click Control Panel The Control Panel appears 2 Double click Display The Display Properties dialog box appears 3 Click the Settings tab 4 Click the Advanced button The Sony Notebook LCD and Mobility Radeon Properties dialog box appears 5 Click the Displays tab Select the Monitor Panel...

Страница 94: ...tings and then click Control Panel 2 Double click Phone and Modem Options The Phone And Modem Options dialog box appears 3 Select your location on the Dialing Rules tab 4 Click the Edit button to change the current configuration The Edit Location dialog box appears Or Click the New button to configure your modem The New Location dialog box appears 5 Check the country region settings and make sure ...

Страница 95: ... Start point to Settings and then click Control Panel 2 Double click UI Design Selector The UI Design Selector dialog box appears 3 Click or and select the design you like 4 Click Apply The UI Design Selector window design changes to give you a preview of the design you chose for the Sony software 5 To try another design click or 6 Click OK once you are satisfied with your choice The UI Design Sel...

Страница 96: ...the Background tab A list of Windows and VAIO wallpapers is displayed 4 Select a wallpaper You can see a preview of this wallpaper in the monitor above the background list 5 Adjust the position of the wallpaper with the Picture Display drop down list and the Pattern option 6 Click Apply when you have found the appropriate wallpaper 7 Click OK to close the Display Properties dialog box The wallpape...

Страница 97: ...tube after hours of the same image being rescanned In fact today s CRT display technology makes burn in unlikely except under extreme conditions Your computer comes with built in screen savers that you can select To change the built in screen saver proceed as follows 1 Right click on the desktop 2 Select Properties The Display Properties dialog box appears 3 Select the Screen Saver tab 4 In the Sc...

Страница 98: ...ng and updating applications This section explains how to install run or uninstall a software Furthermore you will learn how to download the latest updates from our website Installing software page 98 Changing or removing software page 100 Downloading software page 101 ...

Страница 99: ...nel The Control Panel window appears 2 Double click Add or Remove Programs The Add or Remove Programs dialog box appears 3 Click Add New Programs and then click CD or Floppy The Install Program From Floppy Disk or CD ROM window appears 4 Insert the first installation floppy disk or CD ROM and click Next The Run Installation Program appears 5 Click Browse to find the installation program The Browse...

Страница 100: ...type of installation you wish and click Next The software installation begins Make sure to select Yes I want to restart my computer now if you are asked to 10 Click Finish Installation is complete and your computer restarts When using Add or Remove Programs you can only install programs that were written for Windows operating systems ...

Страница 101: ...ninstall a program click Change Remove or Remove then click Next followed by OK If the Locked file detected dialog box appears click Reboot The computer restarts once uninstallation is completed and all previously used files are deleted If the Shared file detected dialog box appears it is recommended that you click No to keep shared files Click Close The software is uninstalled When you click Chan...

Страница 102: ...t www vaio link com To download the latest upgrades proceed as follows 1 Go to www vaio link com and choose your language 2 Click the VAIO User button 3 Fill in the two codes and enter the site 4 Select Downloads and follow the procedure A list of available downloads appears 5 Choose the appropriate upgrade and follow the online instructions to download it To install your application see the Insta...

Страница 103: ... the operating system This section explains how to install check update or uninstall a driver Separate repair recover procedures are also detailed Emergency Repair Disk creation Finally you will learn how to download the latest drivers from our site Installing a driver page 103 Checking the driver s installation page 104 Updating a driver page 106 Uninstalling a driver page 107 Creating an Emergen...

Страница 104: ...om the provided CD ROM or disk by using a CD ROM or disk drive connected to the computer select the Drivers folder on the disc drive 5 When installing a driver after having copied the contents of the provided CD ROM or disk to your hard disk browse to the appropriate subdirectory containing the driver The subdirectory should be found in the folder you copied from the CD ROM or disk 6 Click OK to b...

Страница 105: ...he opened windows your device is ready for use The device is not working properly in the following cases Your device is shown in Device Manager with a yellow question or exclamation mark Right click your device and click Uninstall Then repeat from step 2 in Installing a driver page 103 Double clicking the category of your device in the device manager list does not display your device You have to r...

Страница 106: ...om step 2 in Installing a driver page 103 If your device is not displayed in the Properties dialog box the device is not working properly Repeat steps 1 through 4 in the previous sections to check the driver s installation Click your device then click Uninstall to remove the driver Click Yes to restart the computer When the computer restarts repeat from step 2 in Installing a driver page 103 ...

Страница 107: ...System icon The System Properties dialog box appears 4 On the Hardware tab click Device Manager The Device Manager screen appears 5 Right click the hardware and select Properties The Properties dialog box appears 6 On the Driver tab click Update driver 7 Follow the instructions that appear on your screen You can have Windows search for the driver or point to the driver s location yourself ...

Страница 108: ...s 2 Click Control Panel 3 Double click the System icon The System Properties dialog box appears 4 On the Hardware tab click Device Manager The Device Manager screen appears 5 Right click the hardware and select Properties The Properties dialog box appears 6 On the Driver tab click Uninstall 7 Follow the instructions that appear on your screen You can have Windows search for the driver or point to ...

Страница 109: ... Disk 4 Follow the instructions that appear on your screen You will need a blank 1 44 MB floppy disk to create an Emergency Repair Disk It is recommended to recreate an Emergency Repair Disk each time your computer undergoes major changes new program installation The repair process relies on information that is saved in the system root repair folder You may not change or delete this folder Choosin...

Страница 110: ...he latest drivers proceed as follows 1 Go to www vaio link com and choose your language 2 Click the VAIO User button 3 Fill in the two codes and enter the site 4 Select Downloads and follow the procedure A list of available downloads appears 5 Choose the appropriate driver and follow the online instructions to download it To install your driver follow the instructions you received with the device ...

Страница 111: ...driver if a device is not functioning properly Reinstall an individual application if you have problems running it Perform a System Recovery in the following cases In the event of a serious system crash If you want to modify the size of the hard drive partitions You can only use these product recovery CD ROMs on the Sony computer they came with and not on any other Sony PC or other manufacturer s ...

Страница 112: ...OMs contains most of the applications that were preinstalled on your computer Reinstalling a program from this application CD can fix the problems encountered if it does not run correctly anymore or if Windows is having a problem running a device Please read your printed Application CD Guide for details on re installing bundled applications ...

Страница 113: ...n performing a system recovery The recovery process can last up to sixty minutes and in this time you will be prompted to change CDs You can recover only the software bundled to your computer It does not work for the software you have installed subsequently or the data you have created This procedure recovers the entire system which means you cannot choose to only recover Windows Make sure that yo...

Страница 114: ...to perform a system recovery but do not want to lose all the data stored on your hard disk copy all the files you want to keep on the D drive During the system recovery process choose to keep the current partition information Doing so will keep your D drive unchanged after the recovery process If you do need to change the size of your partitions you can do so by choosing Option Recovery in the sys...

Страница 115: ...ur D drive will remain You should allow one hour for the recovery process To perform the Default System Drive Recovery proceed as follows 1 Select the button next to Default System Drive Recovery Recommended 2 Click Next You are asked if you are sure you want to recover the system 3 To start the procedure click Next 4 Click Yes to confirm The recovery process starts 5 When asked to do so remove th...

Страница 116: ...ing partition sizes Choosing Change Partition Size and Recover allows you to manually select the size of your C drive leaving the remaining gigabytes to the D drive Meanwhile all current partition sizes are deleted the hard disk is reformatted and all the original software is restored as with a standard system recovery You should allow one hour for this process To manually change the partition siz...

Страница 117: ...original size Meanwhile the current partitions are deleted the hard disk is reformatted and all the original software is restored as with a standard system recovery You should allow one hour for the recovery process To restore the default size of the hard drive proceed as follows 1 Select the button next to Recovery To Originally Shipped State 2 Click Next 3 Read the summary of the recovery proces...

Страница 118: ...incur and you can either to go back to the previous screen press Back or abort the recovery setup altogether To abort remove the recovery CD press Cancel and click Yes to confirm However once the recovery process has started cancelling the job will delete all the current data on your C drive If you have made changes to the partition settings you will lose all data on both hard drive partitions If ...

Отзывы: