background image

VAIO® C1 PictureBook™ Notebook User Guide

16

Ergonomic Considerations

You will be using your notebook computer as a portable device in a variety of 
environments. Whenever possible, you should apply the following ergonomic 
considerations to both stationary and portable environments.

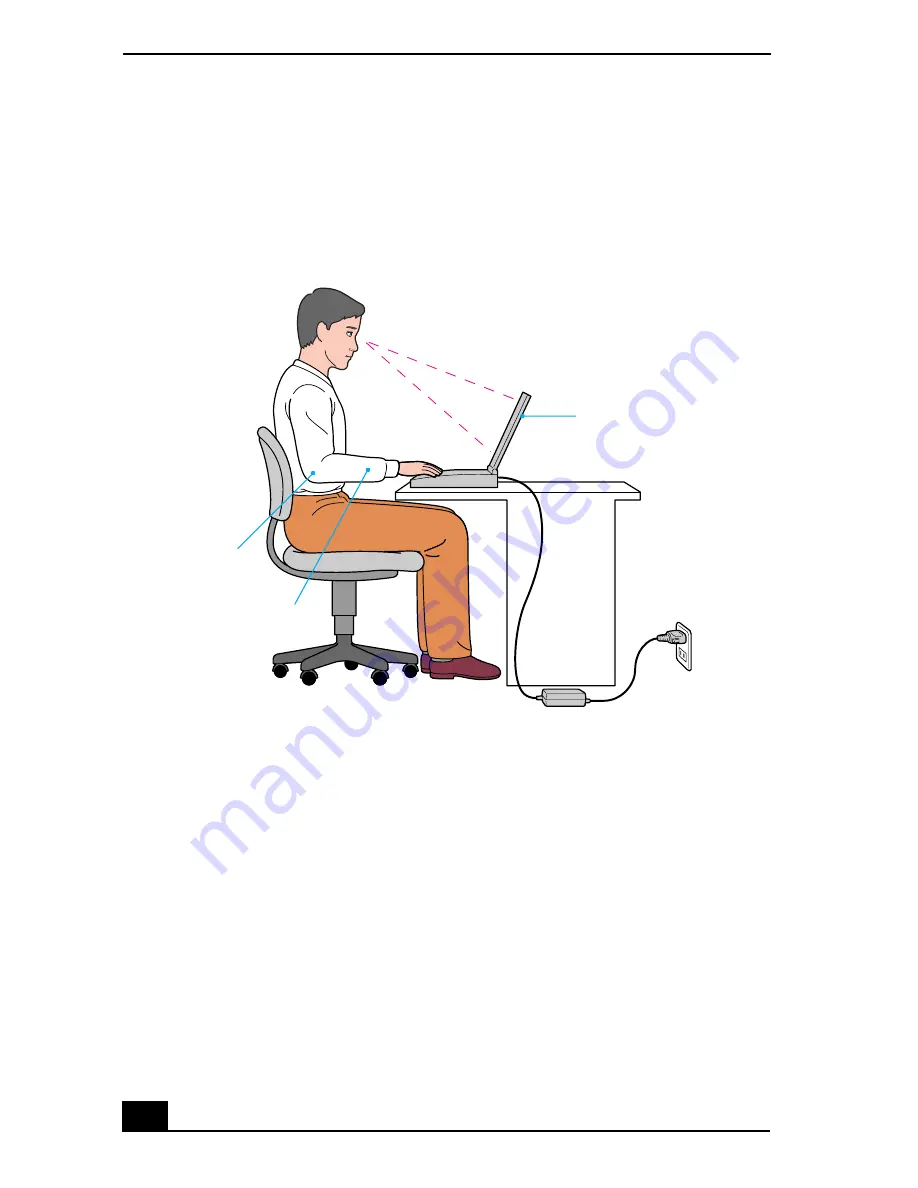
Position of your computer — 

Place the computer directly in front of you as 

you work. Keep your forearms horizontal, with your wrists in a neutral, 
comfortable position while using the keyboard, touchpad, or external mouse. 
Let your upper arms hang naturally at your sides. Take breaks during 
sessions with your computer. Excessive use of the computer may strain 
muscles or tendons.

Furniture and posture — 

Sit in a chair with good back support and 

armrests. Adjust the level of the chair so your feet are flat on the floor. 
A footrest may make you more comfortable. Sit in a relaxed, upright posture 
and avoid slouching forward or leaning far backward.

Recommended position

Computer positioned
directly in front of you

Wrists relaxed
and flat

Arms at desk 
level

Содержание VAIO PCG-C1VN

Страница 1: ...VAIO C1 PictureBook Notebook PCG C1VN www sony com User Guide Printed in USA 4 650 626 11 2000 Sony Electronics Inc VAIO C1 PictureBook Notebook User Guide ...

Страница 2: ...VAIO C1 PictureBook Notebook User Guide PCG C1VN ...

Страница 3: ...t be transported or used outside the United States Software specifications are subject to change without notice and may not necessarily be identical to current retail versions Updates and additions to software may require an additional charge Subscriptions to online service providers may require a fee and credit card information Financial services may require prior arrangements with participating ...

Страница 4: ...e modem or a telephone to report a gas leak in the vicinity of the leak A socket outlet should be as close as possible to the unit and easily accessible AVERTISSEMENT Pour prévenir tout risque d incendie ou d électrocution garder cet appareil à l abri de la pluie et de l humidité Pour prévenir tout risque d électrocution ne pas ouvrir le châssis de cet appareil et ne confier son entretien qu à une...

Страница 5: ... can be determined by turning the equipment off and on the user is encouraged to try to correct the interference by one or more of the following measures Reorient or relocate the receiving antenna Increase the separation between the equipment and the receiver Connect the equipment into an outlet on a circuit different from that to which the receiver is connected Consult the dealer or an experience...

Страница 6: ...provide advance notice in order for you to make the necessary modifications in order to maintain uninterrupted service If trouble is experienced with this equipment you can reach the Sony Customer Information Service Center at 1 888 4SONYPC or write to the Sony Customer Information Service Center at 12451 Gateway Blvd FL 33913 or find Sony Customer Service on the web at http www sony com pcsupport...

Страница 7: ...ndle damaged or leaking lithium ion batteries Ne pas manipuler les batteries au lithium ion qui fuient ou sont endommagées Danger of explosion if battery is incorrectly replaced Replace only with the same or equivalent type recommended by the manufacturer Discard used batteries according to the manufacturer s instructions Une batterie non conforme présente un danger d explosion La remplacer seulem...

Страница 8: ...telephone interface The termination on an interface may consist of any combination of devices subject only to the requirement that the sum of the Ringer Equivalence Numbers of all the devices does not exceed 5 The Ringer Equivalence Number for this equipment is 0 1 AVIS DE L INDUSTRIE CANADA AVIS L étiquette d Industrie Canada identifie le matériel homologué Cette étiquette certifie que le matérie...

Страница 9: ...assigné à chaque dispositif terminal indique le nombre maximal de terminaux qui peuvent être raccordés à une interface La terminaison d une interface téléphonique peut consister en une combination de quelques dispositifs à la seule condition que la somme d indices d équivalence de la sonnerie de tous les dispositifs n excède pas 5 L indice d équivalence de la sonnerie de ce matériel est 0 1 ...

Страница 10: ... Source 25 Conserving Battery Power 30 Starting Your VAIO C1 PictureBook Computer 31 Shutting Down Your Computer 32 Using the Keyboard 33 Using the built in MOTION EYE camera 38 Using the Pointing Device 43 Using PC Cards 45 Connecting with another VAIO computer 47 Connecting an i LINK device 48 VAIO Action Setup 51 The Jog Dial Control 51 Using Memory Stick Media 55 Using Power Saving Modes 59 ...

Страница 11: ...onal 69 Connecting an Optical Drive optional 71 Connecting External Speakers 75 Connecting an External Microphone 75 Recording from a Microphone or Audio Equipment 76 About the Software on Your Computer 79 OpenMG Jukebox Software Instructions 82 Software Information 89 MovieShaker 89 PictureGear 92 For Answers to Your Software Questions 94 Using the System and Application Recovery CDs 97 Troublesh...

Страница 12: ...11 Specifications 115 Index 119 ...

Страница 13: ...VAIO C1 PictureBook Notebook User Guide 12 ...

Страница 14: ...s a fast Crusoe processor Portability The rechargeable battery pack provides hours of use without AC power Sony audio and video quality A high resolution LCD screen enables you to take advantage of today s advanced multimedia applications games and entertainment software Windows Millennium Edition Your system includes one of the latest operating systems from Microsoft Communications Access popular...

Страница 15: ...reBook Notebook User Guide 14 Unpacking Your Notebook Remove the following hardware items from the box Main Unit Power cord AC adapter AV Cable Rechargeable battery pack Display adaptor Spare pointing device covers ...

Страница 16: ...llows you to reinstall Microsoft Word 2000 to the VAIO notebook you purchased Recovery CDs System Recovery CD s Allows you to restore the software titles that shipped with your computer if they become corrupted or are erased It can only be used to restore the hard disk of the VAIO notebook you purchased Application Recovery CD s Allows you to reinstall individual applications or device drivers if ...

Страница 17: ...a neutral comfortable position while using the keyboard touchpad or external mouse Let your upper arms hang naturally at your sides Take breaks during sessions with your computer Excessive use of the computer may strain muscles or tendons Furniture and posture Sit in a chair with good back support and armrests Adjust the level of the chair so your feet are flat on the floor A footrest may make you...

Страница 18: ...up Setting Up Your Notebook Do not place your computer in a location subject to Heat sources such as radiators or air ducts Direct sunlight Excessive dust Moisture or rain Mechanical vibration or shock Strong magnets or speakers that are not magnetically shielded Ambient temperature of more than 95ºF 35ºC or less than 40ºF 5ºC High humidity Do not place electronic equipment near your computer The ...

Страница 19: ... Your Notebook Make sure to disconnect the power cord before cleaning the computer Avoid rubbing the LCD screen as this can damage the screen Use a soft dry cloth to wipe the LCD screen Clean the computer with a soft cloth lightly moistened with a mild detergent solution Do not use any type of abrasive pad scouring powder or solvent such as alcohol or benzine Handling the LCD Screen Do not leave t...

Страница 20: ...nts red blue or green that continuously appear on the LCD This is a normal result of the manufacturing process and does not indicate a malfunction On Moisture Condensation If the computer is brought directly from a cold location to a warm one moisture may condense inside your computer In this case allow at least an hour before turning on your computer If any problems occur unplug your computer and...

Страница 21: ...VAIO C1 PictureBook Notebook User Guide 20 ...

Страница 22: ...your notebook and the internal and external devices such as the pointing device and optional floppy disk drive Locating the Controls and Connectors Front 1 MOTION EYE camera 2 Microphone 3 LCD screen 4 Keyboard 5 Pointing device 6 Speakers 7 Left Center Right buttons 8 Memory Stick indicator ...

Страница 23: ...2 Power button 13 CAPTURE button 14 Power indicator 15 Battery indicator 16 Hard disk drive indicator Left 1 i LINK IEEE1394 S400 connector 2 Memory stick media slot 3 PC card slot 4 Ventilation duct There is a ventilation duct located near the PC card slot Do not cover the ventilation duct while your computer is on ...

Страница 24: ...s and Connectors 23 Right 1 ID label 2 AV Out connector 3 Headphone connector 4 Microphone connector 5 USB connector 6 DC In page 25 7 Mini VGA TV Out Connector page 66 8 Jog Dial Control page 51 9 Phone line jack page 62 ...

Страница 25: ...VAIO C1 PictureBook Notebook User Guide 24 Bottom 1 Reset switch 2 Memory Stick media slot window 3 Battery lock unlock lever page 26 4 Battery release lever page 29 5 Battery connector page 25 ...

Страница 26: ...erates on 100 240 VAC 50 60 Hz Do not share the AC outlet with other power consuming equipment such as a copy machine or shredder You can purchase a power strip with a surge protector This device prevents damage to your computer caused by sudden power surges such as those that may occur during an electrical storm Connecting Computer to AC Outlet Use your notebook only with the supplied AC adapter ...

Страница 27: ... use a battery pack as a source of power The PCGA BP51A battery pack that comes with your computer is not fully charged at the time of purchase Follow the steps below to insert and charge the battery pack To insert the battery pack 1 Make sure the Lock lever on the bottom of the computer is in the unlock position 2 Align the grooves and tabs on the battery with the notches and tabs on the back of ...

Страница 28: ... When the battery is 85 full the battery indicator light turns off This process takes approximately one and one half hours To charge the battery completely continue charging for an additional hour The battery indicator indicates the status of the battery pack Inserting Battery Pack You can charge the battery pack with the optional battery charger PCGA BC5 See the battery charger manual for more in...

Страница 29: ...and insert a fully charged battery You can extend battery life by changing the power management modes in the PowerPanel utility See Using Power Saving Modes on page 59 The battery pack supplied with your computer is a lithium ion battery and can be recharged at any time Charging a partially discharged battery does not affect battery life The battery indicator light is on while you use the battery ...

Страница 30: ... require a longer charging time While the battery is in use or being discharged the battery pack heats up This is normal and is not cause for concern Keep the battery pack away from all sources of heat Keep the battery pack dry Do not open or try to disassemble the battery pack Do not expose the battery pack to any mechanical shock If you are not using the computer for an extended period of time r...

Страница 31: ...siderable amount of time recharge the battery To insert the optional high capacity battery pack PCGA BP54 Insert the battery pack with the VAIO logo side facing down See the manual that came with the battery pack for more information Conserving Battery Power When using the notebook computer with a battery the LCD display and the hard drive can be set to switch off automatically to conserve battery...

Страница 32: ...you before closing the cover Do not turn the built in camera while the cover is closed When starting your notebook for the first time the VAIO InitManager dialog box will appear Please select OK to begin initial setup If you do not execute the initial setup you cannot use part of VAIO original hardware functions such as Jog Dial the Power Management utility the scroll function and keyboard shortcu...

Страница 33: ...any peripheral devices connected to your computer If you are unable to shut down your computer 1 Close or end all operations Close all applications Remove the PC cards Disconnect USB devices 2 Shut down your computer by pressing Ctrl Alt Delete keys at the same time To avoid potential loss of data follow these steps to shut down your computer Respond to any prompts warning you to save documents Du...

Страница 34: ... appear on the front beveled edge of the numeric keys Note that you must press the Num Lock key to activate the numeric keypad When you do so the Num Lock light will be on Navigation keys Several keys are devoted to moving the cursor on the screen the four arrow keys which also function as the Home End Page Up and Page Down keys Correction keys The Insert Backspace and Delete keys enable you to ma...

Страница 35: ...from a menu you can hold down Ctrl and press S referred to as Ctrl S The Shift key operates the same way as on a typewriter it s used to produce capital letters or special symbols such as and Windows key The key with the Windows logo displays the Windows Start menu it s the equivalent of clicking the Start button on the task bar See Combinations and Functions with the Windows Key on page 34 Fn key...

Страница 36: ...the Run window This is the equivalent of selecting Run from the Start menu Fn Insert Displays the Properties window This is the equivalent of double clicking the System icon in the Control Panel Indicator Function Power Power on lights green System Suspend mode flashes umber Battery Indicates the status of the battery inserted in the computer Hard disk Lights when data is read from or written to t...

Страница 37: ...ar in lower case as you type unless you hold down the Shift key Scroll Lock Turns on when the screen scrolls differently Does not work with all applications Turns off when information moves across the display normally Combinations Feature Functions Fn ESC System Suspend Puts the system into System Suspend mode a power management state To return the system to the active state press any key or press...

Страница 38: ... the state of the system and state of the peripheral devices are written to the hard disk and the system power is turned off To return the system to the original state use the power switch to turn on the power Fn D Video standby Turns off the LCD in order to save power To return the LCD to an active state press any key Fn B Bass Boost Toggles the bass boost function off and on This feature is avai...

Страница 39: ...he camera Smart Capture is unavailable while other software that uses the built in camera is in use Close all software that uses the built in camera before you use Smart Capture You cannot transfer still images or video clips from the built in camera while transferring to connected i LINK devices You should take an initial shot before taking a final shot to ensure sound and picture quality Your re...

Страница 40: ...ton To switch to Motion click the on screen Change Capture Mode button You can also use Jog Dial to control this function 4 The Finder window appears Turn the MOTION EYE camera lens towards the subject you want to photograph 5 Adjust the focusing ring Turning MOTION EYE Adjusting the Focusing Ring ...

Страница 41: ...he switch applications list 2 Select Still mode 3 Click the Options button The Still Image Options dialog box appears 4 Click Self timer capture on the Capturing mode tab 5 Click OK If you turn the lens toward you Smart Capture goes into mirror mode You can use the mirror mode to take a still image of yourself A mirror image appears in the finder window of the display while shooting however after ...

Страница 42: ...r mode of MOTION EYE camera 1 Click the Start button point to Settings and then click Control Panel 2 Double click the MOTION EYE camera icon The Camera Control Utility appears After Self timer capture is complete the capturing mode changes automatically to single image Normal Capture To stop Self timer click the CAPTURE button To display the remaining time before the picture is taken turn on the ...

Страница 43: ...or Suitable for outdoor capturing Hold Suspend the proximate settings of the white balance so that settings do not change automatically Shutter speed Set the shutter speed Auto Adjust the shutter speed automatically This speed is suitable for capturing images under fluorescent light Hold Suspend the proximate settings of the shutter speed so that settings do not change automatically The appropriat...

Страница 44: ... button once Double click Press the left button twice Right click Press the right button once In many applications this action displays a shortcut menu of context sensitive choices Drag Press the pointing device in a direction to place the pointer on an item or object While holding the left button press the pointing device in a direction and then release it at the desired point Scroll Press the po...

Страница 45: ...O C1 PictureBook Notebook User Guide 44 Replacing the Pointing Device Cover Make sure the cover is tightly secured to prevent damage to the screen when you close the computer Pointing device cover supplied ...

Страница 46: ... push the card into the slot until it is fixed into the connector the release button comes out The PC card slots can accommodate two Type II PC cards or one Type III PC card These slots are compatible with Card Bus Use the lower slot for Type III PC cards You do not need to shut down your notebook before inserting or removing a PC card You do not need to shut down the computer before inserting or ...

Страница 47: ... appears Click OK 7 Gently grasp the card and pull it out 8 Insert the PC card slot protector into the empty slot Release Button Do not force a card into the slot It may damage the connector pins If you have difficulty inserting a card check that you are inserting the card with the correct orientation See the manual that came with your PC card for more information on its use Follow the procedure b...

Страница 48: ...o print from a printer that is attached to either computer Select the STD mode in Smart Connect 3 0 software to connect with your notebook Connecting with an i LINK cable When you connect two VAIO computers you must assign each computer a unique name The computers can be identified by this unique name when the two computers are networked together If you have previously purchased a VAIO computer or...

Страница 49: ...nnector which you can use to connect to an i LINK enabled digital camcorder To connect a digital camcorder Plug one end of an i LINK cable into the S400 connector on the left side of the computer and the other end into the DV In Out connector on the digital camcorder See Specifications on page 115 i LINK is a trademark of Sony used only to designate that a product contains an IEEE1394 connector Al...

Страница 50: ...he i LINK connector does not supply power to external devices If the external device requires power from the i LINK connector you cannot use the device with your computer The C1 PictureBook Computer supports transfer rates up to 400 Mbps however the actual transfer rate is the lowest transfer rate of the external device The i LINK features available may vary depending on the software applications ...

Страница 51: ...tal video device while using DVgate may cause this situation to occur For more information on DVgate software see the DVgate online help Adjusting Image Resolution If the images on the LCD do not display smoothly the resolution may not be set correctly To check the resolution click the Setup button in the DVgate Motion Monitor window Point to Settings and then select Low Resolution The settings yo...

Страница 52: ...tray and click Help Topics The Jog Dial Control Your computer is equipped with a Jog Dial control on the right side of the unit The Jog Dial control enables you to open an application folder or document from a predefined list by rotating and pressing the Jog Dial control In addition when you press the Jog Dial control you can turn on your computer automatically and start the selected application o...

Страница 53: ...rol window you can display a submenu of that item by selecting it and pressing the Jog Dial control button Using Launcher Mode To use the Jog Dial control click the Jog Dial control window or the Jog Dial control icon in the task tray Alternatively you can press the Jog Dial control while pressing the Ctrl key on the keyboard to switch to the launcher mode 1 Turn the Jog Dial control to select the...

Страница 54: ...ftware see the software applications online Help Using the Jog Dial Control with Other Software If the software you are using does not support the Jog Dial control you can still perform the following functions Action Description Maximize Window Some software does not support these functions Press the Jog Dial control button to maximize the size of the active window Press again to return to normal ...

Страница 55: ...played in the Jog Dial window You can select an item in the window by rotating the Jog Dial control Pressing the Jog Dial control is the equivalent of pressing Enter Internal Timer You can use the internal timer to start an application at a specific time The timer can start applications even when the power is off JOG Guide dialog box ...

Страница 56: ...ck media with your notebook You can also use MagicGate compatible devices to record and playback music when they are connected to your computer You can store mixed data on the Memory Stick media For example you can copy an image onto MG Memory Stick media that already contains music What is MagicGate MagicGate is copyright protection that consists of authentication and encryption technology Authen...

Страница 57: ... the Device Manager tab Inserting the media in the wrong direction may damage the connector pins Hold the Memory Stick media with the arrow pointing in the correct direction and then turn it so the label side is down before inserting into the slot To avoid damaging the computer or the Memory Stick Media do not force the Memory Stick media into the slot Inserting Memory Stick Warning When copying d...

Страница 58: ...toolbar to select a sorting method 4 Resting your cursor on the left end of the main toolbar activates the current Memory Stick properties 5 Resting your cursor on the right end of the main toolbar activates a secondary toolbar with more functions 6 Click an image to show a normal view centered on the screen Double click an image to show an enlarged view 7 Movie files start playback when the view ...

Страница 59: ...es from a digital video camera via Memory Stick media see Connecting an i LINK device on page 48 Only MG Memory Stick media can be used with copyright protected data like music Do not remove a media or turn off the power while the access light is on Do not use the media in locations that are subject to static electricity or electrical noise Do not touch the media connector with your finger or meta...

Страница 60: ...e This is the normal state of your computer when it is in use The green power indicator light is on in this mode To save power you can turn off a specific device such as the LCD or the hard disk System Suspend Mode The computer saves the current state of the system in RAM and switches off power to the CPU The green power indicator light flashes in this mode To activate System Suspend Mode Press Fn...

Страница 61: ...turn to Normal mode Turn on the computer by pressing the power button The computer returns to its previous state Time to return to normal mode System Suspend requires less time than System Hibernation Power consumption System Suspend uses more power than System Hibernation Do not move the notebook until its power indicator light turns off When returning from System Hibernation mode the system stat...

Страница 62: ... can add functionality to your computer by connecting any of these optional peripherals Phone line page 62 USB printer page 64 USB mouse page 65 External display page 66 Microphone page 75 USB floppy drive page 69 CD DVD ROM drive page 71 ...

Страница 63: ... phone cable into the jack on the inside of the phone line jack cover Make sure you insert the phone cable from the rear of the computer and that the modular jack clicks into place In order to register your VAIO C1 PictureBook Computer or register your software online you must connect to a phone line Use care when opening the phone jack cover Opening it beyond a 45 degree angle may result in damag...

Страница 64: ...oin operated telephone and may not work with multiple phone lines or a private branch exchange PBX Some of these connections may result in excess electrical current and could cause a malfunction in the internal modem If you connect a phone line coming through a splitter the modem or connected device may not work properly Phone cable Phone line jack not supplied ...

Страница 65: ...USB printer cable into the USB connector on your computer and the parallel port on your printer To use a printer To use a printer first install the driver software that came with your printer Connecting a Printer See the manual that came with your printer for more information on installation and use Printer Power cord USB Printer cable optional to USB connector Computer USB connector ...

Страница 66: ...ct a USB mouse Plug the mouse cable into the USB connector PCGA UMS1 series driver has already been installed Connecting a USB Mouse A serial mouse or PS 2 mouse is not compatible with the VAIO C1 PictureBook Computer See the manual that came with your mouse for more information on installation and use USB Mouse to USB Connector ...

Страница 67: ...rojector page 67 TV page 68 To connect a computer display Connect the supplied display adapter to the mini VGA TV Out connector and then plug the display cable into the adapter If necessary plug one end of the power cord into the display and the other end into an AC outlet Connecting a Display See the manual that came with your computer display for more information on installation and use Display ...

Страница 68: ...tor using the supplied Display adapter 1 Plug the display adapter into the computer s Out connector and the display s RGB signal cable to the VGA Out connector of the Display adapter 2 Plug the audio cable into the Headphone connector Connecting a Projector Power cord RGB signal cable to Monitor Audio cable Display adapter supplied Computer Projector optional ...

Страница 69: ... manual that came with your projector for more information on installation and use You may not be able to display the computer s LCD and the external display together depending on the type of computer display or projector used Connect the AC adapter after you finish connecting all other peripheral devices Turn on all the peripheral devices before you turn on the computer Connecting a TV T Audio In...

Страница 70: ...py disk drive Plug the USB cable from the floppy disk drive into the USB connector on the computer The VAIO logo on the disk drive should be facing up To insert a diskette You do not need to shut down the computer before connecting or disconnecting the floppy disk drive Before removing the FDD see To remove the floppy disk drive when the computer is on on page 70 Plugging in USB Cable ...

Страница 71: ... and then press the Eject button to remove the diskette To remove the floppy disk drive when the computer is on 1 Double click the Remove Hardware icon in the task tray 2 The Unplug or Eject Hardware dialog displays 3 Select the hardware device you wish to remove by clicking it 4 Click stop 5 Confirm the correct device is selected in the Stop a Hardware device dialog box Inserting diskette Removin...

Страница 72: ...es Connecting an Optical Drive optional You can use the optional PCGA CD51 A CD ROM drive or the PCGA DVD51 A DVD drive with your notebook If you use an optional drive when your computer is running on battery power the battery life will be shorter The drive draws power from the computer through a PC card If you choose and remove the USB Disk the internal memory stick becomes disabled If you have r...

Страница 73: ... details You can connect a PCGA CD51 A CD ROM drive while the computer is on unless you want to use the System and Application Recovery CDs Turn off your computer before using the System and Application Recovery CDs Procedures for connecting the CD drive may vary depending on the CD drive See the manual that came with your CD drive for more information on use Removing PC Card Inserting PC Card A p...

Страница 74: ...des out 2 Place the disc in the tray with the label side facing up Push the disc onto the hub until the disc clicks into place 3 Close the tray by pushing it gently The BUSY indicator on the drive flashes while your computer is reading data from the disc CD ROM Drive Inserting Disc Eject button Disc ...

Страница 75: ... errors Proper care of the disc is essential to maintain its reliability Do not use solvents such as benzine thinner commercially available cleaners or anti static spray as they may cause damage to the disc For normal cleaning hold the disc by its edge and use a soft cloth to wipe the surface from the center out If the disc is badly soiled moisten a soft cloth with water wring it out well and use ...

Страница 76: ...onnect an external microphone Use the symbol to locate the Microphone connector Plug the microphone cable into this connector Make sure your speakers are designed for computer use Turn down the volume of the speakers before you turn them on Do not place diskettes on the speakers the speaker s magnetic field may damage the data on the diskettes See the manual supplied with your speakers for more in...

Страница 77: ...w appears 2 From the Options menu click Properties The Properties window appears 3 In the Adjust Volume panel select Recording and then click OK The Recording Control window appears 4 Select either Microphone or Line Adjusting sound volume in the Recording Control window When Microphone or Line are not displayed in the Recording Control window from the Options menu click Properties click the item ...

Страница 78: ... the bottom right corner of the Desktop window The Volume Control window displays To adjust the sound of other devices from the Option menu click Properties In the Volume Adjust window select Playback and click the check box of the item you want to display in Control Click OK Sound device Function Volume Control Adjust the sound level from the speakers or headphones WAVE Adjust the wavfile sound o...

Страница 79: ... click OK To adjust the sound volume when recording double click in the task tray located in the lower right corner of the Desktop window 1 From the Options menu select Properties 2 In the Volume Adjust window select Recording and then click OK The Recording Control window appears You can adjust the sound using the Smart Label software included or the sound recorder When recording or using microph...

Страница 80: ...rinter 2000 Pro is an easy to use advanced printing program that lets you quickly lay out multiple images in multiple sizes on a single sheet of paper PhotoPrinter Pro offers a wide selection of templates including landscape portrait free style mixed sizes custom templates and more The application includes enhancement tools and special effects for improving photos while giving you the ability to a...

Страница 81: ...to create common web e mail and print documents for use around the world It embraces HTML as a first class file format and extends this software s ease of use to the web and e mail Word 2000 also extends that ease of use to international users making it simple to create multilingual documents MovieShaker Sony Electronics Inc Sony s original MovieShaker software creates personal movies that have tr...

Страница 82: ...tween your computer and a Sony Digital Handycam camcorder that supports the i LINK interface It allows you to capture compressed video or still images that you can save or share via e mail A smart solution to computer digital audio video and network convergence VAIO Action Setup Sony Electronics Inc VAIO Action Setup manages the settings for your computer s shortcut keys and i LINK interface VAIO ...

Страница 83: ... to the Internet minimize the browser window and then double click the icon to register your software When you register you will be directed to the Electronic Music Distribution EMD service Web site where you can download software that enables you to access Internet music Electronic Music Distribution EMD Services EMD allows you to download music files via the Internet To use OpenMG enabled EMD se...

Страница 84: ...OpenMG Jukebox Basic Controls 1 Recorder Starts OpenMG CD Recorder which enables you to record audio files of CDs 2 Internet Accesses a Web site for the EMD service supporting OpenMG 3 Shuffle Repeat indicators Displays the shuffle repeat play status 4 Play mode control buttons Controls playback volume etc 5 Edit My Select Opens the My Select window which enables you to edit albums ...

Страница 85: ...he Portable Player window The Portable Player window also opens when a portable device is connected to the computer 7 Album titles column window Displays the Original album My Select album or Various Search 8 Songs column window Displays the songs in the selected album ...

Страница 86: ...n select the desired tracks 4 Click record Recording begins When the recording is finished the new Original album appears in the Album Title list of the OpenMG Jukebox window To import MP3 files use the OpenMG File Importer software To name the album and songs type the name or retrieve it from the CDDB2 Web site on the Internet http www cddb com cddb2info using html For details see Adding informat...

Страница 87: ...s on the right side in the main window 2 Select the desired album in the Album titles column and click The song names in the selected album appear in the Song list of the Portable Player window 3 Check out begins When check out is complete changes to and the shaded Song list area in the Portable Player window returns to normal state To select a check out candidate from the original album click the...

Страница 88: ...ebox software 2 Select the song you want to return in the Portable Player window then click To select more than one song click the songs while holding down the Ctrl key To check in all the songs click the 3 During check in the STOP button flashes When check in is finished the song titles disappear from the Portable Player window To exit OpenMG Jukebox Close the OpenMG Jukebox window To cancel chec...

Страница 89: ...VAIO C1 PictureBook Notebook User Guide 88 ...

Страница 90: ...special effects still images pictures and music files and then saved in a format most computers can play Importing Images and Sound Clips 1 Click 2 Find the file you want to add 3 Select the file 4 Click Open The file is added to the Clip tray Main window Importing files over 75 seconds in length may cause MovieShaker to stop responding Clip tray Working Panel Product tray Editing trays Help Trash...

Страница 91: ...licking a face in the Shaker tray 3 Click A thirty second scene is automatically generated and saved to the Product tray 4 To preview switch the Work Panel to Product tray mode and press play Shaker Tray Scenes created with Shaker begin with black frame and after processing are placed in the first available slot on the Product tray Limit the number of scenes placed on the Product tray to 10 or les...

Страница 92: ...e Effects tray to the Effects palette on the Working Panel 4 See Help for instructions on adjusting effect duration and replaying clips scenes Saving a Movie 1 Verify that the clip s you want to save is on the Product tray See Help for more details on saving movies 2 Click Export 3 Select the format in which you want the document to be saved Working Panel To preview an Effect click on the clip in ...

Страница 93: ...wallpaper still pictures from MPEG and even html photo albums Managing Your Pictures Use the collection feature to manage your pictures 1 Click the Folder tab and browse to locate your pictures 2 Select the pictures you want to have in a collection 3 From Collection menu select Create New Collection 4 Enter a name for the collection and then click OK Exporting movies may take a long time to comple...

Страница 94: ...r stitches a group of still images into a 360 degree panoramic picture The source images should be the same size and overlap 20 How to stitch a panoramic picture 1 Gather the source images into the same folder or collection 2 Select the images you want to use 3 From the Utilities menu select Panorama Maker 4 Select the correct lens and click OK If 35mm lens is selected the prompt does not appear t...

Страница 95: ...t fax 206 628 5737 e mail techdocs adobe com hours M F 6 AM 5 PM PT Web site http support mcafee com phone 408 988 3832 e mail cybr nai com hours M F 9AM 5PM Central Time Web site http www netscape com phone 888 4SONYPC 888 476 6972 Support from 1 888 4SONYPC is free of charge for 90 days after the original date of purchase hours 7 days a week 24 hours a day Web site s http www arcsoft com http ww...

Страница 96: ... nearest you call 1 888 4SONYPC 1 888 476 6972 or find Sony Customer Service on the Web at http www sony com pcsupport Web site http www intuit com support phone 900 555 4688 hours 7 days a week 24 hours a day Web site http www microsoft com support phone 888 4SONYPC 888 476 6972 Support from 1 888 4SONYPC is free of charge for 90 days after the original date of purchase hours 7 days a week 24 hou...

Страница 97: ...VAIO C1 PictureBook Notebook User Guide 96 ...

Страница 98: ...your computer if they become corrupted or are erased It can be used only to restore the hard disk of the Sony computer you purchased Using the System Recovery CD s You can reinstall software titles that shipped with your computer if they are corrupted or erased You may not need to recover the entire contents of your hard drive If you experience a problem with your computer reinstalling an individu...

Страница 99: ...will lose any software you have installed and any other files you have created since you started to use your computer This means you will have to reinstall any applications that were not included with the computer when you purchased it If you choose the Full Restore without Format option you may need to reinstall applications that were not included with the computer when you purchased it If you ha...

Страница 100: ...ter key The message Save configuration changes and exit now appears 7 Check that Yes is selected then press the Enter key The computer restarts from the Recovery CD Using the Application Recovery CD s The Application Recovery CDs allow you to reinstall individual applications and device drivers if they are corrupted or erased Reinstalling an individual device driver or software title may correct a...

Страница 101: ...soft Word 2000 will not be recovered Use the supplied Word 2000 CD ROM to recover this application The basic version of Word 2000 is preloaded you may load other Word options from the Word Application CD You must be in Windows to run the Application Recovery CDs The application will not run from MS DOS If you have any questions on using the Application Recovery CDs contact Sony Customer Support So...

Страница 102: ...d that it is turned on Check that the power indicator on the front panel of the notebook indicates that the power is on Check that the battery pack is inserted properly and is charged Make sure there is no diskette in the floppy disk drive Confirm that the power cord and all cables are connected firmly as described in Connecting Peripheral Devices on page 61 If you plugged the notebook into a powe...

Страница 103: ... Select Yes and then press Enter The notebook restarts My notebook starts but the message Operating system not found appears and Windows does not start Make sure there is no diskette in the floppy disk drive non bootable If a non bootable diskette is in the drive follow these steps 1 Turn off the notebook and then remove the diskette 2 Restart the notebook and confirm that Windows starts properly ...

Страница 104: ...n click Shut Down and then click Restart If you cannot restart as described in the preceding step you can restart the notebook by pressing Ctrl Alt Delete If the previous step does not work press and hold the power button for at least four seconds This turns off the power If your notebook stops responding while playing a CD or DVD stop the CD DVD and restart the notebook by pressing Ctrl Alt Delet...

Страница 105: ...otebook The Power Management setting is not responding Your notebook s operating system may become unstable if a lower power state such as system hibernation is initiated and then changed before the notebook completely enters the lower power state To restore the notebook to its normal operating stability Close all open applications Push and hold the power button for four seconds or longer to shut ...

Страница 106: ...rnal display is not centered or sized properly Use the controls on your external display to adjust the image See the manual that came with your display for more information I want to change the video resolution of my display You can use independent controls to change the video resolution of your display Click Start point to Settings point to Control Panel and then click the Display icon The Displa...

Страница 107: ...Windows taskbar and select Shut Down to display the Shut Down Windows dialog box then press Enter If you cannot turn off your notebook as described in the step above press Ctrl Alt Delete to restart the notebook If you cannot restart your notebook as described in the step above press and hold the power button for more than four seconds to turn off the notebook If the pointer does not move while pl...

Страница 108: ...sing external speakers check the volume settings and then check the connections between your external speakers and the notebook Click Start Control Panel System Device Manager Check that the correct drivers are installed properly Do not use adhesive labels to identify the CD The label may come off while the disc is in use in the optical drive and cause the drive to malfunction If a region code war...

Страница 109: ...provider for technical support See the About Software section of this manual When I click an application icon the message You must insert the application CD into your CD ROM DVD ROM drive appears and the software does not start Some titles require specific files that are located on the application CD Insert the disc and try starting the program again Make sure you place the CD in the tray with the...

Страница 110: ... are using is compatible with the notebook s modem All preinstalled Sony programs are compatible My modem connection is slow Your notebook is equipped with a V 90 K56flex compatible modem Many factors may influence modem connection speed including telephone line noise or compatibility with telephone equipment such as fax machines or other modems If you think your modem is not connecting properly t...

Страница 111: ...has its own volume control check that the volume is turned up Check the volume controls in Windows If you connect external speakers check that the speakers are properly connected and the volume is turned up If the speakers have a mute button make sure it is off If the speakers are powered by batteries check that the batteries are inserted properly and that they are charged If you have connected an...

Страница 112: ...at the Memory Stick using Memory Stick Formatter software preinstalled on this notebook Memory Stick does not work I cannot access the S drive If you cannot find the icon for Removable Disk S in My Computer on the Desktop take the following steps 1 Double click the System icon in the Control Panel and Device Manager appears If you cannot find the icon click Display all the options of Control Panel...

Страница 113: ...y your preinstalled software Most of the manuals for preinstalled software are located on your hard disk drive as online help files You can access the online help files from the Help menu in the specific application A printed manual is available for some applications 4 VAIO Support Agent VAIO Support Agent can be accessed from the Windows desktop Using advanced diagnostic technology Sony s VAIO Su...

Страница 114: ...that you want to receive To contact the Sony fax on demand service call 1 888 4SONYPC 1 888 476 6972 Requires a fax machine or your fax software 7 Calling Sony Customer Support You can call and speak with a Sony Customer Support Representative without using your computer by calling 1 888 4SONYPC 1 888 476 6972 Software support is available free of charge for 90 days after the original date of purc...

Страница 115: ...VAIO C1 PictureBook Notebook User Guide 114 ...

Страница 116: ... 320 240 640 480 Display Frames 30 frames second maximum overlay Capture Frames 30 frames second maximum 320 240 motion JPEG 15 frames second maximum 640 480 motion JPEG Standard RAM 128 MB SDRAM System uses 16 MB LCD Screen 8 9 UWXGA 1024 480 TFT screen with XWIDE active matrix L2 Cache Memory 512 KB on die MPEG MPEG1 Digital Video supports full screen playback Graphics 3D graphic accelerator wit...

Страница 117: ...i LINK DC in Supplied AccessoriesRechargeable battery AC adapter power cord AV cable Display adapter Pointing device spare caps Service 90 day limited express service Extendible to one year from original date of purchase upon registration Limited Warranty 90 day parts labor standard Extendible to one year from original date of purchase upon registration Power Requirements 40 watts maximum 19 5 V D...

Страница 118: ... C Storage Temperature 4 F to 140 F 20 C to 60 C temperature gradient less than 18 F 10 C hour Storage Humidity 10 to 90 not condensed when that humidity is less than 20 at 140 F 60 C hygrometer reading of less than 95 F 35 C MHz denotes microprocessor internal clock speed other factors may affect application performance GB means one billion bytes when referring to hard drive capacity Accessible c...

Страница 119: ...VAIO C1 PictureBook Notebook User Guide 118 ...

Страница 120: ... 27 inserting 26 loading 26 power status 27 rechargeable 25 removing 29 brightness adjusting 32 36 built in speaker 36 volume 36 buttons Start 32 C cameras digital video camcorder 48 canceling commands 34 Caps Lock indicator light 36 CD or DVD Media cleaning 74 handling 74 CD ROM discs inserting 73 CD ROM drive closing lid 73 connecting 45 71 using 71 charge status indicator light 27 charging batt...

Страница 121: ...power source 25 printer 64 projector 67 connectors DC In 25 external speakers 23 parallel 64 printer 64 USB 69 correction keys 33 34 Ctrl key 34 cursor movement keys 33 customer assistance support options 112 D DC In 25 digital video camera 48 diskettes ejecting 70 handling 71 inserting into drive 70 disposal of lithium ion battery 6 drives 72 CD ROM 71 72 floppy disk 69 DV In Out 48 DVD ROM drive...

Страница 122: ... 36 Scroll Lock 22 36 input devices 4 Insert key 33 34 inserting battery pack 26 diskettes into drive 70 installing hardware 61 memory 45 peripherals 61 interference 4 17 J Jog Dial 51 K keyboard 33 35 36 connecting 65 L Launcher Mode 52 LCD 18 troubleshooting 105 lithium ion battery disposal 6 safety precautions 6 loading battery pack 26 M MagicGate 55 maintenance 17 memory module installing 45 M...

Страница 123: ...4 output devices 4 adding 64 P parallel port 64 party phone lines 63 PBX 63 PC card inserting 45 removing 46 slots 45 troubleshooting 108 Type II 45 phone connecting line 62 jack 62 laws governing 5 power saving modes 59 System Hibernation 37 60 System Suspend 36 59 Video Standby 37 power sources 26 connecting 25 precautions 17 Print Screen key 34 printer connecting 64 port 64 projector 67 R radio...

Страница 124: ...ing display 37 monitor 37 System Hibernation mode 37 60 System Recovery CD s 97 System Suspend mode 36 59 T technical support support options 112 troubleshooting 101 startup 32 101 turning on computer 31 TV interference 4 17 U USB connector 69 Using the Jog Dial Control 53 V VAIO Action Setup 51 ventilation 17 video camera 48 Video Standby mode 37 W Windows taskbar 32 Windows Me Explorer 34 Find w...

Страница 125: ...VAIO C1 PictureBook Notebook User Guide 124 ...

Отзывы: