background image

13

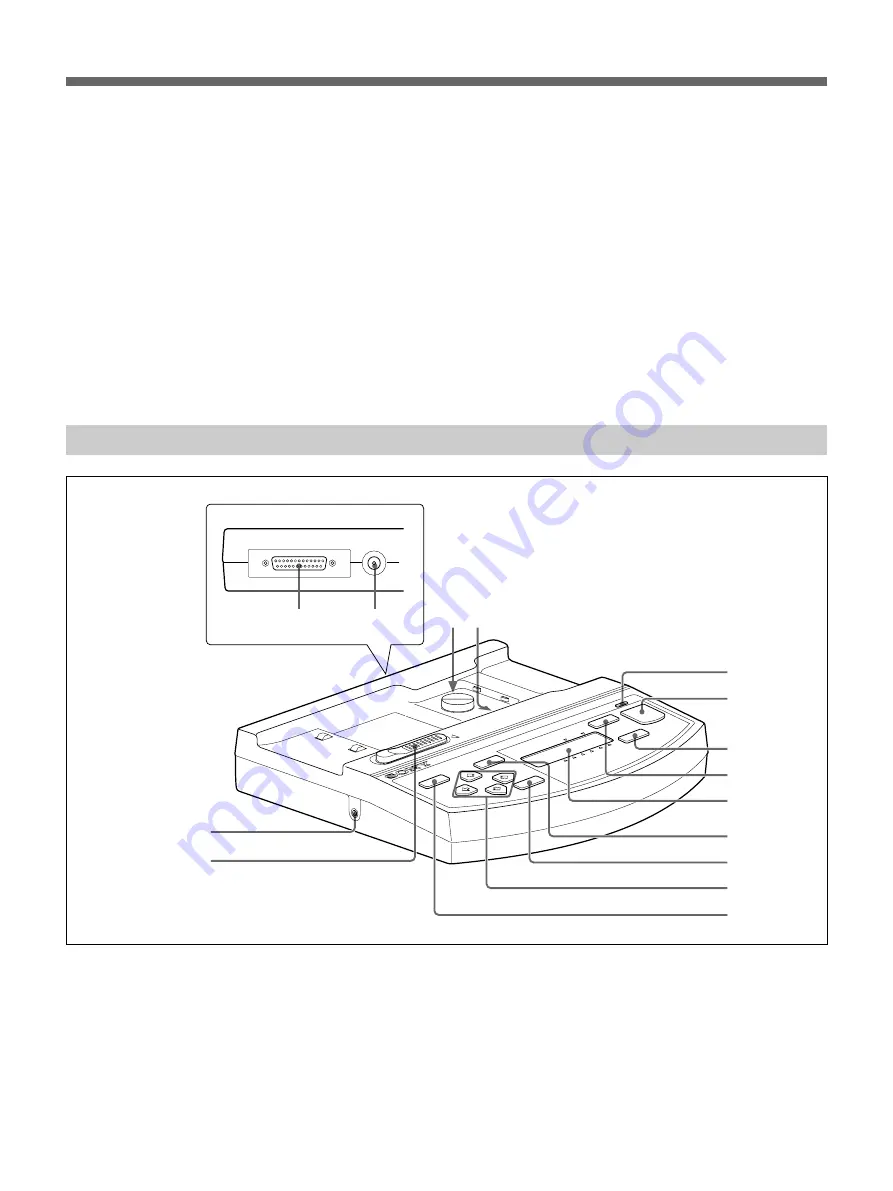
qs

 Tripod screw hole (36)

Used to attach the camera to the tripod.  A quick shoe
can be also attached.

qd

 Standby lamp (37)

The lamp is lit or flashing to indicate the following
conditions when the PLAY/CAMERA switch is set to
CAMERA.

Flashing in red: Preparing for recording, charging

the flash, storing the data (recording is disabled).

Lit in red: Memory full
Flashing in green: Manual setting for exposure, iris

or white balance

Lit in green: Standby for recording

Station

1

 Camera attachment part (27)

Attach the camera here.

2

 Metal contacts

For connection with the camera.  Always keep them
clean.  If they become dirty, clean them with a cotton
swab, etc.

3

 POWER/BUSY lamp (48)

Lights in green when the connected printer is turned
on.  Blinks in red while image data is being transmitted
from the camera to the station.  Do not remove the
camera from the station while this lamp is blinking in
red.

qf

qg

1 2

qs

qd

3

4

5

6

7

8

9

0

qa

PRINTER

DC IN

CAMERA

RELERASE

B/W

COL

POWER/BUSY

MENU

BATTER

Y

CHARGE

BW/

COLOR

SPLIT

EXEC

PRINT

UPX-C21

16

9

8

4

2

1

CAMERA

qf

 Viewfinder (39)

You can see the subject through the viewfinder and
can shoot a picture without using the LCD monitor.

Содержание UPX-C21

Страница 1: ...S Ver 4 0 UPX C21GFE 3 204 293 12 1 Digital Printing System UPX C21 2000 Sony Corporation 3 204 293 12 1 UPX C21 Operating Instructions page 2 Mode d emploi page 58 Manual de instrucciones página 116 ES GB FR ...

Страница 2: ...d if not installed and used in accordance with the instructions may cause harmful interference to radio communications However there is no guarantee that interference will not occur in a particular installation If this equipment does cause harmful interference to radio or television reception which can be determined by turning the equipment off and on the user is encouraged to try to correct the i...

Страница 3: ...ions of Parts 10 Camera 10 Station 13 Printer 15 Preparations 17 Preparation of Printer 17 Connections 25 Preparation of the Camera 29 Operation 37 Taking a Picture 37 Viewing a Picture 42 Picture Erasure 43 Protecting a Picture 46 Printing 48 Specifications 52 Troubleshooting 54 Indicators on the Front Panel of the Printer 57 Table of Contents GB English ...

Страница 4: ...00 000 colors System Configuration Case 1 Case 2 Station Camera Printer Station Printer Camera B W COL POWER BUSY MENU BA TTERY CHARGE CAMERA RELERASE BW COLOR MULTI PICTURE EXEC PRINT UPX C21 16 9 8 4 2 1 S O N Y ZOOM LENS OPTICAL 1 3x F 12 15 6 m m 1 4 0 4 7 H S POWER PLAY CAMERA LCD M OMITOR ON OFF W MODE SET T H S POWER ON OFF B W COL POWER BUSY MENU BATTERY CHARGE CAMERA RELERASE BW COLOR MUL...

Страница 5: ... of printouts can be made Model for the U S A and Canada Printout of six reduced images is possible only when the UPC 2040A or UPC 2045 Self laminating color printing pack is used Single portrait Wallets U S passport Printout of Printout of Printout of four reduced images six reduced images 16 reduced images ...

Страница 6: ... for adjustment can be printed For details on color guide printout refer to the Operating Instructions Advanced Operations Hue RGB adjustment Light intensity DARK LIGHT GAMMA adjustment B 3 0 0 3 G 3 0 3 0 now 0 0 0 G 3 0 3 0 B 3 0 0 3 R 3 3 0 0 R 3 3 0 0 D 3 3 0 0 L 3 0 3 0 Gm 3 0 0 3 now 0 0 0 D 3 3 0 0 L 3 0 3 0 Gm 3 0 0 3 System Overview Printout of Printout of Printout of six reduced images n...

Страница 7: ...s of the AC power adaptor clean Do not apply mechanical shock or drop the unit Do not disassemble or convert the unit Do not remove the cover There is a danger of electric shock from the internal parts Be careful not to spill water or other liquids on the unit or to allow combustible or metallic material to enter the cabinet If used with foreign matter in the cabinet the unit is liable to fail or ...

Страница 8: ...ases the printer will probably not work properly and may even develop a fault if you persist in using it If condensation forms turn off the power and leave the printer to stand for at least one hour If the printing pack is subjected to wide and sudden changes in temperature condensation may form on the ink ribbon or paper This will cause the printer to malfunction Also if the printing pack is used...

Страница 9: ...ake pictures for your personal enjoyment with this digital still camera However it is illegal to take pictures of items protected by copyright laws without the permission of the copyright owner Keep this in mind when shooting in concerts shows and exhibitions etc many of the items on display are protected by copyrights Cleaning Clean the cabinet panel and controls with a soft dry cloth or a soft c...

Страница 10: ...tructions Advanced Operations If a video monitor is connected using an optional video cable you can view a picture displayed on the LCD on the monitor s screen 6 RELEASE jack minijack Refer to the Operating Instructions Advanced Operations Connect an optional remote release 7 RS 232C jack minijack 28 To use the camera far from the station connect to the CAMERA jack of the station using the supplie...

Страница 11: ... is recomended for shooting with the built in and external strobes The built in strobe does not light The optimum shutter speed is selected by automatically detecting the lighting conditions E The built in strobe does not light but only the external strobe lights The shutter speed is fixed at 1 250 second The redeye effect that may occur in flash shooting is reduced by prelighting several times Ot...

Страница 12: ...teries large and small supplied and close the lid 0 Mode button 42 43 46 Lightly press the MODE SET b or B side of the button and the following action is obtained MODE Each time you press this side the mode displayed on the LCD changes cyclically When the PLAY CAMERA switch is set to PLAY it changes as follows no indication t MULTI multiple screen t PROTECT t ERASE t SET UP When the PLAY CAMERA sw...

Страница 13: ...ment part 27 Attach the camera here 2 Metal contacts For connection with the camera Always keep them clean If they become dirty clean them with a cotton swab etc 3 POWER BUSY lamp 48 Lights in green when the connected printer is turned on Blinks in red while image data is being transmitted from the camera to the station Do not remove the camera from the station while this lamp is blinking in red q...

Страница 14: ...rge the large battery installed in the camera 9 EXEC execute button 49 50 Press to store the values set in the menu operation 0 Cursor keys 49 50 Use during the menu operation qa MENU button 49 50 Press to enter menu operation Press again to return to the normal display qs CAMERA RELEASE lever 27 Slide to the left to detach the camera qd CAMERA connector minijack 28 To use the camera far from the ...

Страница 15: ...1 POWER switch 48 Press to switch the unit on or off 2 Top cover Only in case the paper has jammed inside the top cover open the top cover to remove a jammed paper 3 PRINT indicator 48 57 Lights while printing 4 ALARM indicator 48 57 Lights in case of paper jamming or occurrence of any other problem 5 RIBBON indicator 48 57 Lights when a problem for ink ribbon cartridge occurs 6 PAPER indicator 48...

Страница 16: ...16 AC IN Rear panel 1 Station connector 26 Connect the interface cable of the station 2 AC IN connector 25 Used to connect the printer to a wall outlet with the supplied power cord Locations of Parts ...

Страница 17: ...absolutely necessary Loading an ink ribbon cartridge To make printouts an ink ribbon cartridge and paper which are compatible must be loaded see Printing pack and paper tray page 23 Notes Use only ink ribbon cartridge and paper that are designed for use with this printer Failing to do so is likely to result in unsatisfactory printing or malfunctions When replacing the ink ribbon cartridge it is no...

Страница 18: ...ng the ink ribbon cartridge itself The ink ribbon cartridge pops out When you use the printer first this operation is not required Note Never put your hand into the ink ribbon compartment The thermal head becomes very hot You may burn yourself if you touch it ...

Страница 19: ... from the ink ribbon If the ribbon is left slack it may be damaged when inserted 4 Insert the ink ribbon cartridge firmly until it stops 5 Close the front panel Wind the spool until the not used point comes to the right end ...

Страница 20: ...parent tape There should be no problem with using the remaining portion of the ribbon Loading the paper and paper cover To load paper follow the procedure below Use the paper tray with appropriate paper size Notes Use only ink ribbon cartridge and paper that are designed for use with this printer Failing to do so is likely to result in unsatisfactory printing or malfunctions When replacing paper t...

Страница 21: ...pack For detailed information on the maximum amount of paper that the paper tray can hold see Printing Pack and Paper Tray page 23 Do not place different types of paper in the tray Doing so may cause paper jams to occur Load the paper so that it lays flat in the paper tray If the paper is curled it will overflow from the paper tray and the printing position may shift If this happens load fewer she...

Страница 22: ...o not touch the printing surface Dust or finger prints are likely to cause unsatisfactory printing or malfunction of the head Hold the paper by the printing surface protection sheet When storing print paper Avoid storing the print paper in a location subject to high temperatures high humidity excessive dust direct sunlight Use the original package for storing unused paper Paper cover ...

Страница 23: ...rinting pack Color postcard printing pack UPC 2070E Contains an ink ribbon cartridge and paper for post cards Color ink ribbon cartridge 1 roll A 6 size paper 150 sheets The size is a little larger than paper of another printing pack Printing packs used with the small paper tray 16 split self adhesive pre cut color printing pack UPC 20S16 Contains an ink ribbon cartridge and paper for sticker of 1...

Страница 24: ...24 Preparations B W printing pack UPC 2020 Contains an ink ribbon cartridge and paper B W ink ribbon cartridge 1 roll A 6 4 1 4 5 3 4 inches size paper 200 sheets ...

Страница 25: ...tor supplied 2 Connect the DC cord of the AC power adaptor to the DC IN connector of the station 3 Connect the AC power adaptor to wall outlet Supplying power to the station begins To stop supplying power to the station Disconnect the AC power adaptor from wall outlet POWER BUSY CAMERA RELERASE UPX C21 PRINTER DC IN DC IN AC power adaptor supplied AC power cord supplied to wall outlet Station Rele...

Страница 26: ...ct the DC OUT connector of the AC power adaptor charger and the DC 8 4 V IN connector of the camera For details refer to the operation manual furnished with the AC power adaptor charger Connection of the station and the printer Connect the station and printer using the supplied interface cable AC IN PRINTER DC IN PRINTER PRINTER Station Printer To the station connector Interface cable supplied to ...

Страница 27: ...he station Slide the CAMERA RELEASE lever to the left and the camera pops up PLAY CAMERA LCD M OMITOR ON OFF W MODE SET T H S POWER ON OFF B W COL POWER BUSY MENU BATTERY CHARGE CAMERA RELERASE BW COLOR MULTI PICTURE EXEC PRINT UPX C21 16 9 8 4 2 1 CAMERA RELEASE lever B W COL POWER BUSY MENU BATTERY CH ARGE BW CO LOR MULTI PICTURE EXEC PRINT UPX C21 16 9 8 4 2 1 CAM ERA RELERASE PLAY CAMERA LCD M...

Страница 28: ...ted below Attaching the ferrite filters Release the lock of the ferrite filter with a screwdriver or a similar tool and attach it to the plug B W COL P O W E R B U S Y M E N U B A T T E R Y C H A R G E B W C O L O R M U L T I P I C T U R E E X E C P R I N T UPX C21 1 6 9 8 4 2 1 CAMERA C A M E R A R E L E R A S E VIDEO OUT FLASH RELEASE RS 232C DC8 4V IN O F F P O W E R O N S O N Y ZOOMLENS OPTICA...

Страница 29: ...a large battery and a button battery Insert both of them as described below 1 Open the battery compartment lid on the bottom of the camera by pushing the PUSH button and sliding the lid in the direction of the arrow 2 Pull out the button battery case PUSH CR2025 PUSH Continue to next page ...

Страница 30: ...30 Preparations CR2025 PUSH PUSH 3 Install the button battery in its case 4 Reinsert the case 5 Insert the large lithium ion battery 6 Close the lid PUSH CR2025 CR2025 CR2025 CR2025 ...

Страница 31: ...ill begin and CHARGING appears on the liquid crystal display of the station When finished charging When CHARGING on the liquid crystal display disappears charging is completed Disconnect the camera from the station by sliding the CAMERA RELEASE lever to the left Note on charging It is recommended to charge the battery when the battery indicator shows that the battery is not full PLAY CAMERA LCD M ...

Страница 32: ...he SET UP display 1 Set the POWER switch to ON 2 Set the PLAY CAMERA switch to PLAY 3 Press MODE of the mode button four times so that SET UP appears on the LCD of the camera 03 Hi 1 SET UP 4 Press SET of the mode button The SET UP display appears and the select mark points to CLOCK SETUP CLOCK FRAME POWER SAVE H S PLAY CAMERA LCD MONITOR ON OFF W MODE SET T POWER OFF ON 1 2 3 4 ...

Страница 33: ...ode button 4 Press bor B of the mode button to set the year then press SET of the mode button 5 Press bor B of the mode button to set the month then press SET of the mode button 6 Press bor B of the mode button to set the day then press SET of the mode button 7 Press bor B of the mode button to set the hour then press SET of the mode button CLOCK SET DISP OFF 2000 01 01 00 00 Y M D 8 Press bor B o...

Страница 34: ... Press bor Bof the mode button to select ON then press SET of the mode button The FRAME select display appears FRAME 1 2 3 4 3 Press bor B of the mode button to select frame mode 1 2 3 or 4 then press SET of the mode button The selected guideline appears on the LCD For details on the guideline see Optimum distance between the subject and lens page 38 To make the guideline disappear Select OFF in s...

Страница 35: ...AMERA half pressing the release button also restore power 1 When the SET UP display is shown on the LCD press Bof the mode button so that the select mark points to POWER SAVE then press SET of the mode button The POWER SAVE ON OFF display appears OFF ON POWER SAVE 2 Press bor B of the mode button to select ON then press SET of the mode button Power save mode is set To cancel power save mode Select...

Страница 36: ...an easily attach and detach the camera Size of the quick shoe that can be used H S H S VIDEO OUT FLASH RELEASE RS 232C DC8 4V IN O F F P O W E R O N S O N Y ZOOMLENS OPTICAL 1 3x F 12 1 5 6 m m 1 4 0 4 7 VIDEO OUT FLASH RELEASE RS 232C DC8 4V IN O FF PO W ER O N S O N Y ZOOMLENS OPTICAL 1 3x F 12 1 5 6 m m 1 4 0 4 7 Quick shoe 32 mm or less 26 mm or less 50 mm or less Thickness 14 mm or less Lens ...

Страница 37: ...sing the release button 5 Press the H S button to select the resolution mode 6 Point the camera at the subject and adjust the frame by monitoring the LCD of the camera Zooming is available by pressing the zoom lever 7 Press the release button on the camera The standby lamp starts flashing in red Once the picture is stored in memory flashing stops and the standby lamp lights in green When finished ...

Страница 38: ...e chin the optimum distance and the face size that will appear on the printout are shown below Type of a Optimum distance according to the zoom position guideline and printout FRAME 1 Wide 1 m Telephoto 1 3 m FRAME 2 Wide 1 05 m Telephoto 1 35 m US passport Two reduced images Wide 1 45 m Telephoto 1 9 m US passport Two reduced images FRAME 3 Wide 1 m Telephoto 1 25 m FRAME 1 2 3 4 FRAME 1 2 3 4 FR...

Страница 39: ...ve battery power Set the LCD MONITOR switch to OFF look through the viewfinder and adjust the frame Note The picture seen through the viewfinder does not reflect the framing correctly The correct framing is the picture on the LCD H S PLAY CAMERA LCD MONITOR ON OFF W MODE SET T P O W E R O F F O N Viewfinder LCD MONITOR switch FRAME 1 2 3 4 22 mm 7 8 inch ...

Страница 40: ...40 Adjusting the angle of the grip The block with the LCD is rotated by 90 degrees to adjust the angle for easy monitoring of a picture on the LCD PLAY CAMERA LCD MONITOR ON OFF W MODE SET T Operation ...

Страница 41: ...manual mode the exposure aperture and white balance can be set as desired Exposure settings This camera is adjusted so that the optimum brightness is obtained with the exposure of 0 The brightness can be changed with the exposure settings changed setting of the exposure increases the brightness while setting decreases it Aperture settings Two aperture positions OPEN and CLOSE are provided on this ...

Страница 42: ...tic playback Hold b or B of the mode button pressed for about two seconds The pictures stored in memory are played back in sequence at the intervals of about four seconds Stopping automatic playback Press MODE or SET of the mode button After playback Set the POWER switch to OFF Multiple playback Multiple playback is available Details on multiple playback refer to the Operating Instructions Advance...

Страница 43: ...OWER switch to ON 2 Set the PLAY CAMERA switch to PLAY A picture in memory appears on the LCD 3 Press MODE of the mode button three times The ERASE mark appears on the LCD Hi 1 03 ERASE 4 Press b or B of the mode button to select a picture to be erased H S PLAY CAMERA LCD MONITOR ON OFF W MODE SET T POWER OFF ON 1 2 3 4 5 6 Continue to next page ...

Страница 44: ...rasing Press MODE of the mode button repeatedly in step 4 or 5 until the ERASE mark disappears Erasing all pictures simultaneously 1 Set the POWER switch to ON 2 Set the PLAY CAMERA switch to PLAY A picture in memory appears on the LCD 3 Press MODE of the mode button three times The ERASE mark appears on the LCD 4 Press SET of the mode button The ONE ALL appears on the screen 5 Press b or B of the...

Страница 45: ...t protected are erased If all pictures are erased the screen becomes blue If some picture is protected that picture and the ERASE mark will appear on the screen To temporarily stop erasing Press MODE of the mode button repeatedly in steps 4 and 5 until the ERASE mark disappears To finish erasing Press MODE of the mode button repeatedly until the ERASE mark disappears ...

Страница 46: ...itch to ON 2 Set the PLAY CAMERA switch to PLAY A picture in memory appears on the LCD 3 Press MODE of the mode button twice The PROTECT mark appears on the LCD Hi 1 02 PROTECT 4 Press b or B of the mode button to select a picture to be protected H S PLAY CAMERA LCD MONITOR ON OFF W MODE SET T POWER OFF ON 1 2 3 4 5 Operation ...

Страница 47: ...dental erasure Hi 1 02 PROTECT Repeat steps 4 and 5 to protect the other pictures To finish setting the protection Press MODE of the mode button To erase a protected picture If you wish to erase a protected picture select the picture and repeat steps 4 and 5 to make the protect mark disappear upon which the protection is released ...

Страница 48: ...EM UPX C21 is displayed for about 8 seconds on the LCD of the station then disappears 2 Press the B W COLOR button on the station to select black and white B W or color COL for a printout 3 Press the SPLIT button on the station to select a full size or split reduced image for a printout 4 Set the POWER switch on the camera to ON 5 Set the PLAY CAMERA switch to PLAY 6 Select a picture to be printed...

Страница 49: ...pending on the type of paper used When finished printing Set the POWER switch on the camera to OFF to save battery power To print two or more sheets You can print up to nine sheets of a picture at a time To print two or more sheets set the number of sheets to be printed before pressing the PRINT button in step 7 above 1 Press the MENU button on the station 2 Press the V button so that PRINT QTY ap...

Страница 50: ...thermal head of the printer needs to be preheated to start printing When for example printing immediately after turning on the printer the PRINT lamp of the printer lights during preheating then printing starts automatically when the printer is ready Notes When storing your printouts Avoid storing the printout in a location subject to high temperatures high humidity excessive dust and direct sunli...

Страница 51: ...n gives it more greenish YEL BLU This item is enabled when COL is selected with the B W COLOR button Pressing the b button gives the picture more yellowish while pressing the B button gives it more bluish DARK Contrast in the dark areas is adjusted Pressing the B button increases the darknesss LIGHT Contrast in the light areas is adjusted Pressing the B button increases the lightness SHARPNESS The...

Страница 52: ...41 F to 95 F Camera General Power supply Supplied from a Sony NP F550 Lithium Battery or from an optional AC power adaptor 8 4 V DC Operating temperature 5 C to 35 C 41 F to 95 F Storage temperature 20 C to 60 C 4 F to 140 F Operating humidity 20 to 80 non condensation Dimensions w h d 220 210 71 mm 8 3 4 8 3 8 2 7 8 inches Mass approx 980 g 2 lb 3 oz System Camera type Digital still camera Re pla...

Страница 53: ... mode Operating temperature 5 C to 35 C 41 F to 95 F Storage temperature 20 C to 60 C 4 F to 140 F Dimensions w h d Approx 125 39 62 mm 5 1 9 16 2 3 2 inches including projecting parts Mass Approx 230 g 8 oz Supplied accessories Standard paper tray 1 Postcard size paper tray 1 Paper cover 1 AC power cord for printer 1 AC power adaptor PCS AC08 2 AC power cord for the PCS AC08 2 Interface cable 1 C...

Страница 54: ...on to A or E The cord of the external strobe is not connected to the camera t Connect the cord of the external strobe to the FLASH jack of the camera The battery is discharged t Charge the battery or replace it with a new one t The strobe may be out of life Contact the Sony service facility Liquid crystal display of the camera Symptom Possible causes Action When taking a picture no image is displa...

Страница 55: ...rty t Clean the lens The flash was blocked by a finger or other obstacle t Hold the camera correctly and make sure nothing blocks the flash The subject was too far away t Take the picture within range of the flash The subject was backlit t Use the flash This is due to fluorescent lighting t Set the white balance correctly A finger was blocking the lens t Hold the camera correctly and make sure a f...

Страница 56: ...Load the ink ribbon cartridge page 17 SET PAPER Paper has been exhausted t Load the paper page 20 The paper tray is not installed t Install the paper tray page 20 INSERT RIBBON The ink ribbon cartridge and paper are not loaded SET PAPER t Load the ink ribbon cartridge and paper pages 17 through 22 REMOVE PRINTS The maximum number of printouts has accumulated on the paper cover t Remove the printou...

Страница 57: ... reused page 17 The ink ribbon cartridge is not loaded t Load the ink ribbon cartridge page 17 PAPER The paper has been exhausted t Load the paper in the paper tray page 20 The paper tray is not installed t Install the paper tray page 20 ALARM and PAPER The ink ribbon cartridge and paper are not compatible t Use a valid combination of paper and ink ribbon cartridge page 23 ALARM and RIBBON The ink...

Страница 58: ...il qu à un personnel qualifié pour l appareil photo numérique DKC C21X ATTENTION Il y a danger d explosion s il y a remplacement incorrect de la batterie Remplacer uniquement avec une batterie du même type ou d un type équivalent recommandé par le constructeur Mettre au rebut les batteries usagées conformément aux instructions du fabricant pour l imprimante UPD C21X AVERTISSEMENT CET APPAREIL DOIT...

Страница 59: ... Nomenclature 66 Appareil photo 66 Station 69 Imprimante 71 Préparatifs 73 Préparatifs pour l imprimante 73 Raccordements 81 Préparation de l appareil photo 85 Fonctionnement 93 Prise de vues 93 Visionnement d une Image 98 Effacement d une Image 99 Protection des images 102 Impression 104 Spécifications 108 Guide de dépannage 110 Indicateurs d erreur du panneau avant de l imprimante 114 FR Françai...

Страница 60: ... Configuration du système B W COL POWER BUSY MENU BA TTERY CHARGE CAMERA RELERASE BW COLOR MULTI PICTURE EXEC PRINT UPX C21 16 9 8 4 2 1 S O N Y ZOOM LENS OPTICAL 1 3x F 12 15 6 m m 1 4 0 4 7 H S POWER PLAY CAMERA LCD M OMITOR ON OFF W MODE SET T H S POWER ON OFF B W COL POWER BUSY MENU BATTERY CHARGE CAMERA RELERASE BW COLOR MULTI PICTURE EXEC PRINT UPX C21 16 9 8 4 2 1 Station Imprimante numériq...

Страница 61: ...èle pour les États Unis et le Canada Portrait Format portefeuille Passeport U S Impression de quatre images réduites Impression de six images réduites Impression de seize images réduites L impression de six images réduites est possible seulement si vous utilisez le kit d impression couleur autolaminant UPC 2040A ou UPC 2045 avec l imprimante numérique ...

Страница 62: ... de l intensité de la lumière DARK LIGHT GAMMA B 3 0 0 3 G 3 0 3 0 now 0 0 0 G 3 0 3 0 B 3 0 0 3 R 3 3 0 0 R 3 3 0 0 D 3 3 0 0 L 3 0 3 0 Gm 3 0 0 3 now 0 0 0 D 3 3 0 0 L 3 0 3 0 Gm 3 0 0 3 Présentation du système Impression d une image grand format Impression de deux images réduites Impression de quatre images réduites Impression de six images réduites Impression de neuf images réduites Impression...

Страница 63: ...e soumettez pas l appareil à des chocs mécaniques et ne le laissez pas tomber Ne démontez pas l appareil et ne le modifiez pas N enlevez pas le couvercle Vous courez le risque d être électrocuté par un contact avec les composants internes Veillez à ne pas répandre d eau ou un autre liquide sur l appareil prévenez toute pénétration éventuelle de matériaux combustibles ou métalliques dans le châssis...

Страница 64: ...on peut se former à l intérieur de l imprimante Cette condensation risque d entraîner un dysfonctionnement de l imprimante voire de provoquer une panne si vous persistez à l utiliser Si de la condensation se forme mettez l imprimante hors tension et laissez la sécher pendant au moins une heure Si le kit d impression est soumis à des variations de température importantes et brutales de la condensat...

Страница 65: ...sur la propriété artistique Vous pouvez prendre des photos destinées à l usage personnel avec cet appareil photo numérique Néanmoins prendre en photo des objets protégés par les lois sur la propriété artistique est interdit sans l autorisation du détenteur des droits d auteur N oubliez pas cela lorsque vous prendrez des photos pendant un concert un spectacle ou dans une salle d exposition etc une ...

Страница 66: ...us aux Instructions de fonctionnement Opérations avancées Si un moniteur vidéo est raccordé avec un câble vidéo optionnel vous pourrez visualiser une image de l écran LCD sur l écran du moniteur 6 Prise RELEASE minijack Reportez vous aux Instructions de fonctionnement Opérations avancées Pour le branchement d un déclencheur optionnel 7 Prise RS 232C minijack 84 Pour utiliser l appareil photo loin ...

Страница 67: ...es avec le flash intégré ou un flash extérieur Le flash intégré ne se déclenche pas La vitesse d obturation optimale est sélectionnée par détection automatique des conditions d éclairage E Le flash intégré ne se déclenche pas mais seul le flash extérieur s allume La vitesse d obturation est fixée à 1 250 de seconde L effet d yeux rouges qui peut survenir lors de la prise de vues au flash est rédui...

Страница 68: ...A 9 Couvercle du compartiment de la batterie 85 Insérez les batteries lithium ion grande et petite fournies et refermez le couvercle 0 Touche de mode 98 99 102 Appuyez légèrement sur le côté MODE SET b ou B de la touche pour obtenir les résultats suivants MODE Chaque fois que vous appuyez sur ce côté le mode affiché sur l écran LCD change cycliquement Quand le commutateur PLAY CAMERA est réglé sur...

Страница 69: ...Y 104 S allume en vert quand l imprimante raccordée est sous tension Clignote en rouge pendant que les données d image sont transmises de l appareil photo à la station Ne débranchez pas l appareil photo de la station pendant que ce témoin clignote en rouge qf qg 1 2 qs qd 3 4 5 6 7 8 9 0 qa PRINTER DC IN CAMERA RELERASE B W COL POWER BUSY MENU BATTERY CHARGE BW COLOR SPLIT EXEC PRINT UPX C21 16 9 ...

Страница 70: ...n 105 106 Appuyez sur cette touche pour enregistrer les valeurs réglées avec le menu des opérations 0 Touches de curseur 105 106 Utilisez ces touches pendant l affichage du menu des opérations qa Touche MENU 105 106 Appuyez sur cette touche pour afficher le menu des opérations Appuyez de nouveau sur cette touche pour revenir à l affichage normal qs Levier CAMERA RELEASE 83 Faites glisser le levier...

Страница 71: ...rtouche à ruban encreur se produit 6 Indicateur PAPER 104 114 L allume en cas de problème avec le papier 7 Touche STOP Appuyez sur cette touche pour interrompre une impression en cours 8 Touche PRINT Appuyez sur cette touche pour réimprimer l image mémorisée par l imprimante 9 Panneau avant Ouvrez le panneau avant en le tirant vers vous L ouverture du panneau avant révèle la cartouche à ruban encr...

Страница 72: ...ière 1 Connecteur de la station 84 Branchez sur ce connecteur le câble d imprimante de la station 2 Prise AC IN Sert au raccordement de l imprimante à une prise murale au moyen du cordon d alimentation fourni Nomenclature ...

Страница 73: ...stallation d une cartouche à ruban encreur Pour pouvoir réaliser des tirages vous devez installer une cartouche à ruban encreur et charger du papier compatibles voir Kit d impression et bac d alimentation à la page 79 Remarques Utilisez uniquement les cartouches à ruban encreur et le papier conçus en vue d une utilisation avec cette imprimante faute de quoi le résultat de l impression risque d êtr...

Страница 74: ...e à ruban encreur est éjectée Cette opération n est pas nécessaire la première fois que vous utilisez l imprimante Remarque N introduisez jamais les doigts dans le compartiment du ruban encreur La tête thermique atteint en effet une température très élevée et vous risquez de vous brûler si vous la touchez ...

Страница 75: ...u il risque d être endommagé lors de son insertion 4 Introduisez fermement la cartouche à ruban encreur jusqu à ce qu elle s encliquette 5 Refermez le panneau avant Rembobinez le ruban jusqu à ce que la partie non utilisée arrive à l extrémité droite Voir page suivante ...

Страница 76: ...la partie restante du ruban ne devrait poser aucun problème Chargement du papier d impression et mise en place du réceptacle à papier Pour charger du papier appliquez la procédure ci dessous Utilisez le bac d alimentation avec du papier au format approprié Remarques Utilisez uniquement les cartouches à ruban encreur et le papier conçus en vue d une utilisation avec cette imprimante faute de quoi l...

Страница 77: ...d impression Pour plus de détails sur la capacité maximale du bac d alimentation voir Kit d impression et bac d alimentation à la page 79 Ne placez pas différents types de papier en même temps dans le magasin Sinon un bourrage de l imprimante risque de se produire Chargez le papier d impression de façon à ce qu il soit parfaitement à plat dans le bac d alimentation Si le papier est ondulé il dépas...

Страница 78: ...ou des traces de doigts risquent d entraîner des résultats d impression insatisfaisants ou un dysfonctionnement de la tête d impression Tenez le papier par la feuille de protection de la surface d impression Rangement du papier d impression Evitez de ranger le papier d impression dans un endroit soumis à des températures élevées une humidité importante des poussières excessives au rayonnement dire...

Страница 79: ... Cartouche à ruban encreur couleur 1 rouleau 120 feuilles de papier format A6 le format est un peu plus large que le papier des autres kits d impression Kit d impression couleur sur carte postale UPC 2070E Contient une cartouche à ruban encreur et du papier pour cartes postales Cartouche à ruban encreur couleur 1 rouleau 150 feuilles de papier format A6 le format est un peu plus large que le papie...

Страница 80: ...pier à étiquettes pour 4 images réduites Cartouche à ruban encreur couleur 1 rouleau 200 feuilles de papier format A6 41 4 53 4 pouces Kit d impression en noir et blanc UPC 2020 Contient une cartouche à ruban encreur et du papier d impression Cartouche à ruban encreur noir et blanc 1 rouleau 200 feuilles de papier format A6 4 1 4 53 4 pouces ...

Страница 81: ...eur fourni 2 Branchez le cordon CC de l adaptateur d alimentation secteur sur la prise DC IN de la station 3 Branchez l adaptateur d alimentation secteur sur une prise murale La station est alimentée Pour couper l alimentation de la station Débranchez l adaptateur secteur de la prise murale POWER BUSY CAMERA RELERASE UPX C21 PRINTER DC IN DC IN Adaptateur d alimentation secteur fourni Cordon d ali...

Страница 82: ...AC V615 optional Raccordez la prise DC OUT de l adaptateur secteur chargeur à la prise DC8 4V IN de l appareil photo Pour les détails reportez vous au mode d emploi fourni avec l adaptateur d alimentation secteur chargeur Installation sur un trépied Raccordez la station à l imprimante en utilisant le câble d interface fourni AC IN PRINTER DC IN PRINTER PRINTER Station Imprimante vers le connecteur...

Страница 83: ...de l appareil photo de la station Faites glisser le levier CAMERA RELEASE vers la gauche et l appareil photo sortira vers le haut PLAY CAMERA LCD M OMITOR ON OFF W MODE SET T H S POWER ON OFF B W COL POWER BUSY MENU BATTERY CHARGE CAMERA RELERASE BW COLOR MULTI PICTURE EXEC PRINT UPX C21 16 9 8 4 2 1 Levier CAMERA RELEASE B W COL POWER BUSY MENU BATTERY CH ARGE BW CO LOR MULTI PICTURE EXEC PRINT U...

Страница 84: ...ion ci dessous Mise en place des filtres à ferrite Débloquez le filtre à ferrite avec un tournevis ou un outil similaire et mettez le en place sur la fiche B W COL P O W E R B U S Y M E N U B A T T E R Y C H A R G E B W C O L O R M U L T I P I C T U R E E X E C P R I N T UPX C21 1 6 9 8 4 2 1 CAMERA C A M E R A R E L E R A S E VIDEO OUT FLASH RELEASE RS 232C DC8 4V IN O F F P O W E R O N S O N Y Z...

Страница 85: ...on lithium ion sont fournies Insérez les de la façon décrite ci dessous 1 Ouvrez le couvercle du logement de batterie au bas de l appareil photo en appuyant sur le bouton PUSH et en faisant glisser le couvercle dans le sens de la flèche 2 Tirez sur le logement de la pile bouton PUSH CR2025 PUSH Voir page suivante ...

Страница 86: ...ifs PUSH PUSH CR2025 CR2025 CR2025 CR2025 CR2025 PUSH 3 Insérez la pile bouton dans son logement 4 Réinsérez le logement dans l appareil photo 5 Insérez la batterie rechargeable lithium ion 6 Refermez le couvercle ...

Страница 87: ...ement commencera et CHARGING apparaîtra sur l afficheur LCD de la station Quand le chargement est terminé Quand CHARGING disparaît de l afficheur LCD le chargement est terminé Détachez l appareil photo de la station en faisant glisser le levier CAMERA RELEASE vers la gauche Remarque sur le chargement Il est conseillé de recharger la batterie quand l indicateur de la batterie indique qu elle n est ...

Страница 88: ...de l affichage SET UP 1 Réglez le commutateur POWER sur ON 2 Réglez le commutateur PLAY CAMERA sur PLAY 3 Appuyez sur MODE de la touche de mode quatre fois de telle façon que SET UP apparaisse sur l écran LCD de l appareil photo 03 Hi 1 SET UP 4 Appuyez sur SET de la touche de mode L affichage SET UP apparaît et le repère de sélection indique CLOCK SETUP CLOCK FRAME POWER SAVE H S PLAY CAMERA LCD ...

Страница 89: ...ppuyez sur b ou B de la touche de mode pour régler l année puis appuyez sur SET de la touche de mode 5 Appuyez sur b ou B de la touche de mode pour régler le mois puis appuyez sur SET de la touche de mode 6 Appuyez sur b ou B de la touche de mode pour régler le jour puis appuyez sur SET de la touche de mode 7 Appuyez sur b ou B de la touche de mode pour régler l heure puis appuyez sur SET de la to...

Страница 90: ...OFF ON FRAME 2 Appuyez sur b ou B de la touche de mode pour sélectionner ON puis appuyez sur SET de la touche de mode L affichage de sélection de cadre FRAME apparaît FRAME 1 2 3 4 3 Appuyez sur b ou B de la touche de mode pour sélectionner le mode de cadrage 1 2 3 ou 4 puis appuyez sur SET de la touche de mode Les repères de cadrage sélectionnés apparaissent sur l écran LCD Pour faire disparaître...

Страница 91: ...1 Quand l affichage SET UP apparaît sur l écran LCD appuyez sur B de la touche de mode de telle façon que le repère de sélection indique POWER SAVE puis appuyez sur SET de la touche de mode L affichage POWER SAVE ON OFF apparaît OFF ON POWER SAVE 2 Appuyez sur b ou B de la touche de mode pour sélectionner ON puis appuyez sur SET de la touche de mode Le mode d économie d énergie est activé Pour des...

Страница 92: ...ourrez facilement attacher détacher l appareil photo Taille du sabot de fixation rapide pouvant être utilisé H S H S VIDEO OUT FLASH RELEASE RS 232C DC8 4V IN O F F P O W E R O N S O N Y ZOOMLENS OPTICAL 1 3x F 12 1 5 6 m m 1 4 0 4 7 VIDEO OUT FLASH RELEASE RS 232C DC8 4V IN O FF PO W ER O N S O N Y ZOOMLENS OPTICAL 1 3x F 12 1 5 6 m m 1 4 0 4 7 Sabot de fixation rapide Trépied Côté objectif 32 mm...

Страница 93: ...he H S pour sélectionner le mode de résolution 6 Dirigez l appareil photo vers le sujet et réglez le cadrage en regardant l écran LCD de l appareil photo Le zooming est aussi possible en appuyant sur le levier de zoom 7 Appuyez sur le déclencheur de l appareil photo Le témoin de veille se met à clignoter en rouge Quand l image est enregistrée dans la mémoire le clignotement s arrête et le témoin d...

Страница 94: ...ille du visage telle qu elle apparaîtra sur le tirage sont indiqués ci dessous Type de repères Distance optimale en fonction du réglage de zoom de cadrage et tirage FRAME 1 Grand angle 1 m Téléobjectif 1 3 m FRAME 2 Grand angle 1 05 m Téléobjectif 1 35 m Passeport U S Deux images réduites Grand angle 1 45 m Téléobjectif 1 9 m Passeport U S Deux images réduites FRAME 3 Grand angle 1 m Téléobjectif ...

Страница 95: ...énergie de la batterie rechargeable et de la pile Réglez le commutateur LCD MONITOR sur OFF regardez dans le viseur et cadrez Remarque L image vue dans le viseur ne reflète pas le cadrage de façon correcte Le cadrage correct est représenté par l image de l écran LCD FRAME 1 2 3 4 H S PLAY CAMERA LCD MONITOR ON OFF W MODE SET T P O W E R O F F O N Viseur Commutateur LCD MONITOR 22 mm 7 8 pouce ...

Страница 96: ...le de la poignée Le bloc comportant l écran LCD peut pivoter sur 90 degrés pour le choix d un angle permettant un visionnement facile d une image sur l écran LCD PLAY CAMERA LCD MONITOR ON OFF W MODE SET T Fonctionnement ...

Страница 97: ...sition l ouverture et la balance des blancs Dans le mode MAN manuel l exposition l ouverture et la balance des blancs peuvent être réglés selon vos goûts Réglage de l exposition Cet appareil photo est réglé de telle façon que la luminosité optimale soit obtenue avec une exposition de 0 La luminosité peut être changée en modifiant les réglages d exposition Le réglage de l exposition augmente la lum...

Страница 98: ... ou B enfoncée pendant plus de deux secondes Les images stockées dans la mémoire seront visionnées dans l ordre à des intervalles d environ quatre secondes Arrêt du visionnement automatique Appuyez sur MODE ou SET de la touche de mode Après le visionnement Réglez le commutateur POWER sur OFF Visionnement d images multiples Le visionnement d images multiples est possible Pour des détails sur le vis...

Страница 99: ...teur POWER sur ON 2 Réglez le commutateur PLAY CAMERA sur PLAY Une image enregistrée apparaît sur l écran LCD 3 Appuyez sur MODE de la touche de mode trois fois L indicateur ERASE apparaît sur l écran LCD Hi 1 03 ERASE 4 Appuyez sur b ou B de la touche de mode pour sélectionner une image à effacer H S PLAY CAMERA LCD MONITOR ON OFF W MODE SET T POWER OFF ON 1 2 3 4 5 6 Voir page suivante ...

Страница 100: ...a touche de mode à plusieurs reprises à l étape 4 ou 5 jusqu à ce que l indicateur ERASE disparaisse Effacement simultané de toutes les images 1 Réglez le commutateur POWER sur ON 2 Réglez le commutateur PLAY CAMERA sur PLAY Une image enregistrée apparaît sur l écran LCD 3 Appuyez sur MODE de la touche de mode trois fois L indicateur ERASE apparaît sur l écran LCD 4 Appuyez sur SET de la touche de...

Страница 101: ...tes les images sont effacées l écran devient bleu Si une image est protégée cette image et l indicateur ERASE apparaîtront sur l écran Pour interrompre l effacement Appuyez sur MODE de la touche de mode à plusieurs reprises à l étape 4 ou 5 jusqu à ce que l indicateur ERASE disparaisse Pour arrêter l effacement Appuyez sur MODE de la touche de mode à plusieurs reprises jusqu à ce que l indicateur ...

Страница 102: ... Réglez le commutateur PLAY CAMERA sur PLAY Une image enregistrée apparaît sur l écran LCD 3 Appuyez sur MODE de la touche de mode deux fois L indicateur PROTECT apparaît sur l écran LCD Hi 1 02 PROTECT 4 Appuyez sur b ou B de la touche de mode pour sélectionner une image à protéger H S PLAY CAMERA LCD MONITOR ON OFF W MODE SET T POWER OFF ON 1 2 3 4 5 Fonctionnement ...

Страница 103: ... Hi 1 02 PROTECT Répétez les étapes 4 et 5 pour protéger d autres images Pour terminer le réglage de la protection Appuyez sur MODE de la touche de mode Pour effacer une image protégée Si vous souhaitez effacer une image protégée sélectionnez l image et répétez les étapes 4 et 5 de telle façon que l indicateur de protection disparaisse L image ne sera plus protégée ...

Страница 104: ... imprimante se trouve à présent en mode de veille Le message DIGITAL PRINTING SYSTEM UPX C21 est affiché pendant 8 secondes environ sur l écran LCD de la station puis disparaît 2 Appuyez sur le commutateur B W COLOR de la station pour sélectionner noir et blanc B W ou couleur COL pour un tirage 3 Appuyez sur le commutateur SPLIT de la station pour sélectionner une image grand format ou plusieurs i...

Страница 105: ...essage PROCESSING IMAGE est affiché L impression sera terminée en deux minutes et demie environ Le temps nécessaire pour l impression varie en fonction du type de papier utilisé Quand l impression est terminée Réglez le commutateur POWER de l appareil photo sur OFF pour économiser l énergie de la batterie rechargeable et de la pile Pour imprimer deux feuilles ou plus Vous pouvez imprimer jusqu à n...

Страница 106: ...uleur autolaminant UPC 2040A est utilisé La tête thermique de l imprimante doit être pré chauffée avant le début de l impression Si vous essayez de commencer l impression immédiatement après la mise sous tension de l appareil par exemple le témoin PRINT de l imprimante restera allumé pendant le pré chauffage puis l impression commencera automatiquement dès que l imprimante sera prête Remarques Ran...

Страница 107: ...nne plus de vert YEL BLU Ce paramètre est activé quand COL est sélectionné avec la touche B W COLOR Une pression sur la touche b donne à l image plus de jaune tandis qu une pression sur la touche B lui donne plus de bleu DARK Le contraste dans la partie sombre est réglé Une pression sur la touche B rend l image plus sombre LIGHT Le contraste dans la partie claire est réglé Une pression sur la touc...

Страница 108: ...ASE 3 5 mm de dia minijack Appareil photo Généralités Alimentation Fournie par une batterie lithium ion NP F550 Sony ou par un adaptateur d alimentation secteur chargeur en option Température de fonctionnement 5 C à 40 C 41 F à 104 F Température d entreposage 20 C à 60 C 4 F à 140 F Humidité de fonctionnement 20 à 80 sans condensation Dimensions 220 210 71 mm l h p 8 3 4 8 3 8 2 7 8 pouces Poids E...

Страница 109: ...ion 100 240 V CA 50 60 Hz Consommation 23 W 34 VA CA 100 V 51 VA CA 240 V Tension de sortie DC OUT 8 4 V 1 8 A en mode de fonctionnement Température de fonctionnement 0 C à 40 C 32 F à 104 F Température d entreposage 20 C à 60 C 4 F à 140 F Dimensions Env 56 44 107 mm l h p 2 3 16 1 3 4 4 3 16 pouces parties faisant saillie comprises Poids Env 190 g 6 7 on Accessoires fournis Bac d alimentation st...

Страница 110: ... E Le cordon du flash extérieur n est pas branché sur l appareil photo t Branchez le cordon du flash sur la prise FLASH de l appareil photo La batterie est épuisée t Rechargez la batterie ou remplacez la par une neuve t Le flash a peut être dépassé sa durée de vie Contactez un centre de service après vente Sony Afficheur à cristaux liquides de l appareil photo Symptômes Causes possibles Mesures à ...

Страница 111: ... ou autre chose t Tenez l appareil photo correctement en faisant attention à ce qu un doigt ne recouvre pas le flash Le sujet était trop éloigné t Prenez la photo dans la plage de fonctionnement du flash Le sujet est photographié à contre jour t Utilisez le flash Ceci est dû à l éclairage fluorescent t Réglez la balance des blancs correctement Un doigt bloquait l objectif t Tenez l appareil photo ...

Страница 112: ...ice après vente Sony END OF RIBBON Le ruban est épuisé t Remplacez la cartouche à ruban encreur par une neuve Page 73 Le ruban encreur ne peut pas être réutilisé INSERT RIBBON La cartouche à ruban encreur n est pas installée t Mettez la cartouche à ruban encreur en place Page 73 SET PAPER Le papier est épuisé t Chargez du papier Page 76 Le bac d alimentation n est pas installé t Installez le bac d...

Страница 113: ... autre rechargée page 85 ou utilisez l appareil photo avec l adaptateur d alimentation secteur fourni page 82 Pour effacer le message et faire revenir l écran LCD à son affichage normal appuyez sur la touche EXEC CAMERA ERROR Un problème de communication avec l appareil photo s est produit t Mettez l appareil photo et l imprimante hors tension puis remettez les sous tension ...

Страница 114: ...rtouche à ruban encreur Page 73 PAPER Le papier est épuisé t Chargez du papier dans le bac d alimentation Page 76 Le bac d alimentation n est pas installé t Installez le bac d alimentation Page 76 ALARM et PAPER La cartouche à ruban encreur et le papier ne sont pas compatibles t Utilisez une combinaison de papier d impression et de cartouche à ruban encreur compatibles Page 79 ALARM et RIBBON La c...

Страница 115: ...115 ...

Страница 116: ...e el servicio de personal cualificado únicamente para la cámara digital DKC C21X PRECAUCIÓN Si reemplaza incorrectamente la batería es posible que explote Reemplácela solamente por otra del mismo tipo u otro equivalente recomendada por el fabricante Tire las pilas de acuerdo con las instrucciones del fabricante para la impresora UPD C21X ADVERTENCIA ESTE APARATO DEBERÁ CONECTARSE A TIERRA Español ...

Страница 117: ... 123 Ubicación de partes 124 Cámara 124 Estación 127 Impresora 129 Preparativos 131 Preparación de la impresora 131 Conexiones 139 Preparación de la cámara 143 Operación 151 Fotografía 151 Contemplación de fotografías 156 Borrado de fotografías 157 Protección de una fotografía 160 Impresión 162 Especificaciones 166 Solución de problemas 168 Indicadores del panel frontal de la impresora 171 ES Espa...

Страница 118: ...color 16 700 000 colores Configuración del sistema B W COL POWER BUSY MENU BA TTERY CHARGE CAMERA RELERASE BW COLOR MULTI PICTURE EXEC PRINT UPX C21 16 9 8 4 2 1 S O N Y ZOOM LENS OPTICAL 1 3x F 12 15 6 m m 1 4 0 4 7 H S POWER PLAY CAMERA LCD M OMITOR ON OFF W MODE SET T H S POWER ON OFF B W COL POWER BUSY MENU BATTERY CHARGE CAMERA RELERASE BW COLOR MULTI PICTURE EXEC PRINT UPX C21 16 9 8 4 2 1 E...

Страница 119: ...s fotografías reducidas Impresión de una fotografía completa Impresión de dos fotografías para cartera Impresión de dos fotografías para pasaporte de EE UU Impresión de quatro fotografías reducidas Impresión de seis fotografías reducidas La impresión de seis fotografías reducidas solamente será posible cuando utilice el paquete de impresión en color autolaminador UPC 2040A o UPC 2045 con la impres...

Страница 120: ... la intensidad de iluminación DARK LIGHT GAMMA Descripción general del sistema B 3 0 0 3 G 3 0 3 0 now 0 0 0 G 3 0 3 0 B 3 0 0 3 R 3 3 0 0 R 3 3 0 0 D 3 3 0 0 L 3 0 3 0 Gm 3 0 0 3 now 0 0 0 D 3 3 0 0 L 3 0 3 0 Gm 3 0 0 3 Impresión de fotografía una completa Impresión de dos fotografías reducidas Impresión de cuatro fotografías reducidas Impresión de seis fotografías reducidas Impresión de nueve fo...

Страница 121: ...Mantenga siempre limpios los contactos metálicos del adaptador cargador de CA No golpee ni deje caer la unidad No desarme la unidad No quite la cubierta Existiría el peligro de descargas eléctricas al tocar las partes internas Tenga cuidado de no salpicar con agua ni otros líquidos la unidad y no permita que dentro de la misma entren combustibles ni objetos metálicos Si la utilizase con materias e...

Страница 122: ...e averíe si continúa utilizándola Si se ha condensado humedad desconecte la alimentación y deje así la impresora durante una hora por lo menos Si el paquete de impresión se somete a cambios amplios y repentinos de temperatura es posible que en la cinta entintadora o en el papel se condense humedad Por lo tanto evite guardar el paquete de impresión en lugares sometidos a cambios amplios y repentino...

Страница 123: ...os por las leyes de autor sin permiso del propietario de los derechos de autor Tenga esto en cuanta cuando fotografíe conciertos exhibiciones etc Es posible que muchos de los materiales exhibidos estén protegidos por los derechos de autor Limpieza Limpie la caja el panel y los controles con un paño suave y seco o ligeramente humedecido en una solución poco concentrada de detergente No utilice ning...

Страница 124: ...avanzadas Si ha conectado un videomonitor utilizando un cable para vídeo opcional podrá contemplar las fotografías mostradas en el visualizador de cristal líquido en la pantalla del monitor 6 Toma para disparador RELEASE minitoma Consulte el Manual de instrucciones Operaciones avanzadas Conéctele un disparador remoto opcional 7 Toma RS 232C minitoma 142 Conéctela a la toma CAMERA de la estación ut...

Страница 125: ...tivo Esta distancia se recomienda para fotografiar con los flahes incorporado y externo El flash incorporado no se encenderá La velocidad de obturación óptima se seleccionará automáticamente detectando las condiciones de iluminación E El flash incorporado no se encenderá sino que solamente lo hara el flash externo La velocidad de obturación se fijará a 1 250 segundos El efecto de ojos rojos produc...

Страница 126: ... cristal líquido cuando el selector PLAY CAMERA esté en CAMERA 9 Tapa del compartimiento de la batería pila 143 Inserte la batería de iones de litio NP F550 grande y la pila pequeñas suministradas y cierre la tapa 0 Botón de modo 156 157 160 Presione ligeramente el lado MODE SET b o B del botón y obtendrá la acción siguiente MODE Cada vez que presione este lado el modo indicado en el visualizador ...

Страница 127: ...pación POWER BUSY 162 Se encenderá en verde cuando conecte la alimentación de la impresora Parpadeará en rojo mientras los datos de una imagen estén transmitiéndose de la cámara a la estación Mientras la lámpara esté parpadeando en rojo no quite la cámara de la estación qf qg 1 2 qs qd 3 4 5 6 7 8 9 0 qa PRINTER DC IN CAMERA RELERASE B W COL POWER BUSY MENU BATTERY CHARGE BW COLOR SPLIT EXEC PRINT...

Страница 128: ... de ejecución EXEC 163 164 Presiónelo para almacenar los valores establecidos en el menú de operación 0 Teclas del cursor 163 164 Se utilizan para la operación del menú qa Botón de menú MENU 163 164 Presiónelo para entrar en la operación del menú Presiónelo de nuevo para volver a la visualización normal qs Palanca de liberación de la cámara CAMERA RELEASE 141 Deslícelo hacia la izquierda para solt...

Страница 129: ... el cartucho de cinta entintadora 6 Indicador de papel PAPER 162 171 Se encenderá cuando ocurra algún problema con el papel 7 Botón de parada STOP Presiónelo para parar la impresión en curso 8 Botón de impresión PRINT Presiónelo para realizar una reimpresión de la imagen almacenada en la memoria de la impresora 9 Panel frontal Tire de la puerta frontal hacia usted para abrirla Al abrir el panel se...

Страница 130: ...r 1 Conector de interfaz en paralelo 140 Conéctele el cable de interfaz en paralelo de la estación 2 Conector de entrada de CA AC IN 139 Se utiliza para conectar la impresora a un tomacorriente de la red con el cable de alimentación suministrado ...

Страница 131: ...mente necesario Carga de un cartucho de cinta entintadora Para realizar copias impresas tendrá que cargar un cartucho de cinta entintadora y papel compatibles consulte Paquete de impresión y bandeja del papel página 137 Notas Utilice solamente el cartucho de cinta entintadora y el papel diseñados para utilizarse con esta impresora Si no hiciese esto la impresión sería insatisfactoria o se producir...

Страница 132: ...entintadora saldrá hacia afuera Cuando vaya a utilizar la impresora por primera vez no necesitará realizar esta operación Nota No introduzca nunca la mano dentro del compartimiento del cartucho de la cinta entintadora El cabezal térmico se calentará mucho Si la tocase podría sufrir quemaduras ...

Страница 133: ...nta floja podría dañarse cuando la insertase 4 Inserte firmemente el cartucho de cinta entintadora hasta que se pare 5 Cierre el panel frontal Bobine el carrete hasta que el punto no utilizado llegue al extremo derecho Continúa en la página siguiente ...

Страница 134: ...epárela con la cinta transparente No habrá problema ninguno en utilizar la parte restante de la cinta Carga de papel y colocación de la cubierta del papel Para cargar el papel realice el procedimiento siguiente Utilice la bandeja de papel del tamaño apropiado Notas Utilice solamente el cartucho de cinta entintadora y el papel diseñados para utilizarse con esta impresora Si no hiciese esto la impre...

Страница 135: ... detallada sobre la cantidad máxima de papel que puede contener la bandeja consulte Paquete de impresión y bandeja del papel página 137 No coloque tipos diferentes de papel en la bandeja Si lo hiciese el papel podría atascarse Cargue el papel de forma que quede plano sobre la bandeja del mismo Si el papel está arrugado saldrá de la bandeja del papel y la posición de impresión puede desplazarse Cua...

Страница 136: ...sión El polvo o las huellas dactilares podría causar la impresión insatisfactoria o el mal funcionamiento del cabezal Sujete el papel por la hoja de protección de la superficie de impresión Cuando almacene el papel de impresión Evite almacenar el papel de impresión en un lugar sometido a altas temperaturas gran humedad polvo excesivo la luz solar directa Utilice el paquete original para almacenar ...

Страница 137: ...cho de cinta entintadora en color 1 rollo Papel de tamaño A 6 120 hojas El tamaño es ligeramente más grande que el papel de otro paquete de impresión Paquete de impresión de tarjetas postales en color UPC 2070E Contiene un cartucho de cinta entintadora y papel para tarjetas postales Cartucho de cinta entintadora en color 1 rollo Papel de tamaño A 6 150 hojas El tamaño es ligeramente más grande que...

Страница 138: ...a entintadora y papel para pegatinas de 4 imágenes reducidas Cartucho de cinta entintadora en color 1 rollo Papel de tamaño A 6 200 hojas Paquete de impresión en blanco y negro UPC 2020 Contiene un cartucho de cinta entintadora y papel Cartucho de cinta entintadora en blanco y negro 1 rollo Papel de tamaño A 6 200 hojas ...

Страница 139: ...ión de CA suministrado 2 Conecte el cable del adaptador de alimentación de CA al conector DC IN de la estación 3 Conecte el adaptador de alimentación de CA a un tomacorriente de la red Se iniciará el suministro de alimentación a la estación POWER BUSY CAMERA RELERASE UPX C21 PRINTER DC IN DC IN Adaptador de alimentación de CA suministrado Cable de alimentación de CA suministrado a un tomacorriente...

Страница 140: ...CA usando un adaptador cargador de CA AC V615 opcional Conecte el conector DC OUT del adaptador cargador de CA y el conector DC 8 4V IN de la cámara Con respecto a los detalles consulte consulte el Manual de instrucciones suministrado con el adaptador cargador de CA Conexión de la estación y la impresora Conecte la estación y la impresora utilizando el cable de interfaz suministrado AC IN PRINTER ...

Страница 141: ...ción Deslice la palanca CAMERA RELEASE hacia la izquierda y la cámara saldrá hacia arriba PLAY CAMERA LCD M OMITOR ON OFF W MODE SET T H S POWER ON OFF B W COL POWER BUSY MENU BATTERY CHARGE CAMERA RELERASE BW COLOR MULTI PICTURE EXEC PRINT UPX C21 16 9 8 4 2 1 Palanca CAMERA RELEASE B W COL POWER BUSY MENU BATTERY CH ARGE BW CO LOR MULTI PICTURE EXEC PRINT UPX C21 16 9 8 4 2 1 CAM ERA RELERASE PL...

Страница 142: ...Fijación de los filtros de ferrita Suelte los enganches del filtro de ferrita con un destornillador u otra herramienta similar y fíjelo a la clavija B W COL P O W E R B U S Y M E N U B A T T E R Y C H A R G E B W C O L O R M U L T I P I C T U R E E X E C P R I N T UPX C21 1 6 9 8 4 2 1 CAMERA C A M E R A R E L E R A S E VIDEO OUT FLASH RELEASE RS 232C DC8 4V IN O F F P O W E R O N S O N Y ZOOMLENS...

Страница 143: ...nde y una pila de botón Insértelas como se describe a continuación 1 Abra la tapa del compartimiento de la batería pila de la parte inferior de la cámara empujando el botón PUSH y deslizándola en el sentido de la flecha 2 Extraiga la caja de la pila de botón PUSH CR2025 PUSH Continúa en la página siguiente ...

Страница 144: ...144 Preparativos PUSH PUSH CR2025 CR2025 CR2025 CR2025 CR2025 PUSH 3 Instale la pila de botón en la caja 4 Reinserte la caja 5 Inserte la batería grande de iones de litio 6 Cierre la tapa ...

Страница 145: ...lizador de cristal líquido de la estación aparecerá CHARGING Cuando finalice la carga Cuando desaparezca CHARGING del visualizador de cristal líquido habrá finalizado la carga Desconecte la cámara de la estación deslizando la palanca CAMERA RELEASE hacia la izquierda Nota sobre la carga Se recomienda que cargue la batería cuando el indicador de la misma señale que no está llena PLAY CAMERA LCD M O...

Страница 146: ...Visualización de SET UP 1 Ponga el interruptor POWER en ON 2 Ponga el selector PLAY CAMERA en PLAY 3 Presione cuatro veces MODE del botón de modo para que en el visualizador de cristal líquido de la cámara aparezca SET UP 03 Hi 1 SET UP 4 Presione SET del botón de modo Aparecerá la visualización de SET UP y la marca de selección señalará CLOCK SETUP CLOCK FRAME POWER SAVE H S PLAY CAMERA LCD MONIT...

Страница 147: ...ón de modo 4 Presione b o B del botón de modo para ajustar el año y después presione SET de dicho botón 5 Presione b o B del botón de modo para ajustar el mes y después presione SET de dicho botón 6 Presione b o B del botón de modo para ajustar el día y después presione SET de dicho botón 7 Presione b o B del botón de modo para ajustar la hora y después presione SET de dicho botón CLOCK SET DISP O...

Страница 148: ...odo para elegir ON y después presione SET de dicho botón Aparecerá la visualización de selección de FRAME FRAME 1 2 3 4 3 Presione b o B del botón de modo para elegir el modo de encuadre 1 2 3 o 4 y después presione SET de dicho botón En el visualizador de cristal líquido aparecerá la guía seleccionada Con respecto a los detalles sobre la guía consulte Distancia óptima entre el motivo y el objetiv...

Страница 149: ... mitad de su recorrido 1 Cuando esté indicándose SET UP en el visualizador de cristal líquido presione B del botón de modo de forma que la marca de selección señale POWER SAVE y después presione SET de dicho botón Aparecerá la visualización de FRAME ON OFF OFF ON POWER SAVE 2 Presione b o B del botón de modo para elegir ON y después presione SET de dicho botón Se establecerá el modo de ahorro de e...

Страница 150: ...talar quitar fácilmente la cámara Tamaño de la zapata rápida que podrá utilizarse H S H S VIDEO OUT FLASH RELEASE RS 232C DC8 4V IN O F F P O W E R O N S O N Y ZOOMLENS OPTICAL 1 3x F 12 1 5 6 m m 1 4 0 4 7 VIDEO OUT FLASH RELEASE RS 232C DC8 4V IN O FF PO W ER O N S O N Y ZOOMLENS OPTICAL 1 3x F 12 1 5 6 m m 1 4 0 4 7 Zapata rápida Trípode 32 mm o menos 26 mm o menos 50 mm o menos Grosor 14 mm o ...

Страница 151: ...5 Presione el botón H S para seleccionar el modo de resolución 6 Apunte con la cámara hacia el motivo y encuádrelo observando el visualizador de cristal líquido de la cámara Usted podrá utilizar el zoom presionando la palanca del mismo 7 Presione el botón de disparador de la cámara La lámpara indicadora de espera comenzará a parpadear en rojo Después de que la fotografía se haya almacenado en la m...

Страница 152: ...or de la cabeza a la barbilla la distancia óptima y el tamaño de la cara aparecerán en la impresión como se muestra a continuación Tipo de guía Distancia óptima de acuerdo con la posición del zoom y impresión FRAME 1 Gran angular 1 m Telefoto 1 3 m FRAME 2 Gran angular 1 05 m Telefoto 1 35 m Pasaporte de EE UU Dos fotografías reducidas Gran angular 1 45 m Telefoto 1 9 m Pasaporte de EE UU Dos foto...

Страница 153: ...r energía de la batería Ponga el interruptor LCD MONITOR en OFF observe a través del visor y encuadre Nota La fotografía vista a través del visor no reflejará correctamente el encuadre El encuadre correcto será el del visualizador de cristal líquido H S PLAY CAMERA LCD MONITOR ON OFF W MODE SET T P O W E R O F F O N Visor Interruptor del visualizador de cristal líquido FRAME 1 2 3 4 22 mm ...

Страница 154: ... ángulo de la empuñadura El bloque con el visualizador de cristal líquido podrá girarse 90 para ajustar el ángulo a fin de ver claramente fotografías en el mismo PLAY CAMERA LCD MONITOR ON OFF W MODE SET T Operación ...

Страница 155: ...ión la apertura y el equilibrio del blanco En el modo MAN manual la exposición la apertura y el equilibrio del blanco podrán ajustarse como se desee Ajustes de exposición Esta cámara está ajustada para obtener el brillo óptimo con la exposición de 0 El brillo podrá cambiarse modificando los ajustes de exposición El ajuste de la exposición aumentará el brillo mientras que lo reducirá Ajustes de ape...

Страница 156: ...omática Mantenga presionado b o B del botón de modo durante unos dos segundos Las fotografías almacenadas en la memoria se reproducirán secuencialmente a intervalos de unos cuatro segundos Parada de la reproducción automática Presione MODE o SET del botón de modo Después de la reproducción Ponga el interruptor POWER en OFF Reproducción múltiple Esta cámara permite la reproducción múltiple Con resp...

Страница 157: ...elector PLAY CAMERA en PLAY En el visualizador de cristal líquido aparecerá una fotografía de la memoria 3 Presione tres veces MODE del botón de modo En el visualizador de cristal líquido aparecerá la marca ERASE Hi 1 03 ERASE 4 Presione b o B del botón de modo para seleccionar la fotografía que desee borrar H S PLAY CAMERA LCD MONITOR ON OFF W MODE SET T POWER OFF ON 1 2 3 4 5 6 Continúa en la pá...

Страница 158: ...MODE del botón de modo en los pasos 4 y 5 hasta que desaparezca la marca ERASE Borrado simultáneo de todas las fotografías 1 Ponga el interruptor POWER en ON 2 Ponga el selector PLAY CAMERA en PLAY En el visualizador de cristal líquido aparecerá una fotografía de la memoria 3 Presione tres veces MODE del botón de modo En el visualizador de cristal líquido aparecerá la marca ERASE 4 Presione SET de...

Страница 159: ...borrarán Si borra todas las fotografías el visualizador de cristal líquido se volverá azul Si hay alguna fotografía protegida en el visualizador de cristal líquido aparecerán tal fotografía y la marca ERASE Para detener temporalmente el borrado Presione repetidamente MODE del botón de modo en los pasos 4 y 5 hasta que desaparezca la marca ERASE Para finalizar el borrado Presione repetidamente MODE...

Страница 160: ...A en PLAY En el visualizador de cristal líquido aparecerá una fotografía de la memoria 3 En el visualizador de cristal líquido aparecerá la marca PROTECT En el visualizador de cristal líquido aparecerá la marca PROTECT Hi 1 02 PROTECT 4 Presione b o B del botón de modo para seleccionar la fotografía que desee proteger H S PLAY CAMERA LCD MONITOR ON OFF W MODE SET T POWER OFF ON 1 2 3 4 5 Operación...

Страница 161: ... accidental Hi 1 02 PROTECT Para proteger otras fotografías repita los pasos 4 y 5 Para finalizar el ajuste de protección Presione MODE del botón de modo Para borrar una fotografía protegida Si desea borrar una fotografía protegida selecciónela repitiendo los pasos 4 y 5 para hacer que desaparezca la marca de protección con lo que la protección se desactivará ...

Страница 162: ...és se apagarán La impresora estará ahora en el estado de espera En el visualizador de cristal líquido aparecerá el mensaje DIGITAL PRINTING SYSTEM UPX C21 y después desaparecerá 2 Presione el botón B W COLOR de la estación para seleccionar la impresión en blanco y negro B W o en color COL 3 Presione el botón SPLIT de la estación para seleccionar fotografía de tamaño completo o dividida o reducida ...

Страница 163: ...a POWER BUSY de la estación se encenderá en rojo y se visualizará el mensaje PROCESSING IMAGE La impresión se completará en unos dos minutos y medio El tiempo requerido para la impresión variará dependiendo del tipo de papel utilizado Cuando finalice la impresión Ponga el interruptor POWER de la cámara en OFF para ahorrar energía de la batería Para imprimir dos o más hojas Usted podrá imprimir has...

Страница 164: ...rá la impresión y saldrá la impresión laminada Cuando utilice el paquete de impresión en color autolaminador UPC 2040A La cabeza térmica de la impresora tiene que calentarse para poder iniciar la impresión Cuando por ejemplo inicie inmediatamente la impresión después de haber conectado la impresora la lámpara PRINT de la impresora se mantendrá encendida durante el precalentamiento y después cuando...

Страница 165: ... YEL BLU Amarillo azul Este elemento se habilitará cuando seleccione COL con el botón B W COLOR Al presionar el botón B la imagen pasará a ser más azulada mientras que al presionar el botón b la imagen se volverá más amarillenta DARK Obscura Para ajustar el contraste de las áreas obscuras Al presionar el botón B aumentará la obscuridad LIGHT Clara Para ajustar el contraste de las áreas claras Al p...

Страница 166: ...vija Puerto en serie RS 232C 230 4 kbps como máx DC8 4V IN 8 4 V CC RELEASE 3 5 mmm de diá minitoma Cámara Generales Alimentación Suministrada por una batería de litio NP F550 o desde el adaptador cargador de CA Sony suministrados Temperatura de operación 5 a 35 C Temperatura de almacenamiento 20 a 60 C Humedad de operación 20 a 80 sin condensación Dimensiones 220 210 71 mm an al prf Masa Aprox 98...

Страница 167: ...1 VA 240 V CA Tensión de salida DC OUT 8 4 V 1 8 A en el modo de operación Temperatura de funcionamiento 5 a 35 C Temperatura de almacenamiento 20 a 60 C Dimensiones Aprox 125 39 62 mm an al prf Incluyendo partes y controles salientes Masa Aprox 230 g Accesorios suministrados Bandeja de papel estándar 1 Bandeja de papel de tamaño tarjeta postal 1 Cubierta del papel 1 Cable de alimentación de CA pa...

Страница 168: ...ash no está conectado a la cámara t Conéctelo a la toma FLASH de la cámara La batería del flash está descargada t Cárguela o reemplácela por otra nueva t La duración útil del flash puede haberse acabado Póngase en contacto con un centro de reparaciones Sony Visualizador de cristal líquido de la cámara Síntoma Causas posibles solución Al tomar una imagen ésta no aparece en el visualizador de crista...

Страница 169: ...sucio t Límpielo El flash estuvo bloqueado por un dedo u otro obstáculo t Sujete correctamente la cámara y cerciórese de que no haya nada que bloquee el flash El motivo estuvo demasiado alejado t Tome la imagen dentro del alcance del flash El motivo estuvo iluminado a contraluz t Utilice el flash Esto se debe a iluminación fluorescente t Ajuste correctamente el selector WB Un dedo estuvo bloqueand...

Страница 170: ...izarse INSERT RIBBON El cartucho de cinta entintadora no está cargado t Cárguelo página 131 SET PAPER El papel se ha agotado t Cargue papel página 134 La bandeja del papel no está instalada t Instálela página 134 INSERT RIBBON No están instalados el cartucho de cinta entintadora ni el SET PAPER papel t Instálelos páginas 131 a 136 REMOVE PRINTS El número máximo de impresiones se ha acumulado en la...

Страница 171: ...arse página 131 No hay cartucho de cinta entintadora cargado t Cargue uno página 131 PAPER El papel se ha agotado t Cargue más en la bandeja del papel página 134 La bandeja del papel no está instalada t Instálela página 134 ALARM y PAPER El cartucho de cinta entintadora y el papel son incompatibles t Utilice una combinación válida de cartucho de cinta entintadora y papel página 137 ALARM y RIBBON ...

Страница 172: ...Printed in Japan ...

Отзывы: