background image

DR80\9041117_4153309111_GB\4153309111\41533091111UPDR80SY\030C01.fm

4

Features / Location and Function of Parts and Controls


In

tr

o

d

u

c

tio

n

Introduction

Features

The UP-DR80 Digital Photo Printer is a dye sublimation 
thermal transfer printer providing high quality and high 
resolution printing of computer image data in full color 
(256 gradations process and 16.7 million colors).

System Configuration

Location and Function of 
Parts and Controls

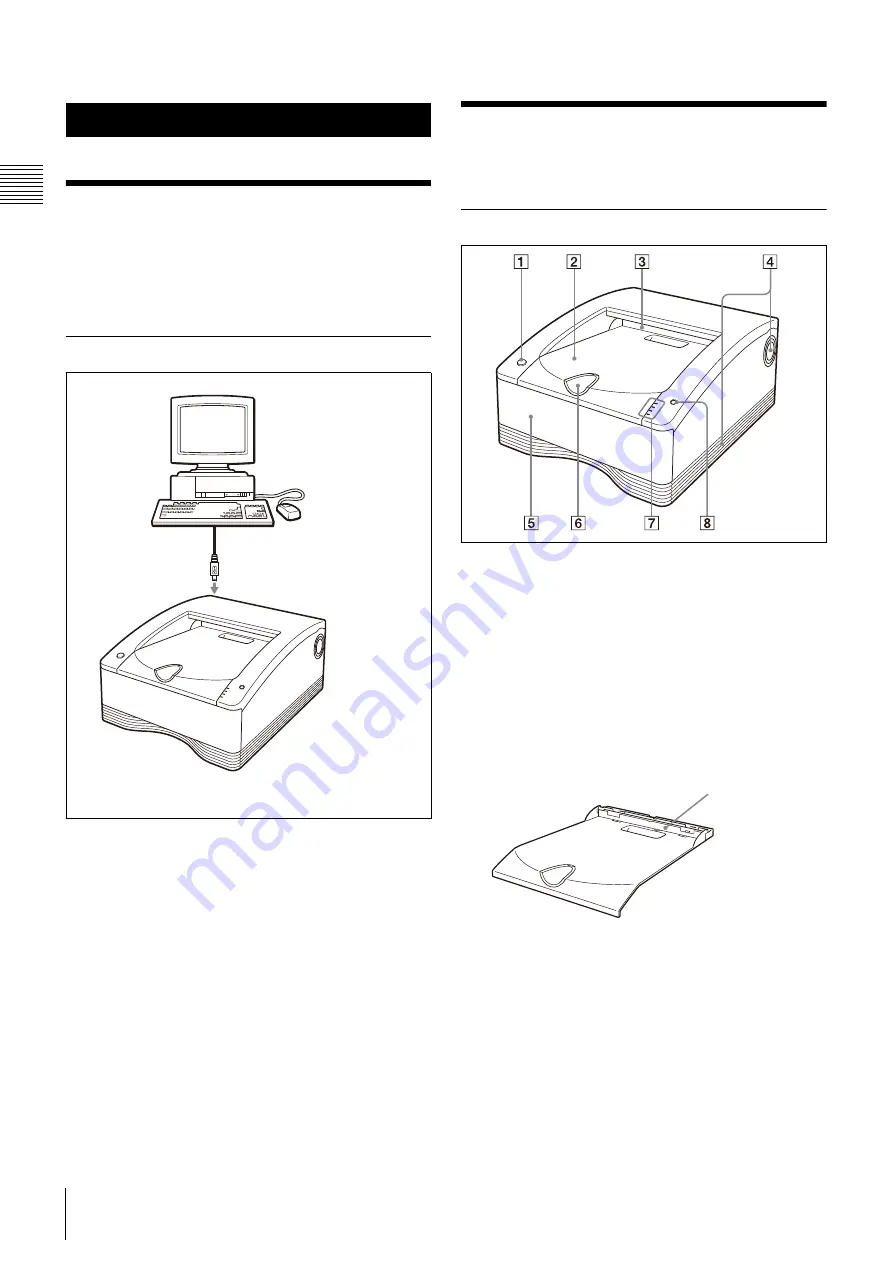
Front

A

1

 ON/STANDBY switch/indicator

When this switch is pressed, the indicator lights, and 
the printer enters the ready state. When it is pressed 
again, the indicator flashes and then goes out, and the 
printer enters the standby state. 

B

Paper cover

Printouts stack here.
The margins of empty space that are created between 
each printout are cut off during printing and dropped 
into the scrap receptacle at the back of the paper cover.

C

Paper outlet

Printouts are ejected here.

D

Vent openings

E

Media tray (page 9)

The ink ribbon and paper are loaded here.

F

Stopper (page 13)

Flip this stopper up in order to prevent the ejected 
printouts from falling.

UP-DR80 Digital Photo Printer

Computer
Controls the printer 
operations.

USB cable

Scrap receptacle

Содержание UP-DR80

Страница 1: ...4 153 309 11 1 Digital Photo Printer Operating Instructions UP DR80 2009 Sony Corporation ...

Страница 2: ...und to comply with the limits for a Class A digital device pursuant to Part 15 of the FCC Rules These limits are designed to provide reasonable protection against harmful interference when the equipment is operated in a commercial environment This equipment generates uses and can radiate radio frequency energy and if not installed and used in accordance with the instruction manual may cause harmfu...

Страница 3: ...ion Before Printing 8 Notes on Handling the Ink Ribbon and Paper 8 Loading the Ink Ribbon and Paper 9 Replacing the Ink Ribbon and Paper 12 Printing 13 Removing Scraps 14 Miscellaneous Precautions 16 Safety 16 Installation 16 Transportation 16 Cleaning 16 Cleaning the Internals of the Printer 16 Ink Ribbon and Paper 19 Specifications 20 About the Self Laminating Color Printing Pack 2UPC R810 20 Tr...

Страница 4: ...itch is pressed the indicator lights and the printer enters the ready state When it is pressed again the indicator flashes and then goes out and the printer enters the standby state B Paper cover Printouts stack here The margins of empty space that are created between each printout are cut off during printing and dropped into the scrap receptacle at the back of the paper cover C Paper outlet Print...

Страница 5: ...he indicators PRINT ALARM RIBBON PAPAER and CLEANING are on or flashing For details refer to Explanation of Indicators on page 22 H STOP button page 13 Press this button to stop a continuous printing operation When this button is pressed the printer returns to ready state after the current page is printed and ejected Rear A USB connector Connects to a computer equipped with the USB interface which...

Страница 6: ...hing is missing from your package Note Retain the original carton and packing materials in case you have to transport this unit in the future Carrying the Printer Hold both sides of the printer as shown below when carrying the printer Note NEVER handle or lift the printer as shown Paper holder Paper holder pink 1 blue 1 USB cable 1 824 211 41 SONY 1 Before Using this Printer 1 CD ROM 1 Cleaning ri...

Страница 7: ...ally disconnected Notes Follow the connection procedures described in the computer manual Make sure that the USB cable is connected securely at both ends The printer driver software provided with the printer is not suitable for using the printer connected to a network Operation of the printer is not guaranteed for connection to a USB hub Installing the Printer Driver After connecting the printer t...

Страница 8: ...bbon can cause smudges in printed output and can damage the thermal head Since like other color dyes the dyes used in this ink ribbon may discolor over time the product will neither be replaced nor be warranted against any color change Handling paper rolls Place the paper roll vertically on the stable place when opening the wrapping If you open the wrapping holding it with hands or placing it hori...

Страница 9: ...ands are securely holding the media tray Do not leave the media tray partially opened When performing work on the media tray pull it out of the printer completely Perform the work while the removed tray is placed on a stable surface Do not set the media tray down in a dusty location Dust can cause smudges in printed output and can damage the thermal head 2 Separate the two spools of the ink ribbon...

Страница 10: ...paper roll is difficult when loading the paper roll squeeze the roll from both sides to restore its shape Correctly insert the paper holders all the way If the paper holder selector comes off The selector could come off if you drop the blue paper holder Follow the procedure described below to reattach the selector to the paper holder 1 As shown in the figure below put the selector in the bobbin li...

Страница 11: ...hesive labels from the paper roll in the direction indicated by the arrow Note Be certain to remove the labels completely If the labels are not peeled off carefully they can leave adhesive on the paper Leaving any of the label in the printer can cause a malfunction 8 Insert the media tray into the printer Push the media tray in until it clicks into place Notes Dropping the media tray while it is l...

Страница 12: ...edia tray Notes If the media tray does not pull out do not force it out Press the 1 ON STANDBY switch to enter the standby state and then press the switch again to turn the printer ON Try pulling the media tray again after the printer finishes initializing After a printing operation is completed the thermal head is very hot When pulling out the media tray be careful not to touch the thermal head T...

Страница 13: ...rs all light simultaneously In such an event press the 1 ON STANDBY switch once to enter the standby state and then press the switch again to turn the printer ON and check that there is no paper jam or the ink ribbon is not broken Also if printing was partway through cut off the used part of the paper roll with a pair of scissors or the like before using the printer Notes Storing printed images Av...

Страница 14: ...ttom Removing Scraps In the following cases pull out the paper cover and remove scraps that have accumulated in the scrap receptacle When replacing the ink ribbon and paper When the CLEANING and ALARM indicators light 1 Pull out the paper cover horizontally as shown Notes Always grasp the body of the paper cover when pulling it out If you pull the paper cover by the stopper the stopper may detach ...

Страница 15: ...15 Removing Scraps Operation 3 Insert the empty paper cover horizontally to attach it Note Be sure to insert the paper cover fully and attach it securely ...

Страница 16: ... one hour If the printing pack is subjected to wide and sudden changes in temperature condensation may form on the ink ribbon or paper inside This will cause the printer to malfunction Also if the printing pack is used in this state spots are likely to appear on the printout To store a half used printing pack replace it in its original packing and reseal the package If possible keep the sealed pri...

Страница 17: ...ropping the media tray while paper is loaded may result in an injury When pulling out and inserting the media tray hold the handle part with one hand and support the media tray from the bottom with the other hand while making sure both of your hands are securely holding the media tray Roller cleaning On rare occasion scratches may appear at regular intervals on printouts as shown in the following ...

Страница 18: ...oller cleaning with the cleaning sheet starts When cleaning finishes the paper is ejected and the CLEANING indicator remains lit Notes The cleaning sheet is ejected with the paper Discard the paper and do not reuse it To perform roller cleaning again repeat the procedure from step 3 If an error occurs restart the procedure from step 1 6 Make sure that the printer is not performing an operation and...

Страница 19: ... of paper 8 inch width Printable quantity The number of printouts that can be printed with a single set of ink ribbon and paper depends on the printout size as follows Notes Do not change the ink ribbon and paper roll when they are only partially used Doing so can cause problems The number of printouts indicated above is not quarantined When the ink ribbon is used up replace both the ink ribbon an...

Страница 20: ...55 Design and specifications are subject to change without notice About the Self Laminating Color Printing Pack 2UPC R810 For the customers in Europe The manufacturer of this product is Sony Corporation 1 7 1 Konan Minato ku Tokyo Japan The Authorized Representative for EMC and product safety is Sony Deutschland GmbH Hedelfinger Strasse 61 70327 Stuttgart Germany TEL 0 711 5858 0 FAX 0 711 5858 23...

Страница 21: ...hen the paper roll has been reloaded t Load the paper roll in the proper direction page 11 The paper holder selector does not match the size of the paper roll t Set the selector properly page 9 The label affixed to the paper roll has not been peeled off t Peel the label off properly page 11 The paper roll is wound to loosely t Rewind the paper roll and then load it page 14 The leading edge of the ...

Страница 22: ...nk ribbon and paper roll A paper eject error has occurred tCheck the ink ribbon and paper roll PRINT green On Printing is in progress Flashing Image data is being received Flashing slowly The printer is waiting until the thermal head reaches a temperature at which printing is possible Once that temperature is reached the PRINT indicator will light All of CLEANING RIBBON PAPER ALARM and PRINT On Th...

Страница 23: ... the media tray cover check whether there is printing on the paper and cut the paper Cut the paper as follows If there is printing on the paper Cut off the printed portion with a pair of scissors If there is no printing on the paper Make sure that the leading edge of the paper is not creased or wrinkled If the leading edge is creased or the paper is wrinkled cut off the leading edge or wrinkled po...

Страница 24: ...Sony Corporation ...

Отзывы: