background image

49

Préparation

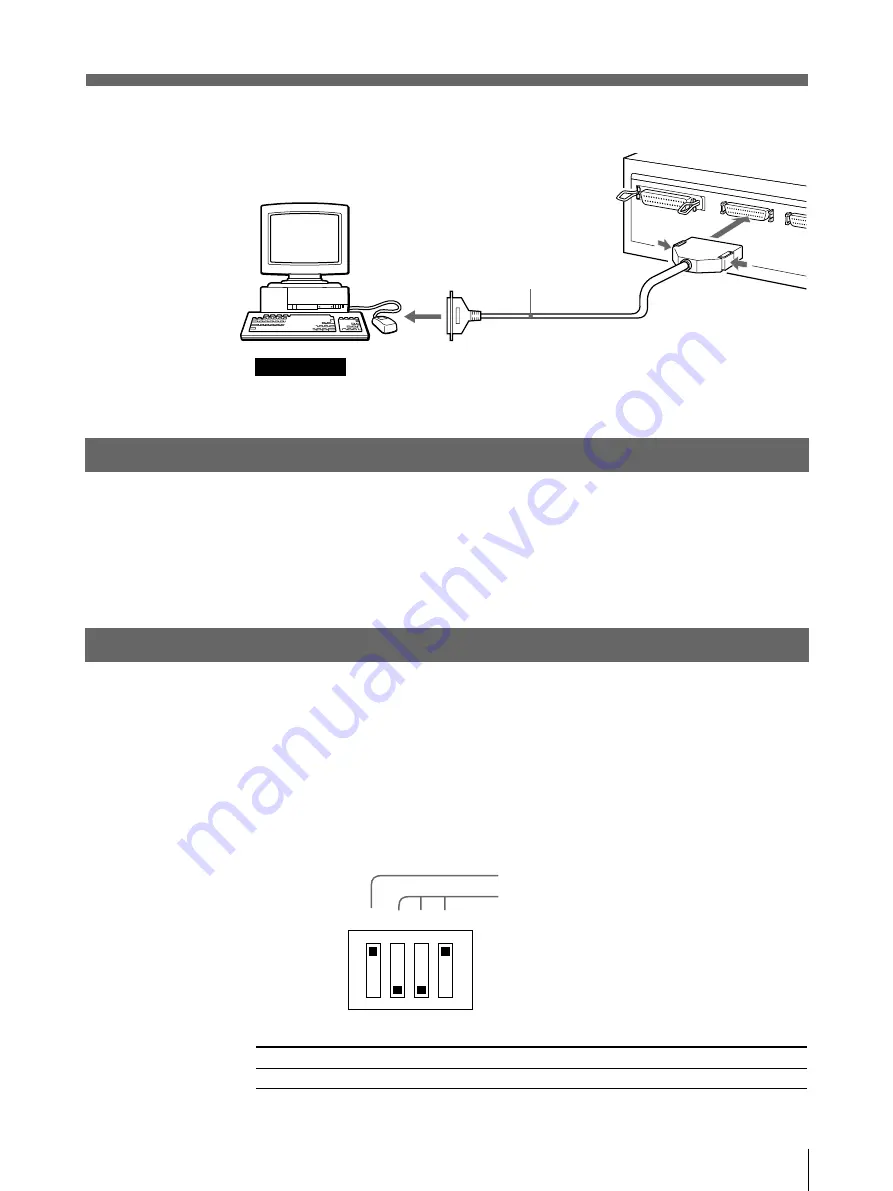
Raccordement d’une imprimante via l’interface SCSI

Remarque

Si l’imprimante est raccordée à l’extrémité physique du bus SCSI, mettez la
terminaison intégrée sur ON (voir cette page 49).

Installation du programme de pilote d’imprimante

Le programme du pilote d’imprimante doit être installé avant la mise en service de
l’imprimante.
Le mode d’emploi du pilote d’imprimante pour l’imprimante couleur numérique
UP-D70A se trouve sur le CD-ROM fourni avec l’imprimante. Utilisez ce mode
d’emploi au lieu de celui pour le pilote d’imprimante UP-D70XR.
Pour des informations plus détaillées, consultez le fichier ReadMe sur le CD-ROM.

Réglage des microcommutateurs

Les microcommutateurs du panneau arrière de l’imprimante déterminent le statut
marche/arrêt de la terminaison de bus SCSI interne et le numéro d’identification du
système SCSI.
Les microcommutateurs sont réglés par défaut de la façon suivante :

Réglage ON/OFF de la terminaison

Si l’imprimante est située à l’extrémité physique du bus SCSI, ce commutateur doit
être réglé sur ON. Mais si un autre appareil se trouve à l’extrémité du bus, réglez-le
sur OFF.

Commutateur

TERMINATOR

Câble SCSI (blindé)
(50 broches plein pas -
50 broches demi-pas)

OFF

La terminaison interne est OFF.

ON    4     2     1

OFF   0     0     0

TERMINATOR

SCSI ID

(Réglage par défaut)

a) Réglage par défaut

ON

La terminaison interne est ON.

a)

Содержание UP-D70XR

Страница 1: ...Digital Color Printer Instructions For Use Page 2 Mode d emploi Page 40 Gebrauchsanweisung Seite 80 GB FR DE 1999 Sony Corporation UP D70XR 3 868 050 21 1 ...

Страница 2: ...quipment 4 This equipment generates uses and can radiate frequency energy If it is not installed and used in accordance with the instruction manual it may cause interference to other equipment If this unit causes interference which can be determined by unplugging the power cord from the unit try these measures Relocate the unit with respect to the susceptible equipment Plug this unit and the susce...

Страница 3: ...DIP Switch 11 Connecting the AC Power Cord 12 Setting the SCSI Device Type 13 Operation Before Printing 14 Loading an Ink Ribbon Cassette 14 Loading the Print Paper 17 Printing 20 Setting the Print Quantity 23 Adjusting the Printouts 24 Adjusting the Gray Balance 26 Selecting the Gamma Curve 28 Setting the Margin Print Option 29 Others Precautions 30 Safety 30 Installation 30 On Transportation 31 ...

Страница 4: ... print paper and actual printing operation Also provided is information on setting the print quantity and adjusting the printouts and gray balance Others Provides technical information on the printer how to handle error messages displayed in the printer window display and how to deal with paper jams Also the index will assist you to locate the necessary section quickly Refer to this chapter when q...

Страница 5: ...ge processor not supplied you can use the UP D70XR as a printer conforming to the DICOM standard System Configuration The following shows an example printer system configuration About the instruction manual of the printer driver The instruction manual for the printer driver for the UP D70A digital color printer is stored on the CD ROM supplied with the printer Substitute this manual for the printe...

Страница 6: ...nt marked with PUSH to remove the paper tray Location and Function of Parts and Controls For details refer to the pages indicated in parentheses Front 1 UPOWER switch Press to turn the printer on or off 2 Fan cover 9 32 Provided to prevent the printer from dust 3 Ribbon door 15 Pull the tab marked with PULL on the top on the ribbon door to open it when loading an ink ribbon cassette 4 PRINT QTY qu...

Страница 7: ...r of the two connectors is not being used set the terminator of the DIP switch to ON See Setting the DIP Switch on page 11 3 Equipotential ground terminal 1 Used to connect to the equipotential plug to bring the various parts of a system to the same potential Refer to Important safeguards notices for use in the medical environments on page 2 4 DIP switch 11 Used to set the SCSI ID number and the b...

Страница 8: ...king materials in case you have to transport this unit in the future When transporting the pritner lock the thermal head For detailed information on how to lock see page 31 Paper tray 1 Paper cover 1 Ink ribbon holder 1 Fan cover with a filter 1 Fan cover Filter Bottom cover 1 Thermal Head Cleaning Kit 1 AC power cord 1 CD ROM 1 Operating Instructions 1 Registration card SOFTWARE LICENSE AGREEMENT...

Страница 9: ...when the thermal head is locked Before assembling turn on the power of the printer The thermal head is unlocked and you can mount the ink ribbon holder When transporting the pritner lock the thermal head For detailed information on how to lock see page 31 Paper cover Paper tray page 17 Ink ribbon holder page 14 Bottom cover Fan cover with a fiter page 32 ...

Страница 10: ...he PARALLEL DATA IN connecter and SCSI connecter of the printer at the same time Before connecting the cable make sure to turn off the power switches on your computer and any peripheral equipment Grasp the connector at the end of the cable and firmly insert it into the socket The total length of the SCSI cabling used with a single host computer should be less than 6 meters The parallel data cable ...

Страница 11: ... CD ROM Setting the DIP Switch The DIP switches on the rear panel of the printer determine the on off state of the internal SCSI bus terminator and the SCSI device ID number As shipped from the factory the DIP switches are set up as follows Terminator ON OFF setting If printer is located at the physical end of the SCSI bus this switch should be set to ON Otherwise if another device is at the end o...

Страница 12: ... 1 at the factory Connecting the AC Power Cord Connect the supplied AC power cord to the AC IN connector on the rear of the printer and then connect the cord to the wall outlet SCSI ID 0 1a 2 3 4 5 6 7 SCSI ID Switch 4 0 0 0 0 4 4 4 4 2 0 0 2 2 0 0 2 2 1 0 1 0 1 0 1 0 1 To AC IN AC power cord supplied To wall outlet Note Operate the printer only on 220 to 240 V AC 50 60 Hz Connections Continued ...

Страница 13: ...l the device driver in your computer 1 While pressing the MENU button turn on the power or the printer 2 Check that the SCSI Device Type is set to the system used in the printer window display When your compuer is Windows 95 SCSI DEVICE TYPE should be set to 3 2 3 SCS I De v i c e T y p e 3 If the setting is incorrect set to the SCSI DEVICE TYPE to 3 using the ı or button 4 Turn off the printer Th...

Страница 14: ...and print paper designed for use with this printer Failing to do so is likely to result in unsatisfactory printing or malfunctions Ink Ribbon and Print Paper on page 33 Loading an Ink Ribbon Cassette Load the ink ribbon to the supplied ink ribbon holder and load the ink ribbon cassette referring to the ink ribbon holder loaded with the ink ribbon to the printer s ribbon compartment Notes When you ...

Страница 15: ...s very hot You may burn yourself if you touch it 3 Detach the used ink ribbon from the ink ribbon holder 4 Load the ink ribbon to ink ribbon holder 1 Remove the spool with the ink ribbon while pressing in the arrow direction 2 Remove the other spool Ink ribbon holder supplied 1 Load the spool holding the ink ribbon into the right hand part of the holder while pressing in the arrow direction 2 Fit ...

Страница 16: ...ansparent tape There should be no problem with using the remaining portion of the ribbon Notes When storing ink ribbons Avoid placing the ink ribbon in a location subject to high temperatures high humidity excessive dust direct sunlight Store partially used ink ribbon in its original package SONY mark faces forwards Remove any slack Transparent tape Before Printing Continued Start position marker ...

Страница 17: ... of the ink ribbon can afford Usually the ink ribbon and paper have run out at the same time However if you add only the print paper pay attentions to the following The paper tray holds up to the total number of sheets contained in a package sheets of paper If you exceed this limit paper jams may occur If you load the paper that is not compatible with the ink ribbon used the gray balance may be ch...

Страница 18: ...e the UPT 730BL blue thermal film specially made for the Sony UP D70XR series If another type of thermal file is used the quality of the printout cannot be guaranteed Use of another type of thermal film may also cause malfunction of the printer Sweat or dirt from hands on the film surface can cause a deterioration in the quality of the printout When using the blue thermal file it is not necessary ...

Страница 19: ...eaning kit supplied with the printer For detailed information on how to clean refer to the Operating Instructions supplied with the thermal cleaning kit For detailed information on the error message see the error message on page 36 Notes on storing the blue thermal film Do not leave film or printed film in direct sunlight or bright room light Store in a dark area at low temperature 30 C 80 F or lo...

Страница 20: ...e printer is connected to the computer through the SCSI bus turn on the power of the printer before turning on the computer Never turn the printer on or off while the power of the computer is on 2 Send the image data from the computer to the printer then enter the print command or press the PRINT button of the printer 1 While the printer is receiving the image data from the computer the following ...

Страница 21: ...he printer is reset to standby status When the printing is abandoned midway the following message appears After the print paper remained in the printer is ejected the printer is reset to standby status PLEASE WA I T Note When the computer with Windows is used the computer may hang up if you press the STOP button during data transmission It is recommended to stop printing midway on the computer sit...

Страница 22: ...rint menu again to send the data for printing Notes on storing your printouts Avoid storing the printout in a location subject to high temperatures high humidity excessive dust and direct sunlight Do not stick tape on a printout Also avoid leaving a plastic eraser on a printout or placing a printout in contact with materials which contain plasticizer under a desk mat for example Do not allow alcoh...

Страница 23: ...A4 QTY 1 2 READY When the print paper runs out during printing Load the print paper in the paper tray and press the PRINT button The printer prints the remaining copies Notes When you turn off the power the print quantity setting is reset to 1 You can also set the print quantity from the application software When the settings of the printer and the application software are different the most recen...

Страница 24: ...g the or button The first item of the printout adjust menu for RED appears in the printer window display The default or preset level is shown both as a value and graphically _ RED 0 _ _ _ _ _ _ _ _ _ _ _ _ _ 3 Perform ajdustment 1 Select the item for adjustment by using the or button Scrolls up to the previous item Scrolls down to the next item 2 Adjust the level by pressing the ı or button You ca...

Страница 25: ...ication software When the adjustment values of the printer and the application software are different the most recently adjusted value becomes the effective one Level value changes Moves to the level 12 position Adjustment items Color Tone Sharpness Half tone Adjustment content Red becomes stronger a Green becomes stronger a Blue becomes stronger a Dark tone becomes stronger a Light tone becomes s...

Страница 26: ...page 24 If the printout adjustment was performed at the computer site then also set them to 0 Set the gray balance to pattern No 0 if you adjusted the gray balance previously See explanation described below 1 Open the GrayADJ 1 file in the Image folder on the supplied CD ROM and make a printout of the gray adjustment patterns from No 0 to No 36 2 Select the printout pattern No which had the best g...

Страница 27: ...was the best No 1 8 GRAY ADJUST 8 To exit from the gray balance adjustment menu press the MENU button again The printer returns to standby status A4 QTY 1 READY The gray balance has been adjusted After finishing the gray balance adjustment make a printout of the gray balance adjustment patterns If the gray balance of the printout of No 0 gray pattern is the best the gray balance has been corrected...

Страница 28: ...sing the or button The GAMMA ADJUST menu appears CG PHOTO GAMMA ADJUST The printer enters the gamma curve selection mode 3 Select the desired gamma curve by pressing the ı or button CG PHOTO GAMMA ADJUST Desired printout Select A printout of image data created by computer graphics application CG programs A printout of image data such as human beings scenery and so on PHOTO created with photographi...

Страница 29: ...ndow display by pressing the or button The MARGIN PRINT menu appears The printer enters the margin print setting mode 3 Select the desired setting by pressing the or button MARGIN PRINT ON FF OFF Desired margin print option Select To print the margin ON To leave the margin blank i e unprinted OFF If you select ON go to step 4 If you select OFF go to step 5 4 Set the print density of the margin MAR...

Страница 30: ... holes are provided to prevent the unit from overheating Be careful not to obstruct them with other units or by covering the unit with a cloth etc On condensation If the printer is subjected to wide and sudden changes in temperature such as when it is moved from a cold room to a warm room or when it is left in a room with a heater that tends to produce large amounts of moisture condensation may fo...

Страница 31: ...tte again Cleaning Note Be sure to turn off the power of the printer before starting cleaning Cleaning the thermal head Clean the thermal head using the thermal head cleaning kit supplied with the printer in the following situations When a vertical white stripe appears on the printout When a scratch appears on the printout For detailed information refer to the Operating Instructions supplied with ...

Страница 32: ...play the filter of the ventilation holes on the left side has become dirty To clean the filter proceed as follows 1 Remove the fan cover then filter 2 Clean the fan using the vacuum cleaner and the like Notes Be careful that the filter will be caught in the cleaner Do not rub the net of the fan strongly 3 Reset the filter and the fan cover on the side panel as they were Filter Fan cover Precaution...

Страница 33: ...per This paper allows you to make the printout of the A 4 size B W Printing Pack UPC 8820 Contains an ink ribbon and paper Black and white ink ribbon 1 roll A4 size paper 100 sheets Self laminating Color Printing Pack UPC 740 Contains an ink ribbon and paper for automatic laminate coating Color ink ribbon 1 roll A4 size paper 72 sheets Blue Thermal Transparent Film UPT 730BL Contains 100 letter si...

Страница 34: ... cyan Picture size Maximum A4 size 271 6 203 2 mm w h 10 3 4 8 inches A4 size 297 0 215 9 mm w h 11 3 4 8 1 2 inches Picture elements Maximum A4 size 3 208 2 400 dots w h A4 size 3 508 2 550 dots w h Printing time Approx 85 seconds per page for color printing 300 dpi Approx 115 seconds per page for laminate printing 300 dpi Approx 52 seconds per page for thermal film printing Picture memory 30 M b...

Страница 35: ...nter window display Note the message and perform whatever action is necessary to solve the problem Possible causes and remedies The size of the printout is set beyond the printing limits n Adjust the printing size from the computer The ink ribbon has been completely used n Replace with the new ink ribbon Ink ribbons cannot be reused page 14 The thermal head has overheated n Leave the printer until...

Страница 36: ...rved All the buttons other than the STOP button are deactivated n To activate the buttons release the reservation of the printer from your computer The ink ribbon develops some trouble n Ensure that the ink ribbon does not tear and the ink ribbon cassette and paper tray are loaded properly pages 15 and 16 The ink ribbon and print paper are not compatible n Use a valid combination of print paper an...

Страница 37: ... remove them first before removing the paper cover 2 Check where any paper is jammed inside the printer If you find a jammed sheet around the paper outlet slowly pull it out straightly to the right If you find a jammed sheet on the way inside the printer slowly pull it out straightly to the right If the tray cover is in the way remove it If the tray cover is in the way remove it by lifting it up 1...

Страница 38: ...it 6 Ensure that the print paper is properly loaded Discard the sheets removed in steps 2 and 5 7 Re insert he removed bottom cover paper tray tray cover and or paper cover into the printer 8 Press the button The error message disappears and the printer returns to the standby status A4 QTY 1 READY Troubleshooting Continued ...

Страница 39: ... Paper tray 9 17 18 Parallel interface 10 34 Picture memory 34 Picture size 34 Power consumption 34 Power requirements 34 Precautions 30 Cleaning 31 Condensation 30 Installation 30 Thermal head 31 Transportation 31 Safety 30 PRINT button 20 21 23 Print paper Adding print paper 17 If paper jams 37 Loading 15 Notes on storing 16 When the print paper runs out during printing 23 PRINT QTY button 23 Pr...

Страница 40: ...uctions d utilisation et de maintenance réparation importantes dans la documemtation accompagnant l appareil Pour les utilisateurs en Europe Instructions de sécurité importantes en vue d une utillsation dans un environnement médical 1 Tous les équipements raccordés à cet appareil doivent être agréés suivant les normes IEC601 1 IEC950 IEC65 ou les autres normes IEC ISO applicables à ces équipements...

Страница 41: ...ocommutateurs 49 Branchement du cordon d alimentation 50 Sélection du type de système SCSI 51 Utilisation Avant d imprimer 52 Chargement d une cassette à ruban encreur 52 Chargement du papier d impression 55 Impression 58 Réglage du nombre de copies 61 Réglage des tirages 62 Réglage de la balance des gris 64 Sélection de la courbe gamma 66 Réglage de l option d impression de la marge 67 Divers Pré...

Страница 42: ...ion ainsi que du fonctionnement de l imprimante Informations sur le réglage du nombre de copies des tirages ainsi que de la balance des gris Divers Informations techniques relatives à l imprimante aux messages d erreur apparaissant dans la fenêtre d affichage de l imprimante et aux bourrages de papier L index vous permet de localiser rapidement la section concernée Reportez vous à cette section lo...

Страница 43: ...cesseur d image numérique UPA D3 non fourni l UP D70XR peut s utiliser comme imprimante au standard DICOM Configuration système Voici un exemple de configuration système intégrant cette imprimante A propos du mode d emploi du pilote d imprimante Le mode d emploi du pilote d imprimante pour l imprimante couleur numérique UP D70A se trouve sur le CD ROM fourni avec l imprimante Utilisez ce mode d em...

Страница 44: ...r le point identifié par PUSH pour extraire le magasin à papier Pour plus de détails reportez vous aux pages indiquées entre parenthèses Avant 1 Commutateur U POWER Appuyez sur ce commutateur pour mettre l imprimante sous et hors tension 2 Capot du ventilateur 46 70 Protège l imprimante contre la poussière 3 Volet d accès au ruban encreur 53 Tirez sur la patte identifiée par PULL sur le dessus du ...

Страница 45: ...s utilisé réglez la terminaison du microcommutateur sur ON Voir Réglage des microcommutateurs à la page 49 3 Borne de masse équipotentielle 1 Utilisée pour se brancher à la prise équipotentielle afin de ramener les différentes parties d un système au même potentiel Reportez vous à Instructions de sécurité importantes en vue d une utillsation dans un environnement médical à la page 40 4 Microcommut...

Страница 46: ...arte d enregistrement SOFTWARE LICENSE AGREEMENT Préparation Accessoires fournis Cette imprimante est livrée avec les accessoires suivants Vérifiez s ils se trouvent tous dans l emballage Remarques Conservez l emballage d origine ainsi que les matériaux de conditionnement afin de faciliter le transport ultérieur de cet appareil Lors du transport de l imprimante verrouillez la tête thermique Pour d...

Страница 47: ...e capot du ventilateur fournis Remarque Vous ne pouvez pas installer le porte ruban encreur lorsque la tête thermique est verrouillée Avant l assemblage mettez l imprimante sous tension La tête thermique est alors déverrouillée et vous pouvez installer le porte ruban encreur Lorsque vous transportez l imprimante verrouillez la tête thermique Pour des informations plus détaillées sur le verrouillag...

Страница 48: ...mps au connecteur PARALLEL DATA IN et au connecteur SCSI de l imprimante Avant de brancher le câble mettez votre ordinateur et tous les périphériques hors tension Saisissez le connecteur à l extrémité du câble de connexion et introduisez le fermement dans la prise La longueur totale du câblage SCSI utilisé avec un seul ordinateur hôte ne peut dépasser 6 mètres Le câble de données parallèle ne peut...

Страница 49: ...tions plus détaillées consultez le fichier ReadMe sur le CD ROM Réglage des microcommutateurs Les microcommutateurs du panneau arrière de l imprimante déterminent le statut marche arrêt de la terminaison de bus SCSI interne et le numéro d identification du système SCSI Les microcommutateurs sont réglés par défaut de la façon suivante Réglage ON OFF de la terminaison Si l imprimante est située à l ...

Страница 50: ...ée sur 1 en usine Branchement du cordon d alimentation Branchez le cordon d alimentation fourni au connecteur AC IN à l arrière de l imprimante et ensuite sur une prise murale secteur Identification SCSI 0 1a 2 3 4 5 6 7 Commutateur d identification SCSI 2 0 0 2 2 0 0 2 2 1 0 1 0 1 0 1 0 1 Vers AC IN Cordon d alimentation fourni Vers une prise murale Remarque Faites uniquement fonctionner l imprim...

Страница 51: ...e périphérique sur votre ordinateur 1 Tout en appuyant sur la touche MENU mettez l imprimante sous tension 2 Vérifiez si le type de dispositif SCSI sélectionné dans la fenêtre d affichage est approprié à l environnement système Si votre ordinateur tourne sous Windows 95 SCSI DEVICE TYPE doit être réglé sur 3 2 3 SCS I De v i c e T y p e 3 Si le réglage est incorrect mettez SCSI DEVICE TYPE sur 3 à...

Страница 52: ...estinés à cette imprimante L imprimante risque sinon de ne pas fonctionner correctement ou de présenter des dysfonctionnements Ruban encreur et papier d impression à la page 71 Chargement d une cassette à ruban encreur Chargez le ruban encreur dans le porte ruban encreur fourni et chargez ensuite la cassette à ruban encreur en vous référant au porte ruban encreur chargé d un ruban encreur dans le ...

Страница 53: ...effet une température très élevée et vous risquez de vous brûler si vous la touchez 3 Enlevez le ruban encreur usagé du porte ruban encreur 4 Chargez le ruban encreur dans le porte ruban encreur 1 Retirez la bobine réceptrice du ruban encreur en poussant dans le sens de la flèche 2 Retirez l autre bobine Porte ruban encreur fourni 1 Chargez la bobine portant le ruban encreur dans la partie droite ...

Страница 54: ...ie restante du ruban ne devrait poser aucun problème Remarques sur le rangement des rubans encreurs Evitez de ranger les rubans encreurs dans un endroit soumis à des températures élevées une humidité importante de la poussière en excès au rayonnement direct du soleil Rangez les rubans encreurs partiellement utilisés dans leur emballage d origine La marque SONY doit être orientée vers le haut Tende...

Страница 55: ... d impression dans le magasin à papier avec la surface d impression face brillante sans légendes et sa feuille de protection orientées vers le bas Recto avec logos imprimés Déramez le papier Pour charger du papier d impression de format A4 relevez la patte et faites coulisser la butée vers l extérieur Remarques Le nombre de copies correspond au nombre de copies qu un rouleau de ruban encreur perme...

Страница 56: ...Utilisez le film thermique bleu UPT 730BL spécialement conçu pour la série Sony UP D70XR Si un autre type de film thermique bleu est utilisé la qualité de l impression ne peut être garantie L utilisation d un autre type de film thermique peut également provoquer un dysfonctionnement de l imprimante La sueur ou la saleté des mains déposée sur la surface du film peut provoquer une détérioration de l...

Страница 57: ...mante Pour plus de détails sur la procédure de nettoyage reportez vous au mode d emploi fourni avec le kit de nettoyage de tête thermique Pour plus de détails sur le message d erreur reportez vous à la page 74 Remarques sur la conservation du film thermique bleu Ne laissez pas le film ou le film imprimé directement au soleil ou sous un éclairage intense Conservez le dans un endroit sombre à tempér...

Страница 58: ...aît dans la fenêtre d affichage de l imprimante A4 QTY 1 READY Remarques Si l imprimante est raccordée à l ordinateur via le bus SCSI mettez l imprimante sous tension avant l ordinateur Ne mettez jamais l imprimante sous ou hors tension lorsque l ordinateur est sous tension 2 Envoyez les données d image de l ordinateur à l imprimante et introduisez ensuite la commande d impression ou appuyez sur l...

Страница 59: ...Lorsqu une impression en cours est interrompue le message suivant s affiche Après que le papier d impression resté dans l imprimante a été éjecté l imprimante revient en mode de veille PLEASE WA I T Remarque Si vous utilisez un ordinateur tournant sous Windows il se peut que l ordinateur se bloque si vous appuyez sur la touche STOP pendant la transmission des données Il est conseillé d interrompre...

Страница 60: ... pour envoyer les données en vue de l impression Remarques sur le rangement des tirages Evitez de ranger les tirages dans un endroit soumis à des températures élevées une humidité importante de la poussière en excès et au rayonnement direct du soleil N apposez pas de bande adhésive sur un tirage De même évitez de laisser une gomme en plastique sur un tirage ou de mettre un tirage directement en co...

Страница 61: ...e papier d impression est épuisé en cours d impression Chargez du papier d impression dans le magasin à papier et appuyez sur la touche PRINT L imprimante imprime le nombre de tirages restant Remarques Lorsque vous mettez l imprimante hors tension le réglage du nombre de copies est ramené à 1 Vous pouvez également définir le nombre de copies à imprimer à partir du logiciel d application Si les rég...

Страница 62: ...u menu de réglage des tirages pour le RED apparaît dans la fenêtre d affichage de l imprimante Le niveau de réglage par défaut ou présélectionné est indiqué à la fois en valeur et par un graphique _ RED 0 _ _ _ _ _ _ _ _ _ _ _ _ _ 3 Effectuez les réglages 1 Sélectionnez le paramètre de réglage à l aide de la touche ou Remonte au paramètre précédent Redescend au paramètre suivant 2 Réglez le niveau...

Страница 63: ...que les valeurs de réglage de l imprimante et du logiciel d application sont différentes la valeur réglée le plus récemment est prise en compte La valeur de réglage change Se déplace sur la position 12 Paramètres de réglage Couleur Tonalité Netteté Demi teintes Explication des réglages Le rouge devient plus intense a Le vert devient plus intense a Le bleu devient plus intense a La tonalité foncée ...

Страница 64: ...auf pour SHARPNESS voir page 62 Si le réglage des tirages a été réalisé sur l ordinateur réglez les sur 0 Réglez la balance des gris sur le no 0 si vous avez déjà ajusté la balance des gris au préalable Voir explications ci dessous 1 Ouvrez le fichier GrayADJ1 dans le dossier Image du CD ROM fourni et réalisez un tirage des mires de réglage du gris no 0 à 36 2 Sélectionnez parmi toutes les mires i...

Страница 65: ...T 8 Pour quitter le menu de réglage de la balance des gris appuyez à nouveau sur la touche MENU L imprimante revient en mode de veille A4 QTY 1 READY La balance des gris a été réglée Lorsque vous avez terminé le réglage de la balance des gris réalisez un tirage des mires de réglage de la balance des gris Si la balance des gris du tirage de la mire de gris no 0 est le meilleur c est que la balance ...

Страница 66: ...e ou Le menu GAMMA ADJUST apparaît CG PHOTO GAMMA ADJUST L imprimante passe en mode de sélection de courbe gamma 3 Sélectionnez la courbe gamma désirée en appuyant sur la touche ı ou CG PHOTO GAMMA ADJUST Tirage désiré Sélectionnez Tirage des données d image créées par les programmes d application CG graphiques d ordinateur Tirage de données d image telles qu un corps humain un paysage PHOTO etc c...

Страница 67: ... MARGIN PRINT apparaît L imprimante passe en mode de réglage d impression des marges 3 Sélectionnez le réglage désiré en appuyant sur la touche ou MARGIN PRINT ON FF OFF Option d impression de marge désirée Sélectionnez Pour imprimer la marge ON Pour laisser la marge blanche c à d non imprimée OFF Si vous avez sélectionné ON passez à l étape 4 Si vous sélectionnez OFF passez à l étape 5 4 Réglez l...

Страница 68: ...tallation Evitez d installer l imprimante dans un endroit soumis à des vibrations mécaniques une humidité élevée de la poussière en excès au rayonnement direct ou excessif du soleil des températures extrêmement basses ou élevées Des orifices de ventilation ont été pratiqués de manière à éviter une surchauffe de l imprimante Veillez à ne pas les obstruer avec d autres appareils ou en recouvrant l i...

Страница 69: ...OP ı et 3 Mettez l imprimante hors tension La tête thermique est verrouillée Pour déverrouiller la tête thermique Remettez l imprimante sous tension La tête thermique se déplace et vous pouvez recharger la cassette à ruban encreur Entretien Remarque Veillez à éteindre l imprimante avant de procéder au nettoyage Nettoyage de la tête thermique Nettoyez la tête thermique à l aide du kit de nettoyage ...

Страница 70: ...ices de ventilation situés sur le côté gauche est encrassé Pour nettoyer le filtre procédez comme suit 1 Retirez le capot de ventilateur et ensuite le filtre 2 Nettoyez le ventilateur à l aide d un aspirateur ou autre Remarques Veillez à ce que le filtre ne reste pas coincé dans le dispositif de nettoyage Ne frottez pas la grille du ventilateur de manière trop énergique 3 Réinstallez le filtre et ...

Страница 71: ...papier vous permet de réaliser des tirages de format A4 Jeu d impression noir et blanc UPC 8820 Contient un ruban encreur et du papier Ruban encreur noir et blanc 1 rouleau 100 feuilles de papier de format A4 Jeu d impression couleur autolaminant UPC 740 Contient un ruban encreur et du papier d impression à laminage automatique Ruban encreur couleur 1 rouleau 72 feuilles de papier de format A4 Fil...

Страница 72: ...4 271 6 203 2 mm l h 10 3 4 8 po Format A4 297 0 215 9 mm l h 113 4 81 2 po Eléments d image Maximum Format A4 3 208 2 400 points l h Format A4 3 508 2 550 points l h Temps d impression Approx 85 secondes par page en impression couleur 300 ppp Approx 115 secondes par page en impression laminée 300 ppp Approx 52 secondes par page pour l impression par film thermique 300 ppp Mémoire d image 30 Mo 4 ...

Страница 73: ...mprimante sur ON Si le commutateur d alimentation est réglé sur ON amenez le sur OFF et puis à nouveau sur ON page 44 Le raccordement est peut être incorrect n Etablissez correctement les connexions page 50 Un message d erreur apparaît dans la fenêtre d affichage de l imprimante n Appliquez les remèdes précisés dans la section Messages d erreur page 73 Il n y a pas de cassette à ruban encreur ni d...

Страница 74: ... imprimante si c est le cas Assurez vous qu il ne reste pas de papier coincé et appuyez ensuite sur la touche page 75 Bourrage de papier dans l imprimante n Retirez le papier coincé de l imprimante et appuyez sur la touche page 75 L imprimante est réservée Toutes les touches autres que la touche STOP sont désactivées n Pour activer les touches annulez la réservation de l imprimante depuis votre or...

Страница 75: ...d avant de retirer le plateau à copies 2 Vérifiez s il n y a pas de papier coincé à l intérieur de l imprimante Si vous trouvez une feuille de papier coincée au niveau de la sortie d éjection du papier tirez la lentement vers la droite Si vous apercevez une feuille de papier coincée à l intérieur de l imprimante tirez la lentement vers la droite Si le couvercle du magasin vous gêne enlevez le Si l...

Страница 76: ...le papier d impression est correctement chargé Eliminez les feuilles de papier enlevées aux étapes 2 et 5 7 Réinstallez le capot inférieur le magasin à papier le couvercle du magasin et ou le plateau à copies sur l imprimante 8 Appuyez sur la touche Le message d erreur disparaît et l imprimante revient en mode de veille A4 QTY 1 READY Dépannage suite ...

Страница 77: ...tre 47 70 Format de l image 72 G H GAMMA 63 GREEN 63 Guide de dépannage 73 I Impression 58 durée d impression 72 mémoire 59 pour arrêter une impression en cours 59 pour imprimer une seconde copie 59 pour interrompre la réception des données d image 59 si l imprimante n imprime pas 58 Interface parallèle 48 72 SCSI 49 72 Interface parallèle 48 72 Interface SCSI connexion 49 réglage de l identificat...

Страница 78: ... de copies 59 Repère de positionnement Start 53 Ruban encreur 52 Ruban et papier d impression 71 S Sélection de la courbe gamme 64 SHARPNESS netteté 63 Sortie du papier 59 Spécifications 72 T U Teinte 63 Terminaison 49 Tête thermique déverrouillage 69 nettoyage verrouillage 69 Tirage 59 réglage 62 remarques sur le rangement 60 Touche EJECT 53 Touche MENU 51 62 64 66 67 Touche PRINT 51 61 62 64 66 ...

Страница 79: ...79 Divers ...

Страница 80: ...r entfernt vom gestörten Gerät auf Schließen Sie dieses Gerät und das andere Gerät an verschiedene Stromkreise an Wenden Sie sich für weitere Informationen an Ihren Händler Vorsicht Befolgen Sie beim Entsorgen des Geräts die im jeweiligen Land geltenden Vorschriften VORSICHT Um Feuergefahr und die Gefahr eines elektrischen Schlags zu vermeiden darf das Gerät weder Regen noch Feuchtigkeit ausgesetz...

Страница 81: ...hließen des Netzkabels 90 Einstellen des SCSI Gerätetyps 91 Betrieb Vor dem Drucken 92 Einlegen einer Farbbandkassette 92 Einlegen des Druckpapiers 95 Drucken 98 Einstellen der Druckmenge 101 Einstellen der Druckqualität 102 Einstellen der Grauton Balance 104 Auswählen der Gamma Kurve 106 Einstellen der Option zum Bedrucken von Rändern 107 Sonstiges Sicherheitsmaßnahmen 108 Sicherheit 108 Installa...

Страница 82: ...nden Sie hier Informationen zum Einstellen der Druckmenge sowie zum Einstellen der Druckqualität und der Grauton Balance Sonstiges Enthält technische Informationen zum Drucker erläutert die Fehlermeldungen die im Display des Druckers angezeigt werden und beschreibt die Behebung von Papierstaus Über den Index können Sie spezifische Stellen in der Anleitung schnell und mühelos finden Wenn Probleme o...

Страница 83: ...n Bildverarbeitungssystem UPA D3 nicht mitgeliefert einsetzen entspricht dieser dem DICOM Standard Systemkonfiguration Im folgenden sehen Sie als Beispiel eine Druckersystemkonfiguration Hinweis zur Dokumentation zum Druckertreiber Die Bedienungsanleitung zum Druckertreiber für den Digitalfarbdrucker UP D70A befindet sich auf der mit dem Drucker gelieferten CD ROM Ziehen Sie diese Anleitung als Dr...

Страница 84: ...e mit PUSH markierte Stelle um das Papierfach zu entnehmen Näheres finden Sie auf den in Klammern angegebenen Seiten Vorderseite 1 Netzschalter UPOWER Zum Ein und Ausschalten des Druckers 2 Lüftungsabdeckung 86 110 Schützt den Drucker vor dem Eindringen von Staub 3 Klappe des Farbbandfachs 93 Zum Einlegen einer Farbbandkassette öffnen Sie zunächst die Klappe des Farbbandfachs indem Sie an der mit ...

Страница 85: ...angeschlossen ist stellen Sie den DIP Schalter für den Abschlußwiderstand auf ON Näheres finden Sie unter Einstellen der DIP Schalter auf Seite 89 3 Äquipotentialmasseklemme 1 Zum Anschließen des Äquipotentialsteckers um die Spannung der verschiedenen Systemkomponenten anzugleichen Siehe auch Wichtige Sicherhleitshinweise für den Gebrauch in medizinischen Umgebungen auf Seite 80 4 DIP Schalter 89 ...

Страница 86: ...Fall daß Sie das Gerät später einmal transportieren müssen Arretieren Sie den Thermokopf wenn Sie den Drucker transportieren wollen Näheres zum Arretieren des Thermokopfs finden Sie auf Seite 109 Papierfach 1 Papierfachabdeckung 1 Farbbandhalter 1 Lüftungsabdeckung mit Filter 1 Lüftungsabdeckung Filter Untere Abdeckung 1 Reinigungssatz für den Thermokopf 1 Netzkabel 1 CD ROM 1 Bedienungsanleitung ...

Страница 87: ... Thermokopf arretiert ist Schalten Sie vor der Montage den Drucker ein Die Arretierung des Thermokopfs ist damit aufgehoben und Sie können den Farbbandhalter montieren Arretieren Sie den Thermokopf wenn Sie den Drucker transportieren wollen Näheres zum Arretieren des Thermokopfs finden Sie auf Seite 109 Papierfachabdeckung Papierfach Seite 95 Farbbandhalter Seite 92 Untere Abdeckung Lüftungsabdeck...

Страница 88: ...hließen Sie einen Computer mit SCSI Schnittstelle und paralleler Schnittstelle nicht gleichzeitig an die Anschlüsse PARALLEL DATA IN und SCSI des Druckers an Schalten Sie vor dem Anschließen des Kabels unbedingt den Computer und alle anderen Peripheriegeräte aus Stecken Sie den Anschluß am Kabelende fest in die Buchse Die Gesamtlänge der SCSI Verkabelung bei einem einzelnen Host Computer sollte we...

Страница 89: ...lter Die DIP Schalter an der Rückseite des Druckers legen den Ein Aus Zustand des internen SCSI Bus Abschlußwiderstands und die SCSI Geräte ID fest Werkseitig sind die DIP Schalter folgendermaßen eingestellt ON OFF Einstellung des Abschlußwiderstands Wenn sich der Drucker am physischen Ende des SCSI Busses befindet muß dieser Schalter auf ON EIN stehen Andernfalls wenn sich also ein anderes Gerät ...

Страница 90: ... auf 1 eingestellt Anschließen des Netzkabels Schließen Sie das mitgelieferte Netzkabel an die Netzeingangsbuchse AC IN an der Rückseite des Geräts und dann an eine Netzsteckdose an SCSI ID 0 1a 2 3 4 5 6 7 SCSI ID Schalter 4 0 0 0 0 4 4 4 4 2 0 0 2 2 0 0 2 2 1 0 1 0 1 0 1 0 1 an AC IN Netzkabel mitgeliefert Hinweis Betreiben Sie den Drucker ausschließlich an 220 bis 240 V Wechselstrom 50 60 Hz An...

Страница 91: ...puter installierten Gerätetreiber aktualisieren 1 Halten Sie die Taste MENU gedrückt und schalten Sie den Drucker ein 2 Überprüfen Sie ob der SCSI Gerätetyp auf das im Drucker Display angezeigte System eingestellt ist Wenn Sie mit dem Betriebssystem Windows 95 arbeiten muß SCSI DEVICE TYPE auf 3 gesetzt sein 2 3 SCS I De v i c e T y p e 3 Ist die Einstellung nicht korrekt setzen Sie SCSI DEVICE TY...

Страница 92: ...sind Andernfalls sind die Ausdrucke unter Umständen von mangelhafter Qualität oder es kommt zu Fehlfunktionen siehe Farbband und Druckpapier auf Seite 111 Einlegen einer Farbbandkassette Legen Sie das Farbband in den mitgelieferten Farbbandhalter ein Beides zusammen wird als Farbbandkassette bezeichnet Legen Sie diese in das Farbbandfach des Druckers ein Hinweise Bevor Sie den Drucker zum ersten M...

Страница 93: ...nd kann Verbrennungen verursachen wenn Sie ihn berühren 3 Nehmen Sie das verbrauchte Farbband aus dem Farbbandhalter 4 Legen Sie das Farbband in den Farbbandhalter ein 1 Nehmen Sie die Spule mit dem Farbband heraus und drücken Sie dabei in Pfeilrichtung 2 Nehmen Sie die andere Spule heraus Farbbandhalter mitgeliefert 1 Legen Sie die Spule mit dem Farbband rechts in den Farbbandhalter ein Drücken S...

Страница 94: ...t des Farbbands läßt sich dann in der Regel problemlos weiterbenutzen Hinweise zum Lagern von Farbbändern Lagern Sie das Farbband nicht an Orten an denen es folgenden Bedingungen ausgesetzt ist hohen Temperaturen hoher Luftfeuchtigkeit übermäßig viel Staub direktem Sonnenlicht Bewahren Sie teilweise verbrauchtes Farbband in der Originalpackung auf Die Markierung SONY weist nach vorn Spannen Sie da...

Страница 95: ... einer Rolle Farbband bedrucken können Farbband und Papier sind daher in der Regel gleichzeitig zu Ende Wenn Sie jedoch einmal nur neues Druckpapier einlegen achten Sie auf folgendes Das Papierfach kann so viele Blätter aufnehmen wie in einem Paket Papier enthalten sind Wenn Sie mehr Blätter einlegen kann es zu Papierstaus kommen Wenn Sie Papier einlegen das nicht mit dem Farbband kompatibel ist k...

Страница 96: ...utzen Hinweise Verwenden Sie die Thermodruckfolie UPT 730BL die speziell für die Drucker der Serie UP D70XR von Sony bestimmt ist Wenn Sie einen anderen Typ von Thermodruckfolie verwenden übernimmt Sony keine Garantie für die Qualität der Ausdrucke Andere Thermodruckfolien können darüber hinaus zu Fehlfunktionen am Drucker führen Fingerabdrücke Schmutzpartikel u ä auf der Druckoberfläche können zu...

Страница 97: ...ten Reinigungssatzes für den Thermokopf Näheres zum Reinigen schlagen Sie bitte in der Bedienungsanleitung nach die mit dem Reinigungssatz für den Thermokopf geliefert wird Ausführliche Informationen dazu finden Sie unter der Fehlermeldung auf Seite 114 Hinweise zum Lagern von blauer Thermodruckfolie Schützen Sie die Thermodruckfolie bedruckt und unbedruckt vor direktem Sonnenlicht und hellem Kuns...

Страница 98: ... Drucker über den SCSI Bus an den Computer angeschlossen ist müssen Sie den Drucker einschalten bevor Sie den Computer einschalten Schalten Sie den Drucker auf keinen Fall ein oder aus solange der Computer eingeschaltet ist 2 Senden Sie die Bilddaten vom Computer an den Drucker geben Sie dann den Druckbefehl ein oder drücken Sie die Taste PRINT am Drucker 1 Während am Drucker die Bilddaten vom Com...

Страница 99: ...hen wird erscheint die folgende Meldung Druckpapier das sich noch im Drucker befindet wird ausgeworfen dann schaltet der Drucker wieder in den Bereitschaftsmodus PLEASE WA I T Hinweis Bei einem Windows Computer stürzt der Computer möglicherweise ab wenn Sie während der Datenübertragung die Taste STOP drücken Es empfiehlt sich bei einem Windows Computer daher einen laufenden Druckvorgang nur über d...

Страница 100: ...e zum Lagern der Ausdrucke Lagern Sie die Ausdrucke nicht an einem Ort an dem sie hohen Temperaturen hoher Luftfeuchtigkeit übermäßig viel Staub und direktem Sonnenlicht ausgesetzt sind Bringen Sie kein Klebeband auf den Ausdrucken an Lassen Sie auch keinen Radiergummi darauf liegen und bringen Sie sie nicht mit Materialien in Berührung die Weichmacher enthalten zum Beispiel einer Schreibtischmatt...

Страница 101: ...ucken A4 QTY 1 2 READY Wenn das Druckpapier während des Druckens zu Ende geht Legen Sie neues Druckpapier ins Papierfach ein und drücken Sie die Taste PRINT Der Drucker druckt die restlichen Exemplare aus Hinweise Wenn Sie den Drucker ausschalten wird die Druckmenge auf 1 zurückgesetzt Sie können die Druckmenge auch über Ihr Anwendungsprogramm einstellen Wenn sich die Einstellungen am Drucker und ...

Страница 102: ... erste Option des Einstellmenüs für die Druckqualität RED Rot erscheint im Drucker Display Der voreingestellte Standardwert wird als Zahl und grafisch angezeigt _ RED 0 _ _ _ _ _ _ _ _ _ _ _ _ _ 3 Nehmen Sie die gewünschte Einstellung vor 1 Wählen Sie mit der Taste oder die Option aus die Sie einstellen möchten Blättert zurück zur vorherigen Option Blättert weiter zur nächsten Option 2 Stellen Sie...

Страница 103: ...ert sich Bewegt sich auf Stufe 12 zu a Wenn Sie drücken Beispiel So stellen Sie den Wert von DARK auf 12 ein Drücken Sie die Taste zwölfmal _ DARK 1 2 _ _ _ _ _ _ _ _ _ _ _ _ 4 Wenn Sie das Einstellmenü für die Druckqualität verlassen wollen drücken Sie nochmals die Taste MENU Der Drucker schaltet wieder in den Bereitschaftsmodus A4 QTY 1 READY Sie können die Druckqualität auch über Ihr Anwendungs...

Страница 104: ...ühren Sie folgende Schritte aus Setzen Sie die eingestellten Werte für die Ausdrucke mit Ausnahme des Wertes für SHARPNESS auf 0 siehe Seite 102 Wenn Sie die Einstellungen für die Ausdrucke über den Computer vorgenommen haben setzen Sie sie auf 0 Setzen Sie die Grauton Balance auf das Muster 0 wenn Sie die Grauton Balance zuvor bereits einmal eingestellt haben Siehe dazu auch die Erläuterungen unt...

Страница 105: ...r Ausdruck mit dem Grautonmuster 18 gefällt Ihnen am besten No 1 8 GRAY ADJUST 8 Wenn Sie das Einstellmenü für die Grauton Balance verlassen wollen drücken Sie nochmals die Taste MENU Der Drucker schaltet wieder in den Bereitschaftsmodus A4 QTY 1 READY Die Grauton Balance wurde eingestellt Nachdem Sie die Grauton Balance eingestellt haben drucken Sie die Muster zum Einstellen der Grauton Balance e...

Страница 106: ...uf Das Menü GAMMA ADJUST erscheint CG PHOTO GAMMA ADJUST Der Drucker wechselt in den Modus zum Auswählen der Gamma Kurve 3 Wählen Sie mit der Taste ı oder die gewünschte Gamma Kurve aus CG PHOTO GAMMA ADJUST Gewünschter Ausdruck Option Ausdruck von Bilddaten die mit Computer Grafikprogrammen CG erstellt wurden Ausdruck von Bilddaten wie Menschen Landschaft usw die mit PHOTO Fotobildprogrammen erst...

Страница 107: ...auf Das Menü MARGIN PRINT wird angezeigt Der Drucker wechselt in den Modus zum Einstellen des Druckbereichsrandes 3 Wählen Sie mit der Taste oder die gewünschte Einstellung aus MARGIN PRINT ON FF OFF Gewünschte Druckbereichsrandeinstellung Option Bedrucken des Randes ON Rand bleibt leer d h unbedruckt OFF Wenn Sie ON wählen fahren Sie mit Schritt 4 fort Wenn Sie OFF wählen fahren Sie mit Schritt 5...

Страница 108: ...stallation Stellen Sie das Gerät nicht an Orten auf an denen es folgenden Bedingungen ausgesetzt ist mechanischen Erschütterungen hoher Luftfeuchtigkeit übermäßig viel Staub direktem oder übermäßig viel Sonnenlicht extremen Temperaturen Die Lüftungsöffnungen dienen dazu eine Überhitzung des Geräts zu verhindern Blockieren Sie diese Öffnungen nicht indem Sie andere Geräte direkt neben dem Drucker a...

Страница 109: ...ie den Drucker aus Damit ist der Thermokopf arretiert So lösen Sie die Arretierung des Thermokopfs Schalten Sie den Drucker wieder ein Der Thermokopf bewegt sich und Sie können die Farbbandkassette wieder einlegen Reinigung Hinweis Schalten Sie unbedingt den Drucker aus bevor Sie mit der Reinigung beginnen Reinigen des Thermodruckkopfs Reinigen Sie den Thermodruckkopf in folgenden Fällen mit Hilfe...

Страница 110: ...en an der linken Seite verschmutzt Zum Reinigen des Filters gehen Sie folgendermaßen vor 1 Nehmen Sie die Lüftungsabdeckung ab und entfernen Sie den Filter 2 Reinigen Sie den Filter mit einem Staubsauger oder ähnlichem Hinweise Achten Sie darauf daß der Filter nicht in den Staubsauger eingezogen wird Reiben Sie nicht zu fest über das Netz des Filters 3 Bringen Sie den Filter und die Lüftungsabdeck...

Страница 111: ...apier können Sie Ausdrucke im Format A4 erstellen Schwarzweiß Drucksatz UPC 8820 Enthält ein Farbband und Druckpapier Farbband für Schwarzweißdrucke 1 Rolle 100 Blatt im Format A4 Farb Drucksatz mit selbstbeschichtendem Papier UPC 740 Enthält ein Farbband und selbstbeschichtendes Papier Farbband für Farbdrucke 1 Rolle 72 Blatt im Format A4 Blaue Thermodruckfolie UPT 730BL Enthält 100 Blätter blaue...

Страница 112: ...Bildgröße höchstens Format A4 ca 271 6 203 2 mm B H Format A4 297 0 215 9 mm B H Bildelemente höchstens Format A4 3 208 2 400 Punkte B H Format A4 3 508 2 550 Punkte B H Druckzeit ca 85 Sekunden pro Seite bei Farbdrucken 300 dpi ca 115 Sekunden pro Seite bei Drucken mit Beschichtung 300 dpi ca 52 Sekunden pro Seite beim Bedrucken von Thermofolien Bildspeicher 30 MB 4 096 2 560 3 8 Bit Schnittstell...

Страница 113: ... FAN FILTER NO RIBBON NO IMAGE DATA Fehlermeldungen Wenn eine Störung vorliegt leuchtet die Anzeige ALARM auf und eine Fehlermeldung die die Störung näher beschreibt erscheint im Drucker Display Lesen Sie die Meldung und führen Sie die dazu angegebene Abhilfemaßnahme durch Mögliche Ursachen und Abhilfemaßnahmen Die angegebene Größe des Ausdrucks übersteigt den zulässigen Druckbereich n Stellen Sie...

Страница 114: ... Achten Sie darauf daß kein Papier mehr gestaut ist und drücken Sie dann die Taste Seite 115 Das Druckpapier staut sich im Drucker n Entfernen Sie das gestaute Papier aus dem Drucker und drücken Sie die Taste Seite 115 Der Drucker ist reserviert d h alle Tasten außer STOP sind deaktiviert n Um die Tasten wieder zu aktivieren heben Sie am Computer die Reservierung des Druckers auf Das Farbband funk...

Страница 115: ...r herunter 2 Sehen Sie nach ob im Drucker Papier gestaut ist Wenn sich an der Papierausgabe ein Blatt gestaut hat ziehen Sie es langsam gerade nach rechts aus dem Drucker heraus Wenn sich weiter innen im Drucker ein Blatt gestaut hat ziehen Sie es langsam gerade nach rechts aus dem Drucker heraus Wenn die Papierfachabdeckung im Weg ist entfernen Sie sie Wenn die Papierfachabdeckung im Weg ist hebe...

Страница 116: ...ier richtig in das Papierfach eingelegt ist Die Blätter die Sie in Schritt 2 und 5 aus dem Drucker gezogen haben werfen Sie bitte weg 7 Bringen Sie die untere Abdeckung wieder an setzen Sie das Papierfach samt Papierfachabdeckung wieder in den Drucker ein 8 Drücken Sie die Taste Die Fehlermeldung wird ausgeblendet und der Drucker schaltet wieder in den Bereitschaftsmodus A4 QTY 1 READY Störungsbeh...

Страница 117: ...bton 102 103 Schärfe 102 103 Vollton 102 103 Drucksatz 111 Druckzeit 112 E Einlegen von Druckpapier 95 Einstellen der Grauton Balance 104 EJECT Taste 93 F Farb Drucksatz 111 Farbband 93 Farbband und Druckpapier 111 Farbbandhalter 92 Farbbandkassette einlegen 92 Farbband gerissen 94 Farbband spannen 93 Hinweise zur Lagerung 94 Startmarkierung 93 Strichcodes 93 Fehlermeldungen 113 Filter 87 110 G H ...

Страница 118: ...08 Kondensation 108 Reinigung 109 Sicherheit 108 Thermokopf 109 Transport 108 Speicher für Bilddaten 99 Startmarkierung 93 Störungsbehebung 113 Strichcodes 93 Systemkonfiguration 83 Systemübersicht 83 T Technische Daten 112 Thermofolie einlegen 97 Hinweise zur Lagerung 97 Bedrucken von Rändern 107 Thermokopf arretieren 109 freigeben 109 reinigen 109 U Untere Abdeckung 87 116 V Ventilator 87 110 Vo...

Страница 119: ...119 Sonstiges ...

Страница 120: ...Sony Corporation Printed in Japan ...

Отзывы: