Sony UP-970AD Скачать руководство пользователя страница 22

A

n

al

o

g

 M
o

de

Printing

22

Printing

Before Starting a Print Job
Always check the following points:
• Unit connected correctly? (page 12)
• Paper loaded correctly? (page 9)
• Menu settings and menu adjustments done correctly? 

(page 13)

• Video source being input? 

Starting a Print Job

You can set up the printing direction, image size, all 
sorts of settings for printing, using the menu. This 
section describes operations after completing all sorts of 
settings using the menu.
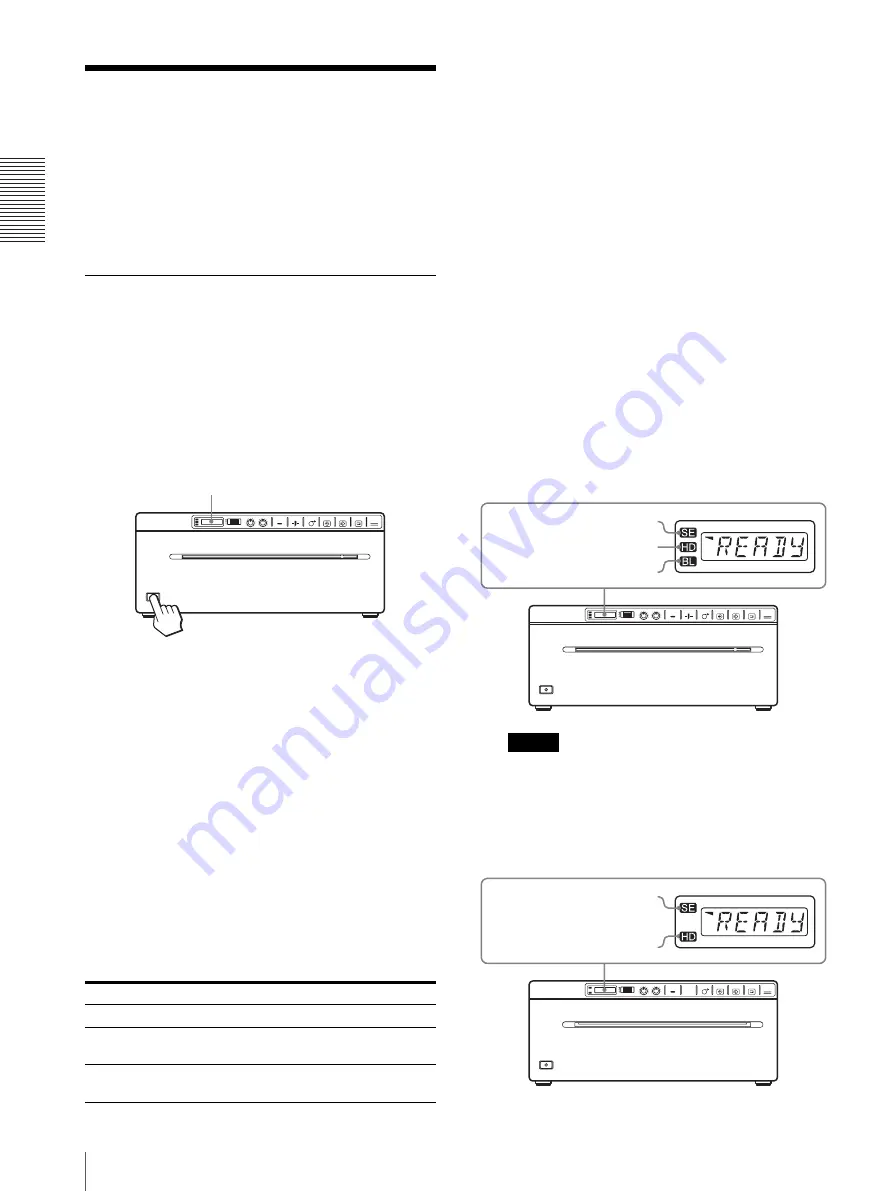
1

Press the power ON/OFF switch to turn the unit on. 
The back light on the LCD lights in green, and 
“READY” is displayed on the LCD.

2

Start the video source.
This operation is done using the controls of the 
video equipment which you are using as a source.

3

Press the PRINT button when the image you want 
to print is on the video monitor.
The image displayed at the instant you press the 
PRINT button is captured into memory and is 
printed out immediately. Up to 6 captured images 
are stored in memory. When captured image 
exceeds 6, the oldest data is overwritten with the 
latest one in sequence.

When the message is displayed on the LCD

If a problem occurs, the back light on the LCD lights in 
umber and the error message stating the problem is 
displayed on the LCD.

When the unit stops printing during printing

When printing almost black images continuously, the 
thermal head protection circuit may shut down the unit 
to prevent the thermal head from overheating. In such a 
case, the message “COOL” is displayed on the LCD.
Leave the unit until the head cools down and this 
message disappears.

To cancel a print job in progress

To cancel a print job in progress, press the OPEN/
CLOSE button, FEED button or CUT button.

To feed paper

To feed paper, press the FEED button. The unit will 
continue to feed paper as long as you hold down the 
FEED button. Do not attempt to pull paper out of the 
unit with your hand.

Paper currently selected

You can confirm the paper currently selected on the 
LCD. The pointer points to the paper currently selected. 
In the following figure, the currently selected paper is 
the UPP-210SE paper.

UP-990AD

Note

If “CT:ON” is selected in the “AT.CUT” menu, 
quickly remove the prints that have been cut. 
Otherwise, the cut prints may block the paper exit 
and cause a paper jam to occur.

UP-970AD

Message

Cause and remedy

EMPTY

Paper is not loaded. Load paper. 

DOOR

The paper door is open. Close the 
paper door.

NOINP

There is no video signal input. Input a 
video signal.

LCD

Indicates the UPP-210SE

Indicates the UPP-210HD

Indicates the UPT-210BL

Indicates the UPP-210SE

Indicates the UPP-210HD

Содержание UP-970AD

Страница 1: ...2 659 569 12 1 2006 Sony Corporation UP 990AD UP 970AD Instructions for Use _______________________________________ B Hybrid Graphic Printer ...

Страница 2: ...d that any changes or modifications not expressly approved in this manual could void your authority to operate this equipment All interface cables used to connect peripherals must be shielded in order to comply with the limits for a digital device pursuant to Subpart B of Part 15 of FCC Rules For the customers in Canada This unit has been certified according to Standard CSA C22 2 No 601 1 For the ...

Страница 3: ...nnector Plug with earthing contacts that conforms to the safety regulations of each country if applicable 2 Use the Power Cord 3 core mains lead Appliance Connector Plug conforming to the proper ratings Voltage Ampere If you have questions on the use of the above Power Cord Appliance Connector Plug please consult a qualified service personnel Warning on power connection for medical use Please use ...

Страница 4: ...Adjusting the Contrast and Brightness 25 Digital Mode Connections 26 Connecting to the USB Connector 26 Installing the Printer Driver 26 Adjustments and Settings Using the Menu 26 Menu Flow 27 Menu List 29 Basic Menu Operations 31 Registering Menu Settings 32 Printing the Menu List 32 Printing 33 Starting a Print Job 33 Adjusting the Contrast and Brightness 34 Others Precautions 35 On Safety 35 On...

Страница 5: ...lm using UPT 210BL separately sold Location and Function of Parts and Controls For more details see the referenced page numbers enclosed in parentheses UP 990AD Front Panel A Power ON OFF Switch page 9 19 22 31 33 36 Press to turn ON the printer The LCD display backlight as well as the CUT FEED COPY and PRINT buttons light When set to digital mode the PRINT button does not light B Printer window d...

Страница 6: ...in progress press to cancel the print job M Paper door Open to install and replace printing paper and to clean the head and platen roller Use the OPEN CLOSE button to open or close the paper door Rear Panel A Equipotential terminal Used to connect to the equipotential plug to bring the various parts of a system to the same potential Refer to Important safeguards notices for use in the medical envi...

Страница 7: ...reen when the unit operates normally Also in normal operation the paper currently selected is indicated by the pointer on the LCD For detailed information on the paper see Installing the Printer Driver on page 26 and Paper currently selected on page 22 and 33 If an error occurs a corresponding alarm message is displayed During menu operations menu items and settings are displayed C Jog dial page 2...

Страница 8: ...el A Equipotential terminal Used to connect to the equipotential plug to bring the various parts of a system to the same potential Refer to Important safeguards notices for use in the medical environments on page 2 B t VIDEO IN input connector BNC type Connect to the video output connector of the video equipment C T VIDEO OUT output connector BNC type Connect to the video input connector of the vi...

Страница 9: ...lypropylene pouch or between sheets of paper that contain no plastic Do not store printouts where they will be exposed to direct sunlight or high humidity Do not store printouts near volatile liquids or allow the prints to contact any organic volatile liquid cellophane tape or any compound of vinyl chloride To prevent fading do not stack printouts on or under a diazo copy sheet To mount printouts ...

Страница 10: ...ut through the paper exit Note Place the paper near the center of the groove of the paper tray inside of the guide Note that paper jams may occur if the paper is placed at the edge of the groove of the paper tray Note Pull out the printing paper to remove any slack and possible creases 5 Press the OPEN CLOSE button to close the paper door You can also push the paper door to close it 6 Remove paper...

Страница 11: ...ed out 15 to 20 cm 6 to 8 inches of paper Then use the paper cutter to remove it Be careful not to touch the paper cutter when cutting the paper Note To use UPT 210BL after printing with UPP 210SE HD clean the head before printing as fine horizontal stripes may otherwise appear on the paper FEED Button ...

Страница 12: ...ing cable BNC y BNC not supplied Video equipment Color black and white video monitor to video input connector Connecting cable not supplied to VIDEO OUT to VIDEO IN to AC IN to REMOTE to wall outlet RM 91 remote control unit not supplied a Set the 75 Ω select switch as follows ON When nothing is connected to the VIDEO OUT connector set the switch to this position OFF When a video monitor or other ...

Страница 13: ...arry out adjustments and settings to meet your requirements Those settings and adjustments are retained even if the unit is turned off You can set up the unit according to its intended purpose connected equipments or your individual preferences You can store up to three settings as a set of user settings ...

Страница 14: ...single picture mode and multi picture mode provide different functions For details see Menu List 2 The SIZE H SIZE V settings and the signal system of the image to be captured determine the values you can set with the Jog dial 3 The SFT H SFT V settings and the signal system of the image to be captured determine the values you can set with the Jog dial 4 The values you can set with the Jog dial in...

Страница 15: ...nd multi picture mode provide different functions For details see Menu List 2 The SCAN settings and the signal system of the image to be captured determine the values you can set with the Jog dial 3 The values you can set with the Jog dial in the analog mode are different from those in the digital mode ...

Страница 16: ...rom the bottom of the screen BACK Cancels the setting change and returns to the item selection column FEED UP 990AD To set the top and bottom margin of a print FE 0 to FE 15 Sets the margin to one of 16 steps from 0 to 15 An increase of one step increases the top and bottom margin by 5 mm The top and bottom margin can be increased to 75 mm The 0 setting is the default value which still provides a ...

Страница 17: ...umn Item Function Settings MEMRY To select the memory mode ME FLD When printing fast moving images such as a ball being thrown the printout may be blue If this happens select this setting ME FRM Normally select this setting BACK Cancels the setting change and returns to the item selection column MENU To print the menu settings currently selected ME OK Prints the menu list currently set BACK Cancel...

Страница 18: ... returns to the item selection column Item Function Settings SFT V UP 970AD To specify the position in the vertical direction of the image to be printed V 0 Adjusts the vertical position The numeric value displayed by turning the jog dial depends on the signal system of the image to be captured and the range setting of images captured with SCAN BACK Cancels the setting change and returns to the it...

Страница 19: ...k light on the LCD lights in green VIDEO To select the video signal output from the VIDEO OUT connector on the rear panel VI EE Outputs the signal after it is processed by the printer VI THR Outputs the signal directly without processing BACK Cancels the setting change and returns to the item selection column BACK To exit menu mode Select this item and press the jog dial to exit the menu mode Item...

Страница 20: ...press the jog dial DI REV is registered as the printing direction DIR reappears on the LCD Note If about 20 seconds elapse without making any menu operation after you have displayed the menu item or setting the display returns to READY on the LCD and the unit exits the menu mode In such a case the setting of DIR is not changed To cancel the setting 1 Display BACK by turning the jog dial in step 5 ...

Страница 21: ... step 3 are loaded When you change the loaded settings The unit operates according to the changed settings In this case the unit operates according to these settings until you load another set of settings even if you turn off the unit When you load another group of settings the settings loaded previously are cleared To retain previously loaded settings Example Settings registered as SA 1 are loade...

Страница 22: ...tating the problem is displayed on the LCD When the unit stops printing during printing When printing almost black images continuously the thermal head protection circuit may shut down the unit to prevent the thermal head from overheating In such a case the message COOL is displayed on the LCD Leave the unit until the head cools down and this message disappears To cancel a print job in progress To...

Страница 23: ...menu to MU 2 MU 6 according to the number of images you want to print on one sheet 2 Turn the Jog dial to display the BACK menu and press the Jog dial The LCD display switches to the multi picture mode When MU 2 is selected 1 indicates that 1 flashes 3 Press the CAPTURE button in step 3 of Starting a Print Job in the section Analog mode page 22 This captures the displayed image assigning it the fl...

Страница 24: ...ly captured images Multi picture mode When an image you want to capture appears press the remote switch to save a screenshot of that instant in memory Printing starts automatically when the number of images set in the MULTI menu have been captured Note Even if IN ON is selected in the INTRT menu pressing the remote switch performs the same action as pressing the PRINT button or CAPTURE button in e...

Страница 25: ...u can adjust the contrast and brightness of the unit using the CONTRAST control and BRIGHT control on the front panel To adjust the contrast You can adjust the contrast of printouts using the CONTRAST control To make the contrast stronger Turn the CONTRAST control clockwise To make the contrast weaker Turn the CONTRAST control counterclockwise To adjust the brightness You can adjust the brightness...

Страница 26: ...g the power on The printer will not print images imported via the VIDEO IN connector The unit drive software provided with the unit is not suitable for using the unit connected to a network Printer operation is not guaranteed when connecting to the computer using the USB cable via a hub Two or more units cannot be connected to a single computer Connecting to the USB Connector Installing the Printe...

Страница 27: ...isplayed on the LCD changes in sequence as you turn the jog dial as shown in the following menu flow chart and you can make the settings for each menu item UP 990AD Menu Flow 1 The values you can set with the Jog dial in the analog mode are different from those in the digital mode ...

Страница 28: ...Digital Mode Adjustments and Settings Using the Menu 28 UP 970AD Menu Flow 1 The values you can set with the Jog dial in the analog mode are different from those in the digital mode ...

Страница 29: ...ue which still provides a narrow margin between two images BACK Cancels the setting change and returns to the item selection column FEED UP 970AD To select the paper feed method used after printing FE ON Increases the margin between prints FE OFF Sets when reducing the margin or when printing multiple images on the same sheet This reduces the margin between images allowing you to print more images...

Страница 30: ... the size of the printing paper BACK Cancels the setting change and returns to the item selection column SAVE To register up to three kinds of settings SA 3 Registers the menu settings as No 3 SA 2 Registers the menu settings as No 2 SA 1 Registers the menu settings as No 1 BACK Cancels the setting change and returns to the item selection column SHARP To adjust the sharpness of the printout SH 0 t...

Страница 31: ...y DIR by turning the jog dial up or down 4 Press the jog dial The unit enters the mode in which you can select the printing direction DI NOR which is the factory setting is displayed on the LCD DI NOR is the currently selected setting In this menu operation you will change the setting to DI REV 5 Display DI REV in the LCD by turning the jog dial up or down and then press the jog dial DI REV is reg...

Страница 32: ...on the LCD and press the jog dial 2 Display LOAD by turning the jog dial and then press the jog dial again 3 Display the number corresponding to the desired settings and then press the jog dial Settings corresponding to the number selected in step 3 are loaded When you change the loaded settings The unit operates according to the changed settings In this case the unit operates according to these s...

Страница 33: ...s message disappears To cancel a print job in progress To cancel a print job in progress press the OPEN CLOSE button FEED button or CUT button To feed paper To feed paper press the FEED button The unit will continue to feed paper as long as you hold down the FEED button Do not attempt to pull paper out of the unit with your hand Paper currently selected You can confirm the paper currently selected...

Страница 34: ... captured image Set the RSIZE menu item to on to magnify the captured image to the size of the selected printing paper size Adjusting the Contrast and Brightness You can adjust the contrast and brightness of the unit using the CONTRAST control and BRIGHT control on the front panel To adjust the contrast You can adjust the contrast of printouts using the CONTRAST control To make the contrast strong...

Страница 35: ...Place the unit on a level and stable surface If you use the unit with placed on an uneven surface malfunction of the unit is likely to occur Do not install the unit near heat sources Avoid locations near radiators or air ducts or places subject to direct sunlight or excessive dust humidity mechanical shock or vibration Provide adequate air circulation to prevent heat build up Do not place the unit...

Страница 36: ...ess the OPEN CLOSE button to open the paper door 3 Insert the supplied cleaning sheet with the black surface facing down into the groove of the paper tray so that a small portion of the front edge of the sheet sticks out of the paper exit 4 Press the OPEN CLOSE button to close the paper door 5 Press the jog dial The menu item changed last is displayed 6 Display CLEAN by turning the jog dial and th...

Страница 37: ...perating temperature 5 C to 35 C 41 F to 95 F Operating humidity 20 to 80 Operating pressure 700 hPa to 1 060 hPa Storage and transport temperature 20 C to 60 C 4 F to 140 F Storage and transport humidity 20 to 80 Storage and transport pressure 700 hPa to 1 060 hPa Dimensions 316 132 5 305 mm w h d 12 1 2 5 1 4 12 1 8 inches Mass 8 kg 17 lb 10 oz printer only Thermal head Thin film thermal head 2 ...

Страница 38: ... 1 3 A max at 25 C Operating temperature 5 C to 35 C 41 F to 95 F Operating humidity 20 to 80 Operating pressure 700 hPa to 1 060 hPa Storage and transport temperature 20 C to 60 C 4 F to 140 F Storage and transport humidity 20 to 80 Storage and transport pressure 700 hPa to 1 060 hPa Dimensions 316 132 5 305 mm w h d 12 1 2 5 1 4 12 1 8 inches Mass 8 kg 17 lb 10 oz printer only Thermal head Thin ...

Страница 39: ...ctions printer driver printer driver install guide 1 Software License Agreement 1 Getting Started 1 Medical Specifications Protection against electric shock Class I Protection against harmful ingress of water Ordinary Degree of safety in the presence of a flammable anesthetic mixture with air or with oxygen or nitrous oxide Not suitable for use in the presence of a flammable anesthetic mixture wit...

Страница 40: ...ted in unit tIf the unit has just been brought into a warm room from a cold location condensation may have formed inside the unit Switch the unit off and let it set for 1 2 hours until it warms to room temperature then try printing again Printouts dirty Thermal head dirty tUse the head cleaning sheet provided with the unit to clean the thermal head page 36 The unit stops printing while printing al...

Страница 41: ...verheating has been activated tWait for the message to disappear Printing will then resume automatically LOCK The menu operation function is locked The jog dial CONTRAST control and BRIGHT control are disabled tIf you want to perform menu operations or use those controls contact the nearest authorized dealer ERROR An internal problem has occurred tContact the nearest authorized SONY dealer NOINP N...

Страница 42: ... flow 14 27 printing the menu list 21 32 storing the menu settings 21 32 O Overview 5 P Paper loading paper in the unit 9 notes on storing and handling 9 paper you can use 9 Precautions on installation 35 paper cutter 35 printer carriage 35 safety 35 Printer driver 26 Printing adjusting the brightness 25 34 adjusting the contrast 25 34 cancelling 22 33 confirming paper 22 33 determining image size...

Страница 43: ...Sony Corporation ...

Отзывы: