


20
Adjusting Your Setup (MENU)
Introducing the menu system
The MENU button lets you open a menu and change the settings of your TV. Here’s
an overview of the menu system.
Level 1
Level 2
Level 3/Function
“PICTURE”
“PICTURE MODE”
Select the picture mode:
“DYNAMIC”
t
“STANDARD”
t
“SOFT”
t
“PERSONAL”
t
“ADJUST”
“ADJUST”
Adjust the “PERSONAL” option:
“PICTURE”
t
“COLOR”
t
“BRIGHT”
t
“HUE”
t
“SHARP”
“WIDE MODE”
Change the picture size.
“INTELLIGENT PIC”
Optimize picture quality.
“SOUND”
“SOUND MODE”
Select the sound mode:
“DYNAMIC”
t
“DRAMA”
t
“SOFT”
t
“PERSONAL“
t
“ADJUST”
“ADJUST”
Adjust the “PERSONAL” option:
“BASS”
t
“TREBLE”
t
“BALANCE”
t
“BBE”
*
“SURROUND”
Select the surround mode:
“TruSurround”
t
“OFF”
“INTELLIGENT VOL”
Adjust volume automatically.
“PIP”
“POSITION”
Change the position of the sub screen.
“PIP”
Display a sub screen within the main picture.
“SWAP”
Exchange pictures between main screen and sub
screen.
“SETUP”
“LANGUAGE”
Change the menu language:
“ENGLISH”
t
“
”(Chinese)
t
“
”(Arabic)
t
“
” (Thai)
“PIC ROTATION”
Rotate the picture.
“PROGRAM SETUP”
Adjust each program number settings.
“COLOR SYS”
Change the color system:
“AUTO”
t
“PAL”
t
“SECAM”
t
“NTSC3.58”
t
“NTSC4.43”
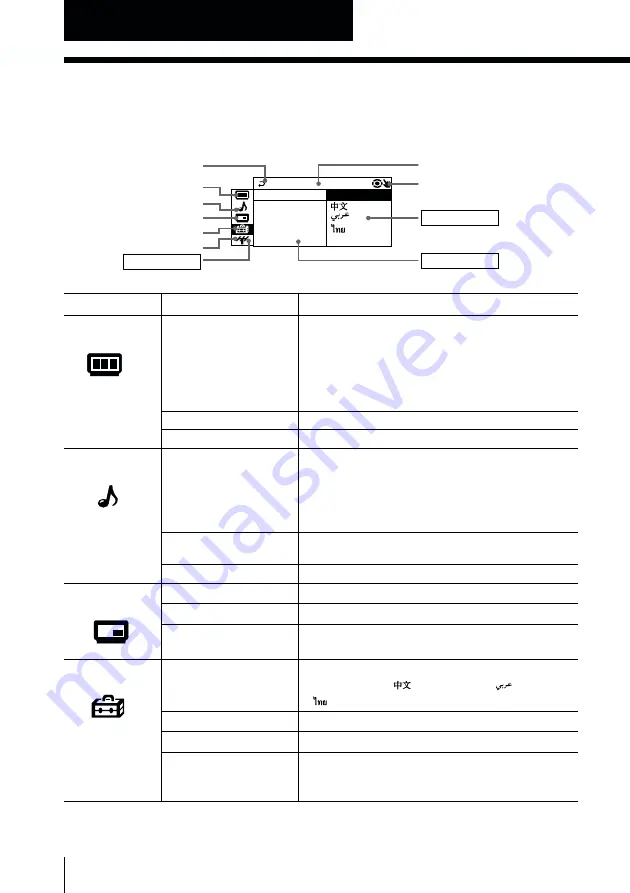
Return icon
“PICTURE” icon
“PIP” icon
“CH PRESET” icon
Name of the current menu
Menu level 3
Menu level 2
Adjusting Your Setup (MENU)
Menu level 1
“SETUP” icon
Menu guide icon
L ANGUAGE :
CO L OR S Y S :
S E T UP
PROGRAM S E
P I C
ROT A T I
ENG L I SH
“SOUND” icon


