background image

13

Advanced Operations

Sony KV-SA32M36 Group F12 (

GB

)_2-348-392-11 (1)

x

Using the wide screen mode

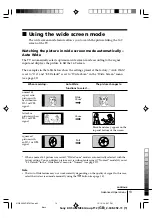
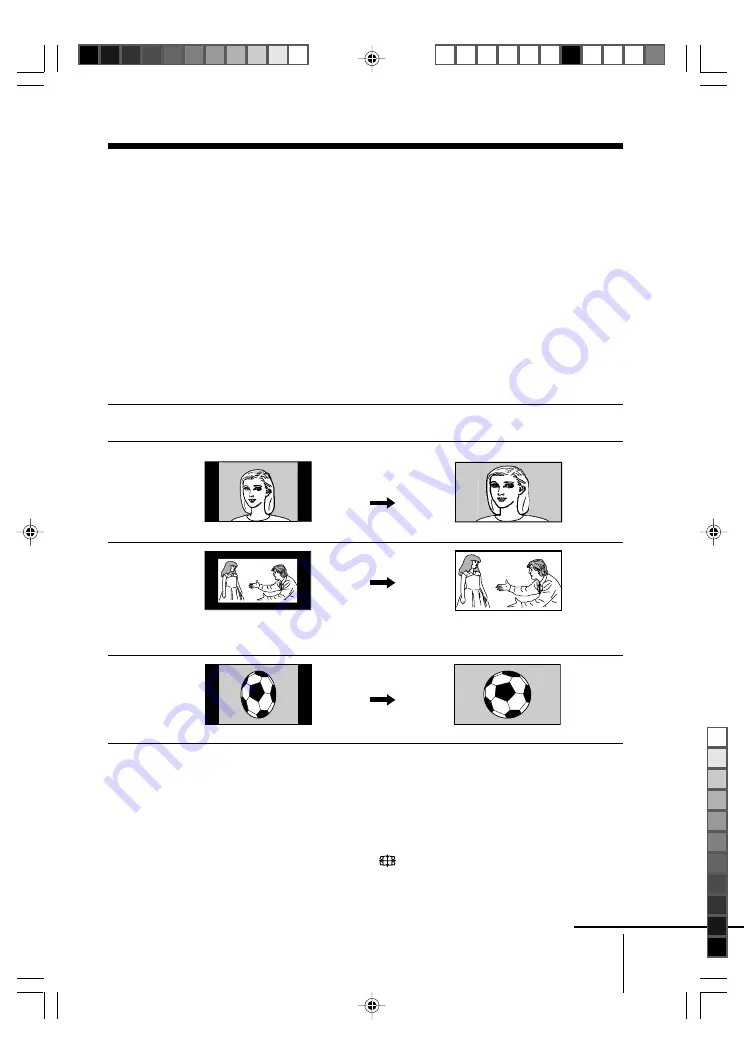
The wide screen mode feature allows you to watch the picture filling the 16:9
screen of the TV.

Watching the picture in wide screen mode automatically –
Auto Wide

The TV automatically selects optimum wide screen mode according to the signal
input and displays the picture to fill the 16:9 screen.

The examples in the table below show the settings preset at the factory; “Auto Wide”
is set to “On” and “4:3 Default” is set to “Wide Zoom” in the “Wide  Screen” menu
(see page 27).

* When a normal 4:3 picture is received, “Wide Zoom” mode is automatically selected with the

factory setting. You can display picture as it is without enlarging it (“Normal” mode) if you set
“4:3 Default” in the “Wide Screen” menu to “Normal” (see page 27).

Note

• The Auto Wide feature may not work correctly depending on the quality of signal. In this case,

select the wide screen mode manually using the 

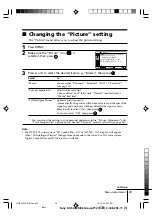
 button (see page 14).

When receiving …

Auto Wide

The picture changes to

functions to select …

normal 4:3
aspect ratio
picture with
or without an
ID-1 or WSS
signal.

letter box
picture with an
ID-1 or WSS
signal.

squeezed
picture with
an ID-1 or WSS
signal.

Black bands may appear on the
top and bottom of the screen.

Wide
Zoom*

Zoom

Full

continue

01GB05AVD-STMOce.p65

10/14/04, 6:07 PM

13

Black

Содержание Trinitron KV-SA28

Страница 1: ...1 M36 2004 Sony Corporation KV SA32 KV SA28 2 348 392 11 1 Trinitron Color TV GB Operating Instructions Before operating the unit please read this manual thoroughly and retain it for future reference 01GB01COV STMOce p65 10 14 04 6 06 PM 1 Black ...

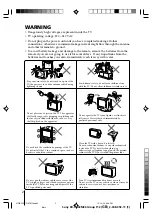
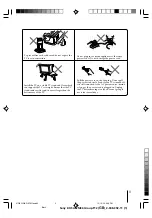
Страница 2: ...tages and other hazards are present inside the TV Refer servicing and disposal of the TV to qualified personnel Your TV is recommended for home use only Do not use the TV in any vehicle or where it may be subject to excessive dust heat moisture or vibrations Do not operate the TV if any liquid or solid object falls into it Have it checked immediately by qualified personnel only Do not block the ve...

Страница 3: ...liances to the same power socket Do not damage the power cord Pull the power cord out by the plug Do not pull the power cord itself Even if your TV is turned off it is still connected to the AC power source mains as long as the power cord is plugged in Unplug the TV before moving it or if you are not going to use it for several days To prevent fire or shock hazard do not expose the TV to rain or m...

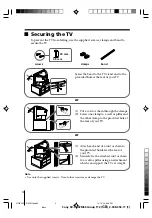
Страница 4: ... Put a cord or chain through the clamps 2 Screw one clamp to a wall or pillar and the other clamp to the provided hole at the rear of your TV 1 Attach each end of a cord or chain to the provided holders at the rear of your TV 2 Securely fix the attached cord or chain to a wall or pillar using an attachment which can support the TV set weight Note Use only the supplied screws Use of other screws ma...

Страница 5: ...enter speaker 15 Watching Picture in Picture PIP 16 Enjoying stereo or bilingual programs 17 Viewing Teletext 18 Operating optional components 19 Menu Adjustment Introducing the menu system 20 Changing the Picture setting 23 Changing the Sound setting 25 Changing the Wide Screen setting 27 Changing the Picture in Picture PIP setting 28 Changing the Channel Setup setting 29 Changing the Setup setti...

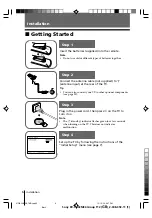
Страница 6: ... by following the instructions of the Initial Setup menu see page 7 Plug in the power cord then press on the TV to turn it on Note The 1 standby indicator flashes green for a few seconds when turning on the TV This does not indicate a malfunction Connect the antenna cable not supplied to 8 antenna input at the rear of the TV Tip You can also connect your TV to other optional components see page 33...

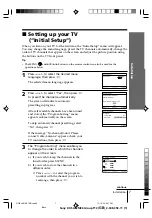
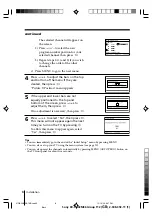
Страница 7: ...he channels automatically The screen will indicate automatic presetting in progress After all available channels have been tuned and stored the Program Sorting menu appears automatically on the screen To skip automatic channel presetting select No then press t If the message No channel found Please connect cable antenna appears check your TV connections then press t 3 The Program Sorting menu enab...

Страница 8: ...ly positioned to the top and bottom of the screen press 2 to adjust them then press t If no adjustment is necessary then press t 6 Press 2 to select No then press t This menu will not appear again the next time you turn on the TV by pressing To allow this menu to appear again select Yes then press t Tips You can immediately go to the end of the Initial Setup menu by pressing MENU You can also set ...

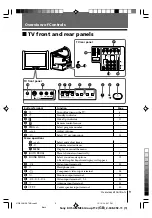
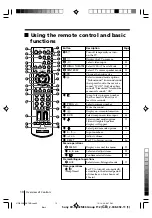
Страница 9: ...y indicator 6 2 Wake Up indicator 11 3 Remote control sensor 4 PROG Select program number 5 2 Adjust volume 6 t Select TV or video input 33 Menu operations 5 2 Select and adjust items 6 t Confirm selected items 7 MENU Display or cancel the menu 7 AUTO PROG Preset channels automatically 8 8 SOUND MODE Select sound mode options 12 5 Band Graphic Equalizer display will appear 9 t4 Video input termina...

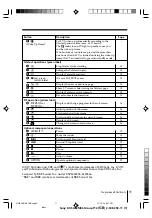
Страница 10: ...om WOW full deep bass sound Simulated stereo like monaural sound Off qf Jump to last program number that has been watched for at least five seconds qg PROG Select program number qk Mute the sound ql Display on screen information w DVD Select component video input 34 wj Select sound mode options 12 5 Band Graphic Equalizer display will appear wk Select picture mode options 12 wl 0 9 Input numbers e...

Страница 11: ...een label 4 Stop Teletext from scrolling 18 7 Enlarge the Teletext display 18 q Display Teletext broadcast 18 qs z red green Access a FASTEXT menu 18 yellow blue qg Display the next or previous page 18 qh Show TV screen while waiting for Teletext page 18 qj Display Teletext service contents 18 ql Reveal concealed information 18 PIP operation yellow label 9 PIP PROG Display and change programs in t...

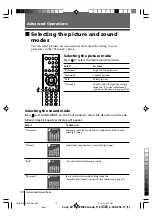
Страница 12: ...the Sound Adjustment option in the menu see page 26 x Selecting the picture and sound modes You can select picture and sound modes and adjust the setting to your preference in the Personal option Selecting the picture mode Press to select the desired picture mode Select To view Dynamic high contrast pictures Standard normal pictures Soft mild pictures Personal the last adjusted picture setting fro...

Страница 13: ...n a normal 4 3 picture is received Wide Zoom mode is automatically selected with the factory setting You can display picture as it is without enlarging it Normal mode if you set 4 3 Default in the Wide Screen menu to Normal see page 27 Note The Auto Wide feature may not work correctly depending on the quality of signal In this case select the wide screen mode manually using the button see page 14 ...

Страница 14: ...ly using the menu see page 27 When the wide screen mode is selected by pressing the button on the remote or using the menu the Auto Wide feature does not work temporarily The Auto Wide feature functions again when you change a TV channel you change the video input the TV is turned off and on again the signal format is changed continued Wide Zoom Normal Zoom Full 1 2 3 4 6 7 8 9 0 5 TV PROG OPTION ...

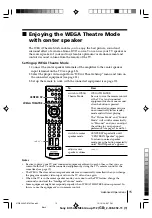
Страница 15: ...mode and will start playing The Picture Mode and Sound Mode will switch automatically to Personal and you can adjust the setting to your personal preference see pages 24 and 26 switch to center CENTER SP repeatedly until speaker mode CENTER IN Speaker appears To return to normal speaker mode press the button repeatedly until MAIN Speaker appears adjust center 2 speaker volume Notes Be sure to plac...

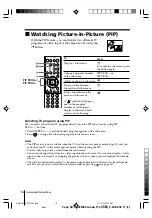
Страница 16: ...desired program appears in the sub screen 2 Press to change the sub screen program to the main screen Notes The PIP feature is not available when the TV is in the center speaker mode page 15 and you cannot set the TV to the center speaker mode while viewing the PIP You can only enjoy stereo sound from the main screen You cannot change the picture to a video input in the sub screen You can only dis...

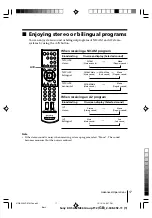
Страница 17: ...ub sound Mono Regular sound t t t Mono Regular sound Stereo Stereo sound t t Main Main sound Sub Sub sound t t NICAM Main Main sound Mono Regular sound t t x Enjoying stereo or bilingual programs You can enjoy stereo sound or bilingual programs of NICAM and A2 stereo systems by using the A B button Note If the stereo sound is noisy when receiving a stereo program select Mono The sound becomes mona...

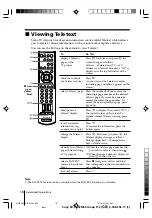
Страница 18: ...s the next or previous page press or hold pause a Press to display the symbol at Teletext display the top left corner of the screen To resume normal Teletext viewing press reveal concealed Press information e g To conceal the information press the an answer to a quiz button again enlarge the Teletext Press Each time you press the display Teletext display changes as follows Enlarge upper half t Enl...

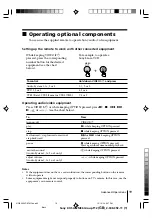
Страница 19: ...N while keeping OPTION pressed stop x while keeping OPTION pressed fast forward step forward or rewind or while keeping OPTION step backward pressed pause X while keeping OPTION pressed Press again to resume normal playback mute the sound while keeping OPTION pressed Audio System 1 1x 2 or 3 only adjust volume 2 while keeping OPTION pressed Audio System 1 1x 2 or 3 only Operating audio video equip...

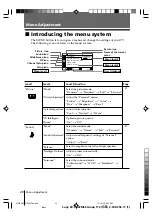
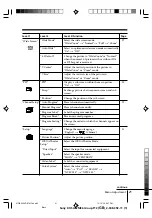
Страница 20: ...nt Volume Surround Level 3 Function Select the picture mode Dynamic t Standard t Soft t Personal Adjust the Personal option Picture t Brightness t Color t Hue t Sharpness t Reset Adjust white color tint Cool t Neutral t Warm Optimize picture quality On t Off Select the sound mode Dynamic t Drama t Soft t Personal Adjust sound frequency settings of Personal option Adjust t Reset Select to emphasize...

Страница 21: ...ed Adjust the vertical position of the picture in Wide Zoom or Zoom mode Adjust the vertical size of the picture in Wide Zoom or Zoom mode Display a sub screen within the main picture On t Off Exchange pictures between main screen and sub screen Change the position of the sub screen Preset channels automatically Preset channels manually Label the program number Block unwanted programs Change the o...

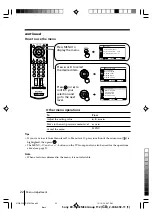
Страница 22: ...the next previous menu level Cancel the menu Press V v B or b B or b MENU Press V or v to select the desired item Press or b to confirm your selection and go to the next level Press MENU to display the menu Select Confirm End Picture Color Temperature Cool Picture Adjustment Mode Dynamic 3D Intelligent Picture On Select End Channel Setup Confirm Program Label Manual Program Program Block Program S...

Страница 23: ...y the picture will become clearer and sharper if the signal is good and noise will be reduced if the signal is noisy Press V or v to select On then press To cancel select Off then press You can adjust the setting to your personal preference in the Picture Adjustment and Color Temperature options only when the Personal mode is selected see page 24 Note For NTSC 3 58 color system 3D Comb Filter On o...

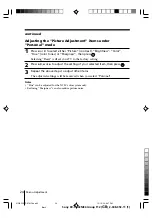
Страница 24: ...ss then press Selecting Reset will set your TV to the factory setting 2 Press V v B or b to adjust the setting of your selected item then press 3 Repeat the above steps to adjust other items The adjusted settings will be received when you select Personal Notes Hue can be adjusted for the NTSC color system only Reducing Sharpness can also reduce picture noise continued 01GB05AVD STMOce p65 10 14 04...

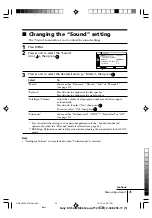
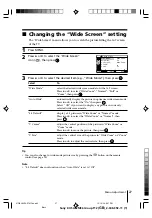
Страница 25: ...adjust the volume of all program numbers and video inputs automatically Press V or v to select On then press To cancel select Off then press Surround choose either TruSurround WOW Simulated or Off see page 10 You can adjust the setting to your personal preference in the Sound Adjustment option only when the Personal mode is selected see page 26 BBE High Definition sound is fully activated maximizi...

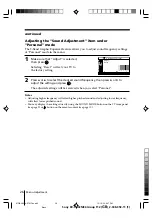
Страница 26: ...Selecting Reset will set your TV to the factory setting 2 Press B or b to select the desired sound frequency then press V or v to adjust the setting and press The adjusted settings will be received when you select Personal Notes Adjusting higher frequency will affect higher pitched sound and adjusting lower frequency will affect lower pitched sound You may display the settings directly using the S...

Страница 27: ... Select Off if you want to display any picture in currently selected wide screen mode 4 3 Default display a 4 3 picture in Wide Zoom or Normal mode Press V or v to select the Wide Zoom or Normal then press V Center adjust the vertical position of the picture in Wide Zoom or Zoom mode Press V or v to move the picture then press V Size adjust the vertical size of the picture in Wide Zoom or Zoom mod...

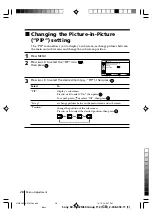
Страница 28: ...e sub screen position 1 Press MENU 2 Press V or v to select the PIP icon then press 3 Press V or v to select the desired item e g PIP then press Select PIP Swap Position To display a sub screen Press V or v to select On then press To cancel press or select Off then press exchange pictures between the main screen and sub screen change the position of the sub screen Press V or v to select the desire...

Страница 29: ... and press Press V or v to select the program number then press 2 Select Label and press Press V or v to select alphanumeric characters for the label then press Program Block block unwanted programs 1 Select Program and press Press V or v to select the program number then press 2 Select Block and press then press V or v to choose either On or Off If you preset a blocked program number that program...

Страница 30: ... by using the Fine tuning feature 1 Press V or v to select Fine then press 2 Press V or v to select Manual then press 3 Press V v B or b until the picture and sound quality are optimal then press The or icon on the menu flashes while tuning 5 If you want to skip this program number when using PROG you can select the Skip feature 1 Press V or v to select Skip then press 2 Press V or v to select On ...

Страница 31: ...hen it is not aligned with the TV screen Press V or v to select Picture Rotation or Picture V Position then press Press V v B or b to adjust picture position then press WEGA Theatre Setup enjoy best picture sound and surround effect of a cinema Press V or v to select Direct Input then press Select either Video 1 Video 2 Video 3 Video 4 or DVD for the connected equipment that you want to view with ...

Страница 32: ...lect Label and press then press V or v to select the label options Video 1 Video 2 Video 3 Video 4 DVD VCR SAT Game or Edit You may edit the video label Press V or v to select alphanumeric characters for the label then press Color System select the color system Press V or v to select Auto PAL SECAM NTSC3 58 or NTSC4 43 then press Normally set this to Auto continued 01GB06ADJ STMOce p65 10 14 04 6 ...

Страница 33: ...r 0 on the TV see page 30 When both S video and video for t1 or t4 are connected at the same time S video is automatically selected To view video disconnect the S video cable VCR Audio Video cable not supplied Antenna cable not supplied TV rear panel S Video cable not supplied Additional Information x Connecting optional components Connecting to the video input terminal t 4 L MONO R TV front panel...

Страница 34: ...the interlace output when connecting to component video input on your TV Your TV can receive either 525i 60Hz or 625i 50Hz interlace signals Some DVD player terminals may be labeled differently If you select DVD on your TV screen the signal from the T monitor output jacks will not be output properly This does not indicate a malfunction DVD player TV rear panel Component video cable not supplied Au...

Страница 35: ...the center speaker you can press the CENTER SP button on the remote control see page 10 or display the WEGA Theatre Setup from Setup menu and select CENTER IN for Speaker see page 31 If your TV is set to CENTER IN Speaker and nothing is connected to the center speaker input terminals on the rear of TV or the sound source emitted from the amplifier does not contain the center speaker channel no sou...

Страница 36: ...on on the TV VCR and at the wall Check the antenna setup Contact a Sony dealer for advice Display the Channel Setup menu and select Manual Program to preset the channel again Display the Channel Setup menu and set the Signal Booster to Auto from Manual Program Try using an external booster Turn off or disconnect the external booster if it is in use Display the Channel Setup menu and set the Signal...

Страница 37: ...antenna setup is inappropriate Check the power cord antenna and VCR connections Press 1 power Press main power on the TV to turn off the TV for about five seconds then turn it on again Press 2 to increase the volume level Press to cancel the muting Press or Do not use a hair dryer or other equipment near the TV Check the antenna setup Contact a Sony dealer for advice Use a highly directional anten...

Страница 38: ...tion is loose or the cable is damaged The antenna setup is inappropriate Signal transmission is too low Keep external speakers or other electrical equipment away from the TV Display the Picture Position under Setup menu then adjust Picture Rotation and Picture V Position so that the picture is aligned to the TV screen Keep external speakers or other equipment away from the TV Do not move the TV wh...

Страница 39: ...g to the received signal with an ID 1 or WSS signal The Auto Wide feature stops working temporarily when you have pressed and functions again when the signal format changes Your TV s self diagnosis function indicates the possible problems The Signal Booster is functioning to detect a weak signal This does not indicate a malfunction Changes in room temperature sometimes make the TV cabinet expand o...

Страница 40: ...ly UHF 28 to 69 CATV S01 to S03 S1 to S41 VHF 1 to 11 New Zealand only UHF 21 to 69 CATV S01 to S03 S1 to S41 UHF B21 to B68 CATV S01 to S03 S1 to S41 VHF C1 to C12 R1 to R12 UHF C13 to C57 R21 to R60 CATV S01 to S03 S1 to S41 Z1 to Z39 VHF A2 to A13 UHF A14 to A79 CATV A 8 to A 2 A to W 4 W 6 to W 84 75 ohm external terminal 10 W 10 W Input 4 Output 1 Phono jacks 1 Vp p 75 ohms Input 5 Output 1 P...

Отзывы: