http://cxema.ru
– 9 –
KV-EX29M63
RM-964
KV-EX34M39/EX34M69/EX34M87
RM-963
6
Using Y
our New TV
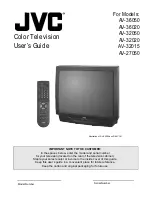
Connecting the 3D WOOFER
Y
ou can enjoy high quality sound by connecting the 3D WOOFER.
Bottom of 3D WOOFER
1
Place the foot at the front of the 3D WOOFER into the footholds on the top
of your TV
.
2
Place the foot at the rear of the 3D WOOFER into the footholds at the rear
of your TV
.
3
Connect the wir
es to the 3D WOOFER (4
Ω
) ter
minals at the rear of your TV
.
The red wire should be connected to the
‘
red terminal and the black wire
to the
’
black terminal.
Notes
•
Connect only the supplied 3D WOOFER; otherwise your TV may
malfunction.
•
Unplug your TV fr
om the wall outlet when connecting the 3D WOOFER.
•
T
o pr
event a malfunction caused by a short cir
cuit of the terminals, make
sur
e that none of the 3D WOOFER wir
e strands stick out, making contact
with it’s neighbouring 3D WOOFER terminal.
Rear of TV
3D WOOFER
1
2
3
Black wir
e
Red wir
e
7
Using Y
our New TV
Using Your New TV
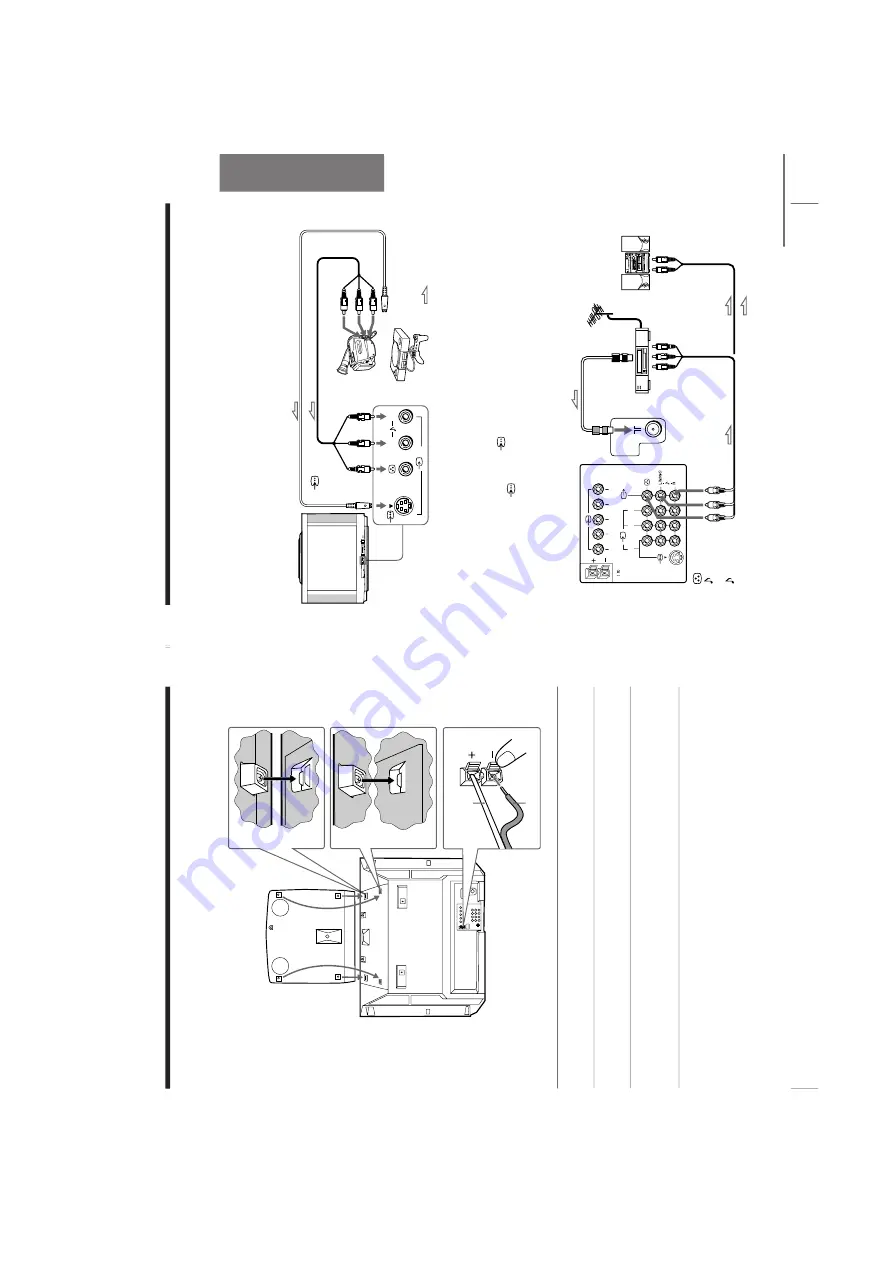
(yellow)
-L (MONO)
(white)
-R (r
ed)
: Signal flow
or
V
ideo game
equipment
Rear of TV
To
antenna
output
To
video and
audio inputs
Audio system
To
audio
inputs
VCR
: Signal flow
To
T
(monitor
output)
Antenna cable (not supplied)
Audio cable
(not supplied)
Audio/V
ideo cable (not supplied)
L(MONO)
R
4
PR
OGR
MENU
AU
T
O
PR
OGR
ENTER
SELECT
L(MONO)
R
4
continued
Camcor
der
To
video and
audio outputs
To
(S video
input)
To
…
4
(video input)
or
Audio/V
ideo cable (not supplied)
S video cable (not supplied)
Fr
ont of TV
To
S video output
123
R
L
Y
C
B
C
R
W
OOFER
4
Connecting optional components
Y
ou can connect optional audio/video components, such as a VCR, multi disc player
,
camcor
der
, video game, or ster
eo system. T
o watch and operate the connected
equipment, see pages 12 and 25.
Connecting a camcor
der/video game equipment
using the
t
(video input) jacks
Notes
•
When connecting video game equipment, display the “PICTURE” menu
and select “ON” for “GAME MODE” to adjust the pictur
e setting that is
suitable for video games (see page 30).
•
Y
ou can also connect video equipment to the
t
1, 2, or 3 (video input)
jacks at the r
ear of your TV
.
•
When
both
the
(
S
video
input)
and
t
4
(
video
input)
ar
e
connected,
the
(S video input) is automatically selected. T
o view the video input
to
t
4 (video input), disconnect the S video cable.
Connecting audio/video equipment using the
T
(monitor output) jacks
Note
•
If you select “DVD” on your TV scr
een, no signal will be output at the
T
(monitor output) jacks (see page 12).


