background image

8

 (FR)

Caractéristiques
techniques du support

Unité : mm (pouces)
Poids : 6,6 kg (14 lb 9 oz)

La conception et les caractéristiques techniques du produit
sont sujettes à modification sans préavis.

550 (21 3/4)

316,4

(11 1/2)

290

(12 1/2)

141

(5 5/8)

(7 7/8)

198,4

Содержание SU-XTQ005

Страница 1: ......

Страница 2: ......

Страница 3: ... manual shows the correct handling of the product and important precautions necessary to prevent accidents Be sure to read this manual thoroughly and use the product correctly Keep this manual available for future reference For Sony dealers Installation of a Display Unit requires two or more people special care and technique When installing a Display Unit refer to this manual carefully Sony is not...

Страница 4: ... cause injury or property damage Be sure to place the stand on a stable shelf Do not place the Table Top Stand on an unstable shelf or on a shelf which is smaller than the Display Unit or on the edge of the shelf If you do so the stand may topple over or the Display Unit may fall This may cause injury or property damage Do not lean on or hang from the Display Unit when it is attached to the Table ...

Страница 5: ...ill hit the wall This may cause serious injury or damage by falling down Observe the following Place the stand at least 8 cm 3 1 4 inches back from the front edge of the shelf Place the stand at least 10 cm 4 inches away from the wall Note on use Cleaning To keep the stand clean occasionally wipe the stand with a dry soft cloth Stubborn stains may be removed with a cloth slightly dampened with dil...

Страница 6: ... installing the Display Unit Since the Display Unit is heavy it is recommended that you decide on the installation location first and then lay the stand down before installing the Display Unit Place the stand at least 8 cm 3 1 4 inches back from the front edge of the shelf and at least 10 cm 4 inches away from the wall The Table Top Stand swivels 18 degrees to the left and right The stand swivels ...

Страница 7: ... Table Top Stand Use the screw alignment holes on the rear of the Display Unit as guides Gently lower the Display Unit to align the holes of the screws over the joints of the Table Top Stand z Hint There are finger slots located at the bottom of the Display Unit on both sides for holding When attaching the Display Unit to the stand use the slot to support the bottom and hold the top with your othe...

Страница 8: ...upplied with the Display Unit for details on connecting the AC power cord and the display interface cable Display securing screw M5 L16 Display interface cable AC power cord Slacken the cables Cable holder 4 Attach the cable cover 1 Push any excess of cable inside the cable compartment and slide the cable cover down until the four tabs of the cable cover snap into place 2 Affix the cable cover wit...

Страница 9: ...over Prepare a commercially available strong rope or chain and wall anchor bracket beforehand 1 Attach the two anchor attachments to the upper free screw holes on the rear of the Display Unit 2 Secure the wall anchor bracket to a solid wall or pillar Anchor attachment 3 Thread the rope or chain through both holes of the anchor attachments and then tighten the other end of the rope or chain to the ...

Страница 10: ...8 US Stand specifications Unit mm inches Weight 6 6 kg 14 lb 9 oz Design and specifications are subject to change without notice 550 21 3 4 316 4 11 1 2 290 12 1 2 141 5 5 8 7 7 8 198 4 ...

Страница 11: ...ue comment manipuler le produit correctement et contient des précautions essentielles à prendre pour éviter tout accident Lisez attentivement ce mode d emploi et veillez à utiliser le produit correctement Conservez ce mode d emploi pour toute référence ultérieure À l attention des détaillants Sony L installation de l écran nécessite au moins deux personnes spécialisées et une attention particulièr...

Страница 12: ...lez à installer le support sur une étagère stable Ne placez pas le support de table sur une étagère instable ou sur une étagère de taille inférieure à l écran ou encore sur le bord d une étagère En pareil cas le support risque de basculer ou l écran risque de tomber Ceci pourrait provoquer des blessures ou le matériel pourrait être endommagé Ne vous appuyez pas sur l écran ou ne vous y suspendez a...

Страница 13: ... Ceci pourrait provoquer des blessures graves ou le matériel pourrait être endommagé en cas de chute Respectez les points suivants Placez le support à au moins 8 cm 3 1 4 pouces en retrait par rapport au bord avant de l étagère Placez le support à au moins 10 cm 4 pouces du mur Remarque à propos de l utilisation Nettoyage Pour maintenir le support propre nettoyez le de temps en temps avec un chiff...

Страница 14: ...rt sur le sol avant d installer l écran Comme l écran est lourd il est recommandé de choisir l emplacement d installation en premier lieu puis d y poser le support avant d installer l écran Placez le support à au moins 8 cm 3 1 4 pouces en retrait par rapport au bord avant de l étagère et à au moins 10 cm 4 pouces du mur Le support de table s incline de 18 degrés vers la gauche et la droite Le sup...

Страница 15: ...des guides Abaissez doucement l écran afin d aligner les orifices des vis sur les jointures du support de table z Conseil Cet écran dispose de fentes permettant d y glisser les doigts de chaque côté de la base pour le tenir Pour installer l écran sur le support utilisez l une des fentes pour supporter la base et tenez le haut avec l autre main Arrière de l écran Dessous de l écran Orifices destiné...

Страница 16: ...ble d interface de l écran Vis de fixation de l écran M5 L16 Câble d interface de l écran Cordon d alimentation CA Laissez du mou au niveau des câbles Collier des câbles 4 Fixez l enveloppe des câbles 1 Poussez tout câble ressortant vers l intérieur du compartiment des câbles et faites glisser l enveloppe des câbles vers le bas jusqu à ce que les quatre onglets de l enveloppe des câbles s enclique...

Страница 17: ...ent une chaîne ou une corde solide ainsi qu un support d ancrage mural disponibles dans le commerce 1 Fixez les fixations d ancrage sur les deux orifices de vis libres supérieurs à l arrière de l écran 2 Fixez le support d ancrage sur un mur ou un pilier solide Ancrage 3 Passez la corde ou la chaîne dans les deux orifices de fixation d ancrage puis serrez l autre extrémité de la corde ou de la cha...

Страница 18: ...s techniques du support Unité mm pouces Poids 6 6 kg 14 lb 9 oz La conception et les caractéristiques techniques du produit sont sujettes à modification sans préavis 550 21 3 4 316 4 11 1 2 290 12 1 2 141 5 5 8 7 7 8 198 4 ...

Страница 19: ...stra la manera correcta de manipular el producto así como precauciones importantes necesarias para evitar accidentes Lea este manual atentamente y utilice el producto correctamente Conserve este manual para consultarlo en el futuro Información para los distribuidores de Sony La instalación de un monitor requiere al menos dos personas además de cuidado y conocimientos técnicos especiales Al instala...

Страница 20: ...el monitor podría caerse y provocar daños personales o materiales Asegúrese de colocar el soporte en un estante estable No coloque el soporte de escritorio en un estante inestable más pequeño que el monitor o en el borde de un estante De lo contrario el soporte podría volcarse o el monitor podría caerse y provocar daños personales o materiales No se apoye en el monitor ni se agarre a él cuando est...

Страница 21: ...s graves Cumpla las indicaciones siguientes Coloque el soporte a una distancia mínima de 8 cm del borde frontal del estante Coloque el soporte a una distancia mínima de 10 cm de la pared Nota sobre el uso Limpieza Para mantener el soporte limpio utilice un paño suave y seco Las manchas resistentes pueden eliminarse con un paño ligeramente humedecido con detergente diluido A continuación seque la z...

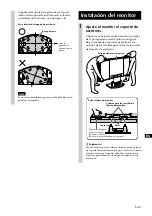
Страница 22: ... y coloque el soporte en el suelo antes de instalar el monitor Debido al peso del monitor es recomendable que elija primero la ubicación de la instalación y que coloque el soporte en el piso antes de instalar el monitor Coloque el soporte a una distancia mínima de 8 cm del borde frontal del estante y a 10 cm como mínimo de la pared El soporte de escritorio puede girar 18 grados a la izquierda y a ...

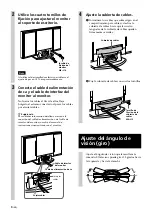
Страница 23: ...e los tornillos de la parte posterior del monitor como guías Baje suavemente el monitor para alinear los orificios de los tornillos por encima de las juntas del soporte de escritorio z Sugerencia Existen ranuras para los dedos situadas a ambos lados de la parte inferior del monitor para sujetarlo Cuando ajuste el monitor al soporte utilice las ranuras para sujetar la parte inferior y sostenga la s...

Страница 24: ...faz del monitor consulte el manual de instrucciones suministrado con el monitor Tornillo de fijación del monitor M5 L16 Cable de interfaz del monitor Cable de alimentación de ca Afloje los cables Sujetacables 4 Ajuste la cubierta de cables 1 Introduzca los cables que sobresalgan en el compartimiento para cables y deslice la cubierta de cables hasta que las cuatro lengüetas de la cubierta de cables...

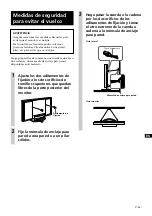
Страница 25: ...una ménsula de anclaje para pared disponibles en el mercado 1 Ajuste los dos aditamentos de fijación a los dos orificios de tornillos superiores que quedan libres de la parte posterior del monitor 2 Fije la ménsula de anclaje para pared a una pared o a un pilar sólidos 3 Haga pasar la cuerda o la cadena por los dos orificios de los aditamentos de fijación y tense el otro extremo de la cuerda o cad...

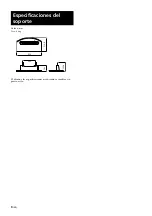
Страница 26: ...8 ES Especificaciones del soporte Unidad mm Peso 6 6 kg El diseño y las especificaciones están sujetos a cambios sin previo aviso 550 316 4 290 141 198 4 ...

Страница 27: ......

Страница 28: ...2 541 809 11 2 2005 Sony Corporation Printed in Japan SONY is a registered trademark of Sony Corporation QUALIA and QUALIA logotype are trademarks of Sony Corporation Printed on 100 recycled paper ...

Отзывы: