


STR-DN1080/ZA810ES
7
NOTE OF REPLACING THE MB-1613 BOARD OR
WLAN/BT COMBO CARD
When the MB-1613 board or WLAN/BT combo card is replaced,
be sure to perform with referring to the following item.
• NETWORK INFORMATION WRITING METHOD
(Refer to this page)
• NETWORK CONNECTION CHECKING METHOD
(Refer to page 8)
• NFC CONNECTION CHECKING METHOD
(Refer to page 9)
• NOTICE OF MAC ADDRESS CHANGE TO CUSTOMERS
(Refer to page 9)
NETWORK INFORMATION WRITING METHOD
When the MB-1613 board or WLAN/BT combo card is replaced,
perform the writing work of the network information in the MTK
service mode.
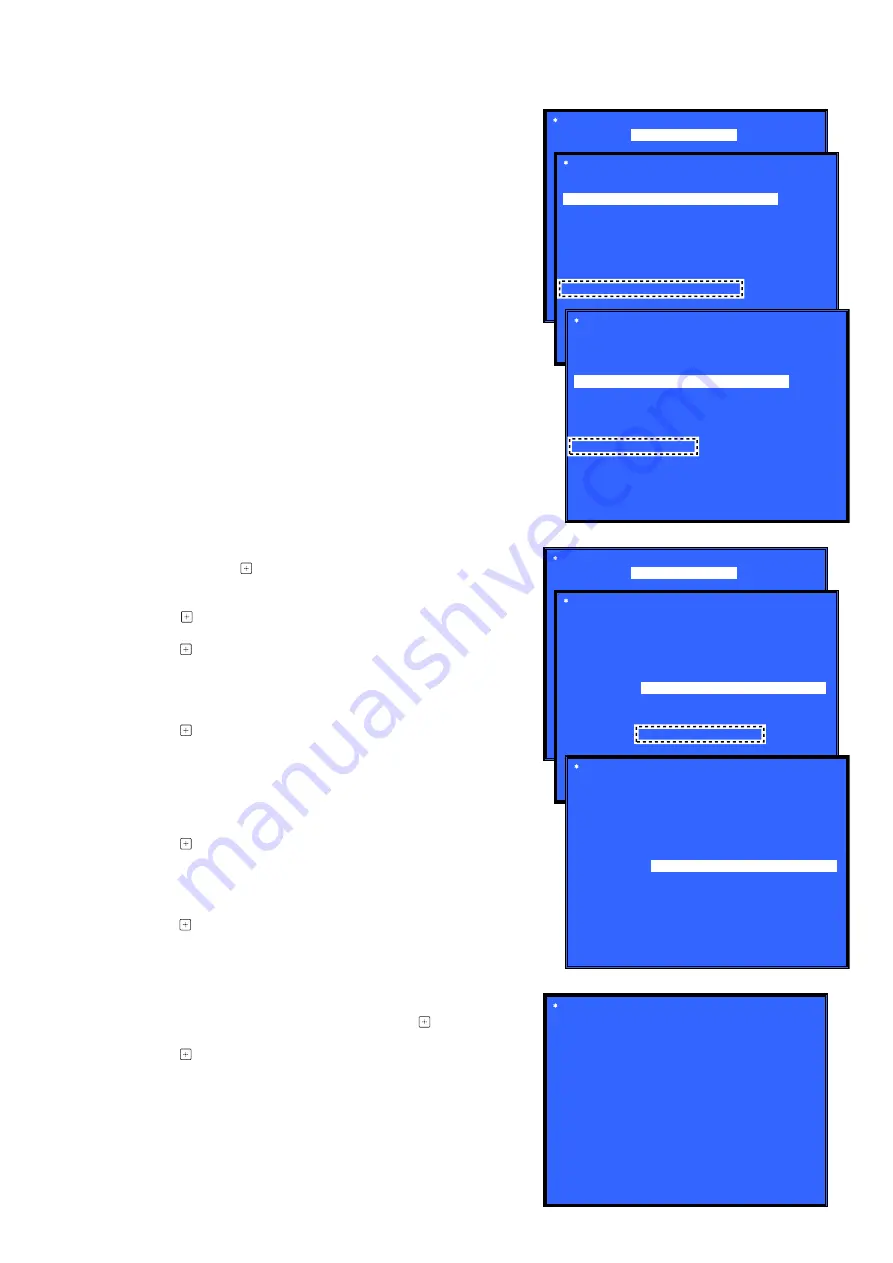
Procedure:
1. Connect this unit with TV monitor.
2. Press the [
1
] button to turn the power on.
3. While pressing the [DISPLAY MODE] button, press the [MU-
SIC], [2CH/MULTI], [MOVIE] button in order.
4. Enter the MTK service mode, the message “SERVICE IN”
appears. The OSD menu on TV monitor can be operated by
remote commander.
5. Press the [
v
] button on the remote commander to select “[1]
Diag”, and press the [ ] button on the remote commander.
6. Press
the
[
b
] button on the remote commander to select “Blue-
tooth Device Test” (refer to Screen 1).
7. Press the [ ] button on the remote commander to select “(1)
Bluetooth Enable”.
8. Press the [ ] button on the remote commander, wait until the
display show “Status: Bluetooth Enable Successful!” (refer to
Screen 2).
9. Press the [
v
] button on the remote commander to select “(3)
Write Bluetooth device address to Registry”.
10. Press the [ ] button on the remote commander, wait until the
display show “Status: Write Successful!” (refer to Screen 3).
11. Press the [BACK] button on the remote commander to return to
category select screen, and press the [
B
] button on the remote
commander to select “Wireless LAN Test” (refer to Screen 4).
12. Press the [
v
] button on the remote commander to select “[5]
Write P2P address to Registry”.
13. Press the [ ] button on the remote commander, wait until the
display show “Status: Write Successful!” (refer to Screen 5).
14. It records the displayed address of the P2P device.
15. Press the [
v
] button on the remote commander to select “[6]
P2P Registry Check”.
16. Press the [ ] button on the remote commander to display P2P
device address (refer to Screen 6).
17. Check that the P2P device address on screen 6 is the same as
the P2P device address recorded on screen 5.
18. Press the [BACK] button on the remote commander to return
to top menu screen, press the [
v
] button on the remote com-
mander to select “[3] Factory Initialize”, and press the [ ] but-
ton on the remote commander (refer to Screen 7).
19. Press the [ ] button on the remote commander to execute the
initialize.
20. When the initialize is completed, the power turns o
ff
automati-
cally.
Diag
Diag
Category: Wireless LAN Test
[2] Connect to AccessPoint
[3] Start Display RSSI Value
[4] Start Ping Test
P2P device address: 5a:00:e3:77:e6:71
HELP: [UP] [DOWN] [ENT] [RET]
Status: Write Successful!
Category:
Wireless LAN Test
[1] Show WLAN HwInfo
[5] Write P2P address to Registry
[6] P2P Registry Check
Diag
Diag
Category: Bluetooth Device Test
(2) Bluetooth Disable
(3) Write Bluetooth device address to Registry
(4) Bluetooth Inquiry Test
HELP: [UP] [DOWN] [ENT] [RET]
Category:
Bluetooth Device Test
(1) Bluetooth Enable
Status: Bluetooth Enable Successful!
Diag
Category: Wireless LAN Test
[2] Connect to AccessPoint
[3] Start Display RSSI Value
[4] Start Ping Test
P2P device address: 5a:00:e3:77:e6:71
HELP: [UP] [DOWN] [ENT] [RET]
[1] Show WLAN HwInfo
[5] Write P2P address to Registry
[6] P2P Registry Check
Status: Write Successful!
Diag
Category: Bluetooth Device Test
(2) Bluetooth Disable
(3) Write Bluetooth device address to Registry
(4) Bluetooth Inquiry Test
Bluetooth Device address: 58:00:E3:77:E6:71
HELP: [UP] [DOWN] [ENT] [RET]
(1) Bluetooth Enable
Factory Initialize
[RET] Return to Top Menu
HELP : [ENT] [RET]
[ENT] Start Initialize
(Screen 7)
(Screen 4)
(Screen 5)
(Screen 3)
(Screen 1)
(Screen 2)
(Screen 6)
SYS SET
2020/11/17 21:24:35 (GMT+09:00)


