


32
US
1
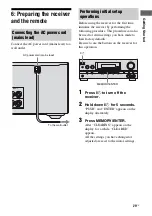
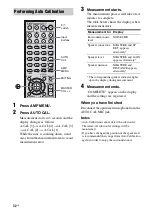
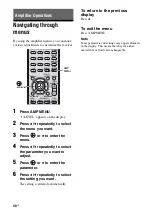
Press AMP MENU.
2
Press AUTO CAL.
Measurement starts in 5 seconds and the
display changes as follows:
A.CAL [5]
t
A.CAL [4]
t
A.CAL [3]
t
A.CAL [2]
t
A.CAL [1]
While the time is counting down, stand
away from the measurement area to avoid
measurement error.
3
Measurement starts.
The measurement process will take a few
minutes to complete.
The table below shows the display when
measurement starts.
* The corresponding speaker indicator lights
up in the display during measurement.
4
Measurement ends.
“COMPLETE” appears on the display
and the settings are registered.
When you have finished
Disconnect the optimizer microphone from the
AUTO CAL MIC jack.
Notes
• Auto Calibration cannot detect the subwoofer.
Therefore, all subwoofer settings will be
maintained.
• If you have changed the position of the speakers, it
is recommended that you perform Auto Calibration
again in order to enjoy the surround sound.
Performing Auto Calibration
1
2
3
4
6
7
8
0/10
ENTER
9
SYSTEM STANDBY
TV INPUT
SLEEP
DMPORT
VIDEO1
VIDEO2
BD
DVD
2CH
A.F.D.
MOVIE
MUSIC
AMP MENU
CLEAR
DISPLAY
MUTING
TV VOL
MASTER VOL
DVD/BD
MENU
AUTO CAL
D.TUNING
D.SKIP
THEATER
SAT
TV
SA-CD/CD TUNER
?/1
5
>10
MEMORY
O
TV
?/1
AV
?/1
TOOLS/
OPTIONS
RETURN/EXIT
MENU/HOME
Input
buttons
?
/
1
switch
MUTING
MASTER
VOL +/–
AMP
MENU
AUTO
CAL
Measurement for Display
Environment noise
level
NOISE.CHK
Speaker connection
MEASURE and SP
DET. appears
alternately*
Speaker level
MEASURE and GAIN
appears alternately*
Speaker distance
MEASURE and
DISTANCE appears
alternately*


