Sony STR-DE698 - A/v Receiver Скачать руководство пользователя страница 12

masterpage:Left

lename[D:\Sony SEM ju\DATA_STR-

DE698_Revision3\J9050212_2560571131DE698_UCA\2560571131\GB03CON_STR-DE698-
UCA.fm]

 model name1[STR-DE698]

 [2-560-571-13(1)]

12

GB

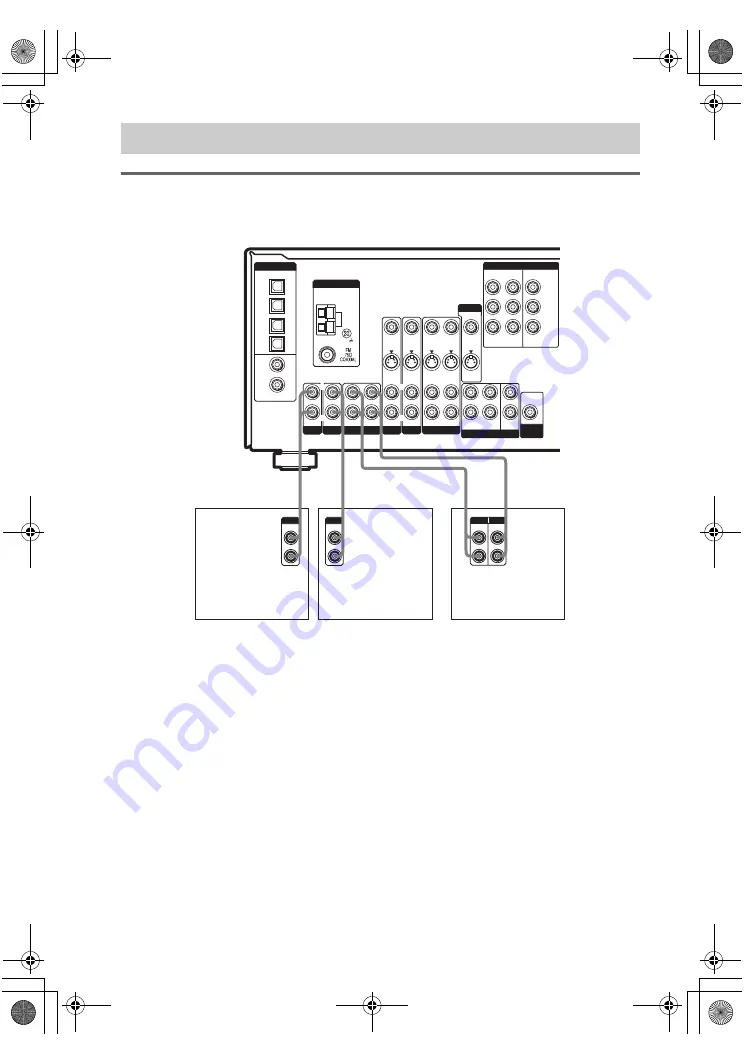
Hooking up audio components

For details on the required cords (

A

H

), see page 6.

Note

If you have an individual audio component (except PHONO), connect the LINE OUT jacks on the CD player, tape 
deck or MD deck to the AUX IN jacks on the receiver so that you can listen to stereo sources in surround sound.

1c: Connecting components with only analog audio jacks

S-VIDEO

OUT

VIDEO 1

MULTI CH IN

FRONT

CENTER

SUB

WOOFER

SURROUND

S-VIDEO

IN

VIDEO IN

AUDIO IN

AUDIO

OUT

S-VIDEO

IN

VIDEO IN

S-VIDEO

OUT

VIDEO OUT

VIDEO 2

AUDIO IN

DIGITAL

OPTICAL

VIDEO 2

IN

MD/

TAPE 

IN

MD/

TAPE 

OUT

SA-CD/

CD

IN

SA-CD/ 

CD 

IN

DVD 

IN

COAXIAL

AUX SA-CD/CD

L

L

R

SUB

WOOFER

L

R

L

L

R

R

OUT

IN

IN

IN

S-VIDEO

IN

VIDEO IN

DVD

AUDIO IN

AUDIO OUT

VIDEO OUT

DVD

IN

VIDEO 2

IN

MONITOR

OUT

COMPONENT VIDEO

Y

ASSIGNABLE

P

B

/C

B

/B–Y

P

R

/C

R

/R–Y

AM

ANTENNA

MONITOR

A

LINE

L

R

LINE

L

R

LINE

INPUT OUTPUT

A

l

IN

A

l

OUT

A

LINE

L

R

OUTPUT

MD/TAPE

R

OUTPUT

Super Audio CD/

CD player

MD/Tape deck

CD player,

MD/Tape deck, etc.

GB01COV_STR-DE698-UCA.book  Page 12  Wednesday, February 23, 2005  10:14 AM

Содержание STR-DE698 - A/v Receiver

Страница 1: ...poration 2 560 571 13 1 FM Stereo FM AM Receiver Operating Instructions Owner s Record The model and serial numbers are located on the rear of the unit Record the serial number in the space provided below Refer to them whenever you call upon your Sony dealer regarding this product Model No Serial No STR DE698 GB01COV_STR DE698 UCA book Page 1 Wednesday February 23 2005 10 14 AM ...

Страница 2: ...k to persons This symbol is intended to alert the user to the presence of important operating and maintenance servicing instructions in the literature accompanying the appliance WARNING This equipment has been tested and found to comply with the limits for a Class B digital device pursuant to Part 15 of the FCC Rules These limits are designed to provide reasonable protection against harmful interf...

Страница 3: ...receiver You can also use the controls on the supplied remote if they have the same or similar names as those on the receiver For details on the use of your remote see pages 45 53 This receiver incorporates Dolby Digital and Pro Logic Surround and the DTS Digital Surround System Manufactured under license from Dolby Laboratories Dolby Pro Logic and the double D symbol are trademarks of Dolby Labor...

Страница 4: ...ls of area code CEL CEK only Changing the display 28 About the indications in the display 29 Enjoying Surround Sound Using only the front speakers 31 Enjoying higher fidelity sound 31 AUTO FORMAT DIRECT Selecting a sound field 33 Selecting the surround back decoding mode 35 SURR BACK DECODING Advanced Adjustments and Settings Assigning the component video input 37 COMPONENT VIDEO INPUT ASSIGN Swit...

Страница 5: ... s internal multi channel decoder through this receiver c Model equipped only with AUDIO OUT L R jacks etc d Model with component video Y PB CB B Y PR CR R Y input jacks Getting Started 1 Check how to hookup your components Component to be connected Page DVD player With digital audio outputa 7 8 With multi channel audio outputb 10 11 With analog audio output onlyc 7 8 TV monitor With component vid...

Страница 6: ... cord G Monaural audio cord Black Tip Audio cord A can be torn into two monaural audio cords G H Component video cord Green Blue Red Notes Turn off the power to all components before making any connections Be sure to make connections firmly to avoid hum and noise When connecting an audio video cord be sure to match the color coded pins to the appropriate jacks on the components yellow video to yel...

Страница 7: ...the receiver 1a Connecting components with digital audio output jacks S VIDEO OUT VIDEO 1 MULTI CH IN FRONT CENTER SUB WOOFER SURROUND S VIDEO IN VIDEO IN AUDIO IN AUDIO OUT S VIDEO IN VIDEO IN S VIDEO OUT VIDEO OUT VIDEO 2 AUDIO IN DIGITAL OPTICAL VIDEO 2 IN MD TAPE IN MD TAPE OUT DVD IN AUX MD TAPE SA CD CD L R L R SUB WOOFER L R L L R R OUT IN IN IN S VIDEO IN VIDEO IN DVD AUDIO IN AUDIO OUT VI...

Страница 8: ...verted to S video signals and this upconverted video signals can only be output from the MONITOR S VIDEO OUT jack S VIDEO OUT VIDEO 1 FRONT SURROUND S VIDEO IN VIDEO IN AUDIO IN AUDIO OUT S VIDEO IN VIDEO IN S VIDEO OUT VIDEO OUT VIDEO 2 AUDIO IN DIGITAL OPTICAL VIDEO 2 IN MD TAPE IN MD TAPE OUT SA CD CD IN SA CD CD IN DVD IN COAXIAL AUX MD TAPE SA CD CD L R L R SUB WOOFER L R L R OUT IN IN IN S V...

Страница 9: ...Super Audio CD on the Super Audio CD player connected to the SA CD CD OPTICAL IN or SA CD CD COAXIAL IN jack on this receiver Connect to the analog input jacks SA CD CD IN jacks Refer to the operating instructions supplied with the Super Audio CD player S VIDEO OUT VIDEO 1 MULTI CH IN FRONT CENTER SUB WOOFER SURROUND S VIDEO IN VIDEO IN AUDIO IN AUDIO OUT S VIDEO IN VIDEO IN S VIDEO OUT VIDEO OUT ...

Страница 10: ... make connections to the MULTI CH IN jacks you will need to adjust the level of the speakers and sub woofer using the controls on the connected component 1b Connecting components with multi channel output jacks S VIDEO OUT VIDEO 1 FRONT CENTER SURROUND S VIDEO IN VIDEO IN AUDIO IN AUDIO OUT S VIDEO IN VIDEO IN S VIDEO OUT VIDEO OUT VIDEO 2 AUDIO IN DIGITAL OPTICAL VIDEO 2 IN MD TAPE IN MD TAPE OUT...

Страница 11: ...eiver standard video signals can be converted to S video signals and this upconverted video signals can only be output from the MONITOR S VIDEO OUT jack S VIDEO OUTPUT S VIDEO INPUT S VIDEO OUT VIDEO 1 MULTI CH IN FRONT CENTER SUB WOOFER SURROUND S VIDEO IN VIDEO IN AUDIO IN AUDIO OUT S VIDEO IN VIDEO IN S VIDEO OUT VIDEO OUT VIDEO 2 AUDIO IN DIGITAL OPTICAL VIDEO 2 IN MD TAPE IN MD TAPE OUT SA CD...

Страница 12: ... analog audio jacks S VIDEO OUT VIDEO 1 MULTI CH IN FRONT CENTER SUB WOOFER SURROUND S VIDEO IN VIDEO IN AUDIO IN AUDIO OUT S VIDEO IN VIDEO IN S VIDEO OUT VIDEO OUT VIDEO 2 AUDIO IN DIGITAL OPTICAL VIDEO 2 IN MD TAPE IN MD TAPE OUT SA CD CD IN SA CD CD IN DVD IN COAXIAL AUX SA CD CD L L R SUB WOOFER L R L L R R OUT IN IN IN S VIDEO IN VIDEO IN DVD AUDIO IN AUDIO OUT VIDEO OUT DVD IN VIDEO 2 IN MO...

Страница 13: ...eo signals can only be output from the MONITOR S VIDEO OUT jack VIDEO 1 MULTI CH IN FRONT CENTER SUB WOOFER SURROUND S VIDEO IN VIDEO IN AUDIO IN AUDIO OUT S VIDEO IN VIDEO IN S VIDEO OUT VIDEO OUT VIDEO 2 AUDIO IN DIGITAL OPTICAL VIDEO 2 IN MD TAPE IN MD TAPE OUT SA CD CD IN SA CD CD IN DVD IN COAXIAL AUX MD TAPE SA CD CD L R L R SUB WOOFER L R L R R OUT IN IN IN S VIDEO IN VIDEO IN DVD AUDIO IN ...

Страница 14: ...e antenna keep it as horizontal as possible 2 Connecting the antennas S VIDEO OUT VIDEO 1 MULTI CH IN FRONT CENTER SUB WOOFER SURROUND S VIDEO IN VIDEO IN AUDIO IN AUDIO OUT S VIDEO IN VIDEO IN S VIDEO OUT VIDEO OUT VIDEO 2 AUDIO IN DIGITAL OPTICAL VIDEO 2 IN MD TAPE IN MD TAPE OUT SA CD CD IN SA CD CD IN DVD IN COAXIAL AUX MD TAPE SA CD CD L R L R SUB WOOFER L R L L R R OUT IN IN IN S VIDEO IN VI...

Страница 15: ... connect one additional surround back speaker 6 1 channel or two surround back speakers 7 1 channel see Selecting the surround back decoding mode on page 35 Example of 7 1 channel speaker system configuration Tips When you connect 6 1 channel speaker system place the surround back speaker behind the listening position see When placing only one surround back speaker illustration on page 20 Since th...

Страница 16: ... A B button For details see Selecting the speaker system page 43 If you connect only one surround back speaker connect it to the SPEAKERS SURROUND BACK L jack AUDIO OUT CENTER SPEAKERS SUB WOOFER L R MONITOR OUT NT VIDEO Y PB CB B Y PR CR R Y FRONT A L R L AC OUTLET A E e A E e A E e E e A INPUT AUDIO IN B E e A SPEAKERS FRONT B E e A E e A SURROUND BACK L R SURROUND SPEAKERS R FRONT B Sub woofer ...

Страница 17: ...dels of area code AR The configuration shape and number of AC outlets vary according to the area code Notes The AC OUTLET s on the rear of the receiver is a switched outlet which supplies power to the connected component only while the receiver is turned on Make sure that the total power consumption of the component s connected to the receiver s AC OUTLET s does not exceed the wattage stated on th...

Страница 18: ...put is set to DVD You can use the SET UP menu to set the size distance and location of the speakers connected to this receiver 1 Press 1 to turn on the receiver 2 Press MAIN MENU repeatedly to select SET UP 3 Press or repeatedly to select the parameter you want to adjust For details see Speaker setup parameters below Note Some speaker setup items may appear dimmed in the display This means that th...

Страница 19: ...s from the sub woofer When the front speakers are set to SMALL the center surround and surround back speakers are also automatically set to SMALL unless previously set to NO x XXXXX Center speaker size LARGE If you connect a large speaker that will effectively reproduce bass frequencies select LARGE Normally select LARGE However if the front speakers are set to SMALL you cannot set the center spea...

Страница 20: ... that speaker On the other hand if you are using a large speaker but prefer not to have bass frequencies output from that speaker set it to SMALL If the overall sound level is lower than you prefer set all speakers to LARGE If there is not enough bass you can use the BASS parameter in the EQ menu to boost the bass levels To adjust the bass see page 39 x DIST X X m XX ft Front speaker distance Init...

Страница 21: ...further away from the listening position than the front speakers And they can be no more than 4 5 meters 15 feet closer This is because incorrect speaker placement is not conducive to the enjoyment of surround sound Please note that setting the speaker distance closer than the actual location of the speakers will cause a delay in the output of the sound from that speaker In other words the speaker...

Страница 22: ...P menu You can adjust the bass crossover frequency from 40 Hz to 160 Hz in 9 steps This setup item is only available when at least one speaker is set to SMALL and the corresponding speaker segment flashes in the display Adjust the speaker levels and balance while listening to the test tone from your listening position Use the remote for the operation Tip The receiver employs a test tone with a fre...

Страница 23: ...he muting function will be canceled when you do the following Press MUTING on the remote again Turn the power off Increase the volume To use the headphones Connect the headphones to the PHONES jack When the headphones are connected speaker output is automatically canceled and SP A and SP B do not light up in the display When the headphones are connected you can select only the following sound fiel...

Страница 24: ...age 14 Tip The tuning scale differs depending on the area code as shown in the following table For details on area codes see page 3 The AM tuning scale can be changed see page 60 Automatic tuning If you do not know the frequency of the station you want you can let the receiver scan all available stations in your area 1 Press TUNER FM AM repeatedly to select the FM or AM band The last received stat...

Страница 25: ...nt to store FM or AM stations one by one see Presetting radio stations page 26 Use the buttons on the receiver for the operation 1 Press 1 to turn off the receiver 2 Hold down MEMORY and press 1 to turn the receiver back on AUTO BETICAL SELECT appears in the display and the receiver scans and stores all the FM and FM RDS stations in the broadcast area For RDS stations the tuner first checks for st...

Страница 26: ...ress SHIFT repeatedly to select a memory page A B or C and then press the numeric buttons to select a preset number 5 Press MEMORY again The station is stored to the selected preset number If MEMORY goes out before you press MEMORY start again from step 3 6 Repeat steps 2 to 5 to preset another station Tuning to preset stations 1 Press TUNER FM AM repeatedly to select the FM or AM band The last re...

Страница 27: ...system t Sound field currently applied a Type of program being broadcast see page 27 b Text messages sent by the RDS station Notes If there is an emergency announcement by government authorities ALARM flashes in the display When the message consists of 9 characters or more the message scrolls across the display If a station does not provide a particular RDS service NO XXXX such as NO TEXT appears ...

Страница 28: ... name does not appear when only blank spaces have been entered or it is the same as the input name During RDS reception only Models of area code CEL CEK only See page 27 Adjusting the brightness of the display Press DIMMER repeatedly The brightness of the display will change in 3 steps Program type indication Description RELIGION Programs of religious content PHONE IN Programs where members of the...

Страница 29: ...d speakers are set to NO and you select a sound field using the A F D button Note Dolby Pro Logic IIx decoding does not function for DTS format signals or for signals with a sampling frequency of more than 48 kHz F DTS ES 96 24 DTS lights up when DTS signals are input DTS ES lights up when DTS ES signals are input DTS 96 24 lights up when the receiver is decoding DTS 96 kHz 24 bit signals Note Whe...

Страница 30: ...sound based on the speakers settings L Front Left R Front Right C Center monaural SL Surround Left SR Surround Right S Surround monaural or the surround components obtained by Pro Logic processing SB Surround Back the surround back components obtained by 6 1 channel decoding SBL Surround Back Left SBR Surround Back Right Example Recording format Front Surround 3 2 Output channel When the surround ...

Страница 31: ... the sub woofer in the 2CH STEREO mode To listen to the 2 channel stereo sources using the front left right speakers and a sub woofer set to the A F D mode The Auto Format Direct A F D mode allows you to select the decoding mode you want for your audio sound Enjoying Surround Sound Using only the front speakers Enjoying higher fidelity sound AUTO FORMAT DIRECT A F D mode Display Decoding mode A F ...

Страница 32: ... encoded in Dolby Surround In addition this mode can reproduce sound in 5 1 channel when watching videos of overdubbed or old movies x PLII MS PRO LOGIC II MUSIC Performs Dolby Pro Logic II Music mode decoding This setting is ideal for normal stereo sources such as CDs x PLII GM PRO LOGIC II GAME Performs Dolby Pro Logic II Game mode decoding This setting is ideal for video game softwares x PLIIX ...

Страница 33: ...inment Kim Novak Theater cinema production studio This mode is ideal for watching science fiction or action movies with lots of sound effects x C ST EX C CINEMA STUDIO EX C DC S Reproduces the sound characteristics of the Sony Pictures Entertainment scoring stage This mode is ideal for watching musicals or films where orchestra music is featured in the soundtrack About CINEMA STUDIO EX modes CINEM...

Страница 34: ...EADPHONE 2CH if using a sound field selected with the 2CH or A F D button or to HEADPHONE THEATER if using a sound field selected with the MOVIE or MUSIC button To turn off the surround effect Press 2CH to select 2CH ST or press A F D repeatedly to select A F D AUTO Tips The receiver lets you apply the last selected sound field to an input whenever it is selected Sound Field Link For example if yo...

Страница 35: ... 6 1 etc format you can enjoy the surround sound intended by the filmmakers Press SURR BACK DECODING repeatedly to select the surround back decoding mode SB XXXX appears in the display For details see How to select the surround back decoding mode on page 36 Tip You can select the surround back decoding mode using SB XXXX in the CUSTOMIZE menu page 40 Note You can select the surround back decoding ...

Страница 36: ... for returning those signals to 6 1 discrete channels Discrete 6 1 channel signals are DVD specific signals not used in movie theaters e When two surround back speakers are connected the output channel will be 7 1 channels Note There may be no sound from the surround back speaker in Dolby Digital EX mode Some discs have no Dolby Digital EX flag even though the packages have Dolby Digital EX logos ...

Страница 37: ...ich have digital audio input jacks 1 Press input buttons to select the input 2 Press INPUT MODE repeatedly to select the audio input mode The selected audio input mode appears in the display Audio input modes AUTO IN Gives priority to digital signals when there are both digital and analog connections If there are no digital signals analog is selected COAX IN Specifies the digital audio signals inp...

Страница 38: ...t speakers You can adjust in the range of BAL L 1 to 8 BALANCE 0 BAL R 1 to 8 in 17 steps x CTR XXX dB Center speaker level x SUR L XXX dB Surround speaker left level x SUR R XXX dB Surround speaker right level x SB XXX dB Surround back speaker level x SBL XXX dB Surround back speaker left level x SBR XXX dB Surround back speaker right level x S W XXX dB Sub woofer level Initial setting 0 dB You c...

Страница 39: ...D etc 2 Press MAIN MENU repeatedly to select EQ 3 Press or repeatedly to select the parameter you want to adjust For details see EQ menu parameters below 4 While monitoring the sound turn the jog dial to select the setting you want The setting is entered automatically 5 Repeat steps 3 and 4 to adjust the other items Note You cannot adjust the equalizer when the receiver is decoding signals with a ...

Страница 40: ...kers are set to SMALL or if the sub woofer is set to NO x SB XXXX Surround back decoding mode You can also press SURR BACK DECODING to set the surround back decoding mode page 35 For details on each decoding mode see page 36 OFF AUTO ON Note This parameter is valid only in the A F D mode except for Dolby Pro Logic IIx mode page 31 x A V SYNC X Time alignment Y Yes The audio output is delayed so th...

Страница 41: ...ces M S Main Sub Sound of the main language will be output through the front left speaker and sound of the sub language will be output through the front right speaker simultaneously M Main Sound of the main language will be output S Sub Sound of the sub language will be output M S Main Sub Mixed sound of both the main and sub languages will be output x COMP V A Component video input assignment Let...

Страница 42: ...d you can select a character 5 Use or and jog dial to create an index name Turn the jog dial to select a character then press to move the cursor to the next position Tips You can select the character type as follows by turning the jog dial Alphabet upper case t Numbers t Symbols To enter a blank space turn the jog dial until a blank space appears in the display If you made a mistake press or repea...

Страница 43: ... up the button page 46 then press SLEEP The remaining time appears in the display If you press SLEEP again the sleep timer will be canceled You can select the front speaker system you want to use Press SPEAKERS OFF A B A B repeatedly to select the front speaker system you want to use The selected speaker system appears in the display To turn off the speaker output press SPEAKERS OFF A B A B repeat...

Страница 44: ...on a video tape You can record from a VCR a TV or a DVD player using the receiver You can also add audio from a variety of audio sources when editing a video tape See the operating instructions of your VCR or DVD player if you need help 1 Select the program source to be recorded 2 Prepare the component for playing For example insert a video tape you want to record into VCR 3 Insert a blank video t...

Страница 45: ...ing so may cause a malfunction If you don t use the remote for an extended period of time remove the batteries to avoid possible damage from battery leakage and corrosion The H TV VOL TV CH and MASTER VOL buttons have a tactile dot Use the tactile dot as a reference when operating the receiver and other audio video components Operations Using the Remote RM AAP001 Before you use your remote Remote ...

Страница 46: ...der Hard disc recorder PSX Turns the audio and video components on or off Remote Button Operations Function CLEAR 9 Satellite tuner CD player DVD player Blu ray disc recorder PSX Clears a mistake when you press the incorrect numeric buttons or returns to continuos playback etc DISC ws CD player VCD player Selects a disc directly multi disc changer only DISPLAY qa Receiver TV VCR Satellite tuner VC...

Страница 47: ...ts the surround back decoding modes SEARCH MODE ws DVD player Selects searching mode Press to select the unit for search track index etc SHIFT 9 Receiver Selects a memory page for presetting radio stations or tuning to preset stations Remote Button Operations Function SLEEP ef Receiver Activates the sleep function and the duration which the receiver turns off automatically SUBTITLE 8 DVD player Ch...

Страница 48: ...atellite tuner Blu ray disc recorder Hard disc recorder PSX Selects the channel entrymode eitherone or two digit 1 ef Receiver Turns the receiver on or off Remote Button Operations Function 8 VCR CD player VCD player LD player DVD player MD deck DAT deck Tape deck Blu ray disc recorder Hard disc recorder PSX Skips tracks m M 9 CD player VCD player DVD player LD player MD deck Blu ray disc recorder...

Страница 49: ...g on the model The above explanation is intended to serve as an example only Therefore depending on the component the above operation may not be possible or may operate differently than described When you press input buttons VIDEO1 VIDEO2 VIDEO3 or DVD the input mode of the TV might not switch to the corresponding input mode that you want In this case press TV VIDEO button to switch the input mode...

Страница 50: ...our system Furthermore you can also program the remote for Sony components that the remote is unable to control Note that the remote can only control components that accept infrared wireless control signals 1 Press AV 1 while holding down RM SET UP The indicator lights up 2 Press the input button including TV 1 for the component you want to control For example if you are going to control a CD play...

Страница 51: ... three numbers entered are valid To clear the memory of the remote To clear all programmed do the following to reset the remote to factory settings Press 1 AV 1 and MASTER VOL at the same time The indicator flashes 3 times then goes off The numeric codes corresponding to the component and the maker of the component Use the numeric codes in the tables below to control non Sony components and also S...

Страница 52: ... 212 PIONEER 213 214 TECHNICS 215 216 YAMAHA 217 218 Maker Code s SONY 601 602 603 PIONEER 606 Maker Code s SONY 605 Maker Code s SONY 701 702 703 704 705 706 AIWA 710 750 757 758 AKAI 707 708 709 759 BLAUPUNKT 740 EMERSON 711 712 713 714 715 716 750 FISHER 717 718 719 720 GENERAL ELECTRIC 721 722 730 GOLDSTAR 723 753 GRUNDIG 724 HITACHI 722 725 729 741 ITT NOKIA 717 JVC 726 727 728 736 MAGNAVOX 7...

Страница 53: ... 534 HITACHI 513 514 515 544 ITT NOKIA 521 522 JVC 516 MAGNAVOX 503 518 544 MITSUBISHI MGA 503 519 544 NEC 503 520 544 PANASONIC 509 524 PHILIPS 515 518 PIONEER 509 525 526 540 RCA PROSCAN 510 527 528 529 544 SAMSUNG 503 515 531 532 533 534 544 SANYO 508 545 546 547 SHARP 535 TELEFUNKEN 523 536 537 538 THOMSON 530 537 539 TOSHIBA 535 540 541 ZENITH 542 543 Maker Code s SONY 801 802 803 804 JERROLD...

Страница 54: ...ged only at the qualified service shop On heat buildup Although the receiver heats up during operation this is not a malfunction If you continuously use this receiver at a large volume the cabinet temperature of the top side and bottom rises considerably To avoid burning yourself do not touch the cabinet On placement Place the receiver in a location with adequate ventilation to prevent heat buildu...

Страница 55: ...alog 2 channel sources Check that the INPUT MODE is not set to COAX IN or OPT IN page 37 Check that you have not selected MULTI CH IN function There is no sound from digital sources from COAXIAL or OPTICAL input jack Check that the INPUT MODE is not set to ANALOG page 37 Check that the INPUT MODE is not set to COAX IN for the sources from OPTICAL input jack or set to OPT IN for the sources from CO...

Страница 56: ...be tuned in Check that the antennas are connected securely Adjust the antennas and connect an external antenna if necessary The signal strength of the stations is too weak when tuning in with automatic tuning Use direct tuning Make sure you set the tuning interval correctly when tuning in AM stations with direct tuning No stations have been preset or the preset stations have been cleared when tuni...

Страница 57: ...ctivate the buttons with orange printing press ALT first before pressing the buttons Before you use the V v B b button for receiver operation press MAIN MENU To operate other components press TOP MENU GUIDE or AV MENU after pressing the function button Error messages If there is a malfunction the display shows a message You can check the condition of the receiver by the message Refer to the follow...

Страница 58: ...0 FRONT2 125 W ch CENTER2 125 W SURR2 125 W ch SURR BACK2 125 W ch Models of area code CEL CEK Rated Power Output at Stereo Mode 8 ohms 20 Hz 20 kHz THD 0 09 90 W 90 W1 8 ohms 1 kHz THD 0 7 100 W 100 W1 8 ohms 1 kHz THD 10 125 W 125 W1 Reference Power Output1 8 ohms 20 Hz 20 kHz THD 0 09 FRONT2 110 W ch CENTER2 110 W SURR2 110 W ch SURR BACK2 110 W ch 8 ohms 1 kHz THD 0 7 FRONT2 120 W ch CENTER2 1...

Страница 59: ...o sound output 3 Measured under the following conditions Frequency response Inputs Analog 4 INPUT SHORT with sound field and equalizer bypassed 5 Weighted network input level Inputs Digital Outputs Analog Outputs Digital Equalizer Area code Power requirements U CA 120 V AC 60 Hz CEL CEK AR 230 V AC 50 Hz E2 E3 AU 240 V AC 50 Hz Area code Power requirements AR 220 V AC 50 Hz MULTI CH IN SA CD CD MD...

Страница 60: ... can change the AM tuning scale to 9 kHz or 10 kHz After tuning in any AM station turn off the receiver While holding down PRESET TUNING or TUNING press 1 All preset stations will be erased when you change the tuning scale To reset the scale to 10 kHz or 9 kHz repeat the procedure Video section Inputs Outputs Video 1 Vp p 75 ohms S video Y 1 Vp p 75 ohms C 0 286 Vp p 75 ohms COMPONENT VIDEO Y 1 Vp...

Страница 61: ... indicator qd 34 56 PHONES jack ed 23 55 PRESET TUNING wl 26 60 SA CD CD wd 23 SPEAKERS OFF A B A B 2 16 43 55 SURR BACK DECODING qf 35 TUNER FM AM ws 23 24 25 26 42 TUNING e 24 60 VIDEO 1 wk 23 VIDEO 2 wj 23 VIDEO 3 wh 23 VIDEO 3 IN PORTABLE AV IN jacks ea 13 2CH button indicator q 31 34 39 1 power 1 18 25 39 57 60 ql 18 38 39 42 jog dial qk 18 38 39 42 List of button locations and reference page...

Страница 62: ... See Recording EQ menu 39 I Indexing See Naming L Labeling See Naming LEVEL menu 38 N Naming 42 P Preset stations how to 26 how to tune 26 R RDS 27 Recording on a video tape 44 on an audio tape or MD 44 Remote commander 45 53 S Selecting component 23 sound field 33 34 speaker system 43 SET UP menu 18 Sleep Timer 43 Sound field customizing 38 pre programmed 33 34 resetting 39 selecting 33 34 Speake...

Страница 63: ...ename D Sony SEM ju DATA_STR DE698_Revision3 J9050212_2560571131DE698_UCA 2560571131 GB01COV_STR DE698 UCAIX fm model name1 STR DE698 2 560 571 13 1 GB01COV_STR DE698 UCA book Page 63 Wednesday February 23 2005 10 14 AM ...

Страница 64: ...u DATA_STR DE698_Revision3 J9050212_2560571131DE698_UCA 2560571131 GB10BKC_STR DE698 UCA fm Sony Corporation Printed in Malaysia model name1 STR DE698 2 560 571 13 1 GB01COV_STR DE698 UCA book Page 64 Wednesday February 23 2005 10 14 AM ...

Отзывы: