background image

61

Co
py
in

g im

a

g

e

s

,

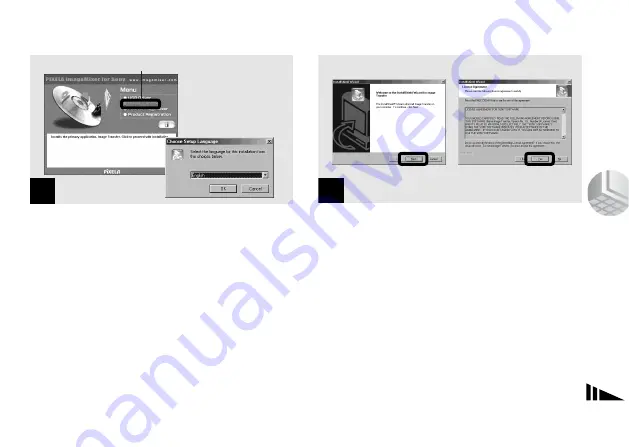
Click [Image Transfer] on the title 
screen.
Select [English] then click [OK].

The “Welcome to the InstallShield Wizard” screen 
appears.

You can use the “Image Transfer” software to copy images to 
your computer automatically when you connect the camera 
to your computer with the supplied USB cable.

The USB driver is needed in order to use “Image Transfer”.  
If the necessary driver is not already installed on your 
computer, a screen that asks if you want to install the driver 
will appear.  Follow the instructions that appear on the 
screen.

,

Click [Next]. When “License Agreement” 
screen appears, click [Yes].

Read the agreement carefully. You must accept the 
terms of the agreement in order to proceed with 
installation.

5

Click here

6

Click here

Содержание SRS-U10

Страница 1: ...ow Refer to these numbers whenever you call upon your Sony dealer regarding this product Model No DSC U10 Serial No DSC U10 2002 Sony Corporation Getting started _________________________ Shooting still images ___________________ Viewing still images ____________________ Enjoying movies _______________________ Deleting images ________________________ Copying images _____________________ Troublesho...

Страница 2: ...alert the user to the presence of uninsulated dangerous voltage within the product s enclosure that may be of sufficient magnitude to constitute a risk of electric shock to persons This symbol is intended to alert the user to the presence of important operating and maintenance servicing instructions in the literature accompanying the appliance ...

Страница 3: ...e harmful interference to radio or television reception which can be determined by turning the equipment off and on the user is encouraged to try to correct the interference by one or more of the following measures Reorient or relocate the receiving antenna Increase the separation between the equipment and receiver Connect the equipment into an outlet on a circuit different from that to which the ...

Страница 4: ...r be sure to attach the fuse cover after you change the fuse Never use the plug without the fuse cover If you should lose the fuse cover please contact your nearest Sony service station For the Customers in the U S A and Canada RECYCLING NICKEL METAL HYDRIDE BATTERIES Nickel Metal Hydride batteries are recyclable You can help preserve our environment by returning your used rechargeable batteries t...

Страница 5: ...y influence the picture and sound of this camera If static electricity or electromagnetism causes data transfer to discontinue midway fail restart the application or disconnect and connect the USB cable again For the Customers in the U S A and Canada THIS DEVICE COMPLIES WITH PART 15 OF THE FCC RULES OPERATION IS SUBJECT TO THE FOLLOWING TWO CONDITIONS 1 THIS DEVICE MAY NOT CAUSE HARMFUL INTERFERE...

Страница 6: ...h materials may be contrary to the provision of the copyright laws Do not shake or strike the camera In addition to malfunctions and inability to record images this may render the Memory Stick unusable or image data breakdown damage or loss may occur LCD screen LCD finder only models with a finder and lens The LCD screen and the LCD finder are manufactured using extremely high precision technology...

Страница 7: ...istered trademarks of the U S Microsoft Corporation in the United States and other countries Macintosh Mac OS and QuickTime are trademarks or registered trademarks of Apple Computer Inc In addition system and product names used in this manual are in general trademarks or registered trademarks of their respective developers or manufacturers However the or marks are not used in all cases in this man...

Страница 8: ... preset 36 Shooting five images continuously Burst 38 Adding special effects Picture Effect 40 Viewing still images on the LCD screen 42 Viewing single images 43 Viewing an index screen four image 44 Choosing images to print Print mark 46 Shooting movies 48 Viewing movies on the LCD screen 50 Deleting images 52 Formatting a Memory Stick 54 Copying images to your computer 56 1 Installing the USB dr...

Страница 9: ...sages 85 Self diagnostics display 86 Menu items 87 Using your camera abroad 90 Precautions 90 On Memory Stick 92 On Nickel Metal Hydride batteries 93 Specifications 94 LCD screen displays 96 Index 99 Troubleshooting Additional information ...

Страница 10: ...ntheses for details of operation A Shutter button 27 B POWER button 19 C POWER lamp 19 D Lens cover E Mode switch PLAY To view images 43 STILL To shoot still images 26 MOVIE To shoot movies 48 F Flash 32 G Lens H Self timer lamp 31 1 2 3 6 4 8 7 5 ...

Страница 11: ...jack cover L RESET button bottom surface 78 1 2 3 5 4 0 qa 9 7 6 8 qs Attaching the neck strap How to use the control button and EXEC button To change the current settings of the camera bring up the menu and use the control button to make the changes For each item press MENU and press v V on the control button to select the desired value then press EXEC to make the setting Press MENU then the menu...

Страница 12: ...e batteries lithium batteries Ni Cd batteries alkaline batteries When the above batteries are used operation is not guaranteed due to possible voltage drops or other characteristics of the batteries In addition the battery remaining indicator is not displayed correctly Charging the batteries Insert Nickel Metal Hydride batteries into the charger supplied 1 BC CS1 supplied Insert with the correct p...

Страница 13: ...e charger immediately shut off the power by disconnecting the plug out of the wall outlet wall socket Connect the charger to a wall outlet wall socket using the power cord mains lead The CHARGE lamp lights up when charging begins and goes off when charging is completed It takes about 13 hours to completely charge the batteries When charging is finished disconnect the power cord mains lead from the...

Страница 14: ...the batteries only after using up the existing charge will correct it The memory effect the situation in which the capacity of the battery is temporarily lowered Precautions to be observed when charging the batteries Do not charge any other batteries except Sony Nickel Metal Hydride batteries in the charger supplied with your camera If you try to charge any other type of battery e g manganese batt...

Страница 15: ...s Approx 1 hour 15 minutes 4 batteries Approx 2 hours 30 minutes Battery remaining indicator when using Nickel Metal Hydride batteries As the battery power decreases with use the battery remaining indicator displays the amount of power remaining using the following symbols If the LCD screen display is off set DISPLAY in to ON with MENU and v V on the control button to turn it on Based on the condi...

Страница 16: ...ction the arrow 2 Insert the batteries Match the poles of the batteries to the marks inside the battery case From time to time use a dry cloth to wipe any dirt off of the battery terminals and the contacts inside the battery Memory Stick cover Skin oil and other dirt on the battery terminals and contacts can significantly shorten the operating time provided by the batteries 1 2 ...

Страница 17: ... recorded viewed with a fully charged batteries at a temperature of 25 C 77 F in auto adjustment mode The numbers of images that can be recorded or viewed take into account changing the supplied Memory Stick as necessary Note that the actual numbers may be less than indicated depending on the conditions of use Shooting still images Under the average conditions 1 1 Shooting in the following situati...

Страница 18: ...SXGA ON Approx 1600 Approx 60 OFF Approx 1800 Approx 70 640 480 VGA ON Approx 1600 Approx 60 OFF Approx 1800 Approx 70 Image size NH AAA DI 2 supplied No of images Battery life min 1280 960 Approx 2400 Approx 120 640 480 Approx 2400 Approx 120 Shooting movies 4 4 The maximum shooting time is 15 seconds The remaining indicator will decrease in the following situations The surrounding temperature is...

Страница 19: ...over in the opposite direction of the arrow or press the POWER button again The POWER lamp goes out and the camera turns off If you open the lens cover too quickly the camera might not turn on If this happens close the cover and then open it again more slowly POWER POWER button POWER lamp Auto power off function If you do not operate the camera for about 3 minutes during shooting or viewing or whe...

Страница 20: ...rm the procedure from step 3 Select the desired date display format with v V on the control button then press EXEC Select from Y M D year month day M D Y month day year or D M Y day month year Then DATE TIME SET screen appears on the LCD screen If the rechargeable button battery which provides the power for saving the time data is ever fully discharged page 91 the DATE NOTATION screen will appear ...

Страница 21: ... items are set If you selected D M Y in step 2 set the time on a 24 hour cycle Select OK with v V on the control button then press EXEC The date and time are entered and the clock starts to keep time If you make a mistake select CANCEL in step 4 to display the DATE NOTATION screen then repeat the procedure from step 2 3 Y M D 12 00AM DATE TIME SET 2002 1 1 EXEC 4 Y M D 10 30AM DATE TIME SET 2002 7...

Страница 22: ...ert the Memory Stick Holding the Memory Stick as shown in the illustration insert it all the way in until it clicks Push the Memory Stick all of the way in so that it is securely seated in the connector If the Memory Stick is not inserted correctly you may not be able to record or display images in the Memory Stick Be careful not to drop the batteries when opening or closing the battery Memory Sti...

Страница 23: ...mp is lit up it means that image data is being read or written Never remove the Memory Stick or turn off the power at this time as the data may be damaged Setting the still image size Set the mode switch to STILL and turn on the power then press MENU The menu appears on the LCD screen 3 Access lamp 1 STILL RETURN FOCUS SELFTIMER P EFFECT AUTO OFF OFF SIZE BURST 1280 1280 1280 MENU ...

Страница 24: ...trol button then press EXEC The image size is set When the setting is complete press MENU so that the menu disappears from the LCD screen The image size selected here is maintained even when the power is turned off 2 RETURN FOCUS SELFTIMER P EFFECT AUTO OFF OFF SIZE BURST 1280 1280 1280 EXEC 3 SIZE BURST 1280 960 640 480 BURST 640 640 640 1280 1280 1280 640 640 640 EXEC ...

Страница 25: ...owing table Number of images that can be saved in a Memory Stick Units number of images Image size is the size when viewing the images on a personal computer Images viewed on the LCD screen of the camera all appear the same size The actual number of images may differ depending on the shooting conditions The image size value e g 1280 960 indicates the number of pixels Image size Usage 1280 960 Prin...

Страница 26: ...with a soft cloth if it is dirty page 90 Hold the camera steadily with both hands and position the subject in the center of the LCD screen Do not cover the lens or flash with your fingers When recording outdoors during clear weather or under other intense light undesired light ghosting may enter the screen If this happens shade the lens with your hand or other object while recording The exposure a...

Страница 27: ...ance to the subject is 10 cm 4 inches Press the shutter button fully down The beep sounds RECORDING appears on the LCD screen and the image will be recorded in the Memory Stick When RECORDING disappears you can shoot the next image When operating the camera using batteries if you do not operate the camera for about 3 minutes during recording or playback the camera turns off automatically to preven...

Страница 28: ...und is poor The subject is seen through glass such as a window A fast moving subject The subject reflects or has a lustrous finish such as a mirror or a luminous body A flashing subject LCD light You can use LCD LIGHT under with MENU and v V on the control button to turn the LCD light on and off This is useful for extending the battery life This camera is equipped with a reflective type LCD screen...

Страница 29: ...and v V on the control button to turn the display on and off This is useful when recording under conditions where it is difficult to check the image on the LCD screen For detailed descriptions of the indicators see page 96 Indicators on the LCD screen are not recorded Displays warnings only Displays all indicators that can be displayed When DISPLAY is OFF When DISPLAY is ON 23 1280 1280 1 STILL RE...

Страница 30: ...trol button then press EXEC Select ON with v V on the control button then press EXEC When you press MENU the menu disappears The self timer indicator appears on the LCD screen 2 SIZE BURST RETURN FOCUS SELFTIMER P EFFECT AUTO OFF OFF 1280 1280 1280 EXEC 3 SELFTIMER ON OFF 1280 1280 1280 23 EXEC ...

Страница 31: ...ge 10 flashes in red and the beep sounds The image will be shot after approximately 10 seconds To cancel the self timer in the middle of the operation Close the lens cover and turn off the power If you press the shutter button while standing in front of the camera the focus and the exposure may not be correctly set 4 1280 1280 1280 23 5 23 1280 1280 1280 Self timer lamp ...

Страница 32: ...No indicator Auto Based on the lighting conditions the camera will decide if there is enough light and will use the flash accordingly factory setting r Red eye reduction Flash mode is set to Auto and the red eye reduction operates if the flash strobes r Forced flash The flash strobes regardless of the surrounding brightness r No flash The flash does not strobe 1280 1280 1280 23 ...

Страница 33: ...flash charge lamp flashes After the charging is complete the lamp goes out When you press the shutter button halfway down while the flash is strobing the flash charge lamp turns on To reduce the red eye phenomenon when shooting live subjects When the red eye reduction is selected indicator appears on the LCD screen and the flash pre strobes before shooting to reduce the red eye phenomenon Red eye ...

Страница 34: ...ene backgrounds at the same time In addition the cross filter effect enhances street lamps or other lights with cross shaped rays The flash strobes in Red eye reduction mode and the recommended subject distance is 0 5 to 1 2 m When set the focus to AUTO the focus is adjusted to approximately 1 m to infinite To record subjects closer than 1 m use the Focus Preset page 36 Vivid nature mode The vivid...

Страница 35: ... V SCENE the indicator changes as follows Soft snap mode t Illumination snap mode t Vivid nature mode t No indicator Auto If the menu is currently displayed press MENU first so that the menu disappears To cancel Scene Selection press V SCENE repeatedly until the indicator disappears You cannot use the Scene Selection in shooting movies 23 1280 1280 ...

Страница 36: ...ass it is difficult to achieve a proper focus using the auto focus function The Focus preset function is useful in these cases Set the mode switch to STILL and press MENU The menu appears on the LCD screen You can also carry out this operation when the mode switch is set to MOVIE 0 5 m 0 2m 1 RETURN FOCUS SELFTIMER P EFFECT AUTO OFF OFF SIZE BURST 1280 1280 1280 MENU ...

Страница 37: ...v V on the control button then press EXEC You can select from the following distance settings AUTO No indicator 0 2 m 0 5 m 1 0 m and infinity To reactivate auto focusing Select AUTO in step 3 Focus setting information is approximate and should be used as a reference 2 RETURN SELFTIMER P EFFECT AUTO OFF OFF SIZE BURST 1280 1280 1280 FOCUS EXEC 3 AUTO 0 2m 1 0m 0 5m FOCUS EXEC ...

Страница 38: ...n If you release the shutter button before all five frames are shot the camera stops shooting as soon as you release the button Select with v V on the control button then press EXEC Select SIZE BURST with v V on the control button then press EXEC 1 RETURN FOCUS SELFTIMER P EFFECT AUTO OFF OFF SIZE BURST 1280 1280 1280 MENU 2 RETURN FOCUS SELFTIMER P EFFECT AUTO OFF OFF SIZE BURST 1280 1280 1280 EX...

Страница 39: ...ges are recorded as long as you hold down the shutter button The images are recorded in 640 480 size You cannot use the flash in this mode If you release the shutter button before the camera records five images only the images that were shot while the shutter button was held down are recorded The recording interval is approximately 0 5 seconds 3 SIZE BURST 1280 960 640 480 BURST 640 640 640 1280 1...

Страница 40: ...y out this operation when the mode switch is set to MOVIE SOLARIZE B W The light contrast is clearer and the picture looks like an illustration The picture is monochrome black and white SEPIA NEG ART The picture is sepia toned like an old photograph The color and brightness of the picture are reversed as in a negative 1 RETURN FOCUS SELFTIMER P EFFECT AUTO OFF OFF SIZE BURST 1280 1280 1280 MENU ...

Страница 41: ...ECT with v V on the control button then press EXEC Select the desired mode with v V on the control button then press EXEC To cancel Picture Effects Select OFF in step 3 2 RETURN FOCUS SELFTIMER AUTO OFF OFF SIZE BURST 1280 1280 1280 P EFFECT EXEC 3 P EFFECT SOLARIZE B W SEPIA NEG ART OFF EXEC ...

Страница 42: ...n You can view one image at a time displayed over the entire screen Index four image screen Four images are displayed simultaneously in separate panels on the screen For a detailed description of the screen indicators see page 98 For details on the movies see page 48 Images that are not VGA or SXGA size are displayed as thumbnails 8 8 100 0008 2002 12 00PM 7 4 1280 1280 1280 Single single image sc...

Страница 43: ...age you shot appears on the LCD screen If you close the lens cover while viewing images the power is off Select the desired still image with v V on the control button v To display the preceding image V To display the next image 1 PLAY 8 8 100 0008 2002 12 00PM 7 4 1280 1280 1280 POWER button 2 10 30AM 6 8 100 0006 2002 7 4 1280 1280 ...

Страница 44: ...age Set the mode switch to PLAY and press MENU The menu appears on the LCD screen Select with v V on the control button then press EXEC 1 PLAY RETURN DELETE DELETE ALL INDEX PRINT OFF MENU 2 RETURN DELETE DELETE ALL INDEX PRINT OFF EXEC ...

Страница 45: ...our image screen To display the next previous index screen Press v V on the control button to move the yellow border To return to the single image screen Select SINGLE in step 3 When 4 frames are displayed press EXEC to display the single image shown with the yellow border 3 RETURN DELETE DELETE ALL INDEX PRINT OFF EXEC ...

Страница 46: ...mera This mark is convenient when you have images printed at a shop that conforms with the DPOF Digital Print Order Format standard You cannot mark movies Set the mode switch to PLAY and display the image you want to print with v V on the control button 1 PLAY 6 8 10 30AM 100 0006 2002 7 4 1280 1280 ...

Страница 47: ...t mark in index image mode For details see page 44 and switch to index screen Select ON with v V on the control button then press EXEC When you press MENU the menu disappears and the print mark is marked on the displayed image To unmark the print mark Select OFF in step 3 The print mark disappears 2 RETURN DELETE DELETE ALL INDEX PRINT OFF EXEC MENU 3 PRINT ON OFF EXEC ...

Страница 48: ...he image The maximum recording time is 15 seconds The auto focus function can set the focus at any distance from approximately 1 0 m to infinity To shoot a subject at a closer distance than 1 0 m select 0 2 m or 0 5 m with the Focus Preset function page 36 Recording stops when the Memory Stick is full For details on the recording time for each image size see page 50 The flash does not function whe...

Страница 49: ...th MENU and v V on the control button to turn the LCD light on and off This is useful for extending the battery life For detailed descriptions of the indicators see page 97 To set the distance to the subject Set the mode switch to MOVIE and follow the procedure on page 36 To use the self timer Set the mode switch to MOVIE and follow the procedure on page 29 3 RECORDING 10 15s ...

Страница 50: ...apacity of the Memory Stick Refer to the following chart when you choose a Memory Stick The maximum shooting time is 15 seconds per recording The shooting time may vary depending on the shooting conditions For numbers of still images that can be recordable see page 25 Units minutes 160 112 8MB 5 min 20 sec 16MB 10 min 40 sec 32MB 21 min 40 sec 64MB 45 min 128MB 90 min 1 PLAY MOV00018 18 18 0 00 12...

Страница 51: ...To stop playback Press EXEC Indicators during viewing movies Indicators on the LCD screen are not recorded You can use LCD LIGHT under with MENU and v V on the control button to turn the LCD light on and off This is useful for extending the battery life For detailed descriptions of the indicators see page 98 2 MOV00016 16 18 0 00 10 30AM 2002 7 4 3 16 18 0 05 MOV00016 EXEC ...

Страница 52: ...to select the image you want to delete Press MENU and select with v V on the control button then press EXEC To delete the image in index image screen For details see page 44 and switch to index screen 1 PLAY 8 8 100 0008 10 30PM 1280 1280 2002 7 4 POWER button 2 RETURN DELETE DELETE ALL INDEX PRINT OFF EXEC MENU Deleting images ...

Страница 53: ...t To delete all the images Select DELETE ALL in step 3 Select OK with v V on the control button then press EXEC MEMORY STICK ACCESS appears on the LCD screen When this message disappears the image has been deleted To cancel deleting Select CANCEL in step 4 3 RETURN DELETE DELETE ALL INDEX PRINT OFF EXEC 4 CANCEL OK DELETE EXEC ...

Страница 54: ...so called initialization The Memory Stick provided with this camera and those available commercially are already formatted and can be used immediately When you format a Memory Stick be aware that all of the images in the Memory Stick will be permanently deleted Press the POWER button to turn on the power and press MENU The menu appears on the LCD screen This operation is available no matter what p...

Страница 55: ...C Select OK with v V on the control button then press EXEC The FORMATTING message appears When this message disappears the format is complete To cancel formatting Select CANCEL in step 4 When you format a Memory Stick be sure to remain sufficient power as FORMAT ERROR may occur 3 RETURN FORMAT EXEC 4 OK CANCEL FORMAT FORMATTING EXEC ...

Страница 56: ...ws 2000 Professional Windows Millennium Edition Windows XP Home Edition or Windows XP Professional The above OS must be installed at the factory Operation is not assured in an environment upgraded to the operating systems described above CPU MMX Pentium 200 MHz or faster USB connector Provided as standard Display 800 600 dots or more High Color 16 bit color 65 000 colors or more OS Steps Windows 9...

Страница 57: ...ations are not guaranteed when using a USB hub Operations are not guaranteed for all the recommended computer environments mentioned above USB mode There are two modes for a USB connection NORMAL and PTP modes The factory setting is the NORMAL mode This section describes the USB connection using the NORMAL mode When the camera is connected to your computer via a USB cable the camera can draw its p...

Страница 58: ...s used to easily transfer images from the camera to a computer x ImageMixer This application is used to display and edit images that are stored in a computer Start up your computer and insert the supplied CD ROM into the CD ROM drive The title screen appears If it does not appear double click My Computer t ImageMixer in that order Do not connect your camera to your computer at this time 1 Title sc...

Страница 59: ... driver When using Windows XP or Windows 2000 log on as Administrators The display settings should be 800 600 dots or more and High Color 16 bit color 65 000 colors or more When set to less than 800 600 dots or 256 colors or less the install title screen does not appear Click USB Driver on the title screen The InstallShield wizard screen appears When using Windows XP you need not install the USB d...

Страница 60: ...ck Next The USB driver installation starts When the installation is completed the screen informs you of completion Click Yes I want to restart my computer now then click Finish The installation is completed Your computer restarts 3 Click here 4 Click here ...

Страница 61: ...omputer with the supplied USB cable The USB driver is needed in order to use Image Transfer If the necessary driver is not already installed on your computer a screen that asks if you want to install the driver will appear Follow the instructions that appear on the screen Click Next When License Agreement screen appears click Yes Read the agreement carefully You must accept the terms of the agreem...

Страница 62: ...62 Click Next Select the folder to be installed then click Next Select the program folder then click Next 7 Click here 8 Click here ...

Страница 63: ...ext The Image Transfer driver installation starts When the installation is completed the screen informs you of completion Click Finish The InstallShield Wizard screen closes If you wish to continue with the installation of ImageMixer follow the procedure that begins on page 64 9 Click here 10 Click here ...

Страница 64: ...tup Language screen appears You can use the PIXELA ImageMixer for Sony software to copy view and edit images For details see the software s help files Select English then click OK The Welcome to the InstallShield Wizard screen appears 11 Click here 12 Click here ...

Страница 65: ... the install screen to close the install screen If DirectX8 0a or a later version is not installed in your computer the Information screen appears Click OK The Microsoft DirectX8 0a Setup screen appears When using Windows XP you need not install DirectX Restart your computer and proceed to page 66 You do not need to install DirectX again if DirectX Ver 8 0a or later is already installed in your co...

Страница 66: ...ectX R Setup screen then when the DirectX Setup screen appears click OK DirectX installation starts When installation is complete your computer restarts Remove the CD ROM Then you can establish the USB connection 15 Click here 16 ...

Страница 67: ...camera For further details on the Memory Stick see page 22 When your camera is connected to a computer it draws power from the computer side Removing the Nickel Metal Hydride batteries before connecting the camera is recommended in order to prevent battery deterioration Turn on your computer 1 Memory Stick 2 ...

Страница 68: ...e to your computer The camera is on Even if there are no batteries in the camera most computers that are recommended for use with this camera can supply power to the camera through the USB connection USB Bus Powered When using a desktop computer connect the USB cable to the USB connector on the rear panel When using Windows XP the copy wizard automatically appears on the desktop Proceed to page 72...

Страница 69: ...onnecting the USB cable from your computer or removing the Memory Stick from your camera during USB connection For Windows 2000 Me or XP users 1 Double click on the tasktray 2 Click Sony DSC then click Stop 3 Confirm the device on the confirmation screen then click OK 4 Click OK This step is unnecessary for Windows XP users 5 Disconnect the USB cable or remove the Memory Stick For Windows 98 or 98...

Страница 70: ... copied into these folders You can change the Image Transfer settings at the SETUP screen When using Windows XP see page 72 Copying images without using Image Transfer If you do not set to launch Image Transfer automatically you can copy images as following procedure a Double click My Computer then double click Removable Disk The contents of the Memory Stick inserted in your camera appear This sec...

Страница 71: ...verwrite it click No then change the file name When a removable disk icon is not shown 1 Right click My Computer then click Properties The System Properties screen appears 2 Confirm if other devices are already installed 1 Click Device Manager 2 Double click Other Devices 3 Confirm if there is a Sony DSC or Sony Handycam with a mark 3 If you find either of the devices above follow the steps below ...

Страница 72: ...le page 68 b Click Start then click My Computer c Right click Sony MemoryStick then click Properties d Cancel the setting 1 Set Content type to Pictures 2 Check Select an action to perform under Actions select Take no action then click Apply 3 Set Content type to Video files and Mixed content and repeat step 2 4 Click OK The Properties screen closes e Disconnect and then reconnect the USB cable pa...

Страница 73: ...opy to your computer and remove the checkmark then click Next The Picture Name and Destination screen appears d Specify the image group names to be copied and the copy destination then click Next Image copying starts When the copying is completed the Other Options screen appears The images are copied into the My Documents folder as an example e Select Nothing I m finished working with these pictur...

Страница 74: ...anings of the file names in the following table are as follows ssss stands for any number within the range from 0001 to 9999 Folder containing still image and Burst image data Folder containing movie data Folder File name File meaning 100MSDCF DSC0ssss JPG Still image file recorded normally Still image file recorded in Burst mode page 38 MOML0001 MOV0ssss MPG Movie file recorded normally page 48 ...

Страница 75: ...ction describes the procedure for copying images to the My Documents folder on pages 70 and 72 When using Windows XP double click Start t My Documents in that order You can use the PIXELA ImageMixer for Sony software to view images on your computer For details see the software s help files Double click the desired image file The image is displayed 1 2 ...

Страница 76: ...4 Sony USB Driver Sony USB Shim 6 When the message for confirmation is shown click OK 7 Select the desired language 8 Follow the instructions on each succeeding screen 9 Restart your computer and remove the CD ROM from the CD ROM drive 2 Preparing your camera For details see page 67 3 Connecting your camera to your computer For details see page 68 Removing the USB cable from your computer or the M...

Страница 77: ...the image files to the hard disk icon The image files are copied to your hard disk 5 Viewing the images on your computer 1 Double click the hard disk icon 2 Double click the desired image file in the folder containing the copied files The image file opens You can use the PIXELA ImageMixer for Sony software to copy images to your computer and to view images on your computer For details see the soft...

Страница 78: ...y service facility Batteries and power RESET button Symptom Cause Solution The battery remaining indicator is incorrect or sufficient battery remaining indicator is displayed but the power runs out soon You have used the camera for a long time in an extremely hot or an extremely cold location The batteries are discharged The battery contacts or the terminals on the battery Memory Stick cover are d...

Страница 79: ...lution Symptom Cause Solution The subject does not appear on the LCD screen The mode switch is set to PLAY p Set the mode switch to STILL or MOVIE pages 26 and 48 The image is out of focus The subject is too close The vivid nature mode is selected for the Scene Selection function The Focus preset function is selected p Make sure to position the lens farther away from the subject than the shortest ...

Страница 80: ...tion page 92 p Wait until charging is complete before you begin shooting with the camera p Set it to STILL page 26 p Set it to MOVIE page 48 The flash does not work The mode switch is set to PLAY or MOVIE The flash is set to no flash The vivid nature mode is selected for the Scene Selection function or Burst mode in the image size p Set it to STILL p Set the flash to auto no indicator Red eye redu...

Страница 81: ...Your camera cannot delete an image The write protect switch on the Memory Stick is set to the LOCK position p Set it to the recording position page 92 Even though you attempted to delete all of the files the Memory Stick is still not empty The Memory Stick contains a file with a file name or storage destination that was changed through the computer Even the DELETE ALL function will not erase files...

Страница 82: ...e before installing the USB driver so the device was not recognized by the computer No Memory Stick is inserted p Use the supplied USB cable page 68 p Disconnect the USB cable and connect it again firmly Make sure that USB MODE is displayed on the LCD screen pages 68 and 89 p Set it to NORMAL page 89 p Disconnect the USB cables except for the ones connected to the keyboard the mouse and your camer...

Страница 83: ...nter settings p Click on the HELP files for the PIXELA ImageMixer for Sony application software An error message appears when you set the supplied CD ROM in your computer The computer display is not set correctly p Set the computer display as follows Windows 800 600 dots or more High Color 16 bits 65 000 colors or more Macintosh 800 600 dots or more 32 000 colors or more Symptom Cause Solution Sym...

Страница 84: ...orks properly The power is on but the camera does not work The built in microcomputer is not working properly p Remove the batteries then install them again after about one minute and turn on the camera If the functions still do not work press the RESET button located on the bottom of the camera using a fine tipped object then turn the power on again page 78 If you press the RESET button all setti...

Страница 85: ... of the Memory Stick is insufficient You cannot record images Delete unnecessary images page 52 NO FILE No images have been recorded on the Memory Stick FILE ERROR An error occurred while playing back the image FOLDER ERROR A folder with the same name already exists on the Memory Stick INVALID OPERATION You are playing back a file that was created on equipment other than this camera You are attemp...

Страница 86: ...y Contact your Sony dealer or local authorized Sony service facility and inform them of the 5 digit code Example E61 10 C 32 ss Self diagnostics display Code Cause Corrective action C 32 ss There is trouble with your camera s hardware Turn the power off and on again page 19 C 13 ss The camera cannot read or write data in the Memory Stick Re insert the Memory Stick several times An unformatted Memo...

Страница 87: ...280 960 640 480 BURST Selects the image size when shooting still images pages 23 and 38 FOCUS xAUTO 0 2 m 0 5 m 1 0 m Selects the auto focus method or sets the focus preset page 36 SELFTIMER ON xOFF Sets the self timer page 29 P EFFECT xOFF NEG ART SEPIA B W SOLARIZE Sets the image special effects page 40 Item Setting Description FOCUS xAUTO 0 2 m 0 5 m 1 0 m Selects the auto focus method or sets ...

Страница 88: ...ages page 52 Cancels deleting of the image INDEX SINGLE Switches between four image display and single image display PRINT ON OFF Marks unmarks the print mark on still images you want to print page 46 Item Setting Description LCD LIGHT xON OFF Selects the brightness of the LCD light Selecting ON makes the screen bright and easy to see when using the camera in dark locations but also uses up the ba...

Страница 89: ...ntrol button shutter button Turns on the shutter sound The shutter sound is heard when you press the shutter button Turns off the beep shutter sound USB xNORMAL PTP Switches the USB mode page 57 LANG JPN xENGLISH Displays the menu items warnings and messages in Japanese Displays the menu items warnings and messages in English Item Setting Description FORMAT OK CANCEL Formats the Memory Stick Note ...

Страница 90: ...Wipe the lens with a soft cloth to remove fingerprints dust etc Cleaning the camera surface Clean the camera surface with a soft cloth slightly moistened with water then wipe the surface dry Do not use any type of solvent such as thinner alcohol or benzine as this may damage the finish or the casing After using your camera at the seashore or other dusty locations Clean your camera carefully Otherw...

Страница 91: ...sture to evaporate Note that if you attempt to shoot with moisture remaining inside the lens you will be unable to record clear images On internal rechargeable button battery This camera has an internal rechargeable button battery for maintaining the date and time and other settings regardless of whether the power is on or off This rechargeable button battery is continually charged as long as you ...

Страница 92: ... uses encryption technology Do not remove the Memory Stick while reading or writing data When you carry or store the Memory Stick put it in the case supplied with it You cannot record or delete images when the write protect switch is set to LOCK The position or the shape of the write protect switch may differ depending on the Memory Stick you use Data may be damaged in a location subject to the ef...

Страница 93: ...the LCD screen with LCD LIGHT to ON the battery power will be used up faster We recommend having spare batteries handy for two or three times the expected shooting time and try test shooting before actually using the camera Do not expose the battery to water The battery is not water resistant Battery life The battery life is limited Battery capacity decreases little by little as you use it more an...

Страница 94: ...G1 compliant without audio Recording media Memory Stick Flash Recommended distance 0 5 m to 1 8 m 1 6 to 6 0 ft Connector USB jack mini B LCD screen LCD panel used 2 5 cm 1 0 type TFT drive Total number of dots 64 460 293 220 dots Power general Used batteries AAA Nickel Metal Hydride batteries 2 2 4 V 5 V from USB cable Power consumption when shooting 1 25 W Operating temperature range 0 C to 40 C...

Страница 95: ... 2 Dimensions 70 29 74 mm 2 7 8 1 3 16 3 inches W H D Mass Approx 70g 2 5 oz Operating temperature range 0 C to 40 C 32 F to 104 F Accessories Size AAA Ni MH batteries 2 Ni MH battery charger 1 Power cord mains lead 1 USB cable 1 Neck strap 1 Memory Stick 8MB 1 CD ROM SPVD 008 1 Operating instructions 1 Design and specifications are subject to change without notice ...

Страница 96: ...dicator 36 F Image size indicator 23 38 G Remaining Memory Stick capacity indicator H Scene selection indicator 34 I Remaining number of recordable images indicator J Self diagnostics function indicator 86 K Self timer indicator 30 L Low battery warning indicator 15 1280 1280 1280 400 C 32 ss SLRZ 1 2 3 4 5 6 7 9 8 0 qa qs Page numbers in parentheses indicate the location of additional important i...

Страница 97: ...cator 36 E Low battery warning indicator 15 F Status indicator 48 G Remaining Memory Stick capacity indicator H Recording time maximum recordable time indicator 50 I Self diagnostics function indicator 86 J Self timer indicator 30 1 2 3 4 5 6 7 8 9 0 STBY SLRZ 12 55 C 32 ss Page numbers in parentheses indicate the location of additional important information ...

Страница 98: ...playback image When playing back moving images A Recording mode indicator 48 B File name 50 C Image number Number of images recorded in Memory Stick D Counter E Recording date of the playback image 100 0011 2002 7 4 1280 1280 1280 11 12 9 30AM 1 2 3 4 5 6 6 8 0 12 1 3 4 MOV00006 2002 7 4 10 30AM 2 5 Page numbers in parentheses indicate the location of additional important information ...

Страница 99: ...atteries 12 remaining indicator 15 Battery life 17 BEEP 89 Burst 38 C Charging charging the batteries 12 charging time 15 Cleaning 90 Clock set 20 Computer copying images 56 70 Image Transfer 61 ImageMixer 64 USB cable 68 USB driver 58 Control button 11 Copying images 56 70 D Deleting images 52 DPOF 46 E EXEC 24 Exif 94 ...

Страница 100: ...e destinations 74 image size 23 25 87 Index screen 44 Installation Image Transfer 61 ImageMixer 64 USB driver 58 J JPEG 26 L LCD screen DISPLAY 29 96 LCD LIGHT 28 M Memory Stick formatting a Memory Stick 54 inserting removing a Memory Stick 22 number of images that can be saved shooting time 25 50 MENU 23 Menu settings 87 Mode switch 10 Moisture condensation 91 Movie shooting movies 48 shooting ti...

Страница 101: ...ting the date and time 20 Shooting mode auto adjustment mode 26 Burst 38 movie 48 Single image screen 43 Still image playback Viewing the images on your computer 75 Still image shooting auto focus 26 image size 23 number of images that can be saved 25 picture effect 40 Scene Selection 34 using auto adjustment mode 26 using the flash 32 using the self timer 29 Still image viewing index screen 44 si...

Страница 102: ...102 U USB 56 69 USB Bus Powered 57 Using your camera abroad 90 V VGA 17 18 Viewing the images on your computer 75 Viewing movies on the LCD screen 50 W Warnings and notice messages 85 ...

Страница 103: ......

Страница 104: ...Sony Corporation Printed in Japan 307655914 The Sony customer support web page URL is as follows Printed on recycled paper using VOC Volatile Organic Compound free vegetable oil based ink ...

Отзывы: