background image

20

EN

Advanced Features

To switch from the handset to the base
phone

1

Press 

(HOLD)

 on the handset.

The TALK/BATT LOW lamp and
the LINE lamp on the base phone
will flash slowly.

2

Press 

(SPEAKERPHONE)

.

The LINE lamp on the base
phone will light up.

The TALK/BATT LOW lamp will
goes off.

3

When you are done talking, press

(SPEAKERPHONE)

 again.

Switching the phones during a call (continued)

TALK/BATT
LOW lamp

(SPEAKERPHONE)

LINE lamp

Содержание SPP-206

Страница 1: ...Operating Instructions Manual de instrucciones SPP 206 1998 by Sony Corporation ES Cordless Telephone 3 864 215 11 1 EN ...

Страница 2: ...llation unless proper ventilation is provided 7 This product should be operated only from the type of power source indicated on the marking label If you are not sure of the type of power supply to your home consult your dealer or local power company 8 Do not allow anything to rest on the power cord Do not locate this product where the cord will be abused by persons walking on it 9 Do not overload ...

Страница 3: ...to the telephone company 2 The applicable registration jack connector USOC RJ11C is used for this equipment 3 This equipment is designed to be connected to the telephone network or premises wiring using a compatible modular jack which is Part 68 compliant The FCC compliant telephone cord and modular plug is provided with this equipment 4 The REN is used to determine the quantity of devices which m...

Страница 4: ... against harmful interference in a residential installation This equipment generates uses and can radiate radio frequency energy and if not installed and used in accordance with the instructions may cause harmful interference to radio communications However there is no guarantee that interference will not occur in a particular installation If this equipment does cause harmful interference to radio...

Страница 5: ...ne 19 Switching the phones during a call 19 To switch from the base phone to the handset 20 To switch from the handset to the base phone 21 Talking between the handset and the base phone Intercom 21 To talk from the handset to the base phone 21 To talk from the base phone to the handset 22 Transferring a call 22 To transfer from the base phone to the handset 23 To transfer from the handset to the ...

Страница 6: ...tal security code to provide protection against unintentional access to your base phone This security code blocks other cordless handsets to make calls through your base phone A random security code will be assigned automatically between your base phone and handset when you charge the battery pack for the first time If you want to reset the digital security code see page 25 Base phone Handset Step...

Страница 7: ...p 1 Base phone Handset Rechargeable battery pack BP T16 AC power adaptor AC T48 Checking the package contents Make sure you have received the following items in the package If anything is missing contact your local Sony dealer Wall bracket stand for base phone ...

Страница 8: ...elephone CAUTION The cordless telephone operates at a frequency that may cause interference to nearby TVs and VCRs the base phone should not be placed near or on top of a TV or VCR and if interference is experienced moving the cordless telephone farther away from the TV or VCR will often reduce or eliminate the interference Near a central location and on a level surface Setting up the base phone D...

Страница 9: ...elephone outlet 3 Connect the AC power adaptor to the DC IN 9V jack and to an AC outlet 4 Fully extend the antenna Make sure it points toward the ceiling Route the cord 4 3 AC power adaptor supplied 2 To LINE To DC IN 9 V Connecting the base phone If you want to hang the base phone on the wall see page 26 Telephone line cord supplied continued To AC outlet To telephone outlet Aligh the marks 1 ...

Страница 10: ...istance To remove the wall bracket press the upper tab Choosing the dialing mode For the telephone to work properly select an appropriate dialing mode tone or pulse Polarity of the plug Step 2 Setting up the base phone continued Modular Depending on your dialing system set the DIAL MODE switch as follows If your dialing system is Set the switch to Tone TONE Pulse PULSE If you are not sure of your ...

Страница 11: ...e handset 2 Connect the battery connector with correct polarity black and red cords 3 Insert the battery pack Then close the lid 4 Place the handset on the base phone The CHARGE lamp lights up when the handset is properly seated on the charge terminals of the base phone Charge the battery pack for more than 12 hours so that the battery is fully charged Step 3 continued CHARGE lamp Red Black ...

Страница 12: ...ys lighted when the handset is placed on the base phone even if the battery pack has been fully charged The battery works best when charged after several calls If you leave the battery pack in the handset without charging it the battery pack will be completely discharged It may require several times of charging to recover to its full capacity When to purchase a new battery pack If the battery last...

Страница 13: ...en you press CHANNEL move closer to the base phone Notes Before dialing make sure you can hear the dial tone otherwise you cannot dial correctly When the TALK BATT LOW lamp lights up by pressing TALK the LINE lamp on the base phone lights up simultaneously If you press TALK while dialing or storing numbers on the base phone you will hear a busy tone If the handset battery becomes weak during a cal...

Страница 14: ...u may find that the volume drops suddenly This is due to a circuit in the telephone designed to protect against feedback In such cases lower the speaker volume slightly Redialing 1 Press TALK or pick up the handset from the base phone The TALK BATT LOW lamp and the dialing keys on the handset light up If you re at the base phone press SPEAKERPHONE The LINE lamp lights up 2 Press REDIAL PAUSE to re...

Страница 15: ... conversation Press FLASH Press FLASH again to return to the first caller Press SPEED DIAL PGM and 1 to turn the ringer on or 0 to turn it off Then press SPEED DIAL PGM Set the RINGER switch to H high L low or OFF Additional tasks Receiving calls FLASH TALK BATT LOW lamp of the handset Adjust the ringer volume of the base phone Contact your telephone company to subscribe to this service HOLD 0 1 S...

Страница 16: ...ation beep and the number is stored The TALK BATT LOW lamp goes off Speed dialing TALK BATT LOW lamp You can dial with a touch of a few keys by storing a phone number on a dialing key You can store up to 10 phone numbers separately on the handset and on the base phone Storing phone numbers on the handset Notes Do not allow more than 20 seconds to elapse between each step of the procedure The hands...

Страница 17: ...evious number dialed Press REDIAL PAUSE directly after step 2 then go to step 4 1 Press SPEED DIAL PGM The LINE lamp flashes quickly 2 Press one of the dialing keys 0 to 9 for the phone number to be stored You will hear a confirmation beep 3 Enter the phone number you want to store You can enter up to 16 digits including a tone and a pause each of which is counted as one digit 4 Press SPEED DIAL P...

Страница 18: ...evious page Making calls with speed dialing on the handset 1 Press TALK The TALK BATT LOW lamp and the dialing keys light up 2 Press SPEED DIAL PGM 3 Enter the desired speed dialing number 0 to 9 The phone number stored in the speed dialing number will be dialed Making calls with speed dialing on the base phone 1 Press SPEAKERPHONE The LINE lamp lights up 2 Press SPEED DIAL PGM 3 Enter the desired...

Страница 19: ...e handset will flash slowly 2 Press TALK or pick up the handset from the base phone The LINE lamp and the TALK BATT LOW lamp on the handset will light up The dialing keys on the handset will light up 3 When you are done talking press OFF or replace the handset to the base phone continued Note If you do not press HOLD in step 1 the call will not be switched to another phone and the conversation wil...

Страница 20: ...TT LOW lamp and the LINE lamp on the base phone will flash slowly 2 Press SPEAKERPHONE The LINE lamp on the base phone will light up The TALK BATT LOW lamp will goes off 3 When you are done talking press SPEAKERPHONE again Switching the phones during a call continued TALK BATT LOW lamp SPEAKERPHONE LINE lamp ...

Страница 21: ...RPHONE If no one answers the phone Press INTERCOM again Note If there is an incoming call while on the intercom only the base phone rings at a low level To answer the call finish the intercom first To talk from the handset to the base phone Press INTERCOM on the handset The dialing keys light up the handset and base phone ring When a person at the base phone presses INTERCOM or SPEAKERPHONE you ca...

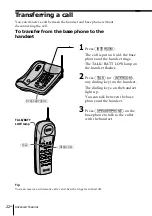
Страница 22: ... handset rings The TALK BATT LOW lamp on the handset flashes 2 Press TALK or INTERCOM any dialing key on the handset The dialing keys on the handset light up You can talk between the base phone and the handset 3 Press SPEAKERPHONE on the base phone to talk to the caller with the handset Tip You can receive an intercom call even when the ringer is turned off Transferring a call SPEAKERPHONE TALK TA...

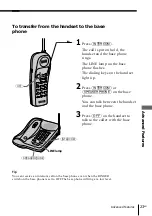
Страница 23: ...s The dialing keys on the handset light up 2 Press INTERCOM or SPEAKERPHONE on the base phone You can talk between the handset and the base phone 3 Press OFF on the handset to talk to the caller with the base phone Tip You can receive an intercom call on the base phone even when the RINGER switch on the base phone is set to OFF The base phone will ring at a low level LINE lamp OFF SPEAKERPHONE INT...

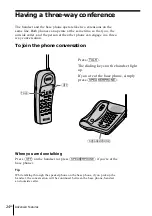
Страница 24: ...the same line Both phones can operate at the same time so that you the outside caller and the person at the other phone can engage in a three way conversation SPEAKERPHONE OFF When you are done talking Press OFF on the handset or press SPEAKERPHONE if you re at the base phone Tip While talking through the speakerphone on the base phone if you pick up the handset the conversation will be continued ...

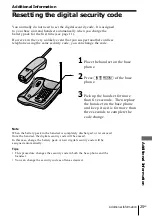
Страница 25: ...t on the base phone 2 Press INTERCOM of the base phone 3 Pick up the handset for more than five seconds Then replace the handset on the base phone and keep it as it is for more than three seconds to complete the code change Note When the battery pack in the handset is completely discharged or is removed from the handset the digital security code will be erased In this case charge the battery pack ...

Страница 26: ...arks of the wall bracket with those of the base phone 4 Plug the telephone line cord to the telephone outlet and hook the base phone to the wall plate 5 Plug the AC power adaptor to an AC outlet Then fully extend the antenna so that it points towards the ceiling Tip To remove the wall bracket press the lower tabs 1 2 Telephone line cord AC power adaptor cord Wall bracket Wall plate Hang up tab AC ...

Страница 27: ... finish of the cabinet If the charge terminals of the base unit and handset are soiled wipe them with a soft cloth If you have any questions or problems concerning your phone please consult your nearest Sony dealer NICKEL CADMIUM BATTERY BATTERY MUST BE RECYCLED OR DISPOSED OF PROPERLY Nickel Cadmium batteries are recyclable You can help preserve our environment by returning your unwanted batterie...

Страница 28: ...arge the battery pack Make sure the telephone line cord is securely connected to the telephone outlet Make sure the battery is fully charged page 11 Make sure the dialing mode is set correctly page 10 Before dialing make sure you can hear a dial tone Make sure the last dialed number is really the one you want to dial The number you last dialed exceeds 32 digits including the tone and pause digits ...

Страница 29: ...store a speed dialing number on the base phone You have entered a speed dialing number for which no phone number has been stored Store a correct number page 16 17 The handset may be engaged in conversation The battery may be weak Charge the battery for more than 12 hours page 11 Move the handset closer to the base phone Place the base phone away from noise sources page 8 Wipe the charge terminals ...

Страница 30: ... Approx 14 days Dimensions Approx 56 x 200 x 40 mm w h d antenna excluded approx 2 1 4 x 7 7 8 x 1 5 8 inches Antenna Approx 105 mm approx 6 inches Mass Approx 230 g approx 8 oz battery included Base phone Power source DC 9 V from AC power adaptor Battery charging time Approx 12 hours Dimensions Approx 160 x 55 x 225 mm w h d antenna excluded approx 6 3 8 x 2 1 4 x 8 7 8 inches Antenna Approx 540 ...

Страница 31: ... I J K Intercom 21 L Location base phone 8 M N O Making calls 13 Mounting the base phone on a wall 26 P Q Package contents 7 Pulse dialing 10 R Receiving calls 15 Redialing 14 Ringer turning on off 15 S Security code system 6 Setting up base phone 8 handset 11 Speakerphone 14 15 Speed dialing 16 Switching the phones during a call 19 T U Talking between the phones 21 Three way conference 24 Tone di...

Страница 32: ...ocubralasranurasde ventilaciónyevitedejarlosobrela cama sofá sillónosuperficiesimilar Esteproductonuncadebecolocarse cercadeunradiadorocalefacción o encimadeéste Esteproductonodebe colocarseenunainstalación empotradasalvoqueseprovea ventilaciónapropiada 7 Esteproductosólodebeoperarse desdeeltipodefuentede alimentaciónindicadaenlaetiqueta deespecificaciones Sinoestáseguro deltipodefuentedealimentac...

Страница 33: ... debe cargar el paquete de pilas suministrado o identificado para uso con este producto de acuerdo con las instrucciones y limitaciones especificadas en el manual de instrucciones correspondiente al producto 6 Observe la orientación de polaridad correcta entre el paquete de pilas y el cargador de pilas INFORMACIÓN GENERAL SOBRE LOS TELÉFONOS 1 Este equipo cumple con la Parte 68 de las reglas de la...

Страница 34: ... punta como por la mañana temprano o a últimas horas de la tarde Precaución Se le advierte que cualquier cambio o modificación no aprobado expresamente en el presente manual podría anular su autorización para operar este equipo Nota Este equipo se ha sometido a pruebas y se ha determinado que cumple los límites para un aparato digital Clase B de conformidad con la Parte 15 de las Reglas FCC Dichos...

Страница 35: ...o base 19 Cambio de teléfonos durante una llamada 19 Para cambiar del teléfono base al microteléfono 20 Para cambiar del microteléfono al teléfono base 21 Conversación entre el microteléfono y el teléfono base Intercomunicación 21 Para conversar del microteléfono al teléfono base 21 Para conversar del teléfono base al microteléfono 22 Transferencia de una llamada 22 Para transferir del teléfono ba...

Страница 36: ...ón contra el acceso involuntario en su teléfono base Este código de seguridad impide que otros microteléfonos inalámbricos puedan realizar llamadas a través de su teléfono base Cuando cargue por primera vez la batería se asignará automáticamente un código de seguridad aleatorio entre su teléfono base y el microteléfono Si desea reponer el código digital de seguridad consulte la página 25 Teléfono ...

Страница 37: ...ería BP T16 Adaptador de alimentación de CA AC T48 Comprobación del contenido del paquete Compruebe si con el paquete ha recibido los ítemes siguientes Si falta alguno póngase en contacto con su proveedor Sony Soporte para instalación mural pedestal del teléfono base Microteléfono ...

Страница 38: ...o funciona con una frecuencia que puede causar interferencias en televisores y videograbadoras cercanos el teléfono base no deberá colocarse cerca de un televisor o una videograbadora ni sobre ellos y si experimenta intrerferencias el alejar el teléfono inalámbrico del televisor o la videograbadora a menudo reducirá o eliminará tales interferencias Cerca de un lugar central y sobre una superficie ...

Страница 39: ...fónica 3 Conecte el cable de alimentación de CA a la toma DC IN 9V y a un tomacorriente de CA 4 Extienda completamente la antena Cerciórese de que quede apuntando hacia el techo Enrute el cable 4 3 Adaptador de CA suministrado 2 A LINE A DC IN 9 V Conexión del teléfono base Si desea colgar el teléfono base de una pared consulte la página 26 Cable de línea telefónica suministrado continúa A un toma...

Страница 40: ...olicitar ayuda Para extraer el soporte para instalación mural presione las lengüetas superiores Elección del modo de marcación Para que el teléfono funcione correctamente seleccione el modo de marcación apropiado por tonos o por pulsos Polaridad de la clavija Paso 2 Instalación del teléfono base continuación Modular Dependiendo de su sistema de marcación ajuste el selector DIAL MODE de la forma si...

Страница 41: ...o 2 Conecte el conector con la polaridad correcta conductores negro y rojo 3 Inserte la batería Después cierre la tapa 4 Coloque el microteléfono en el teléfono base La lámpara CHARGE se encenderá cuando el microteléfono esté adecuadamente asentado en los terminales de carga del teléfono base Cargue la batería durante más de 12 horas para que quede completamente carbada Paso 3 continúa Lámpara CHA...

Страница 42: ...base estará siempre encendida cuando el microteléfono esté colocado en el teléfono base incluso aunque la batería esté completamente cargada La batería rendirá al máximo cuando se haya cargado después de varias llamadas Si deja la batería en el microteléfono sin cargarla se descargará completamente Para que vuelva a recuperar su plena capacidad pueden requerirse varias cargas Cuando adquiera una n...

Страница 43: ...ese el teléfono base 2 Marque el número de teléfono 3 Cuando termine de conversar presione OFF o cuelgue el microteléfono en el teléfono base La lámpara TALK BATT LOW del microteléfono y la lámpara LINE del teléfono base se apagarán Lámpara TALK BATT LOW TONE CHANNEL HOLD Selector VOL Si oye cinco pitidos cortos de error cuando presione CHANNEL acérquese al teléfono base Notas Antes de marcar cerc...

Страница 44: ...nde repentinamente Esto se debe a un circuito del teléfono diseñado para protección contra la retroalimentación acústica En tal caso reduzca ligeramente el volumen del altavoz Repetición de la marcación 1 Presione TALK o tome el microteléfono del teléfono base La lámpara TALK BATT LOW y las teclas de marcación del microteléfono se encenderán Si está en el teléfono base presione SPEAKERPHONE La lám...

Страница 45: ...del teléfono base cuando se encuentre colocado en el mismo La lámpara TALK BATT LOW del microteléfono y la lámpara LINE del teléfono base se encenderán 2 Cuando termine de conversar presione OFF o coloque el microteléfono en el teléfono base La lámpara TALK BATT LOW del microteléfono y la lámpara LINE del teléfono base se apagarán Tareas adicionales Recepción de llamadas FLASH Lámpara TALK BATT LO...

Страница 46: ...para TALK BATT LOW se apagará Notas No deje que transcurran más de 20 segundos entre cada paso del procedimiento Para almacenar números de teléfono el microteléfono deberá estar desconectado Sugerencia Si ha introducido un número erróneo presione SPEED DIAL PGM y vuelva a comenzar desde el principio Para almacenar el número previamente marcado Presione REDIAL PAUSE directamente después del paso 2 ...

Страница 47: ... pitido largo de confirmación y el número se almacenará La lámpara LINE se apagará Notas No deje que transcurran más de 20 segundos entre cada paso del procedimiento Usted no podrá almacenar números de teléfono ene l teléfono base mientras esté utilizando el microteléfono La lámpara LINE se encenderá para indicar esta condición Sugerencia Si ha introducido un número erróneo presione SPEED DIAL PGM...

Страница 48: ...madas con marcación abreviada desde el microteléfono 1 Presione TALK La lámpara TALK BATT LOW y las teclas de marcación se encenderán 2 Presione SPEED DIAL PGM 3 Introduzca el número de marcación abreviada deseado 0 a 9 El número de teléfono almacenado en el número de marcación abreviada se marcará Realización de llamadas con marcación abreviada desde el teléfono base 1 Presione SPEAKERPHONE La lá...

Страница 49: ...padeará lentamente 2 Presione TALK o descuelgue el microteléfono del teléfono base La lámpara LINE y la lámpara TALK BATT LOW del microteléfono se encenderán Las teclas de marcación del microteléfono se encenderán 3 Cuando termine de conversar presione OFF o coloque el microteléfono en el teléfono base Nota Si no presiona HOLD en el paso 1 la llamada no cambiará a otro teléfono y la conversación c...

Страница 50: ...OW y la lámpara LINE del teléfono base parpadearán lentamente 2 Presione SPEAKERPHONE La lámpara LINE del teléfono base se encenderá La lámpara TALK BATT LOW se apagará 3 Cuando termine de conversar vuelva a presionar SPEAKERPHONE Cambio de teléfonos durante una llamada continuación Lámpara TALK BATT LOW SPEAKERPHONE Lámpara LINE ...

Страница 51: ... el teléfono base sonarán Cuando la persona del microteléfono presione TALK INTERCOM o cualquier tecla de marcación usted podrá conversar Lla llamada al microteléfono se parará al presionar OFF del microteléfono La lámpara TALK BATT LOW del microteléfono se encenderá Las teclas de marcación del microteléfono se encenderán Cuando termine de conversar Presione SPEAKERPHONE Si nadie responde al teléf...

Страница 52: ...léfono parpadeará 2 Presione TALK INTERCOM o cualquier tecla de marcación del microteléfono Las teclas de marcación del microteléfono se encenderán Usted podrá conversar entre el teléfono base y el microteléfono 3 Presione SPEAKERPHONE del teléfono base para conversar a través del microteléfono con la persona del exterior Sugerencia Usted podrá recibir una llamada de intercomunicación incluso aunq...

Страница 53: ...microteléfono se encenderán 2 Presione INTERCOM o SPEAKERPHONE del teléfono base Usted podrá conversar entre el teléfono base y el microteléfono 3 Presione OFF del microteléfono para conversar a través del teléfono base con la persona del exterior Sugerencia Usted podrá recibir una llamada de intercomunicación en el teléfono base incluso aunque el selector RINGER del teléfono base esté en OFF El t...

Страница 54: ...sación tripartita Para unirse a la conversación telefónica Presione TALK Las de marcación del microteléfono se encenderán Si usted está en el teléfono base simplemente presione SPEAKERPHONE SPEAKERPHONE OFF Cuando termine de conversar Presione OFF del microteléfono o presione SPEAKERPHONE si está en el teléfono base Sugerencia Cuando esté conversando a través del interfono del teléfono base si des...

Страница 55: ...microteléfono en el teléfono base 2 Presione INTERCOM del teléfono base 3 Tome el microteléfono durante más de cinco segundos Después devuelva el microteléfono al teléfono base y déjelo así durante más de tres segundos para completar el cambio del código Nota Cuando la batería del microteléfono se haya descargado completamente o cuando la extraiga el código de seguridad se borrará En este caso car...

Страница 56: ... cable de línea telefónica en la toma telefónica y enganche el teléfono base en la placa mural 5 Enchufe el cable del adaptador de alimentación de CA en un tomacorriente de CA Después extienda completamente la antena de forma que quede apuntando hacia el techo Sugerencia Para extraer el soporte para instalación mural presione las lengüetas inferiores 1 2 Cable de línea telefónica Cable del adaptad...

Страница 57: ... de su electrólito Mantenimiento Limpie el exterior con un paño suave ligeramente humedecido en agua o en una solución de detergente neutro No utilice limpiadores abrasivos desengrasantes ni disolventes como el alcohol o la bencina ya que podrían dañar el acabado Si los terminales de carga de la unidad base y el auricular están sucios límpielos con un paño suave En caso de duda o problemas con el ...

Страница 58: ...seguridad pagina6 Cercióresedequeelgeneradordellamadaesté activado página15 Acerqueelmicroteléfonoateléfonobase Presione CHANNEL delmicroteléfonoparapasara uncanalqueofrezcamejorrecepción Coloqueelteléfonobasealejadodefuentesderuido página8 Labateríaestádébil Cárgueladurantemásde12 horas página11 Tengaencuentaqueustednopodráutilizarel microteléfonosinhabercargadosubateríadurante másdeunminuto Prob...

Страница 59: ...alteléfonobase Alejeelteléfonobasedefuentesderuido página8 Limpielosterminalesdecargadelteléfonobaseydel microteléfonoconunpañosuaveparamejorarsu contacto Compruebesielmicroteléfonoestáadecuadamente colocadoenelteléfonobase Labateríasecargódurantemenosde12horas debidoauncortedelsuministroeléctrico etc Laduraciónútildelabateríahaexpirado Problema Noesposiblealmacenarun númerodemarcación abreviada S...

Страница 60: ...nversación Aprox 7 horas Espera Aprox 14 días Dimensiones Aprox 56 x 200 x 40 mm an al prf excluyendo la antena aprox 2 1 4 x 7 7 8 x 1 5 8 pulgadas Antena Aprox 105 mm aprox 6 pulgadas Masa Aprox 230 g aprox 8 oz incluyendo la batería Teléfono base Fuente de alimentación DC 9 V del adaptador de alimentación de CA Tiempo de carga de la batería Aprox 12 horas Dimensiones Aprox 160 x 55 x 225 mm an ...

Страница 61: ...ción microteléfono 11 teléfono base 8 Interfono 14 15 Intercomunicación 21 M N O P Q Marcación abreviada 16 Marcación por pulsos 10 Marcación por tonos cambio a 13 modo de marcación 10 Modo de marcación elección 10 cambio temporal a marcación por tonos 13 Montaje del teléfono base en una pared 26 R Realización de llamadas 13 Recepción de llamadas 15 Repetición de la marcación 14 Retención 13 15 S ...

Страница 62: ......

Страница 63: ...Para clientes en EE UU ...

Страница 64: ...Sony Corporation Printed in the Philippines For the customers in the USA UDZZ01601EZ ...

Отзывы: