background image

Setting up your SmartBand 2

Preparing to use your SmartBand 2

For your SmartBand 2 to work properly, you must install the latest version of the

SmartBand 2 application on the Android™ device, and then pair and connect it with

your Android™ device. You also need to install the Lifelog application, which adds

extra features and functions that allow you to, for example, see more detailed

information about your daily activities.
You can set up your SmartBand 2 using NFC, which launches the pairing, connection

and setup procedures automatically, or you can use the Bluetooth® option to do the

steps manually.
A setup wizard in the SmartBand 2 application guides you through the process of

setting up your SmartBand 2 for the first time.

All applications required for the SmartBand 2 to work are available on Google Play™.

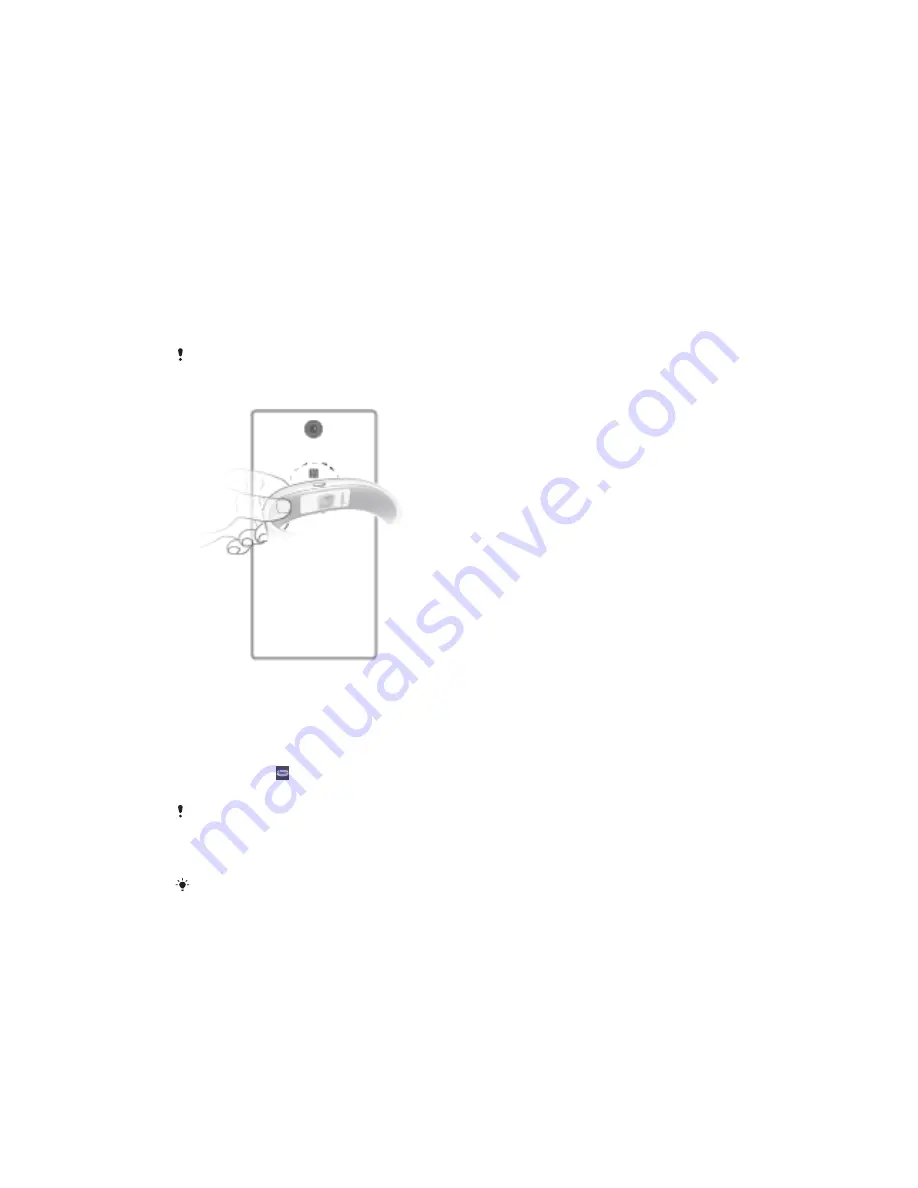
To set up your SmartBand 2 using NFC

1

Make sure that your SmartBand 2 is fully charged.

2

Android™ device:

 Make sure that the NFC function is turned on and that the

screen is active and unlocked.

3

Place the Android™ device over your SmartBand 2 so that the NFC detection

area of each device touches the other, then follow the instructions on the

Android™ device to install the SmartBand 2 application and the Lifelog

application.   appears briefly in the status bar and permanently in the

Notification panel when a connection with the SmartBand 2 is active.

When starting your SmartBand 2 for the first time and the SmartBand 2 has not been paired

with a device before, your SmartBand 2 automatically enters pairing mode. If your SmartBand

2 is turned on and has been paired before, it tries to reconnect to the last paired device

instead. Your SmartBand 2 can only be paired to one device at a time.

You can set up your SmartBand 2 using NFC even when the SmartBand 2 is turned off. The

SmartBand 2 turns on when the NFC detection area touches it. If you have problems pairing

your SmartBand 2 with an Android™ device using NFC, try to connect manually using

Bluetooth®. You can drag down the status bar to open the Notification panel and get quick

access to the SmartBand 2 application and the Lifelog application.

7

This is an Internet version of this publication. © Print only for private use.

Содержание SmartBand 2 SWR12

Страница 1: ...User guide SmartBand 2 for Android SWR12 ...

Страница 2: ...ed 9 Measuring Stress Recovery 9 Smart wake up alarms 11 Out of range alert notifications 12 Do not disturb 13 Remote control 13 Connecting to Google Fit 14 Notification lights 14 Logging your activities using the Lifelog application 16 Using the Lifelog application 16 Setting goals 18 Editing logged activities 18 Synchronising data with the Lifelog application 19 Important information 20 Using yo...

Страница 3: ...ack your progress in a comprehensive and easily viewable format When used with a compatible Android device you can use the SmartBand 2 to receive notifications and manage your alarms and phone calls Before you can get started using your SmartBand 2 you must download the SmartBand 2 application and set up the accessory to work with your phone or tablet Refer to the relevant setup information for mo...

Страница 4: ...n off state when the charger is unplugged Battery notification light status Red light Battery is charging and the charge level is less than 15 Orange light Battery is charging and the charge level is between 15 and 90 Green light Battery is charging and the charge level is greater than 90 To check the battery level of your SmartBand 2 From the main application screen of your Android device find an...

Страница 5: ...for the SmartBand 2 to monitor your pulse it should stay in place on your wrist While you re exercising tighten the wristband a bit When you re done loosen the wristband Caring for your SmartBand 2 and your skin To help avoid skin irritation correctly adjust the bracelet s fit around your wrist and clean your SmartBand 2 regularly Rinse the SmartBand 2 with fresh water under a faucet and dry the d...

Страница 6: ... SmartBand 2 for the first time it automatically enters pairing mode and notification light A flashes until your SmartBand 2 is connected to a device To turn off the SmartBand 2 Press and hold down the power key until your SmartBand 2 vibrates All notification lights are on simultaneously and then turn off one by one 6 This is an Internet version of this publication Print only for private use ...

Страница 7: ...d unlocked 3 Place the Android device over your SmartBand 2 so that the NFC detection area of each device touches the other then follow the instructions on the Android device to install the SmartBand 2 application and the Lifelog application appears briefly in the status bar and permanently in the Notification panel when a connection with the SmartBand 2 is active When starting your SmartBand 2 fo...

Страница 8: ...nnecting or you can use NFC to reconnect the two devices To force the SmartBand 2 to try reconnecting Briefly press the power key To reconnect your SmartBand 2 using NFC 1 Android device Make sure that the NFC function is turned on and that the screen is active and unlocked 2 Place the Android device over your SmartBand 2 so that the NFC detection area of each device touches the other The SmartBan...

Страница 9: ...ess of reading notifications for your SmartBand 2 To select which notifications to forward to your SmartBand 2 1 From the main application screen of your Android device find and tap SmartBand 2 Settings Get notified 2 Drag the sliders beside Off and Notifications to the on position 3 Tap Get notifications from then select the desired apps To mute the ringtone for an incoming call Briefly press the...

Страница 10: ...rs while you sleep There are factors that can affect your recovery measurements A physically active lifestyle healthy nutrition lower consumption of alcohol and elimination of stress factors make it possible to improve recovery during sleep in the long run Avoiding highly strenuous physical activities and slowing down mental activities well before going to bed also have a positive effect on recove...

Страница 11: ...lights start to flash orange alternately and then together when the reading is complete The results are then displayed on the SmartBand 2 and Lifelog application on your Android device 2 To end the measurement double press the power key again If the SmartBand 2 cannot detect your pulse it vibrates three times and the notification lights start to flash alternately in orange If the heart rate sensor...

Страница 12: ...om the main application screen of your Android device find and tap SmartBand 2 Settings 2 Tap Smart wake up then tap the alarm that you want to edit 3 Edit the options as desired 4 When you re finished tap SAVE To delete a Smart wake up alarm 1 From the main application screen of your Android device find and tap SmartBand 2 Settings 2 Tap Smart wake up then tap the alarm that you want to delete 3 ...

Страница 13: ...tap OK 4 Tap End time and select the relevant values for the hour and minute then tap OK Remote control You can use your SmartBand 2 to control media playback and the Find phone application on the connected Android device You can select which application you want to control using the SmartBand 2 If you select a media application you can manage media playback on the Android device If you select the...

Страница 14: ...der beside Off to the on position then follow the on screen instructions to confirm your Google account Notification lights You can determine the status of your SmartBand 2 via the three notification lights on the device Notification light activity Status of the SmartBand 2 All lights illuminating in white one by one then turning off simultaneously Powered on All lights illuminating in white simul...

Страница 15: ...Light A flashing in the same colour as on your Android device for 5 minutes Other notifications 15 This is an Internet version of this publication Print only for private use ...

Страница 16: ...your daily activities including any exercise you perform Take note however that SmartWear products are not medical devices and data from Lifelog is not meant to replace the advice of a qualified medical professional 1 View detailed information about a Life Bookmark 2 View list of Lifelog insights such as comparison of steps with others 3 View all logged activities for the selected day 4 View menu ...

Страница 17: ...ings Profile 3 Find and tap Running stride length 4 Unmark the Automatic checkbox if it is marked then scroll up or down to adjust the setting and tap SET Activity box overview 1 View the amount of active calories that you have burned while exercising and the passive calories that you have burned while not exercising 2 View your sleep hours and check the quality of your sleep based on the informat...

Страница 18: ... Bookmarks Activity overview 1 Show data in a day week month or year view 2 Show the current activity in different units 3 Show the amount of activity using the chosen unit type 4 Show your current goal status 5 Details about your activity Setting goals Set goals for activities in your daily life for example the number of steps to take the distance you want to walk or the amount of calories you wa...

Страница 19: ... or right on the timeline to navigate to the logged sleeping activity that you want to delete 3 Tap the sleeping activity animation then tap DELETE Synchronising data with the Lifelog application When your SmartBand 2 is connected to your Android device data gets synchronised automatically to the Lifelog application When the SmartBand 2 gets disconnected from the Android device it can continue to ...

Страница 20: ...of a medical professional Sony Mobile disclaims any warranty that this device could be used or suitable for medical purposes Seek medical advice before undertaking a new or altered training regime using this device particularly if using this device together with a pacemaker or other medical devices Prior to use please read the Important information leaflet separately provided This User guide is pu...

Страница 21: ...io or television reception which can be determined by turning the equipment off and on the user is encouraged to try to correct the interference by one or more of the following measures Reorient or relocate the receiving antenna Increase the separation between the equipment and receiver Connect the equipment into an outlet on a circuit different from that to which the receiver is connected Consult...

Отзывы: