background image

29 

GB

Ad
va
nce

d

 o

pera

tio

ns

Adjusting image size 
and orientation

You can enlarge or reduce an image in single 
view mode.

To enlarge an image, press   (zoom in) 
on the remote control. To reduce an 
enlarged image, press   (zoom out).

Each press of the   button enlarges the image 
further. You can enlarge an image to a 
maximum of 5 times the original scale. You 
can move an enlarged image up, down, left, and 
right.

To save an enlarged or a reduced image 
(Crop and save)

1

Press MENU while the enlarged or reduced 
image is displayed.

2

Press 

v

/

V

 to select the saving method.

If you select [Save as new image], a copy of 
the image is saved. Proceed to step 

3

.

If you select [Overwrite], the new image 
overwrites the old image. Proceed to step 

5

.

3

Press 

v

/

V

 to select the device on which to 

save the image and press 

.

4

Press 

v

/

V

 to select a destination folder and 

press .

5

Press 

v

/

V

 to select [Yes] and press 

.

The image is saved.

6

When the confirmation screen appears after 
you finish saving the image, press 

.

Tip

If you move the enlarged image with 

B

/

b

/

v

/

V

 and 

press MENU in step 

1

, the image is trimmed into the 

displayed image size and saved.

Notes

• You cannot overwrite files except for a JPEG file 

(extension: JPG).

• Enlarging an image may reduce the quality 

depending on the image size.

• It is not possible to enlarge an image using the 

buttons on the photo frame.

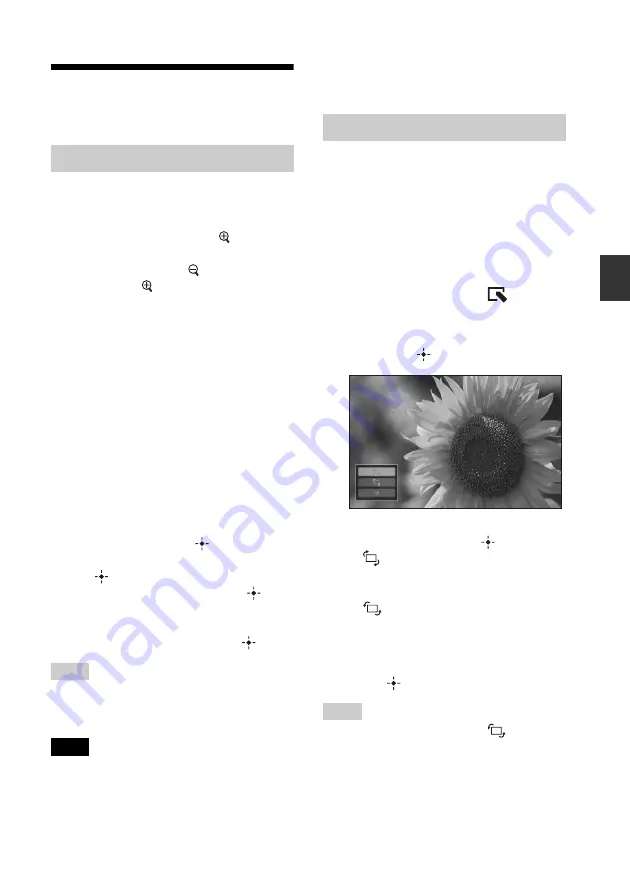
You can rotate an image during single view 
mode.

Operate from the menu of the 
photo frame

1

Press MENU in single view mode.

2

Press 

B

/

b

 to select the 

 (Editing) 

tab.

3

Press 

v

/

V

 to select [Rotate], and 

then press 

.

4

Press 

v

/

V

 to select the direction to 

rotate and then press 

.

:

Rotates the image 90 degrees 
clockwise.

:

Rotates the image 90 degrees 
counterclockwise.

5

Press 

v

/

V

 to select [OK] and then 

press .

Tips

• You can also rotate an image with 

 (ROTATE) 

on the remote control. The image rotates 90 degrees 
counterclockwise every time you press the button.

• For an internal memory image, image rotation data 

will be retained even after the power is turned off.

• You can rotate the image of the index image 

display.

Enlarging/reducing an image

Rotating an image

Содержание S-Frame DPF-A73

Страница 1: ...1 Digital Photo Frame DPF A73 E73 2010 Sony Corporation Before operation Basic operations Advanced operations Using with a computer Error messages Troubleshooting Additional information Digital Photo Frame Handbook ...

Страница 2: ...ay 19 Index image display 20 Advanced operations Enjoying a slideshow 22 Changing the settings of the slideshow 22 Importing images from a memory card to the internal memory 24 Specifying the playback device 26 Exporting an image from the internal memory to a memory card 26 Deleting an image 28 Adjusting image size and orientation 29 Enlarging reducing an image 29 Rotating an image 29 Changing the...

Страница 3: ...42 SD memory card 43 xD Picture Card 43 Notes on using a memory card 43 Index 44 On the illustrations and screen shots used in this manual The illustrations and screen shots used in this manual are of the DPF A73 unless noted otherwise The illustrations and screen shots used in this manual may not be identical to those actually used or displayed ...

Страница 4: ...B Before operation Enjoying your photo frame in various ways The Sony DPF A73 E73 is a digital photo frame for easily displaying images taken with a digital camera or other device without using a computer ...

Страница 5: ...r display Single view mode and Index image display page 15 xVarious slideshow styles The displayed image can be switched automatically as though you are turning the pages of an album yourself You can select from various slideshow styles including the ones displaying a clock or calendar You can also change playback settings such as the playback order page 22 xImporting images to internal memory You...

Страница 6: ...3 be sure to insert it in an appropriate adaptor xAutomatic rotation of images The photo frame automatically rotates images to their proper orientation Images are also automatically rotated when the photo frame is set in either the portrait or landscape position page 10 xDisplaying images on a wall You can hang the photo frame on the wall supplied Operating Instructions page 11 ...

Страница 7: ...reen Remote sensor Sony logo DPF A73 only page 12 VIEW MODE button page 15 1 on standby button Standby indicator MENU button Direction B b v V buttons ENTER button BACK button Access lamp Memory card slot page 14 Holes for hanging unit on the wall Space for storing the stand Continued ...

Страница 8: ...ndby button SINGLE button INDEX button Zoom in button Direction B b v V buttons ENTER button Zoom out button IMPORT button DELETE button About descriptions in this manual The operations described in this manual are based on remote control operation When an operation is performed differently for example with the remote control and the buttons on the photo frame it will be explained in a tip ...

Страница 9: ...trol Replacing the battery of the remote control If the remote control stops working replace the battery CR2025 lithium battery with a new one 1 Press the tab in 2 Pull the battery holder out 3 Insert a new battery and slide the battery holder back into the remote control Insert the battery so that is facing upwards Notes Using a battery other than the specified one may result in the battery ruptu...

Страница 10: ...ing shorting dismantling or heating the battery or throwing it into a fire may cause the battery to rupture or leak Setting the stand 1 Hold the photo frame tightly and insert the stand straight into the screw hole on the rear panel 2 Screw the stand into the screw hole firmly until the stand stops turning Setting to portrait or landscape orientation You can set the photo frame to portrait or land...

Страница 11: ...t keep anything that is easily affected by magnetism such as a cash card or credit card near the photo frame If you place the photo frame near a cathode ray tube television the colors of the television screen may be affected Tip It is easier to turn the stand if you wind or wrap a rubber band tightly around the stand when you remove the stand from the photo frame To exchange a panel DPF E73 only Y...

Страница 12: ...p to the next section Turning on the power Press 1 on standby on the photo frame or remote control to turn on the power The standby indicator turns to green from red The Sony logo on the front panel lights up DPF A73 only Turning off the power Hold 1 on standby down the photo frame or remote control until the power turns off The standby indicator turns to red from green Note Do not turn the photo ...

Страница 13: ...elect the Settings tab Tip You can use the B b buttons only when the demo mode is not displayed and the Clock and calendar view mode page 18 is not selected 3 Press v V to select Date time Settings and then press 4 Adjust the date 1Press v V to select Date and then press 2Press B b to select month day and year and then press v V to select a value then press 5 Adjust the time 1Press v V to select T...

Страница 14: ...u screen is closed Inserting a memory card Insert the memory card firmly into the corresponding slot with its label side facing toward you when you are facing the back side of the photo frame The access lamp flashes when the memory card is inserted correctly Reinsert the memory card after checking the label side of the memory card if the access lamp does not flash Access lamp xD Picture Card Slot ...

Страница 15: ...calendar view mode is selected the access lamp does not flash Notes The slot is both a Memory Stick standard and Duo size compatible slot so you do not need a Memory Stick adaptor The Memory Stick Standard Duo SD memory card MMC xD Picture Card multi purpose slot automatically detects the card type Do not insert multiple memory cards into A B slots simultaneously If multiple memory cards are inser...

Страница 16: ... cursor is in the display selection area move it to the style selection area by pressing v You can move the cursor within the style selection area by pressing the button corresponding to currently selected view mode or or VIEW MODE on the photo frame repeatedly Note If you have not operated the photo frame for an extended period of time the style the cursor is on will be selected automatically Dis...

Страница 17: ...iewed Display Style Description Slideshow Single view Images are displayed on a single screen one after another Multi image view Displays multiple images at the same time Clock view Displays images one after another while showing the current date and time Calendar view Displays images one after another while showing a calendar The current date and time are displayed Random view Displays images whi...

Страница 18: ...ock and calendar display Note You can select only the Settings tab when the Clock and calendar are displayed Clock1 Clock2 Clock3 Clock4 Clock5 Clock6 Clock7 Clock8 Clock9 Clock10 Calendar1 Calendar2 Calendar3 ...

Страница 19: ...mage information such as the image number file name and shooting date while displaying the entire image You can switch the images to be displayed by pressing B b See About the information displayed on the LCD screen page 21 for details on the image information Fit to screen with Exif Displays image information such as the image number file name and shooting date in fit to screen mode Depending on ...

Страница 20: ...ital camera In the index image display you can press B b v V and to select an image the display changes to the single view mode Display Style Description Index Index 1 Displays a list of large thumbnails You can select an image by pressing B b v V Index 2 Displays a list of thumbnails You can select an image by pressing B b v V ...

Страница 21: ...Setting information 5Image number folder file number This is displayed if the image is DCF compliant If the image does not comply with DCF its file name is displayed If you named or renamed the file on your computer and the file name includes characters other than alphanumeric characters the file name may not be able to be displayed properly on the photo frame Also for a file created on a computer...

Страница 22: ...er to the tables on the next page for details on the setting items Notes Note the following when you select a slideshow using the image stored on the memory card Due to the characteristics of memory card devices images may be subject to data error when read too often Do not run a slideshow for a long time with a small number images This may cause data error We recommend you back up images on the m...

Страница 23: ...fading out the current image and fading in the next image Wipe Transitions to the next image as though the current image is being wiped off the screen to reveal the next image Random Uses the above five effects randomly Shuffle ON Displays images randomly OFF Displays images according to the Listing Order setting of General Settings Color effect Color Displays an image in color Sepia Displays an i...

Страница 24: ... IMPORT when an image stored on the memory card is displayed on the screen Tip If using the buttons on the photo frame press MENU select the Editing tab with B b select Import with v V and press Single view mode Single image display Slideshow display Index image display 2 Press v V to select Import this image Import multiple images or Import all images and then press If you select Import this imag...

Страница 25: ...cide whether to import an image or not to the internal memory is displayed Tip A new folder is created automatically when you select New folder 6 Press v V to select Yes and then press The image is saved in the specified folder in the internal memory 7 Press when the confirmation screen is displayed Notes Import to the internal memory is not available for images in the internal memory Avoid doing ...

Страница 26: ...ou can export the images in the internal memory to a memory card 1 Press MENU when an image stored on the internal memory is displayed on the screen 2 Press B b to select the Editing tab 3 Press v V to select Export and then press Single view mode Single image display 4 Press v V to select Export this image Export multiple images or Export all images and then press If you select Export this image ...

Страница 27: ...e confirmation screen used to decide whether to export or not is displayed Tip A new folder is created automatically when you select New folder 9 Press v V to select Yes and then press The exporting is finished 10Press when the confirmation screen is displayed The image is copied to the specified memory card Note Avoid doing the following while an image is being exported Doing so may damage the ph...

Страница 28: ...tion screen is displayed 5 Press v V to select Yes and then press The image is deleted 6 Press when the confirmation screen is displayed Notes Avoid doing the following while an image is being deleted Doing so may damage the photo frame memory card or the data Turning off the power Removing an memory card Inserting another card When the message Cannot delete a protected file appears on the screen ...

Страница 29: ...er you finish saving the image press Tip If you move the enlarged image with B b v V and press MENU in step 1 the image is trimmed into the displayed image size and saved Notes You cannot overwrite files except for a JPEG file extension JPG Enlarging an image may reduce the quality depending on the image size It is not possible to enlarge an image using the buttons on the photo frame You can rotat...

Страница 30: ... v V to select Enable and press 2Set the time at which you want to activate the Power ON timer or Power OFF timer Press v V to select Auto ON time or Auto OFF time and press Press B b to select the hour or minute press v V to set the hour or minute and press 3Set the day of the week on which you want to activate the timer Press v V to select Auto ON day or Auto OFF day and press Press v V to selec...

Страница 31: ...to set each of the items page 32 Note When the photo frame is for instance displaying a slideshow some settings of some items cannot be changed They are displayed in gray and cannot be selected 5 Press v V to select a setting value and then press Each time you press v V the setting value changes In the case of a numerical value press V to increase the value and press v to decrease the value If you...

Страница 32: ...shooting date Note When images are imported with Resize selected in the Image import size setting the photo frame uses the Exif shooting date information to update the date so images are aligned almost in the same order as Exif shooting date order Number Order Displays images in order of file name Auto display orientation ON OFF You can set the photo frame to automatically detect and rotate the or...

Страница 33: ...e LCD screen Japanese English French Spanish German Italian Russian Simplified Chinese Traditional Chinese Dutch Portuguese Note Default language setting may vary in some regions Initialize Format internal memory You can format the internal memory Notes All the images added to the internal memory will be deleted Do not format the internal memory by using a connection to a computer Initialize setti...

Страница 34: ...aneously Do not disconnect the USB cable during data communication Operation with all computers that satisfy the recommended system requirements is not guaranteed The photo frame has been demonstrated as operable when connected to a computer or Sony digital photo printer When other devices are connected to the photo frame these devices may not recognize the internal memory of the photo frame Note ...

Страница 35: ...g on the file name length or character type If you edit or save an image file on a computer the date of that the file was modified is changed In this case images may not be displayed in order by the shooting date in the index image display or other display mode because the shooting date of the image is changed When images from the computer are saved in the internal memory of the photo frame the im...

Страница 36: ...e protected Slide the write protect switch to the enable position page 42 The Memory Stick is full The SD Memory Card is full The xD Picture Card is full The internal memory is full No more data can be saved because the memory card or the internal memory is full Delete images or use a memory card with free space available Error reading the Memory Stick Error reading the SD Memory Card Error readin...

Страница 37: ...digital camera or other device to format the memory card Note When you initialize the memory card all the files on the memory card will be deleted Cannot open the image The photo frame cannot display or open an image file whose format is not supported Error message Meaning Solutions ...

Страница 38: ...ry card properly page 14 Does the memory card contain images saved with a digital camera or other device c Insert a memory card containing images c Check the file formats that can be displayed See Operating Instructions page 26 Is the file format compatible with DCF c A file that is not compatible with DCF may not be able to be displayed with the photo frame even if it can be displayed with a comp...

Страница 39: ...f the mark on the left is displayed again the image cannot be displayed because the image file is not supported by the photo frame Does the mark displayed below appear in the index view c If the mark shown on the left is displayed the image file is supported by the photo frame but the thumbnail data or image itself cannot be opened Select the mark and press If the mark shown on the left is display...

Страница 40: ... Cancel write protection and try saving again Is the write protect switch of the memory card in the LOCK position c Slide the write protect switch to the enable position Is the memory card full c Replace the memory card with one with sufficient free space Or delete any unwanted images page 28 Is the internal memory full c Delete any unwanted images page 28 Did you save images from a computer to th...

Страница 41: ... it on the photo frame An image was deleted accidentally c An image cannot be recovered once it is deleted Symptom Check item Cause Solutions Nothing happens even if you operate the photo frame c Turn off and then turn on the power page 12 Symptom Check item Cause Solutions Nothing happens even if you operate the remote control Is the battery inserted in the remote control properly c Replace the b...

Страница 42: ...ere you use your photo frame and then select Digital Photo Frame from each area page Do not insert more than one Memory Stick at the same time or this may cause trouble with the photo frame If you use a Memory Stick Micro with the photo frame the Memory Stick Micro needs to be inserted into an M2 adaptor If you insert a Memory Stick Micro into the photo frame without an M2 adaptor you may be unabl...

Страница 43: ...o frame has been demonstrated as operable with an xD Picture Card with a capacity of 2 GB or less When using a card make sure to check the correct insertion direction of the card and the correct insertion slot When inserting the memory card it will only insert part of the way so do not try to force it as this could damage the memory card and or photo frame Do not remove a card or turn off the phot...

Страница 44: ...lay 21 Initialize 33 Initialize settings 33 Inserting a memory card 14 L Language setting 33 Listing Order 32 M Memory card slot 14 Memory cards 42 Memory Stick 42 Notes on use 43 SD memory card 43 xD Picture Card 43 P Placing to portrait or landscape orientation 10 Playback device 26 Power on off 12 R Remote control 9 Removing a memory card 15 Replacing the battery of the remote control 9 Rotatin...

Страница 45: ...Sony Corporation ...

Отзывы: