background image

15

Advanced Remote Operations

To cancel programming

Press USE MODE during any step. The remote
automatically exits the macro setting mode.

To delay the output of an IR code

Start over from step 1. In step 3, press VIDEO
1, then MACRO1 or MACRO2. This allows
you to specify 1 second delay before output the
next IR code. Be sure not to press MACRO1 or
MACRO2 for more than 2 seconds.

To clear the programmed IR codes

Clear each macro step individually.

1

Press MACRO1 or MACRO2 (in which
the IR code you want to clear is
programmed) while pressing down USE
MODE.

2

Press the numeric button to select the
macro step number you want to clear.

3

Press VIDEO 1.

4

Hold down MACRO1 or MACRO2 for
more than 2 seconds.

The IR code is cleared. The indicator lights
twice slowly, then the remote automatically
exits the macro setting mode.

To start macro play

Press MACRO1 (or MACRO2).

Note

If the Macro Play function does not work properly,
program a delay between each operation. See “To
delay the output of an IR code”.

Selecting the mode of the
remote

Set the remote mode using the USE MODE
button (

wk

) and the remote mode buttons (

2

).

Selecting the command mode

You can switch the command mode (AV1 or
AV2) of the remote. If the command mode of
the receiver and the remote is different, you
cannot use the remote to operate the receiver.

Press 1 (AV1) (or 2 (AV2)) while pressing
down USE MODE.

The indicator lights once (twice for AV2), then
the command mode switches.

Setting to the 2nd room mode.

You can use the remote to select the function
for the 2nd room (2nd room mode). You can
use the function buttons only for the 2nd room.

Press 2ND ROOM while pressing down
USE MODE.

The indicator lights for a while, then the mode
switches to the 2nd room mode.

Tips

• If you press a function button while pressing down

2ND ROOM, you can select the function for the
2nd room even though the mode is not set to the
2nd room mode.

• If you press 2ND ROOM only, you can output the

source signal of the current function of the receiver
to the amplifier in the 2nd room.

Setting to the 3rd room mode.

You can use the remote to select the function
for the 3rd room and adjust the volume in the
3rd room (3rd room mode). During 3rd room
mode, you can adjust the volume of speakers in
another room when you set the receiver to
output the sound using SPEAKER terminals.
You can use the function buttons and
MASTER VOL +/– buttons only.

Press 3 (3RD) while pressing down USE
MODE.

The indicator lights 3 times, then the mode
switches to the 3rd room mode.

To check the mode of the remote

Press USE MDOE. You can check the remote
by the indicator.

Mode

Indicator lights

AV1

once

AV2

twice

2nd room

once (for a while)

3rd room

3 times

Содержание RM-PP505L

Страница 1: ... RM PP505L Owner s Record The model and serial numbers are located on the rear panel Record the serial number in the space provided below Refer to them whenever you call upon your Sony dealer regarding this product Model No Serial No 2001 Sony Corporation ...

Страница 2: ...iver On cleaning Clean the cabinet panel and controls with a soft cloth slightly moistened with a mild detergent solution Do not use any type of abrasive pad scouring powder or solvent such as alcohol or benzine If you have any question or problem concerning your remote please consult your nearest Sony dealer About this manual The instructions in this manual are for model RM PP505L Check your mode...

Страница 3: ... Do not use a new battery with an old one Do not expose the remote sensor of the receiver to direct sunlight or lighting apparatuses Doing so may cause a malfunction If you don t use the remote for an extended period of time remove the batteries to avoid possible damage from battery leakage and corrosion Table of Contents Location of Parts and Basic Remote Operations Parts description 4 Table of b...

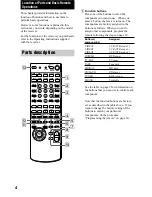
Страница 4: ...LD DVD player TV SAT TV tuner TAPE Tape deck MD DAT MD deck CD SACD CD player TUNER Built in tuner PHONO Turntable See the table on page 9 for information on the buttons that you can use to control each component Note that the function buttons are factory set as described in the table above If you want to change the factory setting of the buttons to match your particular components do the procedur...

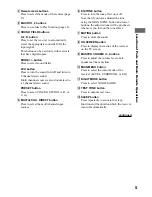
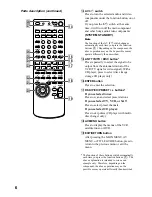
Страница 5: ... C etc 5 MULTI 2CH A DIRECT button Press to select the multi channel input sources continued 6 EQ TONE button Press to turn the tone effect on or off Note that if you have adjusted the tone using the MAIN MENU button and cursor buttons the adjusted tone will be produced whenever you turn on the tone effect 7 MUTING button Press to mute the sound 8 ON SCREEN button Press to display the menus of the...

Страница 6: ...player Press to skip discs CD player with multi disc changer only qk AV MENU button Press to display the menus of the VCR satellite tuner or DVD ql EXIT RETURN button After pressing the MAIN MENU AV MENU or TITLE GUIDE button press to return to the previous menu or exit the menu The function of these buttons switch automatically each time you press the function buttons 1 The above explanation is i...

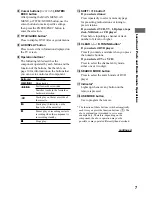
Страница 7: ...r CD player Press before inputting a channel or track number of eleven or higher wg CLEAR D TUNING button If you selected DVD player Press if you made a mistake when you press the numeric buttons If you selected TV or VCR Press to select the channel entry mode either one or two digit wh SEARCH MODE button Press to select the search mode of DVD player wj Indicator Lights up whenever any button on t...

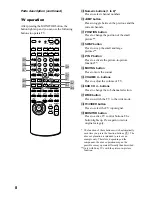
Страница 8: ...ns switch automatically each time you press the function buttons 1 The above explanation is intended to serve as an example only Therefore depending on the component the above operation may not be possible or may operate differently than described Only with Sony TVs with the picture in picture function TV operation After pressing the MONITOR button the button lights up and you can use the followin...

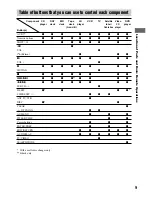
Страница 9: ... z z z Numeric buttons z z z z z z z z z z SHIFT 10 z z z z z z z n z VOL z O Return z z z N z z z z z z z z VOL z X z z z z z z z z MUTING z x z z z z z z z z z z z z z z z z m M z z z z z z z z SUB CH z D SKIP z z z z CH PRESET z z z ANT TV VTR z DISC z z CLEAR z D TUNING z z AV MENU z z z TITLE GUIDE z z Cursor buttons z z z ENTER EXEC z z z EXIT RETURN z z z z z AV DISPLAY z z z z z z TV VIDEO...

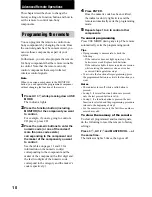
Страница 10: ...he first digit and the last two digits of the numeric code correspond to the category and the maker s code respectively Advanced Remote Operations 4 Press ENTER Once the numeric code has been verified the indicator slowly lights twice and the remote automatically exits the programming mode 5 Repeat steps 1 to 4 to control other components To cancel programming Press USE MODE during any step The re...

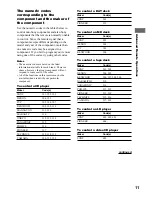
Страница 11: ... Sony components that the remote is normally unable to control Since the remote signal that a component accepts differs depending on the model and year of the component more than one numeric code may be assigned to a component If you fail to program your remote using one of the codes try using other codes Notes The numeric codes are based on the latest information available for each brand There is...

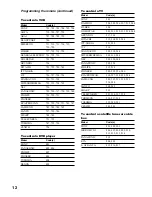
Страница 12: ...a DVD player Maker Code s SONY 401 PANASONIC 402 406 PHILIPS 407 PIONEER 403 TOSHIBA 404 DENON 405 To control a TV Maker Code s SONY 501 DAEWOO 504 505 506 507 515 544 FISHER 508 GOLDSTAR 503 511 512 515 534 544 GRUNDIG 517 534 HITACHI 513 514 515 544 ITT NOKIA 521 522 JVC 516 MAGNAVOX 503 518 544 MITSUBISHI MGA 503 519 544 NEC 503 520 544 PANASONIC 509 524 PHILIPS 515 518 PIONEER 509 525 526 540 ...

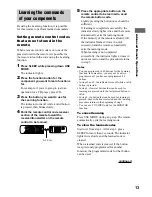
Страница 13: ...remote automatically exits the learning mode If the memory of the remote is already full the indicator flashes 8 times in quick succession and the remote automatically exits the learning mode When learning is not completed successfully the indicator lights 4 times in quick succession and the procedure returns to step 5 Notes You can program up to 80 buttons for the Learning function In some cases ...

Страница 14: ...r press the function button including MONITOR first then press the button for the operation For example to play the CD player press CD then press H When programmed successfully the indicator lights twice slowly then the remote automatically exits the macro setting mode To program the operation IR code of the receiver press the button for the operation Buttons that can be programmed SLEEP 1 2ND ROO...

Страница 15: ...ver and the remote is different you cannot use the remote to operate the receiver Press 1 AV1 or 2 AV2 while pressing down USE MODE The indicator lights once twice for AV2 then the command mode switches Setting to the 2nd room mode You can use the remote to select the function for the 2nd room 2nd room mode You can use the function buttons only for the 2nd room Press 2ND ROOM while pressing down U...

Страница 16: ...sor on the receiver Remove any obstacles in the path between the remote and the receiver Replace both batteries in the remote with new ones if they are weak Make sure you select the correct function on the remote Additional Information Specifications General Remote control system Infrared control Power requirements 3 V DC with two R6 size AA batteries Dimensions 210 x 68 x 25 mm Mass approx 150 g ...

Отзывы: