background image

105

Set
tin

g

s and

 Ad
ju

st

m

ent
s

Language, Parental Control 
Settings/Factory Settings 
(Options)

The “Options” setup allows you to set up other 
operational settings.

1

Press SYSTEM MENU while the recorder is 
in stop mode.

2

Select “Setup,” and press ENTER.

3

Select “Options,” and press ENTER.

The “Options” setup appears with the 
following options. The default settings are 
underlined.

Language

 OSD (On-Screen Display)

Switches the display language on the screen.

 Disc Menu (DVD VIDEO only)

Switches the language for the DVD menu.

 Audio (DVD VIDEO only)

Switches the language of the sound track.
When you select “Original,” the language given 
priority in the disc is selected.

 Subtitle (DVD VIDEO only)

Switches the language of the subtitles recorded on 
the disc.
When you select “Auto,” the subtitle language 
changes according to the language you selected 
for the sound track.

Note

If you select a language in “Disc Menu,” “Subtitle,” or 
“Audio” that is not recorded on the DVD VIDEO, one of 
the recorded languages will be automatically selected.

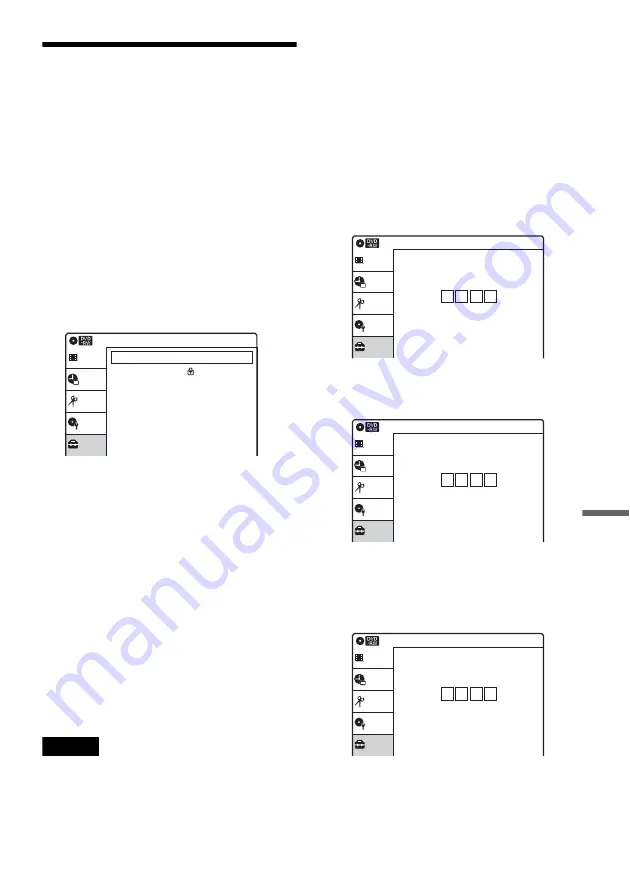
Parental (DVD VIDEO only)

Playback of some DVD VIDEOs can be limited 
according to a predetermined level, such as the age 
of the users. Scenes may be blocked or replaced 
with different scenes.

1

After step 3 above, select “Parental,” and 
press ENTER.
• If you have not entered a password, the 

display for registering a new password 
appears. 
Enter a 4-digit password using the number 
buttons.

The display for confirming the password 
appears.
Re-enter the password.

• When you have already registered a 

password, the display for entering the 
password appears. 
Enter a 4-digit password using the number 
buttons.

Setup

Disc Setting

Edit

Timer

Language

Parental

Front Display

Command Mode

Factory Setting

Options

:  Auto

:  Mode3

Title list

10:10 AM

Setup

Disc Setting

Edit

Timer

Create the password.

Parental

Title list

10:10 AM

Setup

Disc Setting

Edit

Timer

Confirm the password.

Parental

Title list

10:10 AM

Setup

Disc Setting

Edit

Timer

Enter the password.

Parental

Title list

10:10 AM

,

continued

Содержание RDR VX500 - DVD Player/Recorder With VCR

Страница 1: ...low Refer to them whenever you call upon your Sony dealer regarding this product Model No RDR VX500 Serial No ______________ For Customers in Canada If this product is not working properly please call 1 877 602 2008 for Peace of Mind Warranty Replacement service For other product related questions please contact our Customer Information Service Centre at 1 877 899 7669 or write to us at Customer I...

Страница 2: ...ations not expressly approved in this manual could void your authority to operate this equipment Note This equipment has been tested and found to comply with the limits for a Class B digital device pursuant to Part 15 of the FCC Rules These limits are designed to provide reasonable protection against harmful interference in a residential installation This equipment generates uses and can radiate r...

Страница 3: ... designed to be operated in a horizontal position only Keep the recorder discs and cassettes away from equipment with strong magnets such as microwave ovens or large loudspeakers Do not place heavy objects on the recorder To prevent fire or shock hazard do not place objects filled with liquids such as vases on the apparatus On recording Contents of the recording cannot be compensated for if the re...

Страница 4: ...n electrician for replacement of the obsolete outlet 10 Protect the power cord from being walked on or pinched particularly at plugs convenience receptacles and the point where they exit from the apparatus 11 Only use attachments accessories specified by the manufacturer 12 Use only with the cart stand tripod bracket or table specified by the manufacturer or sold with the apparatus When a cart is ...

Страница 5: ... this recorder MP3 MPEG1 Audio Layer 3 is a standard format defined by ISO MPEG which compresses audio data Icon Meaning Functions available for DVD RWs Functions available for DVD RWs in VR Video Recording mode Functions available for DVD RWs in video mode Functions available for DVD Rs Functions available for DVD Rs Functions available for DVD VIDEOs Functions available for VIDEO CDs Super VCDs ...

Страница 6: ... Operation 37 Playing a DVD Disc or VHS Tape 37 Recording a Program to a DVD Disc 38 Recording a Program to a VHS Tape 39 Using the On Screen Menus 40 Using the Title List 42 Using the DVD Disc Setting Displays 43 Checking the Play Information and Playing Time 45 Changing the Name of a Recorded Program Title Input 46 DVD Recording 47 Before Recording 47 DVD Recording without the Timer 48 DVD Timer...

Страница 7: ...ubbing from a Video to a DVD 89 Dubbing from a DVD to a Video 91 DV Dubbing DV t DVD 93 Before DV Dubbing 93 Connecting a Digital Video Camera to the DV IN Jack 93 Dubbing from a DV Format Tape to a DVD 94 Settings and Adjustments 96 Using the Setup Displays 96 Antenna Reception Setting Tuner Preset 97 Clock Setting Clock Set 99 Video Settings Video 100 Audio Settings Audio 102 Recording and VCR S...

Страница 8: ... In addition you can also enjoy playback and editing of DVD discs and VHS tapes Operation restrictions 1 When pressing DVD VHS tape playback stops 2 When pressing VIDEO DVD playback stops Current operation Possible simultaneous operations VHS DVD Playback Recording Playback Recording Playing a VHS tape No Yes 1 Yes 1 Recording on a VHS tape No Yes Yes Playing a DVD disc Yes 2 Yes 2 No Recording on...

Страница 9: ...e to DVD and from DVD to VHS tape with a single deck page 89 Note that when playing back and recording a DVD or VHS tape that includes a copy protect signal the copy protect function will prevent normal recording Simple dubbing of DV tapes DV Edit Connect your digital video camera to the DV IN jack and simply dub the entire contents or just selected scenes to a DVD disc page 93 A list of recordabl...

Страница 10: ... frees up disc space if you erase the last title 4 Erasing titles does not free up disc space Type Disc Logo Icon used in this manual Formatting new discs Compatibility with other DVD players finalizing DVD RW Automatically formatted Playable on DVD RW compatible players automatically finalized DVD RW VR mode Format in VR mode 2 page 43 Playable only on VR mode compatible players finalization unne...

Страница 11: ...s Recording Features Editing Features Rewrite page 48 Auto Chapter page 104 Manual Chapter page 84 Change title name page 82 Erase title page 82 A B Erase page 83 Playlist page 84 Yes Yes Yes Yes Yes 3 No No Yes Yes Yes Yes Yes Yes Yes Yes Yes No Yes Yes 3 No No No Yes No Yes Yes 4 No No No Yes No Yes Yes 4 No No continued ...

Страница 12: ...This DVD recorder can play 8 cm CDs and 8 cm DVDs as well Operation DVD RW DVD RW DVD R DVD R VR mode Video mode 12 cm 8 cm 12 cm 8 cm 12 cm 8 cm 12 cm 8 cm 12 cm 8 cm Playback Yes Yes Yes Yes Yes Yes Yes Yes Recording Yes Yes No Yes No Yes Yes No Type Disc Logo Icon used in this manual Characteristics DVD VIDEO Discs such as movies that can be purchased or rented VIDEO CD VIDEO CDs or CD Rs CD RW...

Страница 13: ...record companies Please be aware that among those discs there are some that do not conform to the CD standard and may not be playable by this product Notes Some DVD RWs DVD Rs DVD RWs DVD Rs or CD RWs CD Rs cannot be played on this recorder due to the recording quality or physical condition of the disc or the characteristics of the recording device and authoring software The disc will not play if ...

Страница 14: ...S VHS system Tapes recorded in EP 3 mode by this VCR cannot be played back on standard mode only VHS decks Noise may appear in the image when tapes recorded in EP 3 mode by this VCR are played back on other VHS decks with 3 mode Playback The VCR automatically identifies the recording system and recording mode SP standard or EP 3 of recorded tapes during playback Notes You cannot play back foreign ...

Страница 15: ...r Cord on page 26 Note to CATV system installer in USA This reminder is provided to call the CATV system installer s attention to Article 820 40 of the NEC that provides guidelines for proper grounding and in particular specifies that the cable ground shall be connected to the grounding system of the building as close to the point of cable entry as practical Notes If your antenna is a flat cable 3...

Страница 16: ...match the channel on the recorder L1 to the input jack connected to the cable box or satellite receiver LINE 1 IN VHF UHF LINE 1 IN LINE OUT AUDIO OUT IN DIGITAL AUDIO OUT COAXIAL OPTICAL PCM DTS DOLBY DIGITAL COMPONENT VIDEO OUT AUDIO AUDIO VIDEO VIDEO S VIDEO OUT R L Y PB PR OUT L R ANT IN R L S VIDEO AUDIO OUT VIDEO OUT TO TV LINE 1 IN AUDIO VIDEO R L to LINE 1 IN VCR DVD recorder Audio video c...

Страница 17: ...e this hookup if you are using a VHF UHF antenna or separate VHF and UHF antennas With this hookup you can record any channel by selecting the channel on the recorder VHF UHF LINE 1 IN LINE OUT AUDIO OUT IN DIGITAL AUDIO OUT COAXIAL OPTICAL PCM DTS DOLBY DIGITAL COMPONENT VIDEO OUT AUDIO AUDIO VIDEO VIDEO S VIDEO OUT R L Y PB PR OUT L R VHF UHF IN OUT ANT IN TO TV to VHF UHF IN Wall VCR DVD record...

Страница 18: ...at the same time VHF UHF LINE 1 IN LINE OUT AUDIO OUT IN DIGITAL AUDIO OUT COAXIAL OPTICAL PCM DTS DOLBY DIGITAL COMPONENT VIDEO OUT AUDIO AUDIO VIDEO VIDEO S VIDEO OUT R L Y PB PR OUT L R VIDEO AUDIO INPUT L R LINE OUT AUDIO VIDEO B A VHF UHF IN OUT Antenna cable supplied TV Signal flow VCR DVD recorder TV or projector red Audio video cord supplied to LINE OUT AUDIO L R white yellow yellow white ...

Страница 19: ...to a TV using an antenna cable Setting the RF Output channel When connecting the recorder to the TV using only the antenna cable you must set the RF Output channel in the Tuner Preset so that the TV can receive the correct signal from the recorder 1 Press 1 to turn on the recorder 2 Press TV VIDEO repeatedly until TV disappears from the front panel display 3 Turn on your TV and set it to the chann...

Страница 20: ...ecording a DVD the DVD video signal is output to the S VIDEO OUT even if you switch the output to VIDEO VHF UHF LINE 1 IN LINE OUT AUDIO OUT IN DIGITAL AUDIO OUT COAXIAL OPTICAL PCM DTS DOLBY DIGITAL COMPONENT VIDEO OUT AUDIO AUDIO VIDEO VIDEO S VIDEO OUT R L Y PB PR OUT L R AUDIO INPUT L R S VIDEO AUDIO OUT DIGITAL AUDIO OUT COAXIAL OPTICAL PCM DTS DOLBY DIGITAL S VIDEO OUT L R S video cord not s...

Страница 21: ...IO OUT L R jacks when you connect the recorder using this connection When playing wide screen images Some recorded images may not fit your TV screen To change the aspect ratio see page 100 z Hint Video signal can also be output from the COMPONENT VIDEO OUT jack when playing a VHS tape VHF UHF LINE 1 IN LINE OUT AUDIO OUT IN DIGITAL AUDIO OUT COAXIAL OPTICAL PCM DTS DOLBY DIGITAL COMPONENT VIDEO OU...

Страница 22: ... of 480 progressive scan picture problems it is recommended that the user switch the connection to the standard definition output If there are questions regarding our TV set compatibility with this model 480p DVD recorder please contact our customer service center When recording a DVD the DVD video signal is output to the COMPONENT VIDEO OUT even if you switch the output to VIDEO ...

Страница 23: ... VHF UHF LINE 1 IN LINE OUT AUDIO OUT IN DIGITAL AUDIO OUT COAXIAL OPTICAL PCM DTS DOLBY DIGITAL COMPONENT VIDEO OUT AUDIO AUDIO VIDEO VIDEO S VIDEO OUT R L Y PB PR OUT L R VIDEO AUDIO INPUT L R LINE OUT AUDIO VIDEO B A DIGITAL AUDIO OUT COAXIAL OPTICAL PCM DTS DOLBY DIGITAL AV amplifier receiver with a decoder red AV amplifier receiver Audio video cord supplied Signal flow Coaxial digital cord no...

Страница 24: ... output jacks to the LINE IN AUDIO L R jacks at the same time This will cause unwanted noise to come from your TV s speakers When recording a DVD the DVD audio signal is output to the DIGITAL AUDIO OUT even if you switch the output to VIDEO ...

Страница 25: ...tal 5 1ch DTS 5 1ch 1 Manufactured under license from Dolby Laboratories Dolby Pro Logic and the double D symbol are trademarks of Dolby Laboratories 2 DTS and DTS Digital Out are trademarks of Digital Theater Systems Inc Notes After you have completed the connection make the appropriate settings under Audio Connection Setup in Easy Setup page 30 Otherwise no sound or a loud noise will come from y...

Страница 26: ...er DVD Recorder change the command mode number for this recorder page 29 Use the batteries correctly to avoid possible leakage and corrosion Do not touch the liquid with bare hands should leakage occur Observe the following Do not use a new battery with an old battery or batteries of different manufacturers Do not attempt to recharge the batteries If you do not intend to use the remote for an exte...

Страница 27: ...h is set to TV the remote performs the following Code numbers of controllable TVs If more than one code number is listed try entering them one at a time until you find the one that works with your TV Press To 1 Turn your TV on or off VOL Adjust the volume of your TV CH Select the channel on your TV TV VIDEO Switch your TV s input source Number buttons and SET Select the channel on your TV TV DVD V...

Страница 28: ... the TV s volume even when the TV DVD VIDEO switch is set to DVD VIDEO repeat the steps above and enter the code number 90 default Code numbers of controllable AV amplifiers receivers If more than one code number is listed try entering them one at a time until you find the one that works with your AV amplifier receiver Sylvania 08 12 Teknika 03 08 14 Toshiba 07 18 Wards 03 04 12 Yorx 12 Zenith 14 ...

Страница 29: ...appears 2 Select Setup and press ENTER 3 Select Options and press ENTER 4 Select Command Mode and press ENTER 5 Select the command mode Mode1 Mode2 or Mode3 and press ENTER 6 Slide the COMMAND MODE switch on the remote so it matches the mode you selected above To return to the previous display Press O RETURN SYSTEM MENU M m ENTER COMMAND MODE switch O RETURN Setup Disc Setting Edit Timer Tuner Pre...

Страница 30: ... Initial setting necessary to operate the DVD recorder will be made You can change them later using Setup appears If this message does not appear select Easy Setup in the Setup display to run Easy Setup page 107 4 Press ENTER The setup display for selecting the language used in the on screen display appears 5 Select a language and press ENTER The setup display for clock setting appears OSD Languag...

Страница 31: ...t the setting that matches your TV type 4 3 Letter Box For standard TVs Displays wide screen pictures with bands on the upper and lower sections of the screen 4 3 Pan Scan For standard TVs Automatically displays wide screen pictures on the entire screen and cuts off the sections that do not fit 16 9 For wide screen TVs or standard TVs with a wide screen mode For details see Video Settings Video on...

Страница 32: ... the number you turn to on your TV or recorder to watch a program with the guide channel the number that s assigned to that channel in your TV program guide To find the guide channel numbers look at the Channel Line up Chart in the program guide for your area that features VCR PlusCode numbers Use the Channel Line up Chart to coordinate the guide channel number with the TV channel number For examp...

Страница 33: ... TV channel number 8 Press SYSTEM MENU to exit the menu To return to the previous display Press O RETURN Setup Disc Setting Edit Timer Tuner Preset Clock Set Video Audio Features Options Setup Title List Easy Setup 10 10 AM Setup Setting Edit TimerList Antenna Cable TV Auto Preset Channel Add Delete 3 4 Ch Out Guide Channel Setup Cable TV 3CH Tuner Preset Title list 10 10 AM Enter actual receiving...

Страница 34: ...er to record using the Synchro Rec function Connecting to the LINE 2 IN jacks on the front panel Connect other VCR or similar device to the LINE 2 IN jacks of this recorder If the equipment has an S video jack you can use an S video cord instead of an audio video cord You can connect a second DVD player and record DVDs Note You cannot record DVD video that contains a copy guard signal played back ...

Страница 35: ...hat distribute monaural sounds to left right channels not supplied VHF UHF LINE 1 IN LINE OUT AUDIO OUT IN DIGITAL AUDIO OUT COAXIAL OPTICAL PCM DTS DOLBY DIGITAL COMPONENT VIDEO OUT AUDIO AUDIO VIDEO VIDEO S VIDEO OUT R L Y PB PR OUT L R LINE OUTPUT AUDIO R L VIDEO LINE 1 IN AUDIO VIDEO R L Other VCR etc VCR DVD recorder Audio video cord not supplied Signal flow to LINE 1 IN continued ...

Страница 36: ...t be recorded If you pass the recorder signals via the VCR you may not receive a clear image on your TV screen Be sure to connect your VCR to the VCR DVD recorder and your TV in the order shown below To watch video tapes watch the tapes through a second Line input on your TV If you disconnect the recorder s power cord you will not be able to view the signals from the connected VCR Do not connect m...

Страница 37: ...el on page 19 4 Slide the TV DVD VIDEO switch to DVD VIDEO then press DVD to control the DVD recorder 5 Press Z OPEN CLOSE and place a disc on the disc tray 6 Press Z OPEN CLOSE to close the disc tray Wait until LOAD disappears from the front panel display Playback starts automatically depending on the disc 7 Press H PLAY To stop playback Press x STOP Playing a VHS tape R DVD RWVR RWVideo RW R DVD...

Страница 38: ...th its safety tab removed 6 Press H PLAY To stop playback Press x STOP Recording a Program to a DVD Disc The following explains how to record a current TV program to a DVD disc 1 Turn on the TV 2 Press 1 The recorder turns on 3 Switch the input selector on your TV so that the signal from the recorder appears on the TV screen When connecting the recorder to the TV using only the antenna cable see S...

Страница 39: ...rding or the disc is full To stop recording Press x STOP Note that it may take a few seconds for the recorder to stop recording z Hint This recorder can record on various discs Select the disc type according to your needs page 10 Recording a Program to a VHS Tape 1 Turn on the TV 2 Press 1 The recorder turns on 3 Switch the input selector on your TV so that the signal from the recorder appears on ...

Страница 40: ...een Menus This section introduces the System Menu TOOLS menu and sub menu By using these displays you can perform most of the recorder s operations System Menu The System Menu appears when you press SYSTEM MENU and provides entries to all of the recorder s main functions such as timer recording and setup Select an option by pressing M m and ENTER A Title List page 42 Press ENTER to display the Tit...

Страница 41: ...enu The sub menu appears when you select an item from a list menu e g a title from the Title List menu and press ENTER The sub menu displays options applicable only to the selected item The displayed options differ depending on the situation and disc type Select an option by pressing M m and ENTER Example The Title List menu TOOLS The TOOLS menu appears when you press TOOLS and displays options Yo...

Страница 42: ... turned on press ORIGINAL PLAYLIST repeatedly to select either Title List Original or Playlist For details see Edit options for DVD RWs VR mode on page 81 To turn off the Title List Press TITLE LIST Notes The Title List does not appear for DVD RW Video mode DVD R or DVD R that have been finalized To view a title press TOP MENU or MENU page 57 The Title List may not appear for discs created on othe...

Страница 43: ...he disc To cancel the protection select Not protected C Disc Format DVD RW DVD RW only Erases all contents of the disc to make a blank disc For DVD RWs select a recording format VR Mode or Video Mode according to your needs D Disc Finalize Finalizes a disc page 44 E Erase All Titles DVD RW DVD RW only Erases all titles on the disc except the protected titles and Playlists created with protected ti...

Страница 44: ...check whether the disc has been finalized or not If you cannot select Finalize in step 2 above the disc has already been finalized Notes Depending on the condition of the disc recording or the DVD equipment discs may not play even if the discs are finalized The recorder may not be able to finalize the disc if it was recorded on another recorder Discs are automatically finalized when stopped record...

Страница 45: ...ot be displayed during DVD recording Checking the playing remaining time You can view the playing or time information displayed on the TV screen and the front panel display Press TIME TEXT repeatedly The displays differ depending on the media type or playing status Front panel display Example When playing a DVD Example When playing a CD Playing time of the current track m Current track number m Cl...

Страница 46: ...sor to the right of the character at the input row Select Backspace and press ENTER To erase the character at the position of the cursor select Delete and press ENTER To insert a character move the cursor to the right of the point where you want to insert the character Select the character and press ENTER To erase all of the characters select Clear and press ENTER 3 Select Finish and press ENTER T...

Страница 47: ...ng Play mode SLP can be a possible choice Note that the recording time in the following table is an approximate guide Press REC MODE repeatedly to switch the recording modes Note Situations below may cause slight inaccuracies with the recording time Recording a program with poor reception or a program or video source of low picture quality Recording on a disc that has already been edited Recording...

Страница 48: ... CLOSE to close the disc tray Wait until LOAD disappears from the front panel display Unused DVD RWs are formatted in VR mode automatically To format in Video mode see page 43 4 Press CH or INPUT SELECT to select the channel or input source you want to record Copy control signals Recordable discs Copy Free Copy Once Ver 1 1 with CPRM Ver 1 2 with CPRM Copy Never None RW RWVR RWVideo R R RWVR RW R ...

Страница 49: ...order 2 Press z REC repeatedly to set the duration Each press advances the time in 30 minute increments The maximum duration is six hours OTR One touch Timer Recording and the remaining recording time are displayed in the front panel display while recording The time counter decreases minute by minute to 0 00 then the recorder stops recording power turns off To cancel the Quick Timer Press z REC re...

Страница 50: ...o cancel DVD Auto Chapter setting select Off z Hint You can create chapters manually when playing DVD RWs or DVD RWs VR mode For details see page 84 DVD Timer Recording Standard VCR Plus You can set the timer for a total of 12 programs together with DVD Timer Recording and VCR Timer Recording up to one month in advance There are two methods to set the timer the standard method and VCR Plus method ...

Страница 51: ...r lights up in the front panel display and the recorder is ready to start recording If the c indicator flashes in the front panel display check that a recordable disc is inserted and that there is enough disc space for the recording There is no need to turn off the recorder before the timer recording starts If the timer settings overlap the message These timer settings overlap appears To confirm c...

Страница 52: ... timer recordings cannot be made while recording a program that has priority Before the timer recording starts TIMER REC flashes in the front panel display Even if a timer recording is started in the condition with the recorder power on the recorder power is automatically turned off when the timer recording finishes If you attempt to make a timer recording of a copy protected broadcast a black scr...

Страница 53: ...V screen Before the timer recording starts TIMER REC flashes in the front panel display Even if a timer recording is started in the condition with the recorder power on the recorder power is automatically turned off when the timer recording finishes If you attempt to make a timer recording of a copy protected broadcast a black screen is recorded Recording from Connected Equipment with a Timer Sync...

Страница 54: ...is on or off During Synchro Recording other operations such as normal recording cannot be done To use the connected equipment while the recorder is standing by for Synchro Recording cancel Synchro Recording by pressing SYNCHRO REC Be sure to turn off the connected equipment and press SYNCHRO REC to reset Synchro Recording before the timer recording starts The Synchro Rec function does not work wit...

Страница 55: ...f the timer is set timer recordings cannot be made while recording a program that has priority RW R RWVR RWVideo R SYSTEM MENU M m ENTER O RETURN Timer List No RecTo Date Start Stop CH Mode Edit 01 DVD 11 17 09 00PM 10 00PM CH8 LP 02 DVD 11 28 09 15PM 09 45PM CH1 LP 04 05 06 03 10 10 AM Timer List No RecTo Date Start Stop CH Mode Edit 01 DVD 11 17 09 00PM 10 00PM CH8 DVD 11 28 09 15PM 09 45PM CH1 ...

Страница 56: ...ode see page 47 5 Select the line input audio Set Line Audio Input of Audio to Stereo or Main Sub in the Setup display page 103 6 Insert the source tape into the connected equipment and set to playback pause 7 At the same time press z REC on this recorder and the pause or play button on the connected equipment Recording starts To stop recording press x STOP on this recorder If you connect a digita...

Страница 57: ...e DVD R or DVD R you can display the disc s menu by pressing TOP MENU or MENU To play VIDEO CDs with PBC functions PBC Playback Control allows you to play VIDEO CDs interactively using the menu on your TV screen When you start playing a VIDEO CD with PBC functions the menu appears Select an item using the number buttons and press ENTER Then follow the instructions in the menu press H PLAY when Pre...

Страница 58: ... on your TV screen 1 Select OK and press ENTER The display for entering your password appears 2 Enter your four digit password using the number buttons The recorder starts playback To register or change the password see Parental DVD VIDEO only on page 105 To lock the recorder Child Lock You can lock all of the buttons on the recorder so that the settings are not canceled by mistake When the record...

Страница 59: ...en pressed repeatedly If various angles multi angles for a scene are recorded on the disc appears in the front panel display ZOOM Zooms into a scene during playback or still mode when pressed repeatedly Magnification changes as follows normal magnification t 2 t 4 t normal magnification The zoom function may not work depending on the DVD To zoom in a JPEG image see page 65 Z OPEN CLOSE X PAUSE AUD...

Страница 60: ...V is pressed within 3 seconds after starting a title chapter scene track All discs fast reverse fast forward Fast reverses fast forwards the disc when pressed during playback Search speed changes as follows fast reverse fast forward FR1 T t FF1 FR2 1 T T t t FF2 1 FR3 2 T T T t t t FF3 2 All discs 1 FR2 and FF2 are not available for MP3 2 FR3 and FF3 are only available for DVDs and VIDEO CDs slow ...

Страница 61: ...a CD When playing DTS encoded CDs excessive noise will be heard from the analog stereo jacks To avoid possible damage to the audio system the consumer should take proper precautions when the analog stereo jacks of the recorder are connected to an amplification system To enjoy DTS Digital Surround playback an external 5 1 channel decoder system must be connected to the digital jack of the recorder ...

Страница 62: ... the elapsed playing time display then select another number 4 Press ENTER The recorder starts playback from the selected number Note Depending on the disc you cannot use the TOOLS menu to search for a title chapter track or start from a point by entering the time code Setting and selecting a favorite scene Bookmark You can have the recorder store specific portions of the disc in memory and play t...

Страница 63: ... then press TOP MENU About MP3 audio tracks MP3 is audio compression technology that satisfies certain ISO MPEG regulations You can play back DATA CDs CD Rs CD RWs recorded in MP3 MPEG1 Audio Layer 3 format However the discs must be recorded according to ISO9660 Level 1 Level 2 or Joliet format for the recorder to recognize the tracks You can also play discs recorded in Multi Session See the instr...

Страница 64: ...er can play MP3 audio tracks recorded in the following sampling frequencies 32 kHz 44 1 kHz 48 kHz ID3 tags cannot be displayed Only alphabet and numbers can be used for album or track names Anything else is displayed as an asterisk Playing JPEG Image Files You can play JPEG image files on DATA CDs CD Rs CD RWs 1 Press DVD to control the DVD recorder 2 Place a DATA CD on the disc tray When you loa...

Страница 65: ...select an image in the Index display then press ENTER 2 Press to select then press ENTER 3 Press ENTER repeatedly to change the magnification Each time you press ENTER the magnification changes as shown below 2 t 4 t 2 t normal magnification To enjoy the Slide show 1 Press M m to select an image in the Index display then press ENTER 2 Press to select then press ENTER The Slide Show Speed menu appe...

Страница 66: ...ion only the first session will be played back z Hint If you add numbers 01 02 03 etc to the front of the file names the files will be played in that order Notes The system can play the extension JPG or JPEG Some CD Rs or CD RWs cannot be played on this system depending on file format If you add the extension JPG or JPEG to data not in JPEG format Unsupported Format will appear Depending on the di...

Страница 67: ... program press AUDIO repeatedly until the MONO indicator disappears from the TV screen The sound will be recorded in monaural but with less noise SAP Second Audio Program When a SAP Second Audio Program is received the SAP indicator lights up in the front panel display To record only SAP sound set Tuner Audio of Audio to SAP in the Setup display page 102 VCR Recording without the Timer 1 Press VID...

Страница 68: ...to leave it on Notes You cannot change the channel or input source of the recorder using CH or INPUT SELECT while recording another TV program If you insert a tape with its safety tab removed the tape is ejected when you press z REC Recording using the Quick Timer One touch Timer Recording You can set the recorder to record in 30 minute increments 1 Press VIDEO to control the VCR 2 Press z REC rep...

Страница 69: ...imer Recording Standard VCR Plus You can set the timer for a total of 12 programs together with DVD Timer Recording and VCR Timer Recording up to one month in advance There are two methods to set the timer the standard method and VCR Plus method Standard Set the date time and channel of the program manually VCR Plus Enter the PlusCode number designated for each TV program page 71 Note Do not opera...

Страница 70: ...he recorder is ready to start recording If the c indicator flashes in the front panel display check that a tape with its safety tab in place is inserted If the timer settings overlap a message appears To confirm change or cancel timer recording see Checking Changing Canceling VCR Timer Settings Timer List on page 74 6 Press SYSTEM MENU to exit the menu To stop recording Press x STOP twice If the t...

Страница 71: ...is set timer recordings cannot be made while recording a program that has priority You cannot record on a tape with its safety tab removed Before the timer recording starts TIMER REC flashes in the front panel display Even if a timer recording is started in the condition with the recorder power on the recorder power is automatically turned off when the timer recording finishes Recording TV program...

Страница 72: ...REC flashes in the front panel display You cannot record on a tape with its safety tab removed Even if a timer recording is started in the condition with the recorder power on the recorder power is automatically turned off when the timer recording finishes Recording from Connected Equipment with a Timer Synchro Rec You can set the recorder to automatically record programs from connected equipment ...

Страница 73: ...other operations such as normal recording cannot be done To use the connected equipment while the recorder is standing by for Synchro Recording cancel Synchro Recording by pressing SYNCHRO REC Be sure to turn off the connected equipment and press SYNCHRO REC to reset Synchro Recording before the timer recording starts The Synchro Rec function does not work with some tuners For details see the tune...

Страница 74: ...setting for the current recording Note Even if the timer is set timer recordings cannot be made while recording a program that has priority SYSTEM MENU M m ENTER O RETURN Timer List No RecTo Date Start Stop CH Mode Edit 01 VCR 11 17 09 00PM 10 00PM CH8 LP 02 VCR 11 28 09 15PM 09 45PM CH1 LP 04 05 06 03 10 10 AM Timer List No RecTo Date Start Stop CH Mode Edit 01 VCR 11 17 09 00PM 10 00PM CH8 04 05...

Страница 75: ... REC MODE repeatedly to select the tape speed SP or EP EP Extended Play provides recording time three times as long as SP Standard Play However SP produces better picture and audio quality 5 Insert the source tape into the connected equipment and set to playback pause 6 At the same time press z REC on this recorder and the pause or play button on the connected equipment Recording starts To stop re...

Страница 76: ...de on other VCRs can be played back on this VCR but the picture quality cannot be guaranteed The counter resets to 0 00 00 whenever a tape is reinserted The counter stops counting when it comes to a portion with no recording When 10 hours have passed the counter in the front panel display returns to 0 00 00 and the count starts over again When playback does not start even if you insert a tape with...

Страница 77: ...he recording is in poor condition In this case manually adjust the tracking Press TRACKING to adjust the picture The tracking meter appears Press TRACKING repeatedly until the distortion disappears To resume automatic tracking adjustment Press TRACKING and TRACKING at the same time Or eject the tape and reinsert it Tracking Tracking meter continued ...

Страница 78: ...lays at high speed when briefly pressed during playback When you press and hold down the button during playback playing at high speed continues until you release the button slow Plays in slow motion when pressed in pause mode INSTANT ADVANCE Plays frame by frame when pressed in pause mode Fast forwards the current scene for 30 seconds when pressed during playback 1 INSTANT REPLAY Replays the previ...

Страница 79: ...The VCR starts searching and automatically stops at the 0 00 00 point Searching for a blank space of the tape The VCR automatically searches for the beginning of a blank space You can easily find a point you can start recording from 1 Press VIDEO to control the VCR 2 Press TOOLS The TOOLS menu appears 3 Select End Search and press ENTER The VCR starts searching and automatically stops at the begin...

Страница 80: ...ll be inserted if the channel is changed while VCR is put in pause Selecting the sound during playback Press AUDIO repeatedly during playback How sound is recorded on a video tape The VCR records sound onto two separate tracks Hi fi audio is recorded onto the main track along with the picture Monaural sound is recorded onto the normal audio track along the edge of the tape Notes To play a tape in ...

Страница 81: ...ated from the original called a Playlist Since each is different in nature and offers different merits read the following and select the one that better suits your needs To edit original titles Edits made to the original titles are final If you plan to retain an unaltered original recording create and edit a Playlist see below The edit functions available for original titles are Labeling a title p...

Страница 82: ...se unnecessary titles Editing a Title This section explains the basic edit functions Note that editing is irreversible To edit a DVD RW VR mode without changing the original recordings create a Playlist title page 84 Note When editing a DVD R DVD R or DVD RW Video mode finish all editing before finalizing the disc You cannot edit a finalized disc 1 Press DVD to control the DVD recorder 2 Press TIT...

Страница 83: ...ed 5 Press ENTER at the starting point of the portion to be erased point A You can use H PLAY x STOP and X PAUSE to find the point of the portion to be erased End is selected 6 Press ENTER at the ending point of the portion to be erased point B Erase is selected 7 Select Erase and press ENTER The display asks for confirmation 8 Select OK and press ENTER The scene is erased To continue repeat from ...

Страница 84: ...ks can be added you may not be able to record or edit You cannot add or erase the chapter marks of the titles of protected discs or protected titles Creating a Playlist You can add a section of the title to the Playlist title as one scene without changing the actual recordings A Playlist title can contain up to 99 scenes For details see Edit options for DVD RWs VR mode on page 81 Note If you erase...

Страница 85: ...IST 2 Press ORIGINAL PLAYLIST to switch to the Playlist 3 Select a Playlist title and press ENTER The sub menu appears 4 Select Play and press ENTER z Hint When a Playlist title is created the start and end points will become chapter marks and each scene will become a chapter Notes The picture may pause when the edited scene is played The start and end points of a title may be different from what ...

Страница 86: ...nd press ENTER The Scene List menu appears with all of the selected scenes Modify Allows you to change the start and end point of the selected scene See Modifying a scene Modify on page 87 Move Changes the scene order See Moving a scene Move on page 87 Add Allows you to add more scenes before the selected scene See Adding a scene Add on page 88 Erase Erases the scene The selection is canceled See ...

Страница 87: ... and end point of a scene may be different from what you have set Moving a scene Move You can change the scene order within the Playlist title 1 After step 7 of Editing a Playlist on page 86 select a scene and press ENTER 2 Select Move and press ENTER 3 Select a new location using 4 Press ENTER The selected scene moves to the new location To move other scenes press O RETURN and repeat from step 1 ...

Страница 88: ...and repeat from step 1 To cancel adding Select Cancel and press ENTER To turn off the display Press SYSTEM MENU Note The start and end point of a scene may be different from what you have set Erasing a scene Erase You can erase a selected scene 1 After step 7 of Editing a Playlist on page 86 select a scene and press ENTER 2 Select Erase and press ENTER The display asks for confirmation 3 Select OK...

Страница 89: ...a source tape 3 Press DVD to control the DVD recorder 4 Press SYSTEM MENU while the recorder is stopped 5 Select Edit and press ENTER 6 Select Dubbing and press ENTER RWVR RWVideo RW R R M m ENTER REC MODE x STOP SYSTEM MENU DVD AUDIO VIDEO X PAUSE H PLAY T VIDEO Setup Disc Setting Edit Timer Title List Original Title List 10 10 AM Press ENTER Title Menu for DVD Title List Setup Disc Setting Edit ...

Страница 90: ...bed disc but this is not a malfunction When dubbing stops there may be some time difference between the tape and the disc In this case a black no signal screen is recorded You can switch the playback tape audio while dubbing When dubbing a VHS tape to a disc the VHS tape counter value may differ slightly from the DVD recording time The audio output is the VHS playback audio Notes Dubbing is not po...

Страница 91: ... PAUSE 6 Press DVD t on the recorder Dubbing starts Using the TV screen 1 Insert a tape with its safety tab in place 2 Insert a source disc 3 Press DVD to control the DVD recorder 4 Press TOP MENU or TITLE LIST and select a title 5 Start playing and press x STOP or X PAUSE 6 Press SYSTEM MENU 7 Select Edit and press ENTER RWVR RWVideo RW R R DVD M m ENTER x STOP REC MODE SYSTEM MENU VIDEO AUDIO SU...

Страница 92: ...nds for the recorder to stop dubbing z Hints You can switch the playback DVD audio while dubbing The brightness of the playback video may differ from that during normal DVD playback The DVD playback time may differ slightly from the VHS tape counter value The audio being played back main audio sub audio etc is the dubbed audio Notes Dubbing is not possible when Video of Progressive is set to On in...

Страница 93: ...disappears Connecting a Digital Video Camera to the DV IN Jack You can connect a digital video camera to the DV IN jack on the recorder to record or edit from a DV format tape Operation is straightforward because the recorder will fast forward and rewind the tape for you you do not need to operate your digital video camera Do the following to start using the DV Edit functions of this recorder See ...

Страница 94: ...mat in Video mode see page 43 4 Insert the source DV format tape into your digital video camera For the recorder to record or edit your digital video camera must be set to video playback mode 5 Press INPUT SELECT repeatedly to select DV 6 Press REC MODE repeatedly to select the recording mode Each time you press the button the display changes on the TV screen as follows For more details about the ...

Страница 95: ... 44 You cannot connect more than one piece of digital video equipment to the recorder You cannot control the recorder using another device or another recorder of the same model You cannot record date time or the contents of the cassette memory onto the disc If you record from a DV format tape with a sound track that is recorded in multiple sampling frequencies 48 kHz 44 1 kHz or 32 kHz no sound or...

Страница 96: ...ions or Easy Setup and press ENTER The selected setup display appears Example Video setup 4 Select the item you want to set up and press ENTER Available options for the item appear Example TV Type M m ENTER SYSTEM MENU Setup Disc Setting Edit Timer Title List Original Title List 10 10 AM Press ENTER Title Menu for DVD Title List Setup Disc Setting Edit Tuner Preset Clock Set Video Audio Features O...

Страница 97: ...receivable channels The recorder can receive VHF channels 2 to 13 UHF channels 14 to 69 and unscrambled CATV channels 1 to 125 First we recommend that you preset the receivable channels in your area using automatic presetting methods 1 Follow steps 1 to 3 of Using the Setup Displays on page 96 to select Tuner Preset in the Setup display 2 Select Antenna Cable and press ENTER Antenna Presets VHF an...

Страница 98: ...steps 1 to 3 of Using the Setup Displays on page 96 to select Tuner Preset in the Setup display 2 Select 3 4 Ch Out and press ENTER 3CH when using channel 3 to receive the recorder signal 4CH when using channel 4 to receive the recorder signal 3 Select 3CH or 4CH and press ENTER The confirmation messages will be displayed for a while Guide Channel Setup Sets up the guide channel number assigned to...

Страница 99: ...to to have the recorder automatically set your time zone The options are Auto y Atlantic y Eastern y Central y Mountain y Pacific y Alaska y Hawaii y Auto Daylight Saving Select On or Off standard time or select Auto to have the recorder automatically set the daylight saving time Manual If the Auto Clock Set function did not set the clock correctly for your local area set the clock manually 1 Foll...

Страница 100: ...T jacks page 18 This setting is not effective when the PROGRESSIVE indicator lights up in the front panel and the recorder outputs progressive signals 16 9 Select this when connecting to a wide screen TV or TV with a wide mode function 4 3 Letter Box Select this when connecting to a 4 3 screen TV Displays a wide picture with bands on the upper and lower portions of the screen 4 3 Pan Scan Select t...

Страница 101: ...o signal appears OK video connection is complete 5 Press ENTER The PROGRESSIVE indicator on the recorder lights up If picture is distorted press O RETURN Check the connection page 21 z Hint The Progressive setting can be canceled by pressing X PAUSE on the recorder continuously for 5 seconds or more or selecting Off in step 3 Note If you select progressive signal when you connect the recorder to a...

Страница 102: ...speaker damage Dolby Digital Output DVDs only Selects the type of Dolby Digital signal DTS DVD VIDEO only Selects whether or not to output DTS signals Main Records only the main sound SAP Records only the SAP Second Audio Program sound Setup Disc Setting Edit Timer Tuner Audio Digital Out Downmix Audio DRC Scan Audio DV Audio Input Line Audio Input Audio Dolby Surround Standard On Stereo 1 Stereo ...

Страница 103: ...2 if you have added a second audio channel when recording with your digital video camera Line Audio Input When recording from equipment connected to the LINE 1 IN or LINE 2 IN jack to a DVD disc in this recorder select line input audio Dolby Surround Normally select this position Multi channel audio signals are output to two channels for enjoying surround sounds Normal Multi channel audio signals ...

Страница 104: ...ynchro Recording Off No chapter mark is inserted 5 Min Inserts chapter marks at approximately 5 minute intervals 15 Min Inserts chapter marks at approximately 15 minute intervals Setup Disc Setting Edit Timer DVD Auto Chapter VCR Function Synchro Recording Features to DVD Title list 5 min 10 10 AM T 120 When using a T 120 or shorter length tape T 160 When using a T 160 length tape T 180 When using...

Страница 105: ...Subtitle or Audio that is not recorded on the DVD VIDEO one of the recorded languages will be automatically selected Parental DVD VIDEO only Playback of some DVD VIDEOs can be limited according to a predetermined level such as the age of the users Scenes may be blocked or replaced with different scenes 1 After step 3 above select Parental and press ENTER If you have not entered a password the disp...

Страница 106: ...e same command mode Be sure to match the COMMAND MODE switch on the remote to the setting made here For details see If you have a Sony DVD Player Video Cassette Recorder or Video Cassette Recorder DVD Recorder on page 29 Factory Setting Allows you to return the setup settings to their default settings Note that all of your previous settings will be lost 1 After step 3 above select Factory Setting ...

Страница 107: ...p program 1 Press SYSTEM MENU while the recorder is in stop mode 2 Select Setup and press ENTER 3 Select Easy Setup and press ENTER 4 Select Start and press ENTER 5 Follow the instructions for Easy Setup page 30 from step 5 Follow the guide to make initial setting Easy Setup Start Cancel 10 10 AM ...

Страница 108: ... signals the image may be affected when you set the recorder to progressive format In this case set Progressive to Off in Video setup page 101 TV program reception does not fill the screen Set the channel manually in Tuner Preset setup page 97 Select the correct source using the INPUT SELECT button or select a channel of any TV program using the CH buttons TV program pictures are distorted Reorien...

Страница 109: ...he audio track for a DVD RW VR mode during playback set Dolby Digital in Audio setup to D PCM page 102 DVD Playback The disc does not play The disc is upside down Insert the disc with the labeled side facing up The disc is not correctly inserted Moisture has condensed inside the recorder Remove the disc and leave the recorder turned on for about half an hour until the moisture evaporates If the di...

Страница 110: ...d alphabet Other characters are displayed as asterisks DVD Recording Timer recording Editing The channel cannot be changed from the channel you are recording Set the TV s input source to TV Recording does not start immediately after you press z REC Operate the recorder only after LOAD FORMAT or INF WRITE disappears from the front panel display Nothing was recorded even though you set the timer set...

Страница 111: ...cal Sony dealer for more information The picture rolls vertically during picture search Adjust the vertical hold control on the TV or monitor The picture has no sound The tape is defective If you made A V connections check the audio cord connection VHS Recording The channel cannot be changed from the channel you are recording Set the TV s input source to TV A TV program does not appear on the TV s...

Страница 112: ...ponds to the remote The same command mode is set for both the Sony DVD Player Video Cassette Recorder or Video Cassette Recorder DVD Recorder and recorder Set a different command mode for the recorder page 29 Others The recorder does not operate properly Restart the recorder Press down 1 on the recorder for more than ten seconds until SONY DVD appears in the front panel display When static electri...

Страница 113: ...ommercially available cleaning disc It may cause a malfunction Notes about the discs To keep the disc clean handle the disc by its edge Do not touch the surface Dust fingerprints or scratches on the disc may cause it to malfunction Do not expose the disc to direct sunlight or heat sources such as hot air ducts or leave it in a car parked in direct sunlight as the temperature may rise considerably ...

Страница 114: ...indication 12 hour cycle Timer setting 12 programs in total max Inputs and outputs LINE 1 IN and LINE 2 IN VIDEO IN phono jack 1 each Input signal 1 Vp p 75 ohms unbalanced sync negative AUDIO IN phono jacks 2 each Input level 327 mVrms Input impedance more than 47 kilohms LINE 2 IN S VIDEO 4 pin mini DIN jack Y 1 0 Vp p unbalanced sync negative C 0 286 Vp p load impedance 75 ohms DV IN 4 pin jack...

Страница 115: ...le i LINK cable Possible applications are operations and data transactions with various digital AV equipment When two or more i LINK compatible equipment are connected to this recorder in a daisy chain operations and data transactions are possible with not only the equipment that this recorder is connected to but also with other devices via the directly connected equipment Note however that the me...

Страница 116: ...er second or the amount of data that can be sent or received in one second For example a baud rate of 100 Mbps means that 100 megabits of data can be sent in one second i LINK functions on this recorder For details on how to dub when this recorder is connected to other video equipment having DV jacks see page 93 The DV jack on this recorder can only input DVC SD signals It cannot output signals Th...

Страница 117: ...ton 89 E Tape compartment 37 67 76 F A eject button 76 G z REC record button 38 39 48 67 H m M rewind fast forward buttons 59 78 I H play button 37 57 76 X pause button 48 59 67 78 x stop button 37 48 57 67 76 89 J SELECT DVD VIDEO buttons 37 K remote sensor 26 L Front panel display 45 121 M SYNCHRO REC indicator 53 72 N PROGRESSIVE indicator 21 100 O CHANNEL TRACKING buttons 38 39 48 67 77 P DV I...

Страница 118: ... 62 SET button 27 E CLEAR button 52 62 F AUDIO button 59 SUBTITLE button 59 G VCR Plus button 52 H DISPLAY button 45 50 TIME TEXT button 45 I ORIGINAL PLAYLIST button 42 82 J M m ENTER button 30 K O RETURN button 30 L TOP MENU button 57 M m M search buttons 59 N PREV previous NEXT buttons 59 O REC MODE button 38 48 94 P TIMER button 50 Q MARKER button 62 R SEARCH button 62 S SHUFFLE button 59 Numb...

Страница 119: ...9 wk ANGLE button 59 wl INSTANT REPLAY INSTANT ADVANCE buttons 59 e MENU button 57 ea H PLAY button 37 57 83 X PAUSE button 48 59 83 x STOP button 37 48 57 83 89 es z REC record button 38 48 ed REPEAT button 59 ef SYNCHRO REC button 53 eg CHAPTER MARK ERASE buttons 84 eh COMMAND MODE switch DVD COMBO 1 2 3 29 CH and H PLAY buttons have a tactile dot Use the tactile dot as a reference w wa ws wd wf...

Страница 120: ... button 30 J m M search buttons 78 K PREV previous NEXT buttons 78 L REC MODE button 39 67 M TIMER button 69 N 1 on standby button 30 O VIDEO button 37 P CH channel TRACKING buttons 39 67 77 Q VOL volume buttons 27 R TV VIDEO button 27 S INPUT SELECT button 39 67 T TOOLS button 41 U M m ENTER button 30 V INSTANT REPLAY INSTANT ADVANCE buttons 78 W H PLAY button 37 76 X PAUSE button 67 78 x STOP bu...

Страница 121: ...pter track index number Recording time recording mode Clock Channel K angle indicator 59 L Disc indicator Rear panel A S VIDEO OUT jack 20 B DIGITAL AUDIO OUT COAXIAL OPTICAL jacks 25 C AUDIO OUT L R jacks 25 D COMPONENT VIDEO OUT Y PB PR jacks 21 E LINE OUT AUDIO L R VIDEO jacks 18 23 F LINE 1 IN AUDIO L R VIDEO jacks 35 G VHF UHF IN OUT jacks 15 DVD RW VR VCD TV SAP VIDEO STEREO VHF UHF LINE 1 I...

Страница 122: ...g format that is comparable to the DVD VIDEO format DVD RW page 10 A DVD RW is a recordable and rewritable disc that is the same size as a DVD VIDEO The DVD RW has two different modes VR mode and Video mode DVDs created in Video mode have the same format as a DVD VIDEO while discs created in VR Video Recording mode allow the contents to be programmed or edited DVD R page 10 A DVD R read plus R is ...

Страница 123: ...of an image field to create one frame the Progressive format shows the entire image at once as a single frame This means that while the Interlace format can show 30 frames 60 fields in one second the Progressive format can show 60 frames in one second The overall picture quality increases and still images text and horizontal lines appear sharper Title page 62 The longest section of a picture or mu...

Страница 124: ...Once 48 Counter 76 CPRM 10 Create Playlist 85 Creating chapters 50 84 D Daylight Saving 99 Del 55 74 Digital Out 102 Disc Finalize 44 Disc Format 43 Disc Menu 105 Disc Name 43 Disc Protect 43 Disc settings 43 Disc types 10 Display front panel display 121 On screen display 40 Setup Display 96 Dolby Digital 31 102 122 Downmix 103 DTS 32 61 102 122 Dubbing 89 92 DV Audio Input 95 103 DV Edit 95 DVD A...

Страница 125: ...68 Recording mode 47 Recording time 47 50 Region code 13 Remaining time 69 Remote 26 118 REPEAT 61 Repeat A B Play 58 Resetting 107 Resume Play 58 Rotate 65 S Safety tab 68 SAP Second Audio Program 47 67 Satellite receiver 16 Scan Audio 61 103 SEARCH 62 Searching for a blank space 79 for Chapter 62 for the counter 0 point 79 for Title 62 for Track 62 Scan and Play 80 Time Search 62 Setting the VCR...

Страница 126: ...126 U Unfinalize 44 Unrecordable pictures 48 V VCR Function 104 VCR Plus 32 52 71 Video mode 10 Video settings 100 VR mode 10 Z ZOOM 59 Zoom 65 ...

Страница 127: ......

Страница 128: ...Sony Corporation Printed in Korea AK68 00523B ...

Отзывы: