Sony RDR-GX210 Скачать руководство пользователя страница 24

1-18

72

[Clock]

[Auto Adjust]

Turns on the Auto Clock Set function when a channel 
in your local area broadcasts a time signal.

1

Select [Clock] and press 

,

.

2

Select [Auto Adjust On] and press ENTER.

z

Hint

If you select [Auto Adjust On], the Auto Clock Set 
function is activated whenever the recorder is turned off.

To set the clock manually

If the Auto Clock Set function did not set the clock 
correctly for your local area, set the clock 
manually.

1

Select [Clock] and press 

,

.

2

Press 

,

.

3

Press 

M

/

m

 to set the day, and press 

,

.

Set the month, year, hour, and minutes in 
sequence. Press 

<

/

,

 to select the item to be 

set, then press 

M

/

m

 to set the numbers. 

To change the numbers, press 

<

 to return to 

the item to be changed, and press 

M

/

m

.

4

Press ENTER to start the clock.

TV and Video Settings

These settings will adjust items related to the 
image, such as size.
Choose the settings according to the type of TV, 
tuner, or decoder connected to the recorder.

Select  

[Settings] in the Setup Display. To use 

the display, see “Using the Setup Displays” (page 
69). The default settings are underlined.

[TV Aspect]

Selects the aspect ratio of the connected TV (4:3 
standard or wide).

[Display Mode]

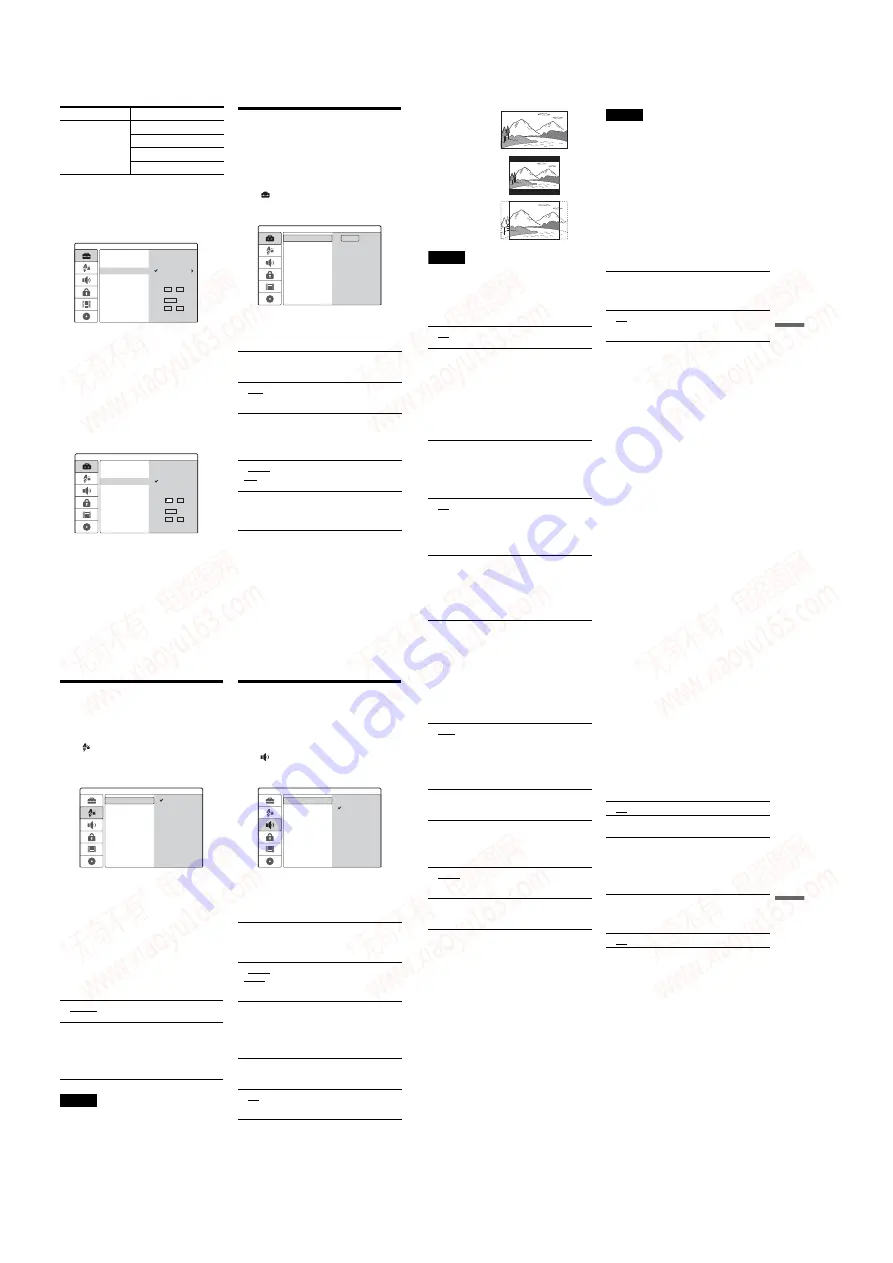
Selects how to display a wide picture on the screen 
when [4:3] is selected in [TV Aspect].

L (France) 
Colour system: 
SECAM

F2 – F10 VHF

F21 – F69 UHF

B – Q CATV

S21 – S41 HYPER

TV system

Channel coverage

Auto Adjust On

Auto Adjust Off

Settings

Channel Settings

Clock

TV Aspect

Display Mode

Line1 Decoder

Progressive Mode

PBC

Factory Setup

Year     2005

Time    12  :    00

Date    12  /    04

Auto Preset

Auto Adjust On

Settings

Channel Settings

Clock

TV Aspect

Display Mode

Line1 Decoder

Progressive Mode

PBC

Factory Setup

Year     2005

Time    12  :    00

Date    12       04

Auto Adjust Off

Auto Preset

[ 4:3 ]

Select this when connecting to a 
4:3 screen TV. When you select 
[4:3], set [Display Mode] below.

[ 16:9 ]

Select this when connecting to a 
wide-screen TV or TV with a 
wide mode function.

[ Letter 
Box ]

Displays a wide picture with 
bands on the upper and lower 
portions of the screen.

[ Pan 
Scan ]

Automatically displays a wide 
picture on the entire screen and 
cuts off the portions that do not 
fit.

Settings

Channel Settings

Clock

TV Aspect

Display Mode

Line1 Decoder

Progressive Mode

PBC

Factory Setup

Start

Auto Preset

73

Se
tti

n

gs
 a

nd 
Adj
u

st

m

e

n

ts

Note

Depending on the disc, [Letter Box] may be selected 
automatically instead of [Pan Scan] or vice versa.

[Line1 Decoder]

Sets the LINE 1-TV jack for inputting encoded 
video signals.

[Progressive Mode] (Viewing in Progressive 
format)

Selects whether the COMPONENT VIDEO OUT 
jacks output progressive signals.

Notes

• You cannot select [On] if the VIDEO OUT SELECT 

switch on the rear panel is set to “RGB” (page 15). 
Make sure that it is set to “COMPONENT.” 

• When set to [On], pictures appear on a progressive 

compatible TV or monitor. Signals are only sent to the 
COMPONENT VIDEO OUT jacks in progressive 
mode. To cancel the setting, remove the disc and close 
the disc tray. Then press and hold 

x

 (stop) on the 

recorder for five seconds.

• If your TV does not accept progressive signals, 

[Progressive Mode] will be set to [Off] automatically 
after a few seconds.

[PBC] (Playback Control)

Turns the PBC function on or off when playing 
VIDEO CDs.

[ Off ]

Inputs the signals from the LINE 
1-TV jack. Normally select this.

[ On ]

The signal input from the LINE 1-
TV jack is output to the LINE 3/
DECODER jack for decoding. 
The decoded signal is then input 
back through the LINE 3/
DECODER jack so you can 
record or view PAY-TV/Canal 
Plus programmes. In this case, 
select “LINE 1” by pressing 
INPUT SELECT.

[ Off ]

Select this when your TV is not 
compatible with progressive 
signals, or, the TV is connected to 
jacks other than the 
COMPONENT VIDEO OUT 
jacks.

[ On ]

Select this when your TV accepts 
progressive 625p format signals, 
and, the TV is connected to the 
COMPONENT VIDEO OUT 
jacks. You will enjoy accurate 
colour reproduction and high 
quality image.

[16:9]

[4:3 Letter Box]

[4:3 Pan Scan]

[ Off ]

The PBC function is not 
activated. VIDEO CDs with PBC 
will be played the same way as 
audio CDs.

[ On ]

The PBC function is activated 
when playing VIDEO CDs with 
PBC.

74

Language Settings

The [Language] Setup allows you to select a 
language for the recorder’s display and discs.

Select 

 [Language] in the Setup Display. To use 

the display, see “Using the Setup Displays” 
(page 69).
The default settings are underlined.

[OSD] (On-Screen Display)

Switches the display language on the screen.

[Menu] (DVD VIDEO only)

Switches the language for the DVD menu.

[Audio] (DVD VIDEO only)

Switches the language of the sound track.

[Subtitle] (DVD VIDEO only)

Switches the language of the subtitles recorded on 
the disc.

Note

If you select a language in [Menu], [Subtitle], or [Audio] 
that is not recorded on the DVD VIDEO, one of the 
recorded languages will be automatically selected.

Audio Settings 

The [Audio] Setup allows you to adjust the sound 
according to the playback and connection 
conditions.

Select  

[Audio] in the Setup Display. To use the 

display, see “Using the Setup Displays” (page 69). 
The default settings are underlined.

[Dolby Digital] (DVDs only)

Selects the type of Dolby Digital signal when 
using the DIGITAL OUT (OPTICAL or 
COAXIAL) jack.

[DTS] (DVD VIDEO only)

Selects whether or not to output DTS signals when 
using the DIGITAL OUT (OPTICAL or 
COAXIAL) jack.

[ Original ]

Selects the language given 
priority in the disc.

[ Other ]

The display for entering a 
language code appears. Press the 
number buttons to enter a four-
digit code number from 
“Language Code List” (page 92) 
and press ENTER.

Español

Português

OSD

Language

Menu

Audio

English

Deutsch

Italiano

Subtitle

[ D-PCM ]

Select this when the recorder is 
connected to an audio component 
without a built-in Dolby Digital 
decoder.

[ Dolby 
Digital ]

Select this when the recorder is 
connected to an audio component 
with a built-in Dolby Digital 
decoder.

[ Off ]

Select this when the recorder is 
connected to an audio component 
without a built-in DTS decoder.

[ On ]

Select this when the recorder is 
connected to an audio component 
with a built-in DTS decoder.

Dolby Digital

Audio

DTS

MPEG

D-PCM

Dolby Digital

Sampling Freq.

Audio DRC

Vocal

75

Se
tti

n

gs
 a

nd 
Adj
us
tm

en
ts

[MPEG] (DVD VIDEO only)

Selects the type of MPEG audio signal when using 
the DIGITAL OUT (OPTICAL or COAXIAL) 
jack.

[Sampling Freq.] (DVD VIDEO only)

Selects the sampling frequency of the audio 
signal.

[Audio DRC] (Dynamic Range Control) (Dolby 
Digital DVDs only)

Makes the sound clear when the volume is turned 
down when playing a DVD that conforms to 
[Audio DRC]. This affects the output from the 
following jacks:
– LINE 2 OUT (AUDIO L/R) jacks
– LINE 1-TV jack
– LINE 3/DECODER jack
– DIGITAL OUT (OPTICAL or COAXIAL) jack 

only when [Dolby Digital] is set to [D-PCM] 
(page 74).

[Vocal] (Karaoke DVD only)

Mixes karaoke channels into normal stereo. 
This function is effective for multi-channel 
karaoke DVDs only.

[ PCM ]

Select this when the recorder is 
connected to an audio component 
without a built-in MPEG decoder. 
If you play MPEG audio sound 
tracks, the recorder outputs stereo 
signals via the DIGITAL OUT 
(OPTICAL or COAXIAL) jack.

[ Bitstream ]

Select this when the recorder is 
connected to an audio component 
with a built-in MPEG decoder. 

[ 48kHz ]

The audio signals of DVD 
VIDEOs are always converted to 
48 kHz/16 bit.

[ 96kHz ]

All types of signals, including 
96 kHz/24 bit, are output in their 
original format.

[ Off ]

Normally select this.

[ On ]

Makes low sounds clear even if 
you turn the volume down.

[ Off ]

Does not mix karaoke channels 
into normal stereo. You can turn 
off the guide vocal on a multi-
channel DVD.

[ On ]

Normally select this.

www. xiaoyu163. com

QQ 376315150

9

9

2

8

9

4

2

9

8

TEL 13942296513

9

9

2

8

9

4

2

9

8

0

5

1

5

1

3

6

7

3

Q

Q

TEL  13942296513  QQ  376315150  892498299 

TEL  13942296513  QQ  376315150  892498299 

http://www.xiaoyu163.com

http://www.xiaoyu163.com

Содержание RDR-GX210

Страница 1: ... p PAL LINE 1 TV 21 pin CVBS IN OUT RGB OUT upstream LINE 3 DECODER 21 pin CVBS IN OUT RGB IN Decoder DV IN 4 pin i LINK S100 DIGITAL OUT OPTICAL Optical output jack 18 dBm wave length 660 nm DIGITAL OUT COAXIAL Phono jack 0 5 Vp p 75 ohms COMPONENT VIDEO OUT Y PB CB PR CR Phono jack Y 1 0 Vp p PB CB 0 7 Vp p PR CR 0 7 Vp p General Power requirements 220 240 V AC 50 60 Hz Power consumption 30W Dim...

Страница 2: ...ODUCT MARKING is located on the rear exterior Unleaded solder Boards requiring use of unleaded solder are printed with the lead free mark LF indicating the solder contains no lead Caution Some printed circuit boards may not come printed with the lead free mark due to their particular size LEAD FREE MARK Unleaded solder has the following characteristics Unleaded solder melts at a temperature about ...

Страница 3: ...r 3 11 7 Power Main Board 3 13 4 Schematic Diagrams 4 1 Frame 1 2 4 1 4 2 Frame 2 2 4 3 4 3 Power 4 5 4 4 Mpeg Encoder 4 7 4 5 Mpeg Decoder 4 9 4 6 Video Decoder DV1394 Phy 4 11 4 7 I O 4 13 4 8 Key 4 15 4 9 Jack 4 17 4 10 Timer 4 19 4 11 Waveforms 4 21 4 12 Circuit Voltage Chart 4 23 5 Printed Wiring Boards 5 1 Main Board 5 1 5 2 I O Board 5 3 5 3 Key Timer Board 5 7 5 4 Jack Board 5 9 6 Troubles...

Страница 4: ...ION OF JIG EXTENSION CABLE Please use the extension cable J 6090 174 A as shown in the figure below when you serve the main board and I O board www xiaoyu163 com QQ376315150 9 9 2 8 9 4 2 9 8 TEL 13942296513 9 9 2 8 9 4 2 9 8 0 5 1 5 1 3 6 7 3 Q Q TEL 13942296513 QQ 376315150 892498299 TEL 13942296513 QQ 376315150 892498299 http www xiaoyu163 com http www xiaoyu163 com ...

Страница 5: ...etc to the hole of mechanism deck and push it See Fig 1 4 Draw out the tray See Fig 1 Hole Tray Fig 1 www xiaoyu163 com QQ376315150 9 9 2 8 9 4 2 9 8 TEL 13942296513 9 9 2 8 9 4 2 9 8 0 5 1 5 1 3 6 7 3 Q Q TEL 13942296513 QQ 376315150 892498299 TEL 13942296513 QQ 376315150 892498299 http www xiaoyu163 com http www xiaoyu163 com ...

Страница 6: ...u163 com QQ376315150 9 9 2 8 9 4 2 9 8 TEL 13942296513 9 9 2 8 9 4 2 9 8 0 5 1 5 1 3 6 7 3 Q Q TEL 13942296513 QQ 376315150 892498299 TEL 13942296513 QQ 376315150 892498299 http www xiaoyu163 com http www xiaoyu163 com ...

Страница 7: ...TAESSA OLET ALTTIINA LASERÄTEILYLLE ÄLÄ KATSO SÄTEESEN ADVARSEL ADVARSEL VARNING VARO 3 On recording Note that the contents of the recording cannot be compensated for under any and all conditions including conditions that may arise due to a malfunction of this unit Make trial recordings before making the actual recording Copyrights Television programmes films video tapes discs and other materials ...

Страница 8: ...VD VIDEOs VIDEO CDs may be intentionally set by software producers Since this recorder plays DVD VIDEOs VIDEO CDs according to the disc contents the software producers designed some playback features may not be available Also see the instructions supplied with the DVD VIDEOs VIDEO CDs Region code DVD VIDEO only Your recorder has a region code printed on the rear of the unit and will only play DVD ...

Страница 9: ...d TV projector or AV amplifier receiver red blue green blue red Signal flow to COMPONENT VIDEO OUT to LINE 2 OUT S VIDEO to LINE 2 OUT VIDEO VIDEO OUT SELECT switch DVD recorder TV SCART cord not supplied to i LINE1 TV 15 Hookups and Settings A Connecting to a SCART input jack Connect using a SCART cord not supplied to the LINE 1 TV jack and your TV Be sure to make the connections firmly to avoid ...

Страница 10: ...s to the markings inside the battery compartment When using the remote point it at the remote sensor on the recorder Notes If the supplied remote interferes your other Sony DVD recorder or player change the command mode number for this recorder page 20 Use the batteries correctly to avoid possible leakage and corrosion Do not touch the liquid with bare hands should leakage occur Observe the follow...

Страница 11: ...low the steps of Setting the clock see below Setting the clock 1 Press M m to select Settings and press Settings Setup appears 2 Press M m to select Clock and check that the clock is correctly set If incorrect set the clock manually page 72 Or the timer recording does not work properly 3 Follow the steps of Setting the aspect ratio for the connected TV see below Setting the aspect ratio for the co...

Страница 12: ...oder To watch or record PAY TV Canal Plus programmes set your recorder to receive the channels using the Setup Display See Channel Settings in Settings Setup page 70 z Hint You do not need to turn on the recorder to view the signals from the connected tuner on your TV Notes To watch or record PAY TV Canal Plus programmes from the LINE 1 TV jack set Line1 Decoder in Settings Setup to On page 73 If ...

Страница 13: ...tle List menu 1 Play a title whose thumbnail picture you want to change 2 Press PICTURE MARK at the scene you want to set for a thumbnail picture A thumbnail mark appears on the screen and the scene is set for the title s thumbnail picture To stop playback Press x To turn off the Title List Press O RETURN Chapter List When you select Chapter List from the sub menu for a title the Chapter List menu...

Страница 14: ...You can change the disc name up to 21 characters 1 Insert a disc 2 Press SET UP to turn on the Setup Display 3 Select Disc Info and press 4 Select Disc Name and press 5 While Edit is selected press ENTER The display for entering characters appears To enter characters see page 32 Note Label the disc before you finalize it Once a disc is finalized you cannot change the disc name Protecting a Disc Yo...

Страница 15: ...le pictures Pictures with copy protection cannot be recorded on this recorder When the recorder receives a copy guard signal the recorder stops recording The recorded disc can be played only on CPRM compatible equipment Timer Recording Standard VIDEO Plus You can set the timer for a total of seven programmes up to one month in advance There are two methods to set the timer the standard method and ...

Страница 16: ...r recording cannot be made if it overlaps with a programme that has priority Dup Date will appear for the overlapped setting in the Timer List Check the priority order of the settings page 42 Even if the timer is set timer recordings cannot be made while recording a programme that has priority The beginning of some recordings may not be made when using the PDC VPS function If the TIMER REC indicat...

Страница 17: ...ake a few seconds for recording to stop z Hint If you erase a title from a DVD RW it appears as Erased title in the Title List However this will not increase the remaining time on the disc You can select Erased title from the Title List and make a new recording on top of it page 61 Notes A protected title cannot be overwritten page 62 If the selected title is shorter than the new recording or less...

Страница 18: ...ound sound effects created from the front left and right speakers All discs subtitle Selects a subtitle language when pressed repeatedly angle Selects an angle when pressed repeatedly appears briefly at the scene where the angle to be changed If various angles multi angles for a scene are recorded on the disc appears in the front panel display Buttons Operations Discs RWVR RWVideo RW R R DVD DVD V...

Страница 19: ...number buttons in step 3 above Press M m to go to the next previous page of the list If you press O RETURN playback stops and the list menu disappears To turn on the list menu again press MENU When the disc contains both MP3 audio tracks and JPEG image files you can switch between lists Press TOP MENU then press to select MP3 or JPEG on the top of the menu and press ENTER Note on playing DTS sound...

Страница 20: ...G Folder 6 JPEG Folder 7 JPEG Folder 8 Folder JPEG Folder 1 JPEG Preview List 1 Image file1 jpg 2 Image file2 jpg 3 Image file3 jpg 4 Image file4 jpg 5 Image file5 jpg 6 Image file6 jpg 7 Image file7 jpg JPEG Folder 1 Folder continued 58 5 Select a file and press H or ENTER Slide show starts from the selected image file To pause playback press X To stop the slide show and return to the list menu p...

Страница 21: ...ch for the scene you want to erase by pressing x X and m M RW RWVR R R RWVideo RW RWVR R R RWVideo RWVR Current playback point Title 1 07 12 0 45 00 00 00 00 Set Point B Set Point A Cancel OK Title Edit A B Erase continued 62 4 Press ENTER at the start of the scene to be erased point A 5 Press ENTER at the end of the scene point B To reset either point A or B select Cancel and repeat from step 3 6...

Страница 22: ... the point where the chapters change New Playlist Select a Playlist Title 1 Title 2 1 5 Title 1 0 45 00 Chapter List Playlist 07 12 Tue 66 DV Dubbing Before DV Dubbing This section explains dubbing with a digital video camera via the DV IN jack on the front panel If you want to dub by way of the LINE IN jacks see Recording From Connected Equipment page 45 To record from the DV IN jack The DV IN ja...

Страница 23: ...isplay see Using the Setup Displays page 69 Auto Preset Presets all receivable channels automatically Select your country Then select Start and press ENTER Channel Settings Presets channels manually If some channels could not be set using the Auto Preset function you can set them manually If there is no sound or if the picture is distorted the wrong tuner system may have been preset during Auto Pr...

Страница 24: ...is connected to the COMPONENT VIDEO OUT jacks You will enjoy accurate colour reproduction and high quality image 16 9 4 3 Letter Box 4 3 Pan Scan Off The PBC function is not activated VIDEO CDs with PBC will be played the same way as audio CDs On The PBC function is activated when playing VIDEO CDs with PBC 74 Language Settings The Language Setup allows you to select a language for the recorder s ...

Страница 25: ...ords original sound at the time of shooting Normally select this when dubbing a DV Digital8 format tape Stereo 2 Records only additional sound over dubbed after shooting SLP Rec Mode Set Rec Setting Rec Aspect Ratio DV Audio Input HQ SP EP Auto Chapter Off No chapter mark is inserted 5Min Sets the interval to 5 minutes 10Min Sets the interval to 10 minutes 15Min Sets the interval to 15 minutes 78 ...

Страница 26: ...he channel was disabled after the timer recording was set See Channel Settings on page 70 Disconnect the mains lead from the mains and connect it again The programme contains copy protection signals that restrict copying Other timer setting overlapped the timer setting page 42 There is no recordable disc inserted in the recorder There is not enough disc space for the recording The disc is protecte...

Страница 27: ... be connected Required i LINK cable Use the Sony i LINK 4 pin to 4 pin cable during DV dubbing i LINK and are trademarks 86 Guide to Parts and Controls For more information see the pages in parentheses Front panel Buttons on the recorder have the same function as the buttons on the remote if they have the same or similar names A 1 on standby button 21 27 38 40 B Front panel display 31 88 C Disc tr...

Страница 28: ...as the multi angle multilingual and Parental Control functions are provided on the DVD 91 Additional Information File page 57 A JPEG image recorded on a DATA CD File is an exclusive definition for this recorder A single file consist of a single image Folder page 57 A unit in which to store JPEG image files on a DATA CD Folder is an exclusive definition for this recorder Interlace format page 73 In...

Страница 29: ...an KE Kenya KH Cambodia KR South Korea KW Kuwait LK Sri Lanka LU Luxembourg LY Libya MA Morocco MC Monaco MN Mongolia MV Maldives MX Mexico MY Malaysia NG Nigeria NL Netherlands NO Norway NP Nepal NZ New Zealand OM Oman PA Panama PH Philippines PK Pakistan PL Poland PT Portugal PY Paraguay RO Romania RU Russian Federation SA Saudi Arabia SE Sweden SG Singapore SI Slovenia SK Slovak Republic SN Sen...

Страница 30: ...oyu163 com QQ376315150 9 9 2 8 9 4 2 9 8 TEL 13942296513 9 9 2 8 9 4 2 9 8 0 5 1 5 1 3 6 7 3 Q Q TEL 13942296513 QQ 376315150 892498299 TEL 13942296513 QQ 376315150 892498299 http www xiaoyu163 com http www xiaoyu163 com ...

Страница 31: ... 2 Two side screws 3 8 1 Two side screws 3 8 3 Three screws 3 10 2 Three claws Front panel section 3 Three claws 1 Four claws www xiaoyu163 com QQ376315150 9 9 2 8 9 4 2 9 8 TEL 13942296513 9 9 2 8 9 4 2 9 8 0 5 1 5 1 3 6 7 3 Q Q TEL 13942296513 QQ 376315150 892498299 TEL 13942296513 QQ 376315150 892498299 http www xiaoyu163 com http www xiaoyu163 com ...

Страница 32: ...rews 3 8 1 Flat cable CN304 6 Video deck assy 2 Connector P1D01 3 Two screws 3 8 5 MD bracket www xiaoyu163 com QQ376315150 9 9 2 8 9 4 2 9 8 TEL 13942296513 9 9 2 8 9 4 2 9 8 0 5 1 5 1 3 6 7 3 Q Q TEL 13942296513 QQ 376315150 892498299 TEL 13942296513 QQ 376315150 892498299 http www xiaoyu163 com http www xiaoyu163 com ...

Страница 33: ...09 Sync Sep MM1443 AV S W 4in 3out Canal Plus V1 Tu E1 E2 Buffer V2 Tu E1 Ext 6dB 75ȍ Driver V3 E2 Ext 6dB 75ȍ Driver SCART 1 SCART 1 EU1_V_IN EU1_V_OUT RGB_OUT R_SCART_OUT G_SCART_OUT B_SCART_OUT SCART 2 SCART 2 EU2_V_IN EU2_V_OUT RGB_IN R_SCART_IN G_SCART_IN B_SCART_IN SDA5650 VPS PDC SDA5650 VPS PDC CVBS_OUT C_SEPA_OUT Pr_RCA_OUT Y_RCA_OUT Pb_RCA_OUT Y_SEPA_OUT CVBS_OUT MM1225 RGB_CONT L H 10K ...

Страница 34: ...t 5 65 Vdc 510 510 47K 47K 510 510 1 0K 1 0K 1 0K A_MUTE_H A_MUTE_L EU1_A_OUT_L EU1_A_OUT_R EU2_A_OUT_L EU2_A_OUT_R EU1_A_IN_L EU1_A_IN_R EU2_A_IN_L EU2_A_IN_R MCLK PCMIO_BCK PCMIO_LRCK PCMO_DATA ADC_DATA A_OUT_L A_OUT_R TU_A_L_OUT TU_A_R_OUT NJM2521 AUDIO S W NJM2521 AUDIO S W A_SEL_1 2 AUDIO SELECT SW_A_L R H L R_A_L R H H F_A_L R L L AUDIO SELECT SW_A_L R H L R_A_L R H H F_A_L R L L SW_A_L_OUT ...

Страница 35: ...T656 format 8Bit Data Data Clock TVP5146 Clock Output is High Z State by IIC control 3 state buffer is Enabled by enable pin Low state VIN_CLK Data Clock 27MHz is generated from IC503 10 9 8 MPEG DECODER CS98200 IC301 oj W pj WZ oj W pj WZ 27MHz CS982_CLK I2C Control pj WZ sj XY 10 9 8 p u a W p u j s r V1_ IN 75ȍ V2_ IN 75ȍ Y_ IN 75ȍ C_ IN 75ȍ 100Kȍ TUNER TUNER RF SIGNAL 1 7 8 17 80 40 43 44 45 4...

Страница 36: ...6 75MHz VIDEO DECODER TVP5146 IC501 MPEG ENCODER CS92686 IC201 DV PHY TSB41AB1 IC401 DV PHY TSB41AB1 IC401 24 576MHz PCNT 1 0 DVCLK PD 7 0 TPA TPB 151 154 57 58 59 60 102 103 104 106 211 205 208 TU_V_IN DV 1394 input From JACK board TUNER TUNER RF SIGNAL V1_ IN V2_ IN Y_ IN C_ IN 14 31818MHz jz _Y jsrG 231 214 215 216 0 1 3 3V 260 261 262 157 131 74HC04 IC504 74HC04 IC504 27MHz zt z zjsr 183 DV_PA...

Страница 37: ...j WZ sj XY G 226 234 224 222 4 185 34 33 35 36 PCMIO_LRCK PCMI_DATA PCMIO_BCK 199 200 k GMGsyjrGaGp G G l Gk XZ G k XZ G ulySh Gp llVyljG SPDIF_OUT 235 pYzG v w SGh GMGk G h Gp G svvwGihjrG I2C Control I2C Control 1st LPF Gain 3 03 DV 1394 input From JACK board NJM2521 AUDIO S W NJM2521 AUDIO S W NJM2521 AUDIO S W NJM2521 AUDIO S W mThTsTpu z ThTv Ts yThTsTpu mThTyTpu z ThTv Ty yThTyTpu 3 9 3 10 w...

Страница 38: ...114 113 HOST_RESET 68 64 65 6 4 8 2 16 11 27 69 16 39 pj W rph WZX 3 1 5 3VA 37 10K 10K 5 3VA 2 2K SYS_5 3VA 470UF 3 1 56 112 36 77 44 11 22 2 13 9 10 59 60 12 13 FLD_RXD FLD_ENA_L FLD_RESET FLD_CLK 5 3VA 10K 2 2K 100K 70 S_DET_H S_DET From JACK BOARD Reset_L VCC A VCC 3 11 3 12 w w w x i a o y u 1 6 3 c o m Q Q 3 7 6 3 1 5 1 5 0 9 9 2 8 9 4 2 9 8 T E L 1 3 9 4 2 2 9 6 5 1 3 9 9 2 8 9 4 2 9 8 0 5 ...

Страница 39: ... wZ Z wZ Z X MPEG Encoder CS92686 IC201 SDRAM SDRAM SDRAM 64Mbit IC302 IC303 SDRAM 64Mbit IC302 IC303 SDRAM SDRAM SDRAM 16Mbit IC202 IC205 SDRAM 16Mbit IC202 IC205 pYjGw T sZW s WX s W s W sYWX sYWYG sYWZG sYW s WX s WY s W sZWX sZWY sZWZ sZW sZW sZW s W s ZG s YG s XG s G s G s G 3 13 3 14 w w w x i a o y u 1 6 3 c o m Q Q 3 7 6 3 1 5 1 5 0 9 9 2 8 9 4 2 9 8 T E L 1 3 9 4 2 2 9 6 5 1 3 9 9 2 8 9 ...

Страница 40: ... 6 3 c o m Q Q 3 7 6 3 1 5 1 5 0 9 9 2 8 9 4 2 9 8 T E L 1 3 9 4 2 2 9 6 5 1 3 9 9 2 8 9 4 2 9 8 0 5 1 5 1 3 6 7 3 Q Q TEL 13942296513 QQ 376315150 892498299 TEL 13942296513 QQ 376315150 892498299 http www xiaoyu163 com http www xiaoyu163 com ...

Страница 41: ...k Y zw kpm ZW nuk X jGv Y nuk Z Gv nuk j izGv nuk GGy Gv _ GnGv GiGv XW nuk XX z G Gv XY nuk XZ nGzjhy Gpu X nuk X y Gzjhy Gpu X nuk X iGzjhy Gpu X_ UX X nuk YW ZUZ YX ZUZ YY nuk YZ XU_ Y XU_ Y XU_ Y nuk Y m GhGsGpu Y_ nuk Y m GhGy Gpu ZW nuk X Y Z X Y Z m s m sk l u l uh m s m sk y l z y l zl l nu nuk m s m sk js jsr m s m sk k m s m sk y y k pVvGivhyk thpuGivhyk ztwzGivhyk ptylGivhyk w WX w WY w...

Страница 42: ... y v ot y okthy x nuk ot kW ot ot kX ot kY ot ot kZ ot k ot ot k ot k ot ot k h hw p y z W Z_ Z Z ZY ZW Y_ Y Y YY YW X_ X X XY XW _ Y nuk ot t jzX ot hY w kphn uj nuk jz nuk nuk nuk uj ot t kX ot t kX ot t kXZ ot t kXY ot kXX ot ot kXW ot ot k ot k_ nuk wu XWX juXWX w w w x i a o y u 1 6 3 c o m Q Q 3 7 6 3 1 5 1 5 0 9 9 2 8 9 4 2 9 8 T E L 1 3 9 4 2 2 9 6 5 1 3 9 9 2 8 9 4 2 9 8 0 5 1 5 1 3 6 7 3...

Страница 43: ...k 0 or dotted line with mark 0 are critical for safety Replace only with part number specified w w w x i a o y u 1 6 3 c o m Q Q 3 7 6 3 1 5 1 5 0 9 9 2 8 9 4 2 9 8 T E L 1 3 9 4 2 2 9 6 5 1 3 9 9 2 8 9 4 2 9 8 0 5 1 5 1 3 6 7 3 Q Q TEL 13942296513 QQ 376315150 892498299 TEL 13942296513 QQ 376315150 892498299 http www xiaoyu163 com http www xiaoyu163 com ...

Страница 44: ... 8 MPEG ENCODER MAIN 1 3 w w w x i a o y u 1 6 3 c o m Q Q 3 7 6 3 1 5 1 5 0 9 9 2 8 9 4 2 9 8 T E L 1 3 9 4 2 2 9 6 5 1 3 9 9 2 8 9 4 2 9 8 0 5 1 5 1 3 6 7 3 Q Q TEL 13942296513 QQ 376315150 892498299 TEL 13942296513 QQ 376315150 892498299 http www xiaoyu163 com http www xiaoyu163 com ...

Страница 45: ...H I J K L M N O P Q R S T w w w x i a o y u 1 6 3 c o m Q Q 3 7 6 3 1 5 1 5 0 9 9 2 8 9 4 2 9 8 T E L 1 3 9 4 2 2 9 6 5 1 3 9 9 2 8 9 4 2 9 8 0 5 1 5 1 3 6 7 3 Q Q TEL 13942296513 QQ 376315150 892498299 TEL 13942296513 QQ 376315150 892498299 http www xiaoyu163 com http www xiaoyu163 com ...

Страница 46: ...B C D E F G H I J K L M N O P Q R S T w w w x i a o y u 1 6 3 c o m Q Q 3 7 6 3 1 5 1 5 0 9 9 2 8 9 4 2 9 8 T E L 1 3 9 4 2 2 9 6 5 1 3 9 9 2 8 9 4 2 9 8 0 5 1 5 1 3 6 7 3 Q Q TEL 13942296513 QQ 376315150 892498299 TEL 13942296513 QQ 376315150 892498299 http www xiaoyu163 com http www xiaoyu163 com ...

Страница 47: ...P Q R S T w w w x i a o y u 1 6 3 c o m Q Q 3 7 6 3 1 5 1 5 0 9 9 2 8 9 4 2 9 8 T E L 1 3 9 4 2 2 9 6 5 1 3 9 9 2 8 9 4 2 9 8 0 5 1 5 1 3 6 7 3 Q Q TEL 13942296513 QQ 376315150 892498299 TEL 13942296513 QQ 376315150 892498299 http www xiaoyu163 com http www xiaoyu163 com ...

Страница 48: ...P Q R S T w w w x i a o y u 1 6 3 c o m Q Q 3 7 6 3 1 5 1 5 0 9 9 2 8 9 4 2 9 8 T E L 1 3 9 4 2 2 9 6 5 1 3 9 9 2 8 9 4 2 9 8 0 5 1 5 1 3 6 7 3 Q Q TEL 13942296513 QQ 376315150 892498299 TEL 13942296513 QQ 376315150 892498299 http www xiaoyu163 com http www xiaoyu163 com ...

Страница 49: ...O P Q R S T w w w x i a o y u 1 6 3 c o m Q Q 3 7 6 3 1 5 1 5 0 9 9 2 8 9 4 2 9 8 T E L 1 3 9 4 2 2 9 6 5 1 3 9 9 2 8 9 4 2 9 8 0 5 1 5 1 3 6 7 3 Q Q TEL 13942296513 QQ 376315150 892498299 TEL 13942296513 QQ 376315150 892498299 http www xiaoyu163 com http www xiaoyu163 com ...

Страница 50: ...N O P Q R S T w w w x i a o y u 1 6 3 c o m Q Q 3 7 6 3 1 5 1 5 0 9 9 2 8 9 4 2 9 8 T E L 1 3 9 4 2 2 9 6 5 1 3 9 9 2 8 9 4 2 9 8 0 5 1 5 1 3 6 7 3 Q Q TEL 13942296513 QQ 376315150 892498299 TEL 13942296513 QQ 376315150 892498299 http www xiaoyu163 com http www xiaoyu163 com ...

Страница 51: ...w w w x i a o y u 1 6 3 c o m Q Q 3 7 6 3 1 5 1 5 0 9 9 2 8 9 4 2 9 8 T E L 1 3 9 4 2 2 9 6 5 1 3 9 9 2 8 9 4 2 9 8 0 5 1 5 1 3 6 7 3 Q Q TEL 13942296513 QQ 376315150 892498299 TEL 13942296513 QQ 376315150 892498299 http www xiaoyu163 com http www xiaoyu163 com ...

Страница 52: ...701 57 SIF_OUT CN304 25 HM_RD CN304 23 HM_WR IC301 226 PCM_XCLK IC301 224 PCM_BCK IC301 234 PCM_DATA IC301 222 PCM_LRCK IC304 28 FLASH_OE IC304 11 FLASH_WE IC301 113 HOST_TXD IC301 114 HOST_RXD IC301 257 CVBS_OUT IC301 211 R_OUT IC301 208 G_OUT IC301 205 B_OUT w w w x i a o y u 1 6 3 c o m Q Q 3 7 6 3 1 5 1 5 0 9 9 2 8 9 4 2 9 8 T E L 1 3 9 4 2 2 9 6 5 1 3 9 9 2 8 9 4 2 9 8 0 5 1 5 1 3 6 7 3 Q Q T...

Страница 53: ...191 1 62 1 64 1 67 192 0 00 0 00 0 00 193 3 09 3 15 3 20 194 2 03 2 06 2 10 195 2 05 2 10 2 10 196 1 88 1 94 1 99 197 0 00 0 00 0 00 198 3 20 3 24 3 24 199 2 02 2 08 2 08 200 1 83 1 94 1 95 201 2 02 2 06 2 06 202 2 00 2 04 2 06 203 0 00 0 00 0 00 204 3 11 3 11 3 11 205 2 01 2 01 2 06 206 2 00 2 07 2 07 207 1 87 1 91 1 96 208 0 00 0 00 0 00 209 3 20 3 21 3 24 210 0 00 0 00 0 00 211 1 84 1 91 1 91 2...

Страница 54: ... 0 00 0 00 0 00 226 1 54 1 54 1 56 227 0 00 0 00 0 00 228 0 00 0 00 0 00 229 1 03 1 08 1 12 230 3 20 3 21 3 21 231 2 46 2 48 2 49 232 2 64 2 67 2 67 233 0 00 0 00 0 00 234 1 10 1 12 1 12 235 1 60 1 62 1 67 236 0 00 0 00 0 00 237 0 00 0 00 0 00 238 0 00 0 00 0 00 239 0 00 0 00 0 00 240 0 00 0 00 0 00 1 3 20 3 24 3 24 2 0 27 0 28 0 28 3 3 20 3 24 3 27 4 0 31 0 32 0 33 5 0 13 0 14 0 14 6 0 00 0 00 0 ...

Страница 55: ...3 42 3 42 3 44 82 5 08 5 08 5 08 83 0 00 0 00 0 00 84 0 00 0 00 0 00 85 0 00 0 00 0 00 86 2 53 2 54 2 54 87 2 53 2 54 2 57 88 4 94 4 94 4 98 89 4 04 4 04 4 04 90 2 18 2 19 2 19 91 4 27 4 29 4 32 92 5 01 5 01 5 01 93 0 00 0 00 0 00 94 0 00 0 00 0 00 95 0 00 0 00 0 00 96 0 30 0 30 0 32 97 0 00 0 00 0 00 98 0 00 0 00 0 00 99 2 06 2 10 2 10 100 0 00 0 00 0 00 101 0 00 0 00 0 00 102 0 00 0 00 0 00 103 ...

Страница 56: ...s that the part isn t mounted in this model is printed on this diagram MAIN BOARD TOP A B C 05 2 1 3 4 5 D E F G H I 6 7 8 9 10 11 12 SECTION 5 PRINTED WIRING BOARDS MAIN w w w x i a o y u 1 6 3 c o m Q Q 3 7 6 3 1 5 1 5 0 9 9 2 8 9 4 2 9 8 T E L 1 3 9 4 2 2 9 6 5 1 3 9 9 2 8 9 4 2 9 8 0 5 1 5 1 3 6 7 3 Q Q TEL 13942296513 QQ 376315150 892498299 TEL 13942296513 QQ 376315150 892498299 http www xiao...

Страница 57: ... 8 ZD727 B 10 ZD728 B 10 ZD729 B 7 ZD730 B 7 ZD731 B 8 ZD732 B 9 ZD733 B 8 ZD734 A 10 ZD735 B 9 ZD736 B 8 ZD737 C 9 ZD738 C 9 ZD739 C 10 ZD740 B 9 ZD741 B 9 ZD742 B 10 ZD743 B 9 ZD744 C 9 ZD745 B 9 ZD746 B 9 ZD747 C 9 ZD749 C 8 IC501 F 4 IC505 F 2 IC701 F 10 IC702 D 5 IC703 G 10 IC704 G 11 IC705 C 4 IC706 H 11 IC707 D 4 IC708 F 9 IC709 D 9 IC710 D 8 IC711 D 8 IC712 D 9 IC801 D 1 IC802 C 2 Q501 E 3...

Страница 58: ...OUT S VIDEO Y PR CR PB CB COMPONENT RGB VIDEO OUT SELECT I O BOARD BOTTOM IC502 E 3 IC503 G 2 IC504 D 3 P7101 F 1 P7102 C 1 PIM01 E 7 PIM02 G 7 PM101 H 1 PM501 F 2 PMT01 I 9 w w w x i a o y u 1 6 3 c o m Q Q 3 7 6 3 1 5 1 5 0 9 9 2 8 9 4 2 9 8 T E L 1 3 9 4 2 2 9 6 5 1 3 9 9 2 8 9 4 2 9 8 0 5 1 5 1 3 6 7 3 Q Q TEL 13942296513 QQ 376315150 892498299 TEL 13942296513 QQ 376315150 892498299 http www x...

Страница 59: ...gram KEY BOARD BOTTOM 05 H X x zREC PROGRAM A PROGRESSIVE TIMER REC TIMER BOARD TOP 05 TIMER BOARD BOTTOM 05 I 1 w w w x i a o y u 1 6 3 c o m Q Q 3 7 6 3 1 5 1 5 0 9 9 2 8 9 4 2 9 8 T E L 1 3 9 4 2 2 9 6 5 1 3 9 9 2 8 9 4 2 9 8 0 5 1 5 1 3 6 7 3 Q Q TEL 13942296513 QQ 376315150 892498299 TEL 13942296513 QQ 376315150 892498299 http www xiaoyu163 com http www xiaoyu163 com ...

Страница 60: ...is model is printed on this diagram R L AUDIO JACK BOARD VIDEO S VIDEO DV IN 05 www xiaoyu163 com QQ376315150 9 9 2 8 9 4 2 9 8 TEL 13942296513 9 9 2 8 9 4 2 9 8 0 5 1 5 1 3 6 7 3 Q Q TEL 13942296513 QQ 376315150 892498299 TEL 13942296513 QQ 376315150 892498299 http www xiaoyu163 com http www xiaoyu163 com ...

Страница 61: ...oyu163 com QQ376315150 9 9 2 8 9 4 2 9 8 TEL 13942296513 9 9 2 8 9 4 2 9 8 0 5 1 5 1 3 6 7 3 Q Q TEL 13942296513 QQ 376315150 892498299 TEL 13942296513 QQ 376315150 892498299 http www xiaoyu163 com http www xiaoyu163 com ...

Страница 62: ...ES YES Replace the TH01 Is the D102 normal Check or Replace the D102 Replace the IC103 NO YES Is there about 2 5V at the IC103 Pin1 Power in Main PCB is short Is Vcc 14V 20V supplied to IC101 Pin3 YES YES YES www xiaoyu163 com QQ376315150 9 9 2 8 9 4 2 9 8 TEL 13942296513 9 9 2 8 9 4 2 9 8 0 5 1 5 1 3 6 7 3 Q Q TEL 13942296513 QQ 376315150 892498299 TEL 13942296513 QQ 376315150 892498299 http www ...

Страница 63: ...heck or Replace the D134 No 5 0VT Is the Vcc 5 3V supplied to Q124 Emittor Check or Replace the Q124 Is the Q122 Base H NO NO YES Check the TIMER H signal from µ com YES YES www xiaoyu163 com QQ376315150 9 9 2 8 9 4 2 9 8 TEL 13942296513 9 9 2 8 9 4 2 9 8 0 5 1 5 1 3 6 7 3 Q Q TEL 13942296513 QQ 376315150 892498299 TEL 13942296513 QQ 376315150 892498299 http www xiaoyu163 com http www xiaoyu163 co...

Страница 64: ...e D125 Check the PWR CTL H signal from µ com YES No 3 3V Is there about 3 7V at the IC152 pin1 Is there about 3 3V 5V at the IC152 pin4 Check the IC152 and Replace YES YES www xiaoyu163 com QQ376315150 9 9 2 8 9 4 2 9 8 TEL 13942296513 9 9 2 8 9 4 2 9 8 0 5 1 5 1 3 6 7 3 Q Q TEL 13942296513 QQ 376315150 892498299 TEL 13942296513 QQ 376315150 892498299 http www xiaoyu163 com http www xiaoyu163 com ...

Страница 65: ...C301 231 27M OSC_IN IC301 157 CVBS CVBS Check IC708 23 CVBS_OUT DRIVE not recognized Check DRIVE power 5V 12V Check ATAPI interface connector CN304 2 System Circuit www xiaoyu163 com QQ376315150 9 9 2 8 9 4 2 9 8 TEL 13942296513 9 9 2 8 9 4 2 9 8 0 5 1 5 1 3 6 7 3 Q Q TEL 13942296513 QQ 376315150 892498299 TEL 13942296513 QQ 376315150 892498299 http www xiaoyu163 com http www xiaoyu163 com ...

Страница 66: ... signal normal IC702 11 12 I2C signal normal Check IC702 24 27 and Other circuits Check IC301 circuits Concerned audio Check IC702 IC301 I2C signal www xiaoyu163 com QQ376315150 9 9 2 8 9 4 2 9 8 TEL 13942296513 9 9 2 8 9 4 2 9 8 0 5 1 5 1 3 6 7 3 Q Q TEL 13942296513 QQ 376315150 892498299 TEL 13942296513 QQ 376315150 892498299 http www xiaoyu163 com http www xiaoyu163 com ...

Страница 67: ... other circuits YES NO YES NO YES NO Q501 Base Video input is Normal YES NO Check X701 C709 C710 X701 18 432MHz Clock is Okay YES NO Check X701 C709 C710 Check IC504 and other circuits IC701 2 pin SIF signal is Okay YES NO Check TUNER and other circuits No Tuner Audio Output www xiaoyu163 com QQ376315150 9 9 2 8 9 4 2 9 8 TEL 13942296513 9 9 2 8 9 4 2 9 8 0 5 1 5 1 3 6 7 3 Q Q TEL 13942296513 QQ 3...

Страница 68: ... IC704 AUDIO SWITCH Check Control signal from MICOM IC501 Tuner 2pin High 4pin Low AV1 2pin High 4pin High AV2 2pin Low 4pin Low Check signal path from RCA JACK to IC703 704 When AV2 Input PIM02 PMI02 27 29p in are okay YES NO Check Connector PIM02 PMI02 When AV2 Input PMJ01 PJM01 2 3pin are okay YES NO Check Connector PMJ01 PJM01 and Cable www xiaoyu163 com QQ376315150 9 9 2 8 9 4 2 9 8 TEL 13942...

Страница 69: ...08 6 Check IC301 154 Check IC301 131 VIN_CLK Check IC301 ATAPI interface Power System CLK S_VIDEO No C signal Check IC708 2 Check IC301 151 www xiaoyu163 com QQ376315150 9 9 2 8 9 4 2 9 8 TEL 13942296513 9 9 2 8 9 4 2 9 8 0 5 1 5 1 3 6 7 3 Q Q TEL 13942296513 QQ 376315150 892498299 TEL 13942296513 QQ 376315150 892498299 http www xiaoyu163 com http www xiaoyu163 com ...

Страница 70: ...ATA normal Check IC401 2 3 Control signal Check IC401 and Other circuits Check IC401 and Other circuits Check IC401 and Other circuits www xiaoyu163 com QQ376315150 9 9 2 8 9 4 2 9 8 TEL 13942296513 9 9 2 8 9 4 2 9 8 0 5 1 5 1 3 6 7 3 Q Q TEL 13942296513 QQ 376315150 892498299 TEL 13942296513 QQ 376315150 892498299 http www xiaoyu163 com http www xiaoyu163 com ...

Страница 71: ...oyu163 com QQ376315150 9 9 2 8 9 4 2 9 8 TEL 13942296513 9 9 2 8 9 4 2 9 8 0 5 1 5 1 3 6 7 3 Q Q TEL 13942296513 QQ 376315150 892498299 TEL 13942296513 QQ 376315150 892498299 http www xiaoyu163 com http www xiaoyu163 com ...

Страница 72: ...2 9 885 077 95 SCREW 3X10 453 9 885 079 06 CABLE FLAT 463 9 885 077 75 SCREW 3X8 465 9 885 077 98 SCREW 3X10BK 467 9 885 077 74 SIDE SCREW 3X8 EXCEPT AEP1 BLACK 467 9 885 079 33 SIDE SCREW 3X8 AEP1 BLACK 468 9 885 077 99 SCREW 3X20 469 9 885 078 07 SCREW 3X6 5 470 9 885 078 08 SCREW 3X24 A43 A 1107 507 A FRONT PANEL ASSY UK A43 A 1110 125 A FRONT PANEL ASSY AEP1 SILVER AEP2 A43 A 1110 320 A FRONT ...

Страница 73: ... 41 MANUAL INST DANISH AEP2 801 2 548 698 51 MANUAL INST FINNISH AEP2 802 1 479 164 11 REMOTE COMMANDER RMT D215P 803 1 696 593 11 CORD CONNECTION PAL 806 9 885 078 16 CABLE RF 811 9 885 078 17 CABLE 1WAY 812 9 885 078 18 CABLE 2WAY not supplied Cable Coaxial Plug Ass y 1Way Plug Ass y 2Way not supplied not supplied Instruction Ass y not supplied not supplied 806 Cable Connection 803 811 812 801 R...

Страница 74: ...2W6 8V ZD704 9 885 078 28 DIODE Z02W6 8V ZD705 9 885 078 28 DIODE Z02W6 8V ZD706 9 885 078 28 DIODE Z02W6 8V ZD707 9 885 078 28 DIODE Z02W6 8V ZD708 9 885 078 28 DIODE Z02W6 8V ZD709 9 885 078 28 DIODE Z02W6 8V ZD710 9 885 078 28 DIODE Z02W6 8V ZD711 9 885 078 28 DIODE Z02W6 8V ZD712 9 885 078 28 DIODE Z02W6 8V ZD713 9 885 078 28 DIODE Z02W6 8V ZD714 9 885 078 28 DIODE Z02W6 8V ZD715 9 885 078 28 ...

Страница 75: ...78 32 DIODE GDZJ5 6B ZD918 9 885 078 32 DIODE GDZJ5 6B ZD919 9 885 078 32 DIODE GDZJ5 6B ZD920 9 885 078 32 DIODE GDZJ5 6B A 1107 517 A MAIN BOARD COMPLETE IC204 8 759 832 09 IC M12L16161A 7T IC205 8 759 832 09 IC M12L16161A 7T IC301 9 885 078 72 IC MS8202 CMZ Caution2 IC302 9 885 073 40 IC M12L64164A 7T IC304 9 885 079 94 IC MEMORIES AEP1 IC304 9 885 079 95 IC MEMORIES AEP2 IC304 9 885 079 93 IC ...

Страница 76: ...C KA431AZ IC151 9 885 078 66 IC G9133 IC153 9 885 078 64 IC KIA78R12PI CU IC154 9 885 078 67 IC KIA278R05PI CU IC156 9 885 078 64 IC KIA78R12PI CU IC158 9 885 078 68 IC KIA278R12PI CU IC160 9 885 078 69 IC PQ070VK02LZH CONNECTOR PW101 9 885 078 78 CONNECTOR GP390 TRANSISTOR Q120 9 885 039 70 TRANSISTOR KSB1151 Y Q121 9 885 078 47 TRANSISTOR KRC103M Q122 9 885 078 47 TRANSISTOR KRC103M Q123 9 885 0...

Страница 77: ...005H0500 1 2005 8 Published by Quality Assurance Dept www xiaoyu163 com QQ376315150 9 9 2 8 9 4 2 9 8 TEL 13942296513 9 9 2 8 9 4 2 9 8 0 5 1 5 1 3 6 7 3 Q Q TEL 13942296513 QQ 376315150 892498299 TEL 13942296513 QQ 376315150 892498299 http www xiaoyu163 com http www xiaoyu163 com ...

Отзывы: