background image

37 

Creating a linked Table of Contents in Acrobat 

 
1.  Open the PDF in Adobe

®

 Acrobat

®

 Standard or Adobe Acrobat Professional. 


2. Open 

Tools 

Œ

 Advanced Editing 

Œ

 Link Tool. 


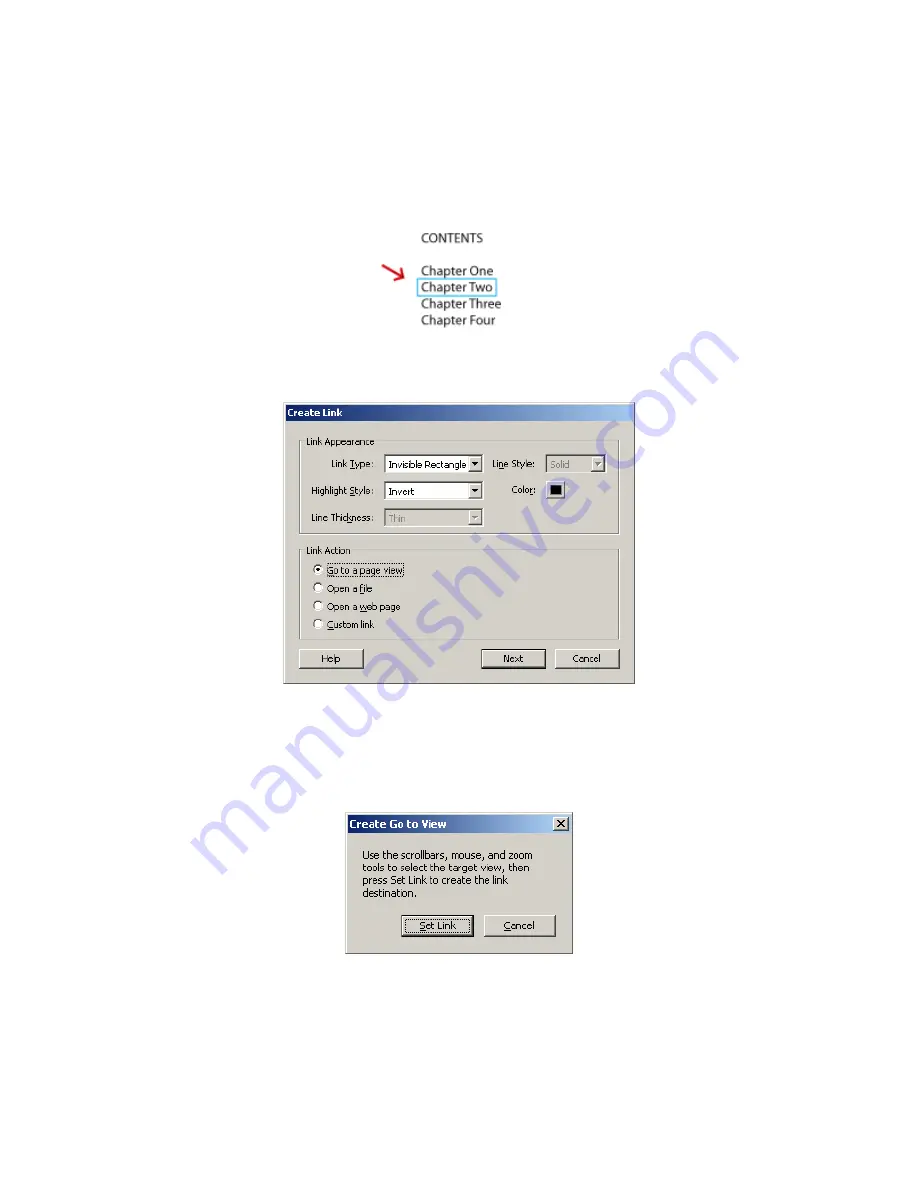
3.  Using the Link Tool, draw a rectangle around the text to be linked. 


4.  Releasing the cursor after drawing the rectangle will launch the “Create Link” dialog. 

Apply the settings shown below. Be sure that “Go to a page view” is selected. 


Click “Next” to bring up the “Create Go To View” dialog. 

 
5.  DO NOT select “Set Link” immediately. Instead, scroll to the page that you want the 

link to navigate to when it is clicked in your PDF. (You can also use View 

Œ

 Go To 

Œ


Page and enter the page number to go directly to that page.) 


6.  Click “Set Link” to complete the link. 

Содержание PRS950BC

Страница 1: ...User s Guide to Creating PDFs for the Sony Reader 1 ...

Страница 2: ...nd layout in Microsoft PowerPoint and OpenOffice org Impress x Generate PDFs with appropriate settings using Adobe PDF or PDF Creator printer IV Creating PDFs from Professional Layout Applications Create presentations with optimized dimensions and layout in QuarkXPress software and Adobe InDesign x Ensure proper font and image embedding x Generate PDFs with appropriate settings using Adobe PDF or ...

Страница 3: ...display clearly on the Reader is to size the PDF properly when you create it and to set margins font sizes etc within a range that is suited to the Reader s screen size and resolution This instructional document is intended to provide all the information necessary to create PDFs that are ready to be viewed in the Sony Reader from a variety of common applications PDF Creation Software On a computer...

Страница 4: ...12 height Pixel size rectangular 151 x 153 microns Screen resolution 166 dots per inch DPI Grayscale capability 2 bit 4 gray levels Font recommendations for the Sony Reader A range of fonts and font sizes will display clearly in PDFs on the Sony Reader As a general starting point we recommend using Arial and Times Roman as base fonts at sizes of 7 points Text is legible at 6 points though at this ...

Страница 5: ...r further enhancing your PDF with links are available in Section V Doing More with Adobe Acrobat Microsoft Word 1 To set document size and margin settings select File Page Setup 2 In the Margins tab check that all units are calculated in terms of inches Throughout this instructional document all measurements are displayed in inches 3 If you need to change measurement units to inches click the Canc...

Страница 6: ...6 7 In the Paper tab set width to 3 47 and height at 4 54 Under Preview section select Apply to Whole document Press OK ...

Страница 7: ...tor you can create PDFs using Microsoft Word s Print menu Adobe Acrobat Standard or Professional 1 Select File Print 2 For Printer select Adobe PDF 3 Click Properties in the Print dialog box This may appear as Preferences instead of Properties depending on the version of Windows you are using Select the Adobe PDF Settings tab 4 Click the Add Custom Page button ...

Страница 8: ...nch Then click the Add Modify button This will bring you back to the Adobe PDF Settings tab In the future your new custom size will be available for you to select in the Adobe PDF Settings tab no need to repeat the Add Custom Page routine 5 Select the Edit button next to the Default Settings field 6 Select the settings shown in the following figures ...

Страница 9: ...9 General tab Images tab ...

Страница 10: ...10 Fonts tab Color tab ...

Страница 11: ... to create a PDF optimized for the Sony Reader just select the Adobe PDF printer click Properties or Preferences and select your preset in the Default Settings list within the Adobe PDF Settings tab see 3 above 8 Press the OK button and provide a filename and location for your PDF file to be written to 9 To set the filename and author that will appear in the Sony Reader menu open your PDF in Adobe...

Страница 12: ... select Document Properties Type the title and author in the corresponding fields PDF Creator 1 Optimize document size and margin settings in Microsoft Word see p 5 step 1 2 Select File Print 3 For Printer select PDFCreator ...

Страница 13: ...13 4 Click Properties in the Print dialog box Select the Paper Quality tab With the Color option selected click the Advanced tab 5 Select PostScript Custom Page ...

Страница 14: ...stom Page Size Dimensions at 3 47 Width by 4 54 Height with Inch as selected Unit Press the OK button 7 In the PDF Creator dialog box type the title and author that you want to appear in the Sony Reader file menu ...

Страница 15: ...iter OpenOffice org is a suite of free open source cross platform applications intended to provide an alternative to Microsoft Office 1 To set page settings select Format Page 2 In the Page tab check that units are displayed in inches Throughout this instructional document all measurements are displayed in inches 3 If you need to change measurement units to inches click the Cancel button then sele...

Страница 16: ...o 4 54 Under Margins set all margins to 0 15 Create PDF using Adobe PDF or PDF Creator printer 1 Select File Print 2 For Printer select either Adobe PDF or PDFCreator 3 Follow instructions provided for creating PDFs in Microsoft Word using either of these PDF rendering applications see above ...

Страница 17: ...inches Inches is the default measurement unit in PowerPoint PowerPoint does not support margin setup Create PDF using Adobe PDF printer or PDF Creator 1 Select File Print 2 For Printer select either Adobe PDF or PDFCreator 3 Follow instructions provided for creating PDFs in Microsoft Word using either of these PDF rendering applications see above OpenOffice org Impress 1 To set document size and m...

Страница 18: ...es Under Margins set all margins to 0 15 inches Then click OK Create PDF using Adobe PDF printer or PDF Creator 1 Select File Print 2 For Printer select either Adobe PDF or PDFCreator 3 Follow instructions provided for creating PDFs in Microsoft Word using either of these PDF rendering applications see above ...

Страница 19: ... properly before you output your PDF The final part of the process is to generate a PDF with appropriate settings Instructions for further enhancing your PDF with links are available in Section V Doing More with Adobe Acrobat QuarkXPress software 1 First ensure that the measurement fields that you will be seeing in all menus are in inches by navigating to Edit Preferences selecting Measurements an...

Страница 20: ...ll fonts that you have used in your document on your computer Any font that QuarkXPress cannot find will not be properly embedded in your PDF To check your font usage go to the Utilities menu select Usage and then select the Fonts tab If all fonts have been properly embedded the fonts will simply be listed by name as in the following screenshot However if you have used fonts in your document that ...

Страница 21: ...mage inside your QuarkXPress document what you see inside the QuarkXPress document itself is a low resolution preview of the original image the original is still being stored separately on your hard drive If you then move the original image file to another location on your hard drive before creating your PDF you need to tell QuarkXPress program the new location Otherwise the PDF that you create wi...

Страница 22: ...eady to output your PDF the first step is to define a Print Style appropriate for the Sony Reader Once you have created this Print Style it will remain available for future use To define a Print Style go to Edit Print Styles In the dialog select New and provide a name for your Sony Reader optimized print style for example SonyPrintStyle Settings for the print style are as follows Layout ...

Страница 23: ...23 Setup Output Options ...

Страница 24: ...e Printer menu at the top of the dialog select Adobe PDF 9 Click the Properties button to the right of the Printer menu in order to select the proper PDF settings In the Default settings menu select Sony Settings See Section V Doing More with Adobe Acrobat for instructions on creating or installing this Sony optimized PDF preset In the Adobe PDF Settings tab ensure that Do not send fonts to Adobe ...

Страница 25: ...ge Size menu Change the Width and Height fields to the values shown below Provide a new Paper Name for example SonySize and then click the Add Modify button 11 You will be returned to the Adobe PDF Document Properties Make sure to select your new Paper Name in the Adobe PDF Page Size field ...

Страница 26: ...ct the Sony Reader optimized print style that you created in step 7 above for example SonyPrintStyle This print style will generate most of the settings in the various tabs depicted below The key exception to this is the OPI tab so please be sure to follow instructions for that tab below Layout ...

Страница 27: ...27 Setup Output Options ...

Страница 28: ...28 Layers Bleed OPI Ensure that OPI Active is unchecked and that the rest of the settings are grayed out 13 Click the Print button to generate your Sony Reader optimized PDF ...

Страница 29: ...ferences Units Increments Set origin to page and ensure that units are in inches 2 Open a new document by selecting File New Document Apply settings shown in the image below Click the More Options button if the bleed settings are not visible ...

Страница 30: ...ument As a general styling recommendation fonts appear clearly on the Reader at a minimum size of 6 or 7 points 5 Before generating a PDF check font usage by going to Type Find Font Any fonts that are identified as missing should be replaced using the Replace with menu or moved into the fonts folder on your Windows PC ...

Страница 31: ...d into your InDesign document and the link has not yet been updated To update a link double click the image name in the Links palette to launch the Link Information dialog Click the Relink button and navigate to the new location of the image in order to relink it When you return to the Links palette the question mark icon will be gone 7 Before outputting your PDF file go to File Print Presets Defi...

Страница 32: ...32 General Setup For Paper Size select Custom Then provide settings as shown below ...

Страница 33: ...33 Marks and Bleed Output ...

Страница 34: ...34 Graphics Color Management ...

Страница 35: ...reated will now be available as a setting in the InDesign Print menu 9 To generate your PDF select File Print In the Print dialog select SonyPrintPreset as the Print Preset All fields will be populated with the settings from your Print Preset Click Print ...

Страница 36: ...op down menu select Rich Text Format rtf Please note that if security settings have been applied to the PDF this option may not be available 3 Click the Settings button Select the settings shown in the screenshot below Name and save the RTF file 4 Open the RTF file in Microsoft Word or OpenOffice org Writer and optimize it for the Sony Reader by applying settings provided in Section II of this ins...

Страница 37: ...sor after drawing the rectangle will launch the Create Link dialog Apply the settings shown below Be sure that Go to a page view is selected Click Next to bring up the Create Go To View dialog 5 DO NOT select Set Link immediately Instead scroll to the page that you want the link to navigate to when it is clicked in your PDF You can also use View Go To Page and enter the page number to go directly ...

Страница 38: ... in this instructional document Note that this may appear as Preferences rather than Properties depending on the version of Windows operating system being used Select the Adobe PDF Settings tab 2 Click the Add Custom Page button Name the custom paper size Sony or whatever name you choose in the Paper Names field Set Width at 3 47 and Height at 4 54 Set the Unit as Inch Then click the Add Modify bu...

Страница 39: ...39 3 Select the Edit button next to the Default Settings field 4 Select the settings shown in the following figures General tab ...

Страница 40: ...40 Images tab Fonts tab ...

Страница 41: ...ame for the settings preset for example SonySettings Next time you want to create a PDF optimized for the Sony Reader just select the Adobe PDF printer click Properties or Preferences and select your preset in the Default Settings list within the Adobe PDF Settings tab ...

Страница 42: ...in parts without written permission is prohibited All rights reserved This manual and the software described herein in whole or in part may not be reproduced translated or reduced to any machine readable form without prior written approval Sony the Sony logo are trademarks of Sony Microsoft Windows PowerPoint are trademarks of Microsoft Corporation All other trademarks are trademarks of their resp...

Страница 43: ...SOURCES AND MAY BE INACCURATE COPIES OF COPYRIGHTED INFORMATION MAY ONLY BE MADE FOR LEGALLY PERMISSIBLE PURPOSES Sony Electronics Inc reserves the right to make any modification to this manual or the information contained herein at any time without notice The software described herein is governed by the terms of a separate user license agreement This manual references software owned by Sony and l...

Отзывы: