background image

145

GB

Ta
ble
 of
 

co
nt

e

n

ts

Sa
mp
le

 pho

to

Me
nu

In

dex

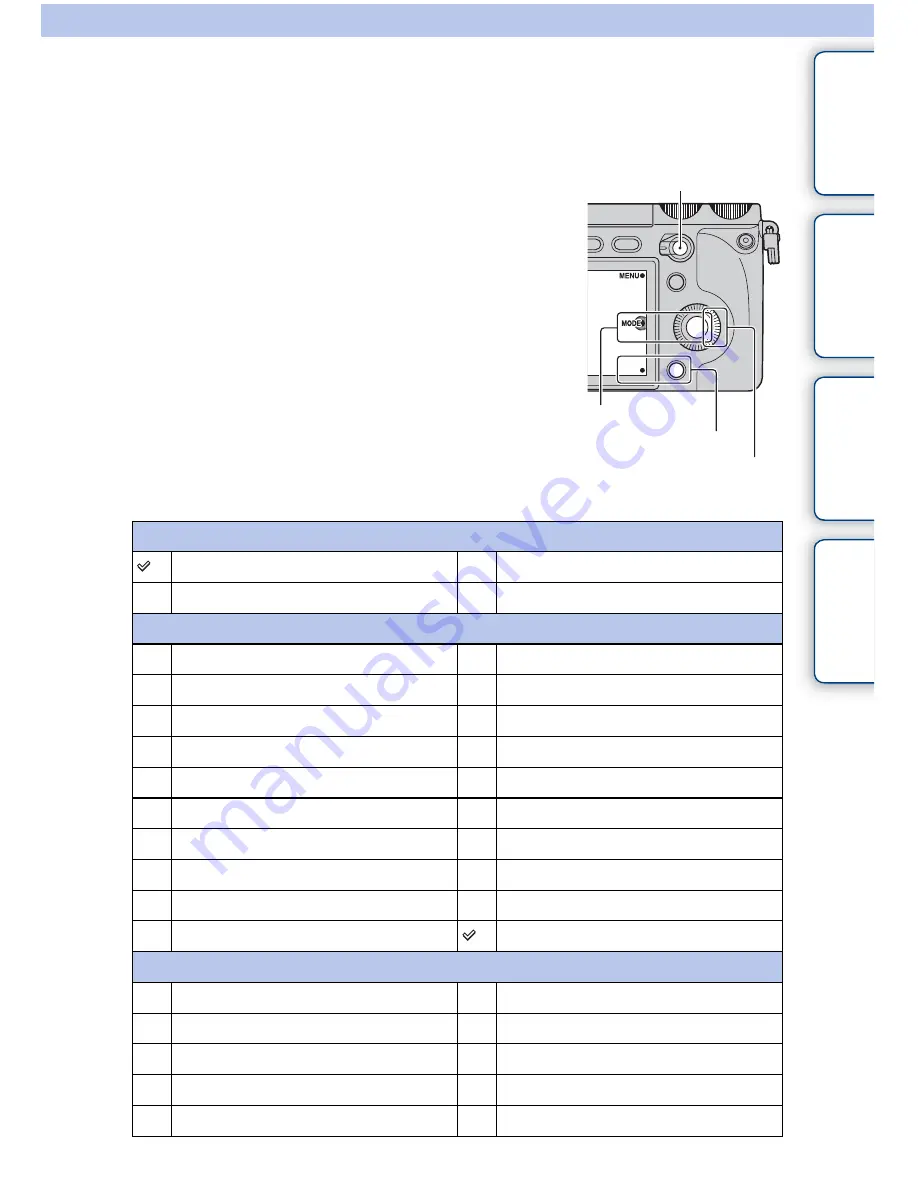
Custom Key Settings

Assigning functions to the various keys allows you to speed up operations by pressing 
the appropriate key on the shooting information screen.

1

MENU 

t

 [Setup] 

t

 [Custom Key Settings] 

t

 desired setting.

Right Key

AF/MF button

AF/MF control

Focus Settings

MF Assist

Right Key Setting

Shoot Mode

White Balance

AF/MF Select

Metering Mode

Autofocus Mode

DRO/Auto HDR

Autofocus Area

Picture Effect

Prec. Dig. Zoom

Creative Style

Face Detection

Flash Mode

Smile Shutter

Flash Comp.

Soft Skin Effect

MF Assist

Quality

Focus Settings

ISO

Not set

Soft key B Setting

Shoot Mode

White Balance

AF/MF Select

Metering Mode

Autofocus Mode

DRO/Auto HDR

Autofocus Area

Picture Effect

Prec. Dig. Zoom

Creative Style

Soft Key C

Soft Key B

AF/MF button

Continued 

r

Содержание NEX-7 &alpha

Страница 1: ...NEX 7 Interchangeable Lens Digital Camera Operations Instruction Manual E mount Parts and controls Triple dial control Custom key assignment AF MF button AEL button Others ...

Страница 2: ... 22 Functions that can be assigned 23 AF MF button AEL button Switching the focusing mode with the AF MF button 27 Locking the AE with AEL button 28 This Operations describes basic operation of the camera and some advanced operations using the major functions See Getting Started for information on how to set up the camera and the Handbook on the CD ROM supplied for more detailed functions and oper...

Страница 3: ...rs Menu list 30 The unique digital shooting functions 39 α Handbook 42 Restriction of the functions 43 Number of recordable images 46 List of icons on the screen 49 Troubleshooting 52 Specifications 53 Index 56 ...

Страница 4: ...Parts and controls All the major parts of your camera and controls and buttons that are used for recording playback and setups are described here ...

Страница 5: ...ms that appear at the top right of the screen Control dial L Sets the items that appear at the top left of the screen Shutter button Shoots still images Allows you to focus on the subject when it is pressed half way down Zoom ring Zooms in or out the subject when a zoom lens is used ON OFF Power switch Turns on the camera at ON off the camera at OFF ...

Страница 6: ... when you do not want to fire the flash page 44 MOVIE button Records movies Pressing this button again stops recording page 41 DISP button Switches the screen display button Selects the drive mode AF MF button AEL button At AF MF the focusing mode switches between auto and manual while the button is held down page 27 At AEL AE is locked while the button is held down page 28 Control wheel Sets the ...

Страница 7: ...play Delete button Deletes the image when is displayed at the lower right corner of the screen Control wheel Selects the image button Displays the image index Enlarge Image button Enlarges the image on the screen when it is pressed while is displayed at the center on the right side of the screen Turning the control wheel adjusts the scaling ...

Страница 8: ...l Sets the items that appear to the right of the screen Turn the control wheel Control dial R Sets the items that appear at the top right of the screen Control dial L Sets the items that appear at the top left of the screen Soft key C Activates the function displayed at the center on the right side of the screen Soft key B Activates the function displayed at the lower right corner of the screen ...

Страница 9: ...Triple dial control The Triple dial control allows you to adjust the various shooting settings quickly and intuitively using the 3 dials and the Navigation button ...

Страница 10: ...you can adjust these functions interactively on the same screen 1 Press the center of the control wheel and turn it to select a shooting mode from P A S or M When Soft key C Setting is set to Custom select a shooting mode by MENU t Shoot Mode 2 Press the Navigation button to select the desired settings Navigation button Items to be set by turning the control wheel Items to be set by turning the co...

Страница 11: ...t to lock the control wheel only or not to lock any of them by selecting MENU t Setup t Dial Wheel Lock z Navigation button Each time you press the button the item toggles as follows Exposure Settings Focus Settings White Balance Settings D Range Settings Creative Style Settings r r r r In addition Picture Effect Settings and Custom Settings are available You can select the settings you want to us...

Страница 12: ...ter speed Aperture Program shift Aperture Exposure compensation ISO Focus Settings AF mode Focus area Flexible spot position right left Flexible spot position up down Focus Settings MF mode Enlarging position up down Enlarging position right left Enlarging position up down White Balance Settings Mode Color temperature Color temperature B A Color temperature G M D Range Settings DRO level HDR level...

Страница 13: ...xposure Settings Shooting mode Control dial L Control dial R Control wheel Manual Exposure Shutter speed Aperture ISO Shutter Priority Shutter speed Exposure compensation ISO Aperture Priority Aperture Exposure compensation ISO Program Auto Program shift Exposure compensation ISO Focus Settings AF mode Set Autofocus Area In Flexible Spot move the area right or left In Flexible Spot turn it to move...

Страница 14: ...ed in the center area exclusively Flexible Spot Moves the focusing area to focus on a small subject or narrow area Press soft key B to bring the focusing area back to the center Focus Settings MF mode White Balance Settings Move the enlarged position up or down Move the enlarged position right or left Move the enlarged position up or down Press the top bottom right left to finely adjust the positi...

Страница 15: ...usts the color temperature depending on the light source Achieves the effect of CC Color Compensation filters for photography To select a color temperature press soft key B followed by turning the control dial L Custom Allows to use the white balance setting retained by Custom Setup z Setting the custom white balance Selecting Custom with the control dial L and pressing soft key B will display the...

Страница 16: ...e and 1 overlaid image are recorded Control dial L AUTO Lv1 Lv5 D Range Opt Using the D Range Optimizer optimizes the gradations of a recorded image in each area of the image Select the optimal level between Lv1 weak and Lv5 strong Automatically adjusted at AUTO AUTO 1 0 EV 6 0 EV Auto HDR Using the Auto HDR sets the exposure difference based on the contrast of the subject Select the optimal level...

Страница 17: ...manual setting exposure difference DRO Level and the exposure compensation you can control the range of the contrast of light and shadow gradations to be reproduced With DRO set a DRO Level to reproduce the shadow side and set a minus value of exposure compensation to reproduce the light side A large minus compensation and DRO Level setting may cause noise It is recommended that you check the resu...

Страница 18: ...nset For shooting the beautiful red of the setting sun Night Scene The contrast is attenuated for capturing a nightscape that is more faithful to the real view Autumn leaves For capturing autumn scenes vividly highlighting the red and yellow of coloring leaves Black White For shooting images in black and white monotone Sepia For capturing images in sepia monotone Control wheel Contrast The higher ...

Страница 19: ...can select primary colors or black and white with the control dial R Retro Photo Creates the look of an aged photo with sepia color tones and faded contrast Soft High key Creates an image with the indicated atmosphere bright transparent ethereal tender soft Partial Color Creates an image which retains a specific color but converts others to black and white You can select a color with the control d...

Страница 20: ...age in black and white with rich gradation and reproduction of details The camera releases the shutter 3 times Miniature Creates an image which enhances the subject vividly with the background defocused considerably This effect may often be found in pictures of miniature models You can select the area to be in focus with the control dial R The focus on other areas is greatly reduced Custom Setting...

Страница 21: ...Custom key assignment You can assign the functions you frequently use to any one of 4 keys This will be handy as you can call up the function by just pressing the key ...

Страница 22: ... frequently to the right key of the control wheel soft key C soft key B and AF MF button Right key 1 Select MENU 2 Select Setup t Custom Key Settings 3 Select the function to be assigned 4 Press the key to call up the function assigned to the key MENU Soft key C Soft key B AF MF button ...

Страница 23: ... setting AF MF button AF MF control MF Assist Focus Settings Right Key Setting Shoot Mode White Balance AF MF Select Metering Mode Autofocus Mode DRO Auto HDR Autofocus Area Picture Effect Precision Dig Zoom Creative Style Face Detection Flash Mode Smile Shutter Flash Compensation Soft Skin Effect MF Assist Quality Focus Settings ISO Not set ...

Страница 24: ...m by pressing the right left of the control wheel Soft key B Setting Shoot Mode White Balance AF MF Select Metering Mode Autofocus Mode DRO Auto HDR Autofocus Area Picture Effect Precision Dig Zoom Creative Style Face Detection Flash Mode Smile Shutter Flash Compensation Soft Skin Effect MF Assist Quality Focus Settings ISO Not set Soft key C Setting Shoot Mode Custom Custom of Soft key C Setting ...

Страница 25: ...ofocus Area Face Detection Smile Shutter Soft Skin Effect Quality ISO Custom 1 default setting White Balance Custom 2 default setting Metering Mode DRO Auto HDR Custom 3 default setting Picture Effect Creative Style Flash Mode Not set Custom 4 5 default setting ...

Страница 26: ...AF MF button AEL button You can switch focusing between auto and manual temporarily with the AF MF button You can lock the AE with the AEL button ...

Страница 27: ... You can make the focusing mode to remain switched even if you remove your finger from the button by selecting MENU t Setup t AF MF control z Useful functions in the manual focusing mode You can select the following items by selecting MENU t Setup MF Assist Enlarges the image to make manual focusing easier The image is enlarged by 5 9 times or 11 7 times You can also use this with the direct manua...

Страница 28: ...E lock button 2 Focus on the spot for which you want to set the exposure 3 Press the AEL button The exposure is locked and AE lock lights up 4 Holding the AEL button down focus on your desired subject and shoot You can keep the AE locked until you press the AEL button again by selecting MENU t Setup t AEL ...

Страница 29: ...Others You will find all the setting items available Menu certain unique functions the screen display specifications etc here ...

Страница 30: ...m Items that cannot be set in the context are displayed in gray Allows you to select a shooting mode such as exposure mode panoramic Scene Selection Shoot Mode Intelligent Auto Manual Exposure Shutter Priority Aperture Priority Program Auto Scene Selection Portrait Landscape Macro SportsAction Sunset Night Portrait Night Scene Hand held Twilight Anti Motion Blur See page 40 Sweep Panorama See page...

Страница 31: ... Flexible Spot Autofocus Mode Single shot AF Continuous AF Object Tracking On Off Prec Dig Zoom Max 10 times Face Detection On Regist Faces On Off Face Registration New Registration Order Exchanging Delete Delete All Smile Shutter On Off Soft Skin Effect On Off LCD Display DISP Graphic Display Display All Info Big Font Size Disp No Disp Info Live View Priority Level Histogram For viewfinder Finder...

Страница 32: ...5p Image Size Still Image Size 3 2 L 24M M 12M S 6M 16 9 L 20M M 10M S 5 1M Aspect Ratio 3 2 16 9 Quality RAW RAW JPEG Fine Standard 3D Panorama Image Size 16 9 Standard Wide Panorama Direction Right Left Panorama Image Size Standard Wide Panorama Direction Right Left Up Down Movie File Format AVCHD1 MP4 Record Setting AVCHD 24M FX 2 17M FH 2 28M PS 3 24M FX 4 17M FH 4 MP4 1440 1080 12M VGA 3M ...

Страница 33: ... Cool White Fluor Day White Fluor Daylight Flash C Temp Filter Custom Custom Setup Metering Mode Multi Center Spot Flash Comp 3 0EV to 3 0EV DRO Auto HDR Off D Range Opt Auto HDR Picture Effect Off Toy Camera Pop Color Posterization Retro Photo Soft High key Partial Color High Contrast Mono Soft Focus HDR Painting Rich tone Mono Miniature Creative Style Standard Vivid Neutral Clear Deep Light Port...

Страница 34: ...Still Folder View MP4 AVCHD View Image Index 6 Images 12 Images Rotate Counterclockwise Protect Multiple Img Cancel All Images Cancel All Movies MP4 Cancel All AVCHD view files 3D Viewing 3D playback on 3D TV Enlarge Image Enlarging the playback image Volume Settings 0 to 7 Specify Printing DPOF Setup Date Imprint Display Contents Display Info Histogram No Disp Info ...

Страница 35: ... Red Eye Reduction Provides pre flash before shooting when using the flash to prevent eyes from being shot in red On Off FINDER LCD Setting Sets how to switch between the viewfinder and the LCD monitor Auto Viewfinder LCD Monitor Live View Display Allows you to choose whether or not to show the value of exposure compensation etc on the screen display Setting Effect ON Setting Effect OFF Auto Revie...

Страница 36: ...e Disable Eye Start AF Sets whether or not to use autofocus when you look through the viewfinder On Off Front Curtain Shutter Sets whether or not to use the electronic front curtain shutter function On Off Long Exposure NR Sets the noise reduction processing for long exposure shootings On Off High ISO NR Sets the noise reduction processing for high ISO sensitivity shootings High Normal Low Lens Co...

Страница 37: ...ge used on the screen Date Time Setup Sets the date and time Area Setting Selects the area where you are using the camera Help Guide Display Turns the Help Guide on or off On Off Power Save Sets the time to turn the camera to the power save mode 30 Min 5 Min 1 Min 20 Sec 10 Sec LCD Brightness Sets the brightness of the LCD monitor Auto Manual Sunny Weather Viewfinder Bright Sets the brightness of ...

Страница 38: ...on of the camera and the lens Demo Mode Sets whether or not to display the demonstration with movies On Off Reset Default Resets the camera to the factory settings Memory Card Tool Format Formats the memory card File Number Selects the method used for assigning file numbers to images Series Reset Folder Name Selects the folder name format Standard Form Date Form Select Shoot Folder Selects the rec...

Страница 39: ...cannot fit all at one time on the screen without any breaks and discontinuity In 3D sweep panorama mode applying the sweep panorama technology the camera shoots separate images one to be viewed by the left eye and the other by the right eye then combines them so that they look like a 3D image Sweep Panorama 3D Sweep Panorama 1 Select MENU t Shoot Mode t Sweep Panorama or 3D Sweep Panorama 2 Shoot ...

Страница 40: ...ject blur are reduced Avoiding use of the flash prevents over exposure Anti Motion Blur 1 Select MENU t Shoot Mode t Anti Motion Blur z Tips for shooting a panoramic image Pan the camera in an arc with a constant velocity and in the same direction as the indication on the LCD monitor Sweep Panorama is better suited for still subjects rather than moving ones Vertical direction Horizontal direction ...

Страница 41: ... Anti Motion Blur and Hand held Twilight functions Just as with Anti Motion Blur the camera combines 6 shots into 1 still image with Hand held Twilight in Scene Selection Hand held Twilight is designed to be used when shooting a dark scene such as a scene shot at night When it becomes dark and camera shake is likely to occur the camera automatically increases the sensitivity and shoots at a shutte...

Страница 42: ... insert the CD ROM supplied into the CD ROM drive 2 Click Handbook 3 Click Install 4 Start α Handbook from the shortcut on the desktop For Macintosh users 1 Turn on your computer and insert the CD ROM supplied into the CD ROM drive 2 Select the Handbook folder and copy Handbook pdf stored in the GB folder to your computer 3 After copying is complete double click Handbook pdf ...

Страница 43: ...not use are displayed in gray on the screen The functions available may be limited also by conditions other than the shooting mode Functions available for each shooting mode Shoot Mode Exposure Comp Self timer Cont Shooting Face Detection Picture Effect Intelligent Auto Sweep Panorama 3D Sweep Panorama Anti Motion Blur SCN Scene Selection P Program Auto A Aperture Priority S Shutter Priority M Man...

Страница 44: ...s the function not available The flash modes you cannot select are displayed in gray on the screen Flash modes available Shoot Mode Flash Off Autoflash Fill flash Slow Sync Rear Sync Wireless Intelligent Auto Sweep Panorama 3D Sweep Panorama Anti Motion Blur SCN Scene Selection P Program Auto A Aperture Priority S Shutter Priority M Manual Exposure ...

Страница 45: ...r than the shooting mode Even if you select a workable flash mode the flash does not fire unless it is raised You cannot use the wireless flash with the built in flash Use a wireless lighting ratio control flash sold separately or a wireless flash sold separately Notes ...

Страница 46: ...on the shooting conditions Image size L 24M Aspect ratio 3 2 Units images When Aspect Ratio is set to 16 9 you can record more images than the numbers shown in the table above except for RAW Once you insert a memory card into the camera and set the power switch to ON the number of images that can be recorded should you continue to shoot using the current settings is displayed on the LCD monitor No...

Страница 47: ...en you record a fast moving subject the image is clearer but the recording time is shorter because a lot of memory needed to record The recording time also vary depending on the shooting condition or your subject or the setting of image quality size Capacity Record Setting 2GB 4GB 8GB 16GB 32GB 60i 24M FX 50i 24M FX 10 m 20 m 40 m 1 h 30 m 3 h 60i 17M FH 50i 17M FH 10 m 30 m 1 h 2 h 4 h 5 m 60p 28...

Страница 48: ...lity is set to Fine Autofocus Mode is set to Single shot AF Shooting takes place once every 30 seconds The flash strobes with every second shot The power is turned off then on again once every 10 shots Using a battery pack that is charged for an hour after the CHARGE lamp goes out Using Sony Memory Stick PRO Duo media sold separately The measurement method is based on the CIPA standard CIPA Camera...

Страница 49: ...play using DISP Display Contents on the control wheel Shooting standby Movie recording Playback A Display Indication P A S M Shoot Mode Scene Selection Scene Recognition Aspect ratio of still images 24M 20M 12M 10M 6M 5 1M Image size of still images RAW RAW J FINE STD Image quality of still images 100 Number of recordable still images ...

Страница 50: ...ot SteadyShot warning Control dials L R Overheating warning Database file full Database file error Dial wheel lock View mode Display Indication 101 0012 Playback folder File number Protect Print order Display Indication Soft keys MENU Shooting mode Delete Enlarge Display Indication Flash Mode Red Eye Reduction Drive Mode Focus mode 0 0 Flash compensation Metering Mode Focus area mode Object Tracki...

Страница 51: ...0 Metered manual Display Indication 0 0 Exposure compensation ISO400 ISO sensitivity AE lock Shutter speed indicator Aperture indicator REC 0 12 Recording time of the movie m s 2011 1 1 9 30AM Recorded date time of the image 12 12 Image number Number of images in the view mode Appears when HDR did not work on the image Appears when Picture Effect did not work on the image Histogram Display Indicat...

Страница 52: ...ns 1 Check the items in Troubleshooting in the α Handbook PDF included on the CD ROM supplied 2 Remove the battery pack wait for about 1 minute re insert the battery pack then turn on the power 3 Reset the settings page 38 4 Consult your Sony dealer or local authorized Sony service facility ...

Страница 53: ...tep Shutter Type Electronically controlled vertical traverse focal plane type Speed range 1 4000 second to 30 seconds BULB 1 3 EV step Flash sync speed 1 160 second Recording media Memory Stick PRO Duo media SD card Electronic viewfinder Type Electronic viewfinder Organic Electro Luminescence Screen size 1 3 cm 0 5 type Total number of dots 2 359 296 dots Frame coverage Approx 100 Magnification 1 ...

Страница 54: ... Input rating 100 V 240 V AC 50 Hz 60 Hz 4 2 W Output rating 8 4 V DC 0 28 A Operating temperature range 0 C to 40 C 32 to 104 F Storage temperature range 20 C to 60 C 4 F to 140 F Maximum dimensions Approx 63 95 32 mm 2 1 2 3 3 4 1 5 16 inches W H D Mass Approx 85 g 3 oz Rechargeable battery pack NP FW50 Used battery Lithium ion battery Maximum voltage DC 8 4 V Nominal voltage DC 7 2 V Maximum ch...

Страница 55: ...gle of this camera is narrower than that of a 35 mm format film camera You can find the approximate equivalent of the focal length of a 35 mm format film camera and shoot with the same picture angle by increasing the focal length of your lens by half For example by using a 50 mm lens you can get the approximate equivalent of a 75 mm lens of a 35 mm format film camera On image data compatibility Th...

Страница 56: ...lete 7 34 Demo Mode 38 Dial Wheel Lock 35 DISP Button Monitor 31 Display Card Space 38 Display Color 37 D Range Settings 16 Drive Mode 31 DRO Auto HDR 33 E Enlarge Image 7 34 Exposure compensation 13 33 Eye Fi Setup 38 Eye Start AF 36 F Face Detection 31 Face Registration 31 File Format 32 File Number 38 Finder Display DISP 31 FINDER LCD Setting 35 Flash 6 44 Flash Comp 33 Flash Mode 31 Focus Sett...

Страница 57: ...ng Color 27 36 Peaking Level 27 36 Picture Effect 19 33 Playback 7 Playback Display 37 Playback zoom 7 Power 5 Power Save 37 Prec Dig Zoom 31 Program Auto 13 30 Protect 34 Q Quality 32 R Record Setting 32 Recording 5 Recover Image DB 38 Red Eye Reduction 35 Release w o Lens 36 Reset Default 38 Rotate 34 S Scene Selection 30 Screen display 6 7 49 Select Shoot Folder 38 Setup 35 Shutter Priority 13 ...

Страница 58: ...GB 58 W White Balance 14 33 Wide Image 37 Wind Noise Reduct 36 Z Zoom 5 ...

Страница 59: ... in Thailand NEX 7 4 408 688 11 1 Printed using VOC Volatile Organic Compound free vegetable oil based ink Additional information on this product and answers to frequently asked questions can be found at our Customer Support Website ...

Страница 60: ...4 297 558 11 1 GB 2011 Sony Corporation NEX 7 Interchangeable Lens Digital Camera α Handbook Table of contents Sample photo Menu Index ...

Страница 61: ...s Search for information in a listing of menu items Search for information by keyword Marks and notations used in this handbook In this handbook the sequence of operations is shown by arrows t Operate the camera in the order indicated The default setting is indicated by Indicates cautions and limitations relevant to the correct operation of the camera zIndicates information that is useful to know ...

Страница 62: ...mera 18 Menu 21 Shooting images 26 Playing back images 28 Deleting images 30 Using functions with the control wheel DISP Display Contents 48 Exposure Comp 51 Drive Mode 52 Image Index 59 Using the Triple dial control function Triple dial control 31 Exposure Settings 33 Focus Settings 34 White Balance Settings 36 D Range Settings 38 Creative Style Settings 40 Picture Effect Settings 42 Custom Setti...

Страница 63: ...yback 23 Setup 24 Connecting with other equipment Viewing images on a TV 174 Using with your computer 177 Using the software 179 Connecting the camera to the computer 182 Creating a movie disc 184 Printing still images 188 Troubleshooting Troubleshooting 189 Warning messages 195 Others Using the camera abroad 198 Memory card 199 InfoLITHIUM battery pack 201 Battery charger 203 Mount Adaptor 204 Co...

Страница 64: ...5GB Table of contents Sample photo Menu Index AVCHD format 206 Cleaning 207 Index Index 208 ...

Страница 65: ...ople page 7 Shooting macro photos page 8 Shooting landscapes page 9 Shooting sunset night scenes page 10 Shooting fast moving subjects page 11 If you click on a photo the screen will jump to the page describing the function recommended for shooting that kind of photo Refer to those descriptions in addition to the shooting tips displayed on the screen of the camera See the pages in parentheses for ...

Страница 66: ...ut while backgrounds blurred away 62 The same scene with different brightness 57 A happy smile 84 In candle light 64 A person in front of night view 62 A moving person 96 A group photo 55 56 A person lit from behind 74 With soft skin tones 86 62 57 84 64 62 96 55 74 86 Continued r ...

Страница 67: ...focusing the background 62 Adjusting the color to indoor light 97 Flowers 62 Lowering the amount of flash light 101 Focusing manually 76 In better brightness 51 Preventing camera shake for indoor shots 96 Making food look appealing 51 62 97 62 101 76 51 96 51 Continued r ...

Страница 68: ...s The sky in vivid colors 51 Running water 71 Vivid green colors 106 Colored leaves 106 Panoramic photos 65 Scenery with a wide range of brightness 102 Light outdoors shot from a dark interior 102 Keeping your shot level 125 51 71 106 106 65 102 102 125 Continued r ...

Страница 69: ... Index Shooting sunset night scenes Holding the camera by hand 62 Shooting the red of the sunset beautifully 62 Fireworks 70 Trail of light 74 The same scene in different brightness 57 Preventing camera shake 55 62 62 70 74 57 55 Continued r ...

Страница 70: ...e of contents Sample photo Menu Index Shooting fast moving subjects Following a moving subject 79 Expressing vigorous action 71 With the subject approaching the camera 76 Capturing the best moment 54 79 71 76 54 ...

Страница 71: ...uto lock Accessory Shoe I Image sensor position mark 76 J Microphone K Lens L Mount M Image sensor N Lens contacts O Playback button 28 P flash pop up button 74 Q Diopter adjustment dial R Control dial L 20 S Control dial R 20 T MOVIE button 26 U AF MF button AEL button 46 47 V AF MF AEL switch lever 46 47 W Control wheel 18 X Soft key C 19 Y Soft key B 19 Z Soft key A 19 Do not cover this part du...

Страница 72: ...f the camera allows flexible shooting positions I Battery memory card cover J Hook for shoulder strap K Tripod receptacle Use a tripod with a screw length of less than 5 5 mm 7 32 inch You will be unable to firmly secure the camera to tripods having screws longer than 5 5 mm 7 32 inch and may damage the camera L Speaker M Access lamp N Battery compartment O Memory card insertion slot P Connection ...

Страница 73: ...s Sample photo Menu Index E18 55 mm F3 5 5 6 OSS supplied with NEX 7K A Hood index B Focusing ring C Zoom ring D Focal length scale E Focal length index F Lens contacts G Mounting index Do not touch this part directly Lens ...

Страница 74: ...e recording Playback A Display Indication P A S M Shoot Mode Scene Selection Scene Recognition Aspect ratio of still images 24M 20M 12M 10M 6M 5 1M Image size of still images RAW RAW J FINE STD Image quality of still images 100 Number of recordable still images 60i 50i 60i 50i 60p 50p 24p 25p 24p 25p Recording mode of movies Memory card Upload 123Min Recordable time of movies 100 Remaining battery...

Страница 75: ...isplay Indication Flash Mode Red Eye Reduction Drive Mode Focus mode 0 0 Flash compensation Metering Mode Focus area mode Object Tracking Face Detection Display Indication Soft Skin Effect AWB 7500K A7 G7 White Balance DRO Auto HDR Creative Style Picture Effect Smile detection sensitivity indicator Display Indication z Focus status 1 125 Shutter speed F3 5 Aperture value 0 0 Metered manual 0 0 Exp...

Страница 76: ...Menu Index 2011 1 1 9 30AM Recorded date time of the image 12 12 Image number Number of images in the view mode Appears when HDR did not work on the image Appears when Picture Effect did not work on the image Histogram Display Indication ...

Страница 77: ... assigned to the control wheel When playing back DISP Display Contents and Image Index functions are assigned to the control wheel You can assign the functions to the right key on the control wheel page 145 The control wheel soft keys control dials etc allow you to use various functions of the camera Control wheel Soft keys Control wheel Control dials Continued r ...

Страница 78: ...er right corner of the screen press soft key B To use the function shown at the center press the center of the control wheel soft key C You can assign the functions to the soft keys B and C page 145 In this handbook the soft keys are indicated by the icon or the function shown on the screen Soft keys The arrow means you can turn the control wheel When options are displayed on the screen you can br...

Страница 79: ...he control wheel See pages 31 to 45 for more details Pressing the Navigation button toggles the functions as follows See page 31 for more details You cannot use the Triple dial control with Intelligent Auto and Scene Selection Functions cannot be assigned to the control dials L and R or the control wheel in certain modes Control dials Notes Navigation button Items to be set by turning the control ...

Страница 80: ...heel to make your choice Shoot Mode Intelligent Auto The camera evaluates the subject and makes the proper settings You can enjoy automatic shooting with the appropriate settings Scene Selection Shoots with preset settings according to the subject or condition Anti Motion Blur Reduces the camera shake when shooting a slightly dark indoor scene or a telephoto Sweep Panorama Shoots with panoramic si...

Страница 81: ...faces Face Registration Registers or changes the person to be given priority in the focus Smile Shutter Each time the camera detects a smile the camera releases the shutter automatically Soft Skin Effect Shoots the skin smoothly in the Face Detection function LCD Display DISP Changes the information to be displayed on the LCD monitor Finder Display DISP Changes the information to be displayed on t...

Страница 82: ...h light DRO Auto HDR Corrects the brightness or contrast automatically Picture Effect Shoots with the desired effects to express a unique atmosphere Creative Style Selects the image processing method Playback Delete Deletes images Slide Show Plays back images automatically View Mode Allows you to determine how to group the playback images Image Index Selects the number of images to be displayed on...

Страница 83: ...olor Sets the color used for the peaking function MF Assist Displays an enlarged image when focusing manually MF Assist Time Sets the length of time the image will be shown in an expanded form Color Space Changes the range of color reproduction SteadyShot Sets camera shake compensation Release w o Lens Sets whether or not to release the shutter when there is no lens Eye Start AF Sets whether or no...

Страница 84: ...yback Display Selects the method used to play back portrait images HDMI Resolution Sets the resolution when connected to HDMI TV CTRL FOR HDMI Sets whether or not to operate the camera with a BRAVIA Sync compatible TV s Remote Control USB Connection Selects the method used for a USB connection Cleaning Mode Allows you to clean the image sensor Version Displays the versions of the camera and the le...

Страница 85: ...nition function begins to work 3 To take still images press the shutter button halfway down to focus on your subject and press it fully down to shoot To record movies press the MOVIE button to start recording Press the MOVIE button again to stop recording Note z On Scene Recognition The camera recognizes Night Scene Tripod Night Scene Night Portrait Backlight Backlight Portrait Portrait Landscape ...

Страница 86: ...ubject is seen through glass The subject is moving quickly The subject reflects light such as mirror or has shiny surfaces The subject is flashing The subject is backlit Focus indicator Status z lit Focus locked lit Focus is confirmed Focal point moves following a moving subject lit Still focusing z flashing Cannot focus When the camera cannot focus on the subject automatically the focus indicator...

Страница 87: ...ck Control wheel operation Pause resume Press the center Fast forward Press the right or turn it clockwise Fast rewind Press the left or turn it counterclockwise Forward slow playback Turn clockwise during pause Reverse slow playback Turn counterclockwise during pause Adjust sound volume Press the bottom t top bottom Note z Displaying a desired folder To select a desired folder select the bar to t...

Страница 88: ...on with movies To enlarge panoramic images pause the playback first and then press Enlarge Image Enlarged playback 1 Display the image you want to enlarge then select Enlarge Image 2 Adjust the scaling by turning the control wheel 3 Select the portion you want to enlarge by pressing the top bottom right left of the control wheel 4 To cancel the enlarged playback select Notes z Scaling range The sc...

Страница 89: ...s Once you have deleted an image you cannot restore it Check whether you delete the image or not beforehand 1 Display the image you want to delete and select Delete 2 Select OK Select to quit the operation OK Notes Delete z To delete several images Select MENU t Playback t Delete to select and delete several images at the same time ...

Страница 90: ...sure Settings In addition to the above set Picture Effect Settings and Custom Settings are available You can select the sets you want to use by selecting MENU t Setup t Function Settings page 144 The Exposure Settings is permanent and cannot be altered Exposure Settings page 33 Allows you to set the aperture exposure compensation shutter speed or ISO depending on the shooting mode Focus Settings p...

Страница 91: ...rating incorrectly You can lock the control dials L R and the control wheel by holding the Navigation button down To unlock them hold the Navigation button down again You can set to lock the control wheel only or not to lock any of them by selecting MENU t Setup t Dial Wheel Lock ...

Страница 92: ...these dials vary depending on the shooting mode You can set the exposure compensation by turning the control dial R when Anti Motion Blur Sweep Panorama or 3D Sweep Panorama is selected Shooting mode Control dial L Control dial R Control wheel M Manual Exposure Shutter speed Aperture ISO S Shutter Priority Shutter speed Exposure compensation ISO A Aperture Priority Aperture Exposure compensation I...

Страница 93: ...ame is displayed around the area that is in focus When the Face Detection function is active AF operates with priority on faces AF range finder frame Center The camera uses the AF area located in the center area exclusively AF range finder frame Flexible Spot Moves the focusing area to focus on a small subject or narrow area You can bring the focusing area back to the center by pressing soft key B...

Страница 94: ...ou set before you started recording is used for focusing When the AF illuminator is used the setting of Autofocus Area is invalid and the AF area is indicated with a dotted line AF operates with priority on and around the center area You can set the enlarged position for manual focusing You can adjust the scaling with soft key B or C Notes Manual Focus Move the enlarged position up or down Move th...

Страница 95: ... balance mode If you finely adjust the color between blue B and amber A and between green G and magenta M Control dial L AWB Auto WB The camera automatically detects a light source and adjusts the color temperature Daylight If you select an option to suit a specific light source the color temperature is adjusted for the light source preset white balance Shade Cloudy Incandescent Fluor Warm White F...

Страница 96: ...d color filter are displayed If the flash is used when the shutter button is pressed a custom white balance is registered with the flash light taken into account Take pictures with the flash in later shootings The message Custom WB error indicates that the value is beyond the expected range When the flash is used on a subject in close proximity or a subject with a bright color is in the frame If y...

Страница 97: ...omatically adjusted at AUTO AUTO 1 0 EV 6 0 EV Auto HDR Sets the exposure difference based on the contrast of the subject Select the optimal level between 1 0 EV weak and 6 0 EV strong Automatically adjusted at AUTO Control wheel Off Does not use DRO Auto HDR D Range Opt By dividing the image into small areas the camera analyzes the contrast of light and shadow between the subject and the backgrou...

Страница 98: ...on the luminance difference of a subject and the shooting conditions When the flash is used this function has little effect When the contrast of the scene is low or when significant camera shake or subject blur has occurred you may not obtain good HDR images If the camera detects such situation is indicated on the recorded image to inform you of this situation Shoot again as necessary recomposing ...

Страница 99: ...ghted area suitable for capturing radiant light Deep For capturing images with deep and dense color expressions suited to capturing the solid presence of the subject Light For capturing images with bright and uncomplicated color expressions suited to capturing refreshingly light ambience Portrait For shooting the skin color in a soft tone ideally suited for shooting portraits Landscape The saturat...

Страница 100: ...e Control wheel Contrast The higher the value selected the more the difference of light and shadow is accentuated thus making an impact on an image Saturation The higher the value selected the more vivid the color When a lower value is selected the color of the image is restrained and subdued Sharpness Adjusts the sharpness The higher the value selected the more the contours are accentuated and th...

Страница 101: ...he Picture Effect function Toy Camera Creates the look of a Toy Camera photo with shaded corners and pronounced colors You can set the color tone with the control dial R Pop Color Creates a vivid look by emphasizing color tones Posterization Creates a high contrast abstract look by heavily emphasizing primary colors or in black and white You can select primary colors or black and white with the co...

Страница 102: ... contrast image in black and white Soft Focus Creates an image filled with a soft lighting effect You can set the intensity of the effect with the control dial R HDR Painting Creates the look of a painting enhancing the colors and details The camera releases the shutter 3 times You can set the intensity of the effect with the control dial R Rich tone Mono Creates an image in black and white with r...

Страница 103: ...ne Mono Miniature In the case of HDR Painting and Rich tone Mono the shutter is released 3 times for 1 shot Be careful about the following Use this function when the subject is motionless or does not blink Do not recompose When the contrast of the scene is low or when significant camera shake or subject blur has occurred you may not obtain good HDR images If the camera detects such situation is in...

Страница 104: ...Press the Navigation button to select Custom Settings 4 Set each item with the control dials L R and the control wheel When Creative Style or White Balance is assigned to Custom Settings 3 you can make a fine adjustment with soft key B Change the mode of the function assigned to Custom Settings 1 The default setting is White Balance Change the mode of the function assigned to Custom Settings 2 The...

Страница 105: ...ghtness lock the exposure at a brighter spot than the subject To shoot the subject brighter lock the exposure at a darker spot than the subject The exposure is locked for the entire screen 1 Set the AF MF AEL switch lever to AEL 2 Focus on the spot for which you want to set the exposure 3 Press the AEL button to lock the exposure AE lock lights up at the bottom right of the screen 4 Holding the AE...

Страница 106: ...r to AF MF 2 Press the AF MF button to switch the focusing mode The focusing mode remains switched while you press and hold down the AF MF button in the default setting You can keep the focusing mode switched until you press the AF MF button again Select MENU t Setup t AF MF control z Changing the function of the AF MF button You can change the function assigned to make the button work as the Focu...

Страница 107: ... Display Contents 2 Select the desired mode During shooting LCD Display DISP Graphic Display Shows basic shooting information Graphically shows the shutter speed and aperture value except for when Shoot Mode is set to Sweep Panorama or 3D Sweep Panorama Display All Info Shows recording information Big Font Size Disp Shows only major items in a larger size No Disp Info Does not show recording infor...

Страница 108: ... Select this when you shoot using the viewfinder Finder Display DISP Disp Basic Info Shows basic recording information on the viewfinder Level Indicates whether the camera is level in both the horizontal and front back directions When the camera is level in both directions the indicator turns to green Histogram Displays the luminance distribution graphically z To set the screen display modes to be...

Страница 109: ...o recording information No Disp Info Does not show recording information Note z What is histogram The histogram displays the luminance distribution that shows how many pixels of a particular brightness exist in the picture Brighter image will make the entire histogram shift to the right side and darker image to the left side If the image has a high key or low key portion that portion flashes on th...

Страница 110: ...itions or when you use the flash you may not be able to get a satisfactory effect Even though you can adjust the exposure between 5 0 EV and 5 0 EV only a value between 2 0 EV and 2 0 EV with the equivalent image brightness appears on the screen when shooting If you set an exposure beyond this range the image brightness on the screen does not show the effect but it will be reflected on the recorde...

Страница 111: ...Shoots 1 still image Normal shooting mode Cont Shooting Shoots images continuously while you press and hold down the shutter button page 53 Spd Priority Cont Shoots images continuously at high speed while you press and hold down the shutter button page 54 Focus and brightness settings of the first shot are used for the following shots Self timer Shoots an image after 10 or 2 seconds page 55 Self t...

Страница 112: ... and hold down the shutter button 1 Drive Mode on the control wheel t Cont Shooting Or MENU t Camera t Drive Mode t Cont Shooting You cannot use Cont Shooting with the following functions Scene Selection excluding Sports Action Anti Motion Blur Sweep Panorama 3D Sweep Panorama Smile Shutter Auto HDR Note ...

Страница 113: ...n that of Cont Shooting 1 Drive Mode on the control wheel t Spd Priority Cont Or MENU t Camera t Drive Mode t Spd Priority Cont You cannot use Spd Priority Cont with the following functions Scene Selection excluding Sports Action Anti Motion Blur Sweep Panorama 3D Sweep Panorama Smile Shutter Auto HDR Focus and brightness settings of the first shot are used for the following shots Notes ...

Страница 114: ... functions Hand held Twilight in Scene Selection Anti Motion Blur Sweep Panorama 3D Sweep Panorama Smile Shutter Auto HDR Self timer 10 Sec Sets the 10 second delay self timer When you press the shutter button the self timer lamp flashes and the audible signal sounds until the shutter operates To cancel the self timer press Drive Mode on the control wheel Self timer 2 Sec Sets the 2 second delay s...

Страница 115: ...he timer press Drive Mode and select Single Shooting You cannot use Self timer Cont with the following functions Hand held Twilight in Scene Selection Anti Motion Blur Sweep Panorama 3D Sweep Panorama Smile Shutter Auto HDR Self timer Cont 10 Sec 3 lmg Shoots 3 or 5 still images continuously after 10 seconds When you press the shutter button the self timer lamp flashes and the audible signal sound...

Страница 116: ...cket Cont 2 Option t desired mode To cancel the bracket press Drive Mode and select Single Shooting You cannot use Bracket Cont with the following functions Intelligent Auto Scene Selection Anti Motion Blur Sweep Panorama 3D Sweep Panorama Smile Shutter Auto HDR The last shot is shown on the auto review In Manual Exposure the exposure is shifted by adjusting the shutter speed When you adjust the e...

Страница 117: ...NU t Camera t Drive Mode t Remote Cdr 2 Focus on the subject point the transmitter of the Wireless Remote Commander to the remote sensor and shoot the image You cannot use Remote Cdr with the following functions Movie recording Hand held Twilight in Scene Selection Anti Motion Blur Sweep Panorama 3D Sweep Panorama Auto HDR A lens or hood may cover the remote sensor and prevent the sensor from rece...

Страница 118: ... 6 image index appears You can switch to 12 image index MENU t Playback t Image Index 3 To return to the single image playback select the desired image and press the center of the control wheel z Displaying a desired folder To select a desired folder select the bar to the left of the image index screen then press the top bottom parts of the control wheel You can change the view mode by pressing th...

Страница 119: ...n is set to Off the Portrait Backlight Portrait Night Portrait and Baby scenes are not recognized 1 MENU t Shoot Mode t Intelligent Auto 2 Point the camera to the subject When the camera recognizes the scene the Scene Recognition icon and guide appear on the screen The camera recognizes Night Scene Tripod Night Scene Night Portrait Backlight Backlight Portrait Portrait Landscape Macro Spotlight Lo...

Страница 120: ...ubject is seen through glass The subject is moving quickly The subject reflects light such as mirror or has shiny surfaces The subject is flashing The subject is backlit Focus indicator Status z lit Focus locked lit Focus is confirmed Focal point moves following a moving subject lit Still focusing z flashing Cannot focus When the camera cannot focus on the subject automatically the focus indicator...

Страница 121: ...tire range of scenery in sharp focus with vivid colors Macro Shoots close subjects such as flowers insects food or small items Sports Action Shoots a moving subject at a fast shutter speed so that the subject looks as if it is standing still The camera shoots images continuously while the shutter button is pressed Sunset Shoots the red of the sunset beautifully Night Portrait Shoots portraits in n...

Страница 122: ... the camera Subjects with a repeating pattern such as tiles and subjects with little contrast such as sky sandy beach or lawn Subjects with constant change such as waves or water falls In the case of Hand held Twilight block noise may occur when using a light source that flickers such as fluorescent lighting The minimum distance that you can come close to a subject does not change even if you sele...

Страница 123: ...e If you select Anti Motion Blur with RAW or RAW JPEG the image quality becomes Fine temporarily The shutter clicks 6 times and an image is recorded Reducing blur is less effective when shooting Subjects with erratic movement Subjects that are too close to the camera Subjects with a repeating pattern such as tiles and subjects with little contrast such as sky sandy beach or lawn Subjects with cons...

Страница 124: ...mbined image is not always the same When the whole angle of panoramic shooting and the angle in which you fixed the focus and exposure with AE AF lock are extremely different in brightness color and focus the shooting will not be successful If this happens change the lock angle and shoot again Sweep Panorama is not suitable when shooting Subjects in motion Subjects that are too close to the camera...

Страница 125: ...sition may fail In such case adjust the frame composition so that the section is in the center of the image then shoot again You can select the direction by operating the control dial L or the control wheel or by selecting MENU t Image Size t Panorama Direction You can select the image size by selecting MENU t Image Size t Image Size Vertical direction Horizontal direction Radius as short as possi...

Страница 126: ...lower with the telephoto side of the lens When you select Wide in Image Size you may not be able to pan the camera across the entire subject within the given time In such cases we recommend that you select Standard or 16 9 in Image Size If you shoot a 3D image with T side of a zoom lens a gray area may occur more often or shooting may be stopped It is recommended that you use a zoom lens with W si...

Страница 127: ...sure and white balance Then press the shutter button fully down and pan the camera When using a zoom lens it is recommended that you use it with W side You can select the direction by operating the control dial L or the control wheel or by selecting MENU t Image Size t Panorama Direction You can select the image size by selecting MENU t Image Size t Image Size Pan the camera in a small arc at a co...

Страница 128: ...djust the shutter speed aperture value and ISO also during movie recording You cannot select Flash Off and Autoflash in Flash Mode When you want to fire the flash press the flash pop up button to pop up the flash When you do not fire the flash push down the flash The SteadyShot warning indicator is not indicated in manual exposure mode The ISO setting ISO AUTO is set to ISO 100 in manual exposure ...

Страница 129: ...more conspicuous the noise on the image After shooting noise reduction Long Exposure NR will be done for the same amount of time that the shutter was open You cannot do any further shooting during the reduction When the Smile Shutter or Auto HDR function is activated you cannot set the shutter speed to BULB If the Smile Shutter or Auto HDR function is used with the shutter speed set to BULB the sh...

Страница 130: ...sh down the flash The SteadyShot warning indicator is not indicated in shutter speed priority mode When the shutter speed is 1 second or more noise reduction Long Exposure NR will be done for the same amount of time that the shutter was open after shooting You cannot do any further shooting during the reduction If proper exposure cannot be obtained after the setup when you press the shutter button...

Страница 131: ... Mode When you want to fire the flash press the flash pop up button to pop up the flash When you do not fire the flash push down the flash If proper exposure cannot be obtained after the setup when you press the shutter button halfway down the shutter speed blinks Although you can shoot as it is resetting is recommended The brightness of the image on the LCD monitor may differ from the actual imag...

Страница 132: ...ntrol wheel Use the menu when you want to set other items 3 Adjust the focus and shoot the subject You cannot select Flash Off and Autoflash in Flash Mode When you want to fire the flash press the flash pop up button to pop up the flash When you do not fire the flash push down the flash Note z Program Shift You can change the shutter speed and aperture F value combination without changing the expo...

Страница 133: ...sition HVL F20AM When the flash is turned off and not raised the flash may touch certain E mount lenses making it difficult to operate the lens In a dark location using the flash allows you to shoot the subject brightly and it also helps to prevent camera shake When shooting into the sun you can use the flash to shoot a bright image of the backlit subject flash pop up button Flash Off Does not fir...

Страница 134: ...u must prepare a lighting ratio control flash sold separately and a wireless flash sold separately Change the channel of your wireless flash when another photographer is using a wireless flash nearby and his her built in flash light causes your wireless flash to fire To change the channel refer to the operating instructions supplied with your wireless flash Wireless flash shooting Notes z Tips on ...

Страница 135: ... look clearer Note z Using manual focusing effectively Focus fixing is convenient when you can predict the distance to the subject With Focus fixing you can fix the focus in advance to the distance at which the subject is to pass z To measure the exact distance to the subject The mark shows the location of the image sensor When you measure the exact distance between the camera and the subject refe...

Страница 136: ...mera t AF MF Select t DMF 2 Press the shutter button halfway down to focus automatically 3 Keep the shutter button halfway down rotate the focusing ring of the lens to achieve a sharp focus Autofocus Mode is fixed to Single shot AF DMF Direct Manual Focus Note ...

Страница 137: ... you set before you started recording is used for focusing When the AF illuminator is used the setting of Autofocus Area is invalid and the AF area is indicated with a dotted line AF operates with priority on and around the center area Multi The camera determines which of the 25 AF areas is used for focusing When you press the shutter button halfway down in still image shooting mode a green frame ...

Страница 138: ...n Blur Sweep Panorama 3D Sweep Panorama Smile Shutter Continuous AF is selected when the exposure mode is set to Sports Action in Scene Selection In Continuous AF mode the audible signals will not sound when the subject is in focus Single shot AF The camera focuses and the focus is locked when you press the shutter button halfway down Use this when the subject is motionless Continuous AF The camer...

Страница 139: ... t On A target frame appears 2 Align the target frame with the subject to be tracked and select OK The camera starts tracking the subject To cancel this tracking feature select 3 Shoot the subject Target frame On Tracks the subject to be focused on When tracking is canceled appears at the lower right corner of the screen If you select a target frame appears Off Does not track the subject Notes z T...

Страница 140: ... in Quality Auto HDR in DRO Auto HDR If you press the MOVIE button when Prec Dig Zoom is working zooming is canceled the image on the screen returns to the normal size and movie recording starts As the image is zoomed by digital processing the image quality deteriorates compared to that before zooming was used If you use a zoom lens we recommend that you fully zoom in on an image first then use Pr...

Страница 141: ...shooting Face Detection is automatically set to On Regist Faces even if it is set to Off On Regist Faces Focuses on faces registered so as to have priority On Selects the face which the camera is to automatically focus on Off Does not use the Face Detection function Notes Face Detection frame white When the camera detects more than 1 subject the camera will judge which is the main subject and set ...

Страница 142: ...orrectly if it is obscured by a hat a mask sunglasses etc The registered faces are not cleared by Reset Default Even if you delete the faces by selecting Delete the face data remains stored in the camera If you want to completely delete the face data from the camera select Delete All New Registration Registers a new face Order Exchanging Changes the priority of faces previously registered Delete D...

Страница 143: ...mode turns to Single Shooting or Remote Cdr automatically 1 MENU t Camera t Smile Shutter t On 2 To set the sensitivity to detect a smile Option t desired setting 3 Wait for a smile to be detected When the smile level exceeds the b point on the indicator the camera records images automatically If you press the shutter button during Smile Shutter shooting the camera shoots the image then returns to...

Страница 144: ...tects the smile of that face only If a smile is not detected set the sensitivity with Option 1 Do not cover the eyes with the bangs Do not obscure the face by a hat masks sunglasses etc 2 Try to orient the face in front of the camera and be as level as possible Keep the eyes narrowed 3 Give a clear smile with an open mouth The smile is easier to be detected when the teeth are shown ...

Страница 145: ...oft Skin Effect with Option You cannot use Soft Skin Effect with the following functions Movie recording Cont Shooting Spd Priority Cont Bracket Cont Self timer Cont Sports Action in Scene Selection Sweep Panorama 3D Sweep Panorama RAW in Quality This function may not work depending on your subject On Uses the Soft Skin Effect Function Off Does not use the Soft Skin Effect function High Sets Soft ...

Страница 146: ... except for when Shoot Mode is set to Sweep Panorama or 3D Sweep Panorama Display All Info Shows recording information Big Font Size Disp Shows only major items in a larger size No Disp Info Does not show recording information Live View Priority Shows the major recording information items to the right of the screen The soft key icons do not appear Level Indicates whether the camera is level in bot...

Страница 147: ...88GB Table of contents Sample photo Menu Index For viewfinder Shows only shooting information on the screen no image Select this when you shoot using the viewfinder ...

Страница 148: ... RAW image with Quality the image size corresponds to L Still Image size when Aspect Ratio is 3 2 Usage guidelines L 24M 6000 4000 pixels Shoots images with the highest image quality M 12M 4240 2832 pixels For prints up to A3 size S 6M 3008 2000 pixels For prints A5 size Image size when Aspect Ratio is 16 9 Usage guidelines L 20M 6000 3376 pixels For viewing on a high definition TV M 10M 4240 2400...

Страница 149: ...a Standard Shoots images using standard size Vertical 3872 2160 Horizontal 8192 1856 Wide Shoots images using wide size Vertical 5536 2160 Horizontal 12416 1856 Note z Tips for selecting the image size The images appear differently depending on the mode selected 16 9 Standard Wide When Standard or Wide is selected the images are scrolled when you press the center of the control wheel ...

Страница 150: ...the aspect ratio of still images 1 MENU t Image Size t Aspect Ratio t desired mode You cannot set this item when using the following functions Sweep Panorama 3D Sweep Panorama 3 2 Standard aspect ratio Suitable for prints 16 9 For viewing on a high definition TV Note ...

Страница 151: ...for viewing and a RAW for editing The image quality is fixed to Fine and the image size is fixed to L FINE Fine File format JPEG The image is compressed in the JPEG format when recorded Since the compression rate of Standard is higher than that of Fine the file size of Standard is smaller than that of Fine This will allow more files to be recorded on 1 memory card but the image quality will be low...

Страница 152: ...a when you shoot 3D Sweep Panorama or Sweep Panorama images 1 MENU t Image Size t Panorama Direction t desired mode 3D Sweep Panorama Right Pan the camera from the left to the right Left Pan the camera from the right to the left Sweep Panorama Right Pan the camera in the direction you set Left Up Down ...

Страница 153: ...utilize the progressive scanning system Dolby Digital audio and the AVCHD format MP4 Records mp4 AVC movies This format is suitable for WEB uploads e mail attachments etc Movies are recorded in MPEG 4 format at about 30 frames second utilizing the progressive scanning system AAC audio and the mp4 format You cannot create a disc from the movies recorded in this format using the supplied software PM...

Страница 154: ... 24p 25p If you use a non compatible TV the movies are converted to 60i 50i and output to the TV File Format AVCHD 60i 60p AVCHD 50i 50p Average bit rate Recording 60i 24M FX 50i 24M FX 24 Mbps Records high image quality movies of 1920 1080 60i 50i 60i 17M FH 50i 17M FH 17 Mbps Records standard image quality movies of 1920 1080 60i 50i 60p 28M PS 50p 28M PS 28 Mbps Records highest image quality mo...

Страница 155: ...to 100 Set the ISO according to your shooting conditions ISO AUTO Sets the ISO sensitivity automatically 100 200 400 800 1600 3200 6400 12800 16000 Sets the sensitivity to light of the imaging sensor Higher sensitivities enable faster shutter speeds and or smaller apertures larger F values The higher the sensitivity the more image noise can become visible Notes z Adjusting ISO Sensitivity Recommen...

Страница 156: ... Auto WB is selected when using the following functions Intelligent Auto Scene Selection AWB Auto WB The camera automatically detects a light source and adjusts the color temperature Daylight If you select an option to suit a specific light source the color temperature is adjusted for the light source preset white balance Shade Cloudy Incandescent Fluor Warm White Fluor Cool White Fluor Day White ...

Страница 157: ...ss Color t White Balance t Custom Setup 2 Hold the camera so that the white area fully covers the AF area located in the center and then press the shutter button down The shutter clicks and the calibrated values color temperature and color filter are displayed 3 To call the custom white balance setting MENU t Brightness Color t White Balance t Custom You can finely adjust the color temperature wit...

Страница 158: ...hootings The message Custom WB error indicates that the value is beyond the expected range When the flash is used on a subject in close proximity or a subject with a bright color is in the frame If you register this value the indicator turns yellow on the recording information display You can shoot at this point but it is recommended that you set the white balance again to get a more accurate whit...

Страница 159: ...ligent Auto Scene Selection Prec Dig Zoom Smile Shutter Multi Measures light on each area after dividing the total area into multiple areas and determines the proper exposure of the entire screen Multi pattern metering Center Measures the average brightness of the entire screen while emphasizing the central area of the screen Center weighted metering Spot Measures only the central area Spot meteri...

Страница 160: ...vel lower and images darker You cannot use Flash Comp with the following functions Intelligent Auto Scene Selection Anti Motion Blur Sweep Panorama 3D Sweep Panorama The higher flash effect may not be visible due to the limited amount of flash light available if the subject is outside the maximum range of the flash If the subject is very close the lower flash effect may not be visible Notes z Tips...

Страница 161: ...noisy Select the proper level by checking the recorded image especially when you enhance the effect Off Does not use DRO Auto HDR D Range Opt By dividing the image into small areas the camera analyzes the contrast of light and shadow between the subject and the background producing the image with the optimal brightness and gradation Auto HDR Shoots 3 images with different exposures and then overla...

Страница 162: ...e subject is motionless or does not blink Do not recompose You may not obtain a desired effect depending on the luminance difference of a subject and the shooting conditions When the flash is used this function has little effect When the contrast of the scene is low or when significant camera shake or subject blur has occurred you may not obtain good HDR images If the camera detects such situation...

Страница 163: ...mphasizing color tones Posterization Creates a high contrast abstract look by heavily emphasizing primary colors or in black and white You can select primary colors or black and white with Option Retro Photo Creates the look of an aged photo with sepia color tones and faded contrast Soft High key Creates an image with the indicated atmosphere bright transparent ethereal tender soft Partial Color C...

Страница 164: ...e contrast of the scene is low or when significant camera shake or subject blur has occurred you may not obtain good HDR images If the camera detects such situation is indicated on the recorded image to inform you of this situation Shoot again as necessary recomposing or paying attention to the blur Soft Focus Creates an image filled with a soft lighting effect You can set the intensity of the eff...

Страница 165: ...dified with a computer Clear For capturing images in a clear tone with limpid colors in the highlighted area suitable for capturing radiant light Deep For capturing images with deep and dense color expressions suited to capturing the solid presence of the subject Light For capturing images with bright and uncomplicated color expressions suited to capturing refreshingly light ambience Portrait For ...

Страница 166: ...ction Picture Effect except Off Contrast The higher the value selected the more the difference of light and shadow is accentuated thus making an impact on an image Saturation The higher the value selected the more vivid the color When a lower value is selected the color of the image is restrained and subdued Sharpness Adjusts the sharpness The higher the value selected the more the contours are ac...

Страница 167: ... movies that were recorded in the AVCHD 60i 60p or AVCHD 50i 50p mode of File Format Multiple Img Deletes the selected images Press the center of the control wheel to select OK All in Folder Deletes all images in the selected folder or all AVCHD View movies All AVCHD view files Notes z To delete an image It is easier to delete an image displayed on the screen by selecting Delete of soft key page 3...

Страница 168: ...n play back images in Slide Show when View Mode is set to Folder View Still only A panoramic image is displayed in full image To scroll a panoramic image press the center of the control wheel when the image is displayed Repeat On Plays back images in a continuous loop Off After all the images have been played back the slide show ends Interval 1 Sec Sets the display interval of images 3 Sec 5 Sec 1...

Страница 169: ... unit of images to be played back 1 MENU t Playback t View Mode t desired mode Folder View Still Displays still images by folder Folder View MP4 Displays movies MP4 by folder AVCHD View Displays movies recorded with the AVCHD 60i 60p or AVCHD 50i 50p mode of File Format ...

Страница 170: ...Playback t Image Index t desired mode 6 Images Displays 6 images 12 Images Displays 12 images z Displaying a desired folder To select a desired folder select the bar to the left of the image index screen then press the top bottom parts of the control wheel You can change the view mode by pressing the center of the control wheel ...

Страница 171: ...in the rotated position even if you turn off the power 1 MENU t Playback t Rotate 2 Press the center of the control wheel The image rotates counter clockwise The image rotates as you press the center You cannot rotate movies or protected images You may not be able to rotate images shot with other cameras When viewing images on a computer the image rotation information may not be reflected dependin...

Страница 172: ...ime AVCHD View movies are movies that were recorded in the AVCHD 60i 60p or AVCHD 50i 50p mode of File Format Multiple Img Applies or cancels the protection of the selected images Press the center of the control wheel to select OK Cancel All Images Cancels the protection of all still images Cancel All Movies MP4 Cancels the protection of all movies MP4 Cancel All AVCHD view files Cancels the prote...

Страница 173: ... control wheel 3 Select the position you want to see by pressing the top bottom right left of the control wheel 4 To cancel the enlarged playback select You cannot enlarge the movies During playing back panoramic images pause first and then enlarge the image Notes z Scaling range The scaling range depends on the image size Image size Scaling range L Approx 1 0 16 7 M Approx 1 0 11 8 S Approx 1 0 8...

Страница 174: ...lume of movies in 8 steps 1 MENU t Playback t Volume Settings t desired value z Adjusting the volume during playback The Volume Settings screen appears when you press the bottom of the control wheel while playing back movies You can adjust the volume while listening to the actual sound ...

Страница 175: ...F mark to movies You can add the DPOF mark to up to 999 images DPOF registration is not cleared after printing It is recommended that you clear it after you print the still images DPOF Setup Multiple Img Selects images to order printing 1Select an image and press the center of the control wheel To cancel the image select the marked image again 2Repeat the operation on all images you want to print ...

Страница 176: ...ck function 1 MENU t Setup t AEL t desired setting The setting may change from Toggle to Hold when you select MENU etc Hold Shoots with the locked in exposure value as long as the button is pressed Toggle Shoots with the locked in exposure value even if you remove your finger from the button The locked exposure value is canceled when you press the button again Note ...

Страница 177: ...ol t desired setting The setting may change from Toggle to Hold when you select MENU etc You can set this item when AF MF control is selected in AF MF button Hold The focusing mode is switched from to auto as long as the button is pressed Toggle The focusing mode remains switched from to auto even if you remove your finger from the button Focusing returns to the previous mode when you press the bu...

Страница 178: ...e control dials and the control wheel are locked when you hold the Navigation button down 1 MENU t Setup t Dial Wheel Lock t desired setting All The control dials and the control wheel are locked Control Wheel Only the control wheel is locked Off The control dials and the control wheel are not locked ...

Страница 179: ...sired setting You cannot use the AF illuminator when Autofocus Mode is set to Continuous AF Landscape Night Scene or Sports Action in Scene Selection is selected Sweep Panorama is selected 3D Sweep Panorama is selected Recording movies Using an A mount lens sold separately When the AF illuminator is used the setting of Autofocus Area is invalid and the AF area is indicated with a dotted line AF op...

Страница 180: ...tion may not produce the desired effects It depends on individual differences and conditions such as distance to the subject or if the subject looked away from the pre strobe On The flash is always fired to reduce the red eye phenomenon Off Does not use Red Eye Reduction Notes z What causes the red eye phenomenon Pupils become dilated in dark environments Flash light is reflected off the blood ves...

Страница 181: ...D monitor to display images Also you can select the viewfinder or the LCD monitor to display images 1 MENU t Setup t FINDER LCD Setting t desired setting Auto When you look into the viewfinder the display is switched to the viewfinder automatically Viewfinder Turns off the LCD monitor and displays images on the viewfinder LCD Monitor Turns off the viewfinder and display images on the LCD monitor ...

Страница 182: ...u can select Setting Effect OFF in the following shooting modes only Manual Exposure Shutter Priority Aperture Priority Program Auto Setting Effect ON Shows the images with effects applied Setting Effect OFF Does not show the images with effects applied This setting will allow you to concentrate on the composition of the subject as the subject appears on the screen as it is The images are always d...

Страница 183: ...ition even if Playback Display is set to Auto Rotate Even if Grid Line is set to a setting other than Off when recording 3D Sweep Panorama or Sweep Panorama images the grid line does not appear in auto review Before the image is displayed an unprocessed image may be displayed temporarily depending on the setting such as DRO Auto HDR Soft Skin Effect 10 Sec Displays for the set time Selecting Enlar...

Страница 184: ...asier to confirm the horizontal level of your composition This is suitable to determine the quality of the composition when shooting landscape close up or duplicated images Diag Square Grid Placing a subject on the diagonal line can express uplifting and powerful feeling Off Does not display the grid line z Checking the frame for movie recording Frame for movie The frame that appears when Grid Lin...

Страница 185: ...Level t desired setting Since the camera judges that sharp areas are in focus the peaking level is different depending on the subject shooting situation or on the lens used The outline of in focus ranges is not enhanced when the camera is connected using an HDMI cable High Sets the peaking level to high Mid Sets the peaking level to middle Low Sets the peaking level to low Off Does not use the pea...

Страница 186: ...ts the color used for the peaking function in manual focus 1 MENU t Setup t Peaking Color t desired setting This item cannot be set when Peaking Level is set to Off White Enhances outlines in white Red Enhances outlines in red Yellow Enhances outlines in yellow Note ...

Страница 187: ...You can enlarge the image also by 11 7 times In DMF Direct Manual Focus turn the focusing ring with the shutter button pressed halfway down after adjusting the focus with autofocus You cannot use MF Assist with the following functions Movie recording Prec Dig Zoom When an A mount lens sold separately is attached pressing soft key will enlarge the image On Enlarges the image You can set the enlargi...

Страница 188: ...e will be shown in an expanded form for the MF Assist function 1 MENU t Setup t MF Assist Time t desired setting This item cannot be set when MF Assist is set to Off No Limit Enlarges the display until is selected 5 Sec Enlarges the image for 5 seconds 2 Sec Enlarges the image for 2 seconds Note ...

Страница 189: ...ns or printers that do not support them may result in or print images that do not faithfully reproduce the color When displaying images that were recorded with Adobe RGB on the camera or non Adobe RGB compliant devices the images are displayed with low saturation sRGB This is the standard color space of the digital camera Use sRGB in normal shooting such as when you intend to print out the images ...

Страница 190: ...ing On is selected when using the following functions Hand held Twilight in Scene Selection Anti Motion Blur You cannot set SteadyShot when the name of the lens attached does not contain OSS such as E16 mm F2 8 or when you are using an A mount lens sold separately On Uses SteadyShot Off Does not use SteadyShot This setting is recommended when you use a tripod Notes ...

Страница 191: ...t metering cannot be achieved when you use lenses that do not provide a lens contact such as the lens of an astronomical telescope In such cases adjust the exposure manually by checking it on the recorded image Enable Releases the shutter when no lens is attached Select this when you attach the camera on an astronomical telescope etc Disable Releases the shutter only when a lens is attached Note ...

Страница 192: ...n you look through the viewfinder 1 MENU t Setup t Eye Start AF t desired setting This item is available only when the LA EA2 Mount Adaptor sold separately is attached On Auto focusing starts when you look through the viewfinder Off Auto focusing does not start when you look through the viewfinder Note ...

Страница 193: ...eeds with a large diameter lens attached the ghosting of a blurred area may occur depending on the subject or shooting conditions In such cases set this item to Off When a Minolta Konika Minolta lens is used set this item to Off If you set this item to On the correct exposure will not be set or the image brightness will be uneven On Uses the electronic front curtain shutter function Off Does not u...

Страница 194: ...en it is set to On Cont Shooting Spd Priority Cont Bracket Cont Hand held Twilight in Scene Selection Anti Motion Blur Sweep Panorama 3D Sweep Panorama You cannot change Long Exposure NR when using the following functions Intelligent Auto Scene Selection Anti Motion Blur Sweep Panorama 3D Sweep Panorama On Activates noise reduction for the same duration that the shutter is open When noise reductio...

Страница 195: ...another picture 1 MENU t Setup t High ISO NR t desired setting You cannot set High ISO NR when using the following functions Sweep Panorama 3D Sweep Panorama Noise reduction will not be carried out on RAW images High Activates high ISO noise reduction considerably Select this to prioritize the image quality Normal Activates high ISO noise reduction normally Low Activates high ISO noise reduction m...

Страница 196: ...ed corners of the screen caused by certain lens characteristics 1 MENU t Setup t Lens Comp Shading t desired setting This item is available only with an E mount lens Auto Compensates for darker corners of the screen automatically Off Does not compensate for darker corners of the screen Note ...

Страница 197: ...or deviation at the corners of the screen caused by certain lens characteristics 1 MENU t Setup t Lens Comp Chro Aber t desired setting This item is available only with an E mount lens Auto Reduces the color deviation automatically Off Does not compensate for the color deviation Note ...

Страница 198: ...e distortion of the screen caused by certain lens characteristics 1 MENU t Setup t Lens Comp Distortion t desired setting This item is available only with an E mount lens Auto Compensates for distortion of the screen automatically Off Does not compensate for distortion of the screen Note ...

Страница 199: ...c Sets whether or not you record the sound during movie recording 1 MENU t Setup t Movie Audio Rec t desired setting The sound of the lens and the camera in operation will also be recorded when On is selected On Records sound stereo Off Does not record sound Note ...

Страница 200: ...Setup t Wind Noise Reduct t desired setting Setting this item to On where wind is not blowing sufficiently hard may cause normal sound to be recorded with too low volume When using a microphone sold separately the wind noise reduction will not be carried out even if it is set to On On Reduces wind noise Off Does not reduce wind noise Notes ...

Страница 201: ...ered If you want to register another lens you must first clear a value Attach a lens of the value to be cleared and select 0 If you want to clear all registered values select Clear Use AF Micro Adj with Sony Minolta and Konika Minolta lenses only If you use AF Micro Adj with other brands of lenses the registered value may be affected You cannot set AF Micro Adj individually for a Sony Minolta and ...

Страница 202: ...isplay the first screen of the menu or to display the screen of the item you set the last time 1 MENU t Setup t Menu start t desired setting Top Always displays the first screen of the menu Previous Displays the last item set This will make it easier to quickly reset the last item you set previously ...

Страница 203: ...n Settings 2 White Balance Settings Function Settings 3 D Range Settings Function Settings 4 Creative Style Settings Picture Effect Settings Custom Settings Not set Custom Settings 1 to 3 Exposure Comp Autofocus Mode ISO Metering Mode Custom Settings 1 White Balance Custom Settings 2 DRO Auto HDR Custom Settings 3 Creative Style Picture Effect Quality Not set Function Settings Start Top Always dis...

Страница 204: ...l Focus Settings MF Assist Right Key Setting Shoot Mode White Balance AF MF Select Metering Mode Autofocus Mode DRO Auto HDR Autofocus Area Picture Effect Prec Dig Zoom Creative Style Face Detection Flash Mode Smile Shutter Flash Comp Soft Skin Effect MF Assist Quality Focus Settings ISO Not set Soft key B Setting Shoot Mode White Balance AF MF Select Metering Mode Autofocus Mode DRO Auto HDR Auto...

Страница 205: ...setting of soft key B is invalid You do not have to set up all the Custom 1 Custom 2 Custom 3 Custom 4 and Custom 5 items Face Detection Flash Mode Smile Shutter Flash Comp Soft Skin Effect MF Assist Quality Focus Settings ISO Not set Soft key C Setting Shoot Mode Calls a recording mode Custom Calls a function assigned to Custom 1 Custom 2 Custom 3 Custom 4 or Custom 5 Custom 1 to 5 AF MF Select A...

Страница 206: ...ple photo Menu Index Calling a function assigned to Custom of soft key C 1 Press soft key C when CUSTOM Custom is displayed 2 Select Custom 1 Custom 2 Custom 3 Custom 4 or Custom 5 by pressing the right left of the control wheel ...

Страница 207: ...mple photo Menu Index Beep Selects the sound produced when you operate the camera 1 MENU t Setup t Beep t desired setting On Turns on audible signals when you press the control wheel or soft keys Off Turns off the audible signal ...

Страница 208: ...149GB Table of contents Sample photo Menu Index Language Selects the language to be used in the menu items warnings and messages 1 MENU t Setup t Language t desired language ...

Страница 209: ... The camera does not have a feature for superimposing dates on images By using PMB on the CD ROM supplied you can print or save images with the date 1 MENU t Setup t Date Time Setup 2 Set the date time etc Daylight Svg Selects ON or OFF Date Format Selects the date and time display format Note ...

Страница 210: ...ndex Area Setting Sets the area where you are using the camera This allows you to set the local area when you use the camera abroad 1 MENU t Setup t Area Setting t desired setting 2 Press the right or left of the control wheel to select an area ...

Страница 211: ...to Menu Index Help Guide Display You can select whether or not the help guide is displayed when you operate the camera 1 MENU t Setup t Help Guide Display t desired setting On Displays the help guide Off Does not display the help guide ...

Страница 212: ...a to switch to power save mode Pressing the shutter button halfway down returns the camera to the shooting mode 1 MENU t Setup t Power Save t desired setting Turn off the camera when you do not use it for a long time 30 Min Switches to power save mode after the set time 5 Min 1 Min 20 Sec 10 Sec Note ...

Страница 213: ...Brightness t desired setting When this is set to Auto do not cover the light sensor with your hand and so on When using the camera with the AC PW20 AC Adaptor sold separately the brightness of the LCD monitor is always set as bright as 2 even if you select Auto Auto Adjusts the brightness automatically Manual Allows you to adjust the brightness within the range of 2 to 2 Sunny Weather Automaticall...

Страница 214: ...ight The brightness of the viewfinder is automatically adjusted to the ambient lighting conditions 1 MENU t Setup t Viewfinder Bright t desired setting Auto Adjust the brightness automatically Manual Allows you to adjust the brightness within the range of 1 to 1 ...

Страница 215: ...156GB Table of contents Sample photo Menu Index Display Color Selects the color of the LCD monitor 1 MENU t Setup t Display Color t desired setting Black Turns to the selected color White ...

Страница 216: ...x Wide Image Selects the method used for displaying the wide images 1 MENU t Setup t Wide Image t desired setting Full Screen Displays the wide images on the entire screen Normal Displays the wide images and the operation information on the screen ...

Страница 217: ...ecorded in the portrait position 1 MENU t Setup t Playback Display t desired setting When you play back the image on a TV or a computer the image will be displayed in the portrait position even if Manual Rotate is selected Auto Rotate Displays in the portrait position Manual Rotate Displays in the landscape position Note ...

Страница 218: ...olution to output images to the TV 1 MENU t Setup t HDMI Resolution t desired setting If you cannot display the screen properly with the Auto setting select either 1080i or 1080p depending on the TV to be connected Auto The camera automatically recognizes an HD TV and sets the output resolution 1080p Outputs signals in HD picture quality 1080p 1080i Outputs signals in HD picture quality 1080i Note...

Страница 219: ... your camera by the TV s remote control aiming at the TV See page 175 on BRAVIA Sync 1 MENU t Setup t CTRL FOR HDMI t desired setting You can perform the operation of the camera with the remote control of your TV by connecting your camera to a BRAVIA Sync compatible TV On Operates the camera with the TV remote control Off Does not operate the camera with the TV remote control Note ...

Страница 220: ...indows 7 computers are connected in MTP and its unique functions are enabled to use Mass Storage Establishes a Mass Storage connection between the camera a computer and other USB devices Standard mode MTP Establishes an MTP connection between the camera a computer and other USB devices Windows 7 computers are connected in MTP and its unique functions are enabled to use In the case of other compute...

Страница 221: ...avity beyond the mount so that the tip of the blower does not touch the image sensor Hold the camera s face downward to prevent the dust from resettling in the camera Do not apply a mechanical shock to the camera during cleaning When cleaning the image sensor with a blower do not blow too hard 1 MENU t Setup t Cleaning Mode t OK The message After cleaning turn camera off Continue appears 2 Select ...

Страница 222: ...ur camera and lens Confirm the version when a firmware update is released 1 MENU t Setup t Version An update can be performed only when the battery level is 3 remaining battery icons or more We recommend that you use a sufficient battery or the AC PW20 AC Adaptor sold separately Note ...

Страница 223: ...tup t Demo Mode t desired setting You can set this item only when the camera is powered by the AC PW20 AC Adaptor sold separately Even if On is selected the camera does not start a demonstration when there is no movie recorded on the memory card When On is selected the camera does not switch to power save mode On The demonstration begins automatically when the camera is not operated for about 1 mi...

Страница 224: ...o the default setting Even if you activate Reset Default the images are retained 1 MENU t Setup t Reset Default t OK Be sure not to turn off the camera while resetting Following settings are not reset Date Time Setup Area Setting Faces registered with Face Registration AF Micro Adj Notes ...

Страница 225: ...a on the memory card and is unrecoverable Save precious data on a computer etc 1 MENU t Setup t Format t OK Formatting permanently erases all data including even protected images During the format the access lamp lights up Do not eject the memory card while the lamp is lit Format the memory card using the camera If you format it on a computer the memory card may not be usable with the camera depen...

Страница 226: ...gns numbers to files in sequence until the number reaches 9999 Reset The camera resets numbers in the following cases and assigns numbers to files from 0001 When the recording folder contains a file a number incremented one higher than the largest number is assigned When the folder format is changed When all the images in the folder are deleted When the memory card is replaced When the memory card...

Страница 227: ...can change the folder name form 1 MENU t Setup t Folder Name t desired setting The movie folder form is fixed as folder number ANV01 You cannot change this name Standard Form The folder name form is as follows folder number MSDCF Example 100MSDCF Date Form The folder name form is as follows folder number Y the last digit MM DD Example 10010405 Folder number 100 date 04 05 2011 Note ...

Страница 228: ... more folders you can select the recording folder to be used to record still images 1 MENU t Setup t Select Shoot Folder t desired folder You cannot select the folder when you select the Date Form setting Movie MP4 files are recorded in a folder for movies that has the same number as the selected folder for still images Notes ...

Страница 229: ...incremented 1 higher than the largest number currently used A folder for still images and a folder for movies that have the same number are created at the same time When you insert a memory card that was used with other equipment into the camera and shoot images a new folder may be automatically created Up to 4 000 images in total can be stored in the folders for still images or movies respectivel...

Страница 230: ...etc images on the memory card will not be played back in this form If this happens the camera repairs the file 1 MENU t Setup t Recover Image DB t OK The Recover Image DB screen is displayed and the camera repairs the file Wait as it is until repairing is completed Use a sufficiently charged battery Low battery power during repairing can cause damage to data Note ...

Страница 231: ...e of contents Sample photo Menu Index Display Card Space Displays the remaining recording time of movies on the memory card Number of recordable still images is also displayed 1 MENU t Setup t Display Card Space ...

Страница 232: ...ly via the Wi Fi network When you use a brand new Eye Fi card for the first time copy the install file of Eye Fi manager recorded on the card to your computer before formatting the card Use an Eye Fi card after updating the firmware to the latest version For details refer to the operating instructions that comes with the Eye Fi card The power save function of the camera does not work while it is t...

Страница 233: ... the Peaking function is activated the outline of in focus ranges is not enhanced when the camera is connected using an HDMI cable 1 Turn off both your camera and the TV 2 Connect the camera to the TV with an HDMI cable sold separately 3 Turn on the TV and switch the input 4 Turn on the camera then press the Playback button to select playback mode Images shot with the camera appear on the TV scree...

Страница 234: ... HDMI cable Only TVs that support BRAVIA Sync can provide SYNC MENU operations The SYNC MENU operations differ depending on the TV connected For details refer to the operating instructions supplied with the TV If the camera performs unnecessary operations in response to the TV Remote Control when the camera is connected to another manufacturer s TV using an HDMI connection operate MENU t Setup t C...

Страница 235: ... an HDMI cable with the HDMI logo Use an HDMI mini connector on one end for the camera and a plug suitable for connecting your TV on the other end 1 Connect the camera to the 3D TV using an HDMI cable sold separately 2 MENU t Playback t 3D Viewing t OK 3D panorama images shot with the camera appear on the TV screen When Standard or Wide is selected you can scroll 3D panorama images by pressing the...

Страница 236: ...ion are not supported Windows Image Mastering API IMAPI Ver 2 0 or later is required to use the function for creating discs Starter Edition is not supported Notes Recommended computer environment Windows OS pre installed Microsoft Windows XP SP3 Windows Vista SP2 Windows 7 SP1 PMB CPU Intel Pentium III 800 MHz or faster For playing editing the HD movies Intel Core Duo 1 66 GHz or faster Intel Core...

Страница 237: ...are using Connecting the camera using a USB interface that is compatible with Hi Speed USB USB 2 0 allows advanced transfer high speed transfer as the camera is compatible with Hi Speed USB USB 2 0 When your computer resumes activity from suspend or sleep mode communication between the camera and your computer may not recover at the same time Recommended computer environment Macintosh OS pre insta...

Страница 238: ...y be required When the restarting confirmation message appears restart the computer following the instructions on the screen DirectX may be installed depending on the system environment of your computer 3 Remove the CD ROM after the installation is complete The following software is installed and shortcut icons appear on the desktop Image Data Converter PMB PMB Launcher PMB Help If PMB has already...

Страница 239: ...ages and JPEG images recorded by this camera To rank images in 5 grades To apply color labels etc With PMB you can do the following etc To set images shot with the camera and display them on the computer To organize images on the computer on a calendar by shooting date to view them To retouch Red Eye Correction etc print and send still images as e mail attachments change the shooting date and more...

Страница 240: ...d by PMB in order to create an AVCHD disc This conversion can take a long time Also you cannot create a disc with the original image quality If you want to keep the original image quality you must store your movies on a Blu ray Disc Notes z To use PMB Refer to PMB Help Double click the shortcut of PMB Help on the desktop Or click Start t All Programs t PMB t PMB Help PMB support page English only ...

Страница 241: ...from such operations via the computer 1 Connect the camera to your Macintosh computer first Double click the newly recognized icon on the desktop t the folder where the images you want to import are stored 2 Drag and drop the image files to the hard disk icon The image files are copied to the hard disk 3 Double click the hard disk icon t the desired image file in the folder containing the copied f...

Страница 242: ...drop the icon of the memory card or the drive icon to the Trash icon beforehand when you use a Macintosh computer and the camera is disconnected from the computer Deleting the USB connection 1 Double click the disconnect icon on the tasktray 2 Click USB Mass Storage Device t Stop 3 Confirm the device on the confirmation window then click OK Disconnect icon Note Windows Vista Windows XP ...

Страница 243: ...VDirect DVD writer make sure that the version of DVD writer s firmware is the latest For details refer to the following URL http sony storagesupport com Selecting the method for creating a disc Player Method Disc type Blu ray Disc playback devices Blu ray Disc player PlayStation 3 etc Create a Blu ray Disc of movies and photos imported to a computer using PMB AVCHD format playback devices Sony Blu...

Страница 244: ...lu ray Disc player and a PlayStation 3 You cannot play the disc on ordinary DVD players Standard definition image quality STD movie converted from high definition image quality HD movie can be recorded on DVD media such as DVD R discs and a standard image quality STD disc is created z Discs you can use with PMB You can use 12 cm discs of following type with PMB For Blu ray Disc see page 186 Always...

Страница 245: ... Blu ray Disc Creating a Blu ray Disc You can create a Blu ray Disc with AVCHD View movies previously imported to a computer Your computer must support the creation of a Blu ray Disc BD R non rewritable and BD RE rewritable media can be used to create a Blu ray Disc You cannot add contents to either type of disc once it has been created Click BD Add on Software on the installation screen of PMB an...

Страница 246: ...ideo STD disc for the first time You can create a disc with a Blu ray Disc recorder and DVD writer The disc type you can create depends on the device used For details on creating a disc refer to the operating manual that comes with the device used You can transmit data via the memory card slot and the USB connection when using a Sony DVD writer When you use Sony DVDirect DVD writer make sure that ...

Страница 247: ...e shop supports photo printing services conforming to DPOF you can make a Print order mark on images in advance in the playback mode so that you do not have to reselect them when you print them out at the shop You cannot print RAW images When you print images shot in 16 9 mode both edges may be cut off You cannot print panoramic images depending on the printer When you print at a shop note the fol...

Страница 248: ...r battery pack is too warm the camera displays a warning message and turns off automatically to protect the camera If you do not operate the camera for given period of time the camera turns to power saving mode To cancel the power save operate the camera such as pressing the shutter button halfway down page 153 The CHARGE lamp flashes when charging the battery pack You can use an NP FW50 battery p...

Страница 249: ...onitor Select Auto page 122 Move your eye a little closer to the viewfinder Nothing is displayed on the LCD monitor when the power is turned on If you do not operate the camera for given period of time the camera turns to power saving mode To cancel the power save operate the camera such as pressing the shutter button halfway down page 153 The shutter does not release You are using a memory card w...

Страница 250: ...will be dark because the flash light does not reach the subject If the ISO is changed the flash range also changes with it The date and time are recorded incorrectly Set the correct date and time page 150 The area selected with Area Setting is different from the actual area Set the actual area by selecting MENU t Setup t Area Setting The aperture value and or shutter speed flashes when you press t...

Страница 251: ...ocessed by a computer or when the image file was recorded using a model other than that of your camera playback on your camera is not guaranteed The camera is in USB mode Delete the USB connection page 183 Use PMB to play images stored on a computer with this camera The image cannot be deleted Cancel the protection page 113 The image was deleted by mistake Once you have deleted an image you cannot...

Страница 252: ...a USB connection PMB does not start automatically Make the USB connection after the computer is turned on page 182 Cannot insert a memory card Insertion direction of the memory card is wrong Insert it in the correct direction Cannot record on a memory card The memory card is full Delete unnecessary images pages 30 108 An unusable memory card is inserted Formatted the memory card by mistake All the...

Страница 253: ...y pack and set the date again page 150 If the message appears every time you charge the battery pack the internal rechargeable battery may be exhausted Consult your Sony dealer or local authorized Sony service facility The date and time are recorded incorrectly Correct or check the date and time setting by selecting MENU t Setup t Date Time Setup The number of recordable images does not decrease o...

Страница 254: ...ncompatible memory card is inserted or the format has failed Reinsert memory card The inserted memory card cannot be used in your camera The memory card is damaged The terminal section of the memory card is dirty This memory card may not be capable of recording and playing normally The inserted memory card cannot be used in the camera Processing Long exposure noise reduction or high ISO noise redu...

Страница 255: ...images exceeds that for which date management in a database file by the camera is possible Unable to register to the database file Import all the images to a computer using PMB and recover the memory card Camera Error Turn the power off remove the battery pack then re insert it If the message appears frequently consult your Sony dealer or local authorized Sony service facility Image Database File ...

Страница 256: ...You attempted to delete without specifying images No images changed You attempted to execute DPOF without specifying images Cannot create more folders The folder with a name beginning with 999 exists on the memory card You cannot create any folders if this is the case ...

Страница 257: ...device NTSC system Bahama Islands Bolivia Canada Central America Chile Colombia Ecuador Jamaica Japan Korea Mexico Peru Surinam Taiwan the Philippines the U S A Venezuela etc PAL system Australia Austria Belgium China Croatia Czech Republic Denmark Finland Germany Holland Hong Kong Hungary Indonesia Italy Kuwait Malaysia New Zealand Norway Poland Portugal Rumania Singapore Slovak Republic Spain Sw...

Страница 258: ... after it has been used for a long time Be careful when you handle it Do not use or store the memory card under the following conditions High temperature locations such as the hot interior of a car parked in direct sunlight Locations exposed to direct sunlight Humid locations or locations with corrosive substances present Images recorded on an SDXC memory card cannot be imported to or played on co...

Страница 259: ...e with Memory Stick Micro media M2 M2 is an abbreviation for Memory Stick Micro media To use a Memory Stick Micro media with the camera be sure to insert the Memory Stick Micro media into an M2 Adaptor as large as of Duo size If you insert a Memory Stick Micro media into the camera without an M2 Adaptor as large as of Duo size you might not be able to remove it from the camera Do not leave the Mem...

Страница 260: ...start shooting The battery pack will run out quickly if you use the flash or record movies frequently We recommend having spare battery packs handy and making trial shots before taking the actual shots Do not expose the battery pack to water The battery pack is not water resistant Do not leave the battery pack in extremely hot places such as in a car or under direct sunlight On the remaining batte...

Страница 261: ...ag to keep away from metal materials when carrying or storing the battery pack On battery life The battery life is limited Battery capacity decreases over time and through repeated use If decreased usage time between charges becomes significant it is probably time to replace it with a new one The battery life varies according to how it is stored and the operating conditions and environment in whic...

Страница 262: ...is the specified type remove the battery pack replace it with a new one or another one and check if the battery charger operates correctly If the battery charger operates correctly a battery error may have occurred When the CHARGE lamp flashes slowly it indicates that the battery charger stops charging temporarily on standby The battery charger stops charging and enters the standby status automati...

Страница 263: ...ens is attached the autofocus speed will be about 2 seconds to 7 seconds when shooting under Sony measurement condition The speed may vary depending on the subject ambient light etc Functions LA EA1 LA EA2 Autofocus Available with SAM SSM lens only Available AF system Contrast AF Phase detection AF AF MF Select Switchable on the lens SAM lens switchable on the lens SSM lens switchable on the lens ...

Страница 264: ...ke a long time or may be difficult for the camera to focus depending on the lens used or the subject If the light of the built in flash is blocked by the lens attached it is recommended that you attach an external flash except for the HVL F20AM sold separately LA EA1 Multi The camera determines which of the 25 AF areas is used for focusing Center The camera uses the AF area located in the center a...

Страница 265: ...ality can be played back only on AVCHD format compatible devices DVD based players or recorders cannot play back HD image quality discs as they are incompatible with the AVCHD format Also DVD based players or recorders may fail to eject HD image quality discs Recording and playback on your camera Based on the AVCHD format your camera records with the high definition image quality HD mentioned belo...

Страница 266: ...al products such as thinner benzine alcohol disposable cloths insect repellent sunscreen or insecticide etc Do not touch the camera with the above on your hand Do not leave the camera in contact with rubber or vinyl for a long time Do not use a cleaning solution containing organic solvents such as thinner or benzine When cleaning the lens surface remove dust using a commercially available blower I...

Страница 267: ... 177 Recommended environment 177 Connection Computer 182 TV 174 Cont Shooting 53 Contrast 41 107 Control dials 20 Control wheel 18 Creative Style 106 Creative Style Settings 40 CTRL FOR HDMI 160 Custom Key Settings 145 Custom Settings 45 Custom white balance 37 98 D Date Format 150 Date Time Setup 150 Daylight Svg 150 Delete 30 108 Demo Mode 164 Dial Wheel Lock 119 Direct Manual Focus 76 Disc crea...

Страница 268: ...dscape 62 Language 149 LCD Brightness 154 Lens Comp Chro Aber 138 Lens Comp Distortion 139 Lens Comp Shading 137 Level 49 Live View Display 123 Live View Priority 48 Long Exposure NR 135 M Macintosh 180 Macro 62 Manual Exposure 69 Manual Focus 76 Memory card 199 Menu 21 Brightness Color 23 Camera 22 Image Size 22 Playback 23 Setup 24 Shoot Mode 21 Menu start 143 Metering Mode 100 MF Assist 128 MF ...

Страница 269: ... Self timer Cont 56 Setup 24 Sharpness 41 107 Shooting 26 Movie 26 Still image 26 Shutter Priority 71 Shutter speed 71 Single shot AF 79 Slide Show 109 Slow Sync 74 Smile Shutter 84 Soft keys 19 Soft Skin Effect 86 Software 179 Spd Priority Cont 54 Specify Printing 116 Sports Action 62 Spot 100 sRGB 130 SteadyShot 131 Sunset 62 Sweep Panorama 65 T Triple dial control 31 Troubleshooting 189 U Uploa...

Страница 270: ...IDEO PROVIDER LICENSED TO PROVIDE AVC VIDEO NO LICENSE IS GRANTED OR SHALL BE IMPLIED FOR ANY OTHER USE ADDITIONAL INFORMATION MAY BE OBTAINED FROM MPEG LA L L C SEE HTTP WWW MPEGLA COM On GNU GPL LGPL applied software The software that is eligible for the following GNU General Public License hereinafter referred to as GPL or GNU Lesser General Public License hereinafter referred to as LGPL are in...

Страница 271: ...4 299 175 11 1 2011 Sony Corporation Printed in Thailand NEX 7 Interchangeable Lens Digital Camera Getting Started Instruction Manual E mount ...

Страница 272: ...NP FW50 1 USB cable 1 Shoulder strap 1 Eyepiece cup 1 Body cap 1 attached to the camera Accessory shoe cap 1 attached to the camera Cleaning Cloth 1 CD ROM 1 Application Software for D camera D Handbook Instruction Manual Getting Started This manual 1 Instruction Manual Operations 1 NEX 7K only E18 55 mm zoom lens 1 Front lens cap 1 Rear lens cap 1 The caps are attached to the lens Lens hood 1 Att...

Страница 273: ...acts as the film it may appear as dark spots on the image depending on the shooting environment The camera vibrates slightly when it is turned off due to the anti dust function to prevent dust from adhering to the image sensor However attach or remove the lens quickly somewhere away from dusty locations Setting up the date When you turn on the camera for the first time the screen to set date and t...

Страница 274: ...may trail across on the LCD monitor in a cold location This is not a malfunction When turning on the camera in a cold location the LCD monitor may become temporarily dark Do not expose the camera to direct sunlight If sunlight is focused on a nearby object it may cause a fire When you must place the camera under direct sunlight attach the front lens cap On using the lenses and accessories It is re...

Страница 275: ...mory card unusable or cause image data breakdown damage or loss Clean the flash surface with a soft cloth The heat of flash emission may cause dirt to adhere on the flash surface resulting in smoking or scorching Keep the camera supplied accessories etc out of the reach of children A memory card etc may be swallowed If such problem occurs consult a doctor immediately Warning on copyright Televisio...

Страница 276: ... in separate service or guarantee documents This product has been tested and found compliant with the limits set out in the EMC Directive for using connection cables shorter than 3 meters 9 8 feet Attention The electromagnetic fields at the specific frequencies may influence the picture and sound of this unit Notice If static electricity or electromagnetism causes data transfer to discontinue midw...

Страница 277: ... _ _ _ ___ __ _ t 4 418 152 01 1 ...

Страница 278: ......

Страница 279: ... 2112x 29 32 DlmenslomitJia U 2112 29132 62 0 x 22 5mm we1g111 Apcltox 67 g 2318oz PoiclSIAoO ox 1 2318011 67a Mln focus 0 4 m 0U f calomin Moo 0 24m Maxmagnlrlcauon o078x Agrandissement max O Q78x 49mm ConverterI ConvertisseurI Convert1dor WltnfiSI1eyt CorNer1er A cCXliMirtJSSeiJt ConCQI I ertJdorde ljOdei Cl ComF1sheyoCoiMtter ZkOIWifntremrybOt ol o ill J 1 w mlJinoWideCoove te A Ullll1grMdangle...

Страница 280: ... t l i Jll r t l9IUIC U Z l8lll 11 II il llii n n E30mmF3 5 Macro Axed focal length lensI Objectif adistance localefixe llente con longilud focal flja Anlll llelelephOIOlenSWith Ia Ft 8apertureandInternalOPbCallmage s tizalion Newlydesignedapbcsandclrcutaraperturetoge11lergeneratea eautd baci Qreunddelocuseffect UnteteoojeCtJImoye avecgtandeouverture Fl 8etstabilisationd lmageopt Que intetnr Piece...

Страница 281: ...Com umacapacldallelierei de zoomde t 1 x estaobjectivaliezoomsupona com tacllidalle totDgrafi3Semmodoexpandldoeteleloto adeQuadaparavideoe lndulaestablloz de lmagemSteadySIIolOpuco OysponUjijC tun cM zoomuoo 1lX tenobOel lyWztatwoscl poradzt scblew przypadlwzdjocszeroktllqtnycllczy tetesl opowycll NadaJe donatrywanla fllmOw t flC Slada funl cJil stabl zaqi ob azuOpocalSteadySIIot tJC I Ill li Slli...

Страница 282: ...l llt1 16AfiJllCIRni1118Uiillor u conlru 1 1rapodeaveeun CD llSd lllll Ammlll Eella plup ytdes oO ectlsAmonllnA lalec nalogoolmnsltmtl lnorleclnJicgy yellllll lrdafof l SIJI eSta delfof CC RJOy11111rlpdaconlosa eposoelascamat1lSde Ey mayonade Joscl ll l5 derra1il rliDCIOA AllJ3TnllWcentMnotTeclnliJ w eoseulllliDrfof twme 11 au1olocagent COII IlleOIoornooorpoclilclmalaEf UJOreoorna matorPD11e l Sio...

Страница 283: ... I RashI Flash GN43tlll6 rrn ISO 100 m Oud SI nao ra lotC II ITlUI1lllf tlll 22 11eC IMirM dq l asllcamni tastmcterge l gh speod andLClpa Cut ard R t ntdeoql AashCMrage24 M lll nm 15mm trlhi PWIUOCI IIelllj ll 1 m OOonlens bcOyt J on05 1S0rrorro 9 lbi Ct _ r qe I IU WIICIJIItC WU J dl r_ z oc a22 _ C11lllon ll llllde __ _ tlcmcf NJ _ _ I1Unicl ct r111rl 2 105t l l m1 le llrvefr 9 ei U CDPIC11 I 14...

Страница 284: ...t tt a e dlt ta f f OCiCrr pnpor erutAzlr lfll f58AM NI St c on6plasae am ioMf3lcolnaooe _ _ oCN11CieiiQAHnelall oor lctlllmliCD Fcnle _ _Pifi LCDI IoPilb 9 oo IM f58Nol Wrza ptuoM oufi Pacb Jion oert Xbillm QN llooaiNJooel3S 1rne _ tl fS AM 1 6 lliUinl ilorlcn IIM I Cia lwk f11 Sl Wt l a 9 lU J I f lll I Ul M of SMM lll lll l lPJo ti lltnitllll Li1 l lit fllllilllll l 1 lt ll FlashI Rash I Flash ...

Страница 285: ... Adaj adOrparallgaraoessOno ltM M11 4AMouHVL lllAMJaOlljeCtNaS SA JOI I28 SAL50F18 AdaPfllrdO rOlnjCh OwltM M124AM lub HVI PLAA 1 oboel ly W1t S l30M28 SAI 50F18J iflltUI SAL30M28 SAL50F18 ll a HVL MT24AM ltH IL l l li8 Clip on LCD Monitor1MomteurLCDaal1achechpIMomtorLCDcon clipde 1 jac On 5OOIICht lle WGA 8 J Mle ewfltlangi LCDscreooforprocoetocusconlrTnaiXIO AQ aanglelll llslllrlnl m rt renillll...

Страница 286: ... eSSOrea naor out ll1ii1JrlU8a ecadaC IaiJ UfdelJ ffellllm or lleg6nerale 11011 IS IJI O V le r n dementouune t att lleAAalcaf01e 1 1ricmde direcoonaldad nlbcta consenslbllidadmin ma patae1 r 1100 arnooental Se1epuedel co1ocar 2 posoezapatas deaa esooos lliP ade accescnosde bioQuOO iillcOcmediljJCadOrde JDilta surninislrado 13batagonerai Aitmtlflla IOnmeoanU ilNffltllllaCtOode encllule opda olcali...

Страница 287: ...lsa blanda LCS ELC7 S l16F28 5a1855 LCS ELC7 lCS SC8 LCS SC21 LCS EMF lCS UlO lCS 8P 2 S 1 30M35 ShoulderStrap Bandouliere Correa de bandolera S l 50f18 NEX 7 I lCS MS10 lCS EMC lCS WR2AM S L2olf18Z STP XH70 t SEI S5Z10 s LCS SC8 LC SC21 LC EMF LCS BP2 lCS MS10 lCS WR2AM 5a18200 18 c lf NbOtW JIIup cn caii Cii IM tQ P ft OICifla MI DWII G IIIIIJ _ l rl 19 ...

Страница 288: ...nda LCS EMF Bloc Dlmensaons WxK xD Dtmonsions lxKxP LCS U10 Gtw Domonsicns WxKxD AjiCrao 170xiJO IDDnvn i6l Ax H 8x411 Domenslons lxKxP 6314x51 1 x4po Back Pack I Sac t dos I Mochlla LCS BP2 Messenger Type Bag I Sac detype besace I Bolso de hombro LCS MS10 _ Clto llw OlmtniiON WxHxO l i 4 r m Do lxHxP 1Slll 73 H 21 ...

Страница 289: ...1J l CS lCIAM LOllSCopHolder 1 0 10 cap dlOnOOOjK l ACC FW1E LCS U10 SoiiCanylnoCooe t lailelte ShoulderStrapI Bandoulhlre ICorrea de bandolera ShoulderStrap I Bandoullere ICorrea de bandolera SS f llimensiOnslbWl 610x mm j241 8xl518 1 Oimensloos l l 4118 1 1ip P SB D a Wl Atlm 430 7Dmm UMOSIOrlS x f1Jx2JI81 1 DlmtnSlons lxQ Appn t 17x2718po WristStrap I DragonneI Correa para muiieca STP WS1 1 Hol...

Страница 290: ...ion Los logotipos de SD ySDXC son marcas comerciales de SD 3C LLC HDMI ellogotipo de HDMI yHigh Definition Multimedia Interface son marcas comerciales omarcas comerciales registradas de HDMI Licensing LLC en los Estados Unidos yotros paises Las demas marcas comerciales pertenecen asus respectivos propietarios Si desea obtener mas informacion consulte el sitio web local Todos as direitos reservados...

Страница 291: ...11111111111111111111111111111 ...

Страница 292: ...ve 3 Double click on SONYPICTUTIL 4 Select the Mac folder and double click Registration 5 Confirm the region and countryI area information Clic k Continue 6 Follow the instructions to connect your productto your Mac and register Just visit this registration site and fill out the form to get your discount e coupon Offer valid until December 31 2013 For the full terms and conditions visit https prod...

Страница 293: ... warranty service for your product Visit Sony s Web Site www sony com support Or call the Sony Customer Information Service Center 1 800 222 SONY 7669 For an accessory or part not available from your authorized dealer call 1 800 488 SONY 7669 Repair I Replacement Warranty This Limited Warranty shall apply to any repair replacement part or replacement product for the remainder of the original Limit...

Отзывы: