background image

Editing Recorded MDs

28

Editing Recorded MDs

Notes on Editing

You can edit the recorded tracks after recording, using
the following functions:
• Track Erase Function allows you to erase recorded

tracks simply by specifying the corresponding track
number.

• All Erase Function allows you to erase the contents

of an entire MD.

• A-B Erase Function allows you to specify a portion

within a track to erase it.

• Divide Function allows you to divide tracks at

specified points so that you can quickly locate those
points afterwards, using the AMS function.

• Combine Function allows you to combine two tracks

into one.

• Move Function allows you to change the order of

tracks by moving a specific track to a track position
you want.

• Name Function allows you to create and edit titles

for your recorded MDs and tracks.

• Undo Function allows you to cancel the last edit.
• S.F Edit Function allows you to change the recorded

level after recording.

To enter Edit Menu

1

While the deck is stopped, playing, or pausing,
press MENU/NO to display “Edit Menu.”

2

Turn AMS to select the desired editing function,
then press AMS.

If “Protected” or “Cannot Edit” appears in the
display

The deck could not edit because the record-protect slot
on the MD is open.  Edit after closing the slot.

When “TOC” and “TOC Writing” flash in the display

Do not move the deck or pull out the AC power cord.
After editing, “TOC” lights continuously until you
eject the MD or turn off the deck.  “TOC” and “TOC
Writing” flash while the deck is updating the TOC.
When the deck finishes updating the TOC, “TOC” and
“TOC writing” turn off.

Track
number

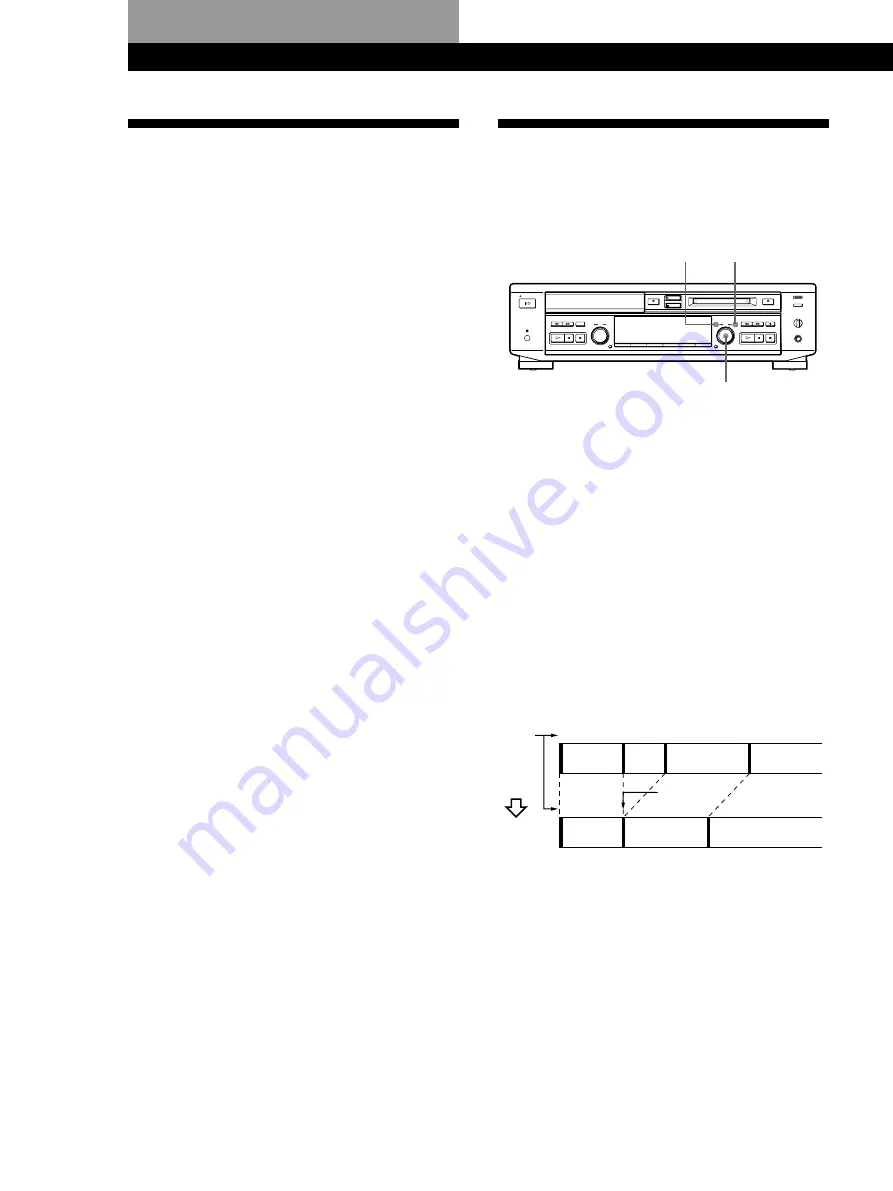
Erasing Recordings

Do the procedures below to erase following:
• A single track (Track Erase)
• All tracks (All Erase)

AMS

MENU/NO YES

Erasing a single track (Track Erase
Function)

You can erase a track simply by specifying the
respective track number. 


When you erase a track, the

total number of tracks on the MD decreases by one and
all tracks following the erased one are renumbered.
Since erasing merely updates the TOC, there is no need
to record over material.

z

To avoid confusion when erasing multiple tracks,
you should proceed in order of high to low track
number to prevent the renumbering of tracks that
have not been erased yet.

Example:  Erasing B

1

2

3

4

A

B

C

D

1

2

3

A

C

D

1

While the deck is stopped, playing, or pausing,
press MENU/NO to display “Edit Menu.”

2

Turn AMS until “Tr Erase ?” appears in the
display.

Track
Erase

B is erased

Содержание MXD-D4

Страница 1: ...4 229 644 15 1 Compact Disc MiniDisc Deck 2000 by Sony Corporation MXD D40 MXD D4 Operating Instructions ...

Страница 2: ...ructions may cause harmful interference to radio communications However there is no guarantee that interference will not occur in a particular installation If this equipment does cause harmful interference to radio or television reception which can be determined by turning the equipment off and on the user is encouraged to try to correct the interference by one or more of the following measures Re...

Страница 3: ...evel 23 Marking Track Numbers While Recording 24 Recording the Current CD Track REC IT Function 25 Synchro Recording With an External Audio Equipment Music Synchro Recording 26 Starting Recording With Prestored Audio Data Time Machine Recording 26 Fading In and Out Fader 27 Editing Recorded MDs Notes on Editing 28 Erasing Recordings 28 Erasing a Part of a Track A B Erase Function 29 Dividing Recor...

Страница 4: ...e near an extremely hot or humid place Do not drop any foreign object into the remote casing particularly when replacing the batteries Do not expose the remote sensor to direct sunlight or lighting apparatuses Doing so may cause a malfunction If you don t use the remote for an extended period of time remove the batteries to avoid possible damage from battery leakage and corrosion Hooking Up the Sy...

Страница 5: ... well as compact discs and MDs Note If Din Unlock or Cannot Copy flashes in the display recording through the DIGITAL OPTICAL IN connector is not possible In this case record the program source through the ANALOG IN jacks with ANALOG selected by INPUT Setting the voltage selector only on models supplied with a voltage selector Check that the voltage selector on the rear panel of the deck is set to...

Страница 6: ...the volume on the amplifier To Do the following Connect the headphones Adjust the headphone volume When using the controls on the deck Use the CD player controls located to the left of the front panel When using the remote Z Set SELECT to CD Audio output Output switches automatically to the audio of the CD z You can start playing with the track selected in step 4 1 Turn AMS or press or to select t...

Страница 7: ...l side up Press p Turn AMS counterclockwise or press on the remote Take out the MD When using the controls on the deck Use the MD deck controls located to the right of the front panel When using the remote Z Set SELECT to MD Audio output Output switches automatically to the audio of the MD z You can start playing with the track selected in step 4 1 Turn AMS or press or to select the track you want...

Страница 8: ...ds by for playing 6 After CD SYNCHRO and Normal turn off press or P on the right of the front panel Recording starts The MD deck section and the CD player section will automatically stop after recording To stop recording Press p on the right of the front panel You can easily make digital recordings from a CD to an MD marking track numbers in the same sequence as the original CD Before recording se...

Страница 9: ...utomatically starts recording from the end of the existing material Make sure that the remaining recordable time on the MD is longer than the playing time of the CD especially if you want to record all the tracks on the CD You cannot pause recording If the play mode is set to Repeat Play or Shuffle Play it automatically switches to normal play at step 5 The recording level specified in the Setup M...

Страница 10: ...ont panel 1 u 0 r p P 0 p P PHONE LEVEL PHONES MIN MAX MENU NO YES CLEAR PUSH ENTER REC AMS EJECT OPEN CLOSE NORMAL CD SYNCHRO HIGH CLEAR TIME PLAY MODE DISPLAY INPUT PLAY MODE TIME CHAR PUSH ENTER CD AMS REC IT STANDBY MD MD LP REC MODE 1 2 5 3 4 6 You can easily make digital recordings from a CD to an MD faster than normal CD MD Synchro Recording marking track numbers in the same sequence as the...

Страница 11: ...k or the buttons on the remote see pages 33 to 36 Notes If the following occurs during CD playback or recording a reading error may occur or noise may be produced in the recorded results The CD tray or other part of the system is bumped The system is placed on an uneven or soft surface The system is located near a speaker door or other source of vibration If the above reading errors occur a extra ...

Страница 12: ... z The disc name and track names are displayed as follows When either of the detailed display is selected the disc name appears whenever the deck is stopped The name of the current track appears when a track is playing If the CD has no text information or no title is recorded on the MD No Name appears instead To label a recordable MD and its tracks see Labeling Recordings on page 33 z You can scro...

Страница 13: ...time Checking the playing time remaining time and track number Each time you press TIME CHAR while playing an MD you can change the display as follows Press Press Press Track number and playing time of the current track normal display Track number and remaining time of the current track Total remaining time of the disc appears only during normal play Total track number and total playing time of al...

Страница 14: ... or disc name see page 12 The next or succeeding tracks During playback turn AMS clockwise or press repeatedly until you find the track The beginning of the current or preceding tracks During playback turn AMS counterclockwise or press repeatedly until you find the track A specific track directly Z Press number button s to enter the track number A specific track by using AMS 1 While the deck is st...

Страница 15: ...ou select REPEAT 1 while the deck is stopped the deck repeats the track that you locate to play While monitoring the sound forward or 0 backward until you find the point Quickly by observing the display during playback pause or 0 until you find the point There is no sound output during this operation Locating a Particular Point in a Track You can also use the 0 and buttons to locate a particular p...

Страница 16: ...DE repeatedly until SHUFFLE disappears z You can specify tracks during Shuffle Play To play the next track turn AMS clockwise or press To play from the beginning of the current track again turn AMS counterclockwise or press You cannot use AMS or to go back to tracks that have already been played Creating Your Own Program Program Play You can specify the playback order of the tracks on a disc and c...

Страница 17: ...s instead of the total playing time when the total playing time of the program exceeds 99 minutes 999 minutes for MD Step Full appears when you program over 25 tracks Erase the unnecessary tracks to enter other tracks The program is erased when you disconnect the AC power cord You cannot use D SKIP on the remote Falling Asleep to Music Sleep Timer You can let the deck turn off after the specified ...

Страница 18: ...n you turn off the deck or eject the MD When a dot appears to the right of the step value in the pitch display this indicates that you have performed fine adjustment see this page and the pitch value is between steps The step and fine control values are linked Finely controlling the pitch Fine Control Function You can fine control the playing speed in 0 1 increments from 87 5 to 0 0 1 Press MENU N...

Страница 19: ...ogram source is not connected as you selected with the INPUT button in step 3 on page 21 To continue connect the program source properly The program source is not on Turn on the program source Depending on the Setup Menu settings and source being recorded track numbers are marked in following ways When recording from a CD on the deck or from a CD player or MD deck connected through the DIGITAL OPT...

Страница 20: ...splay at this time To stop monitoring the signal Press p If Auto Cut appears in the display Auto Cut There has been no sound input for about 30 seconds during recording The 30 seconds of silence are replaced by a blank of about 3 seconds and the deck changes to recording pause If the deck continues pausing for about 10 minutes after the Auto Cut Function activated recording stops automatically Not...

Страница 21: ...tape When using the remote set SELECT to CD or MD To perform CD MD Synchro Recording see Recording a CD to an MD on page 8 or Recording a CD to an MD at High Speed on page 10 REC r INPUT AMS P 1 Turn on the amplifier and set the source selector to the position for the sound source you want to record 2 Insert a recordable MD 3 Press INPUT repeatedly to select the input connector To record through S...

Страница 22: ... recording with OPT or ANALOG selected with the INPUT button Recording for Long Times This deck has two long time recording modes LP2 and LP4 MDLP recording When recording in LP2 Stereo mode you can record 2 times the normal recordable time and in LP4 Stereo mode you can record 4 times the normal recordable time In addition the recordable time for monaural recording is approximately double the ste...

Страница 23: ...ord on an MD in LP2 or LP4 Stereo mode The MDLP indicator lights up when you press REC MODE in Step 2 on page 22 Notes MDs recorded in MDLP LP2 or LP4 Stereo mode should be played back on a deck that supports MDLP mode These MDs cannot be played back on other decks Even if you press REC MODE during recording or recording pause you cannot change the recording mode Even if you press REC MODE repeate...

Страница 24: ...anually You can mark track numbers at any time while recording on an MD Press REC r at the place you want to add a track mark while recording Marking track numbers automatically Track Marking Function The deck adds track marks differently in the following cases When recording from CDs or MDs with OPT selected by the INPUT button when recording from a CD or MD connected through the DIGITAL OPTICAL ...

Страница 25: ... CD Track REC IT Function You can record specific tracks on a CD while listening to them This function allows you to put only the tracks you like onto the MD When using the remote set SELECT to CD REC IT 1 Press on the CD player section Make sure that the MD deck section is stopped 2 Press REC IT when you hear a track you want to record Play returns to the start of the track and recording starts T...

Страница 26: ...unction and the Auto Cut Function turn on automatically regardless of their setting On or Off Starting Recording With Prestored Audio Data Time Machine Recording When recording from an FM or satellite broadcast the first few seconds of material are often lost due to the time it takes you to ascertain the contents and press the record button To prevent the loss of this material the Time Machine Rec...

Страница 27: ...ient when for example you don t want the track cut off abruptly when the disc reaches to its end FADER Fade in recording During recording pause press FADER at the position where you want to start fade in recording Z flashes and the deck performs the fade in recording until the counter reaches 0 0s Fade out recording During recording press FADER at the position where you want to start fade out reco...

Страница 28: ...cted or Cannot Edit appears in the display The deck could not edit because the record protect slot on the MD is open Edit after closing the slot When TOC and TOC Writing flash in the display Do not move the deck or pull out the AC power cord After editing TOC lights continuously until you eject the MD or turn off the deck TOC and TOC Writing flash while the deck is updating the TOC When the deck f...

Страница 29: ... YES When the disc name all recorded tracks and titles on the MD have been erased Complete appears for a few seconds To cancel the All Erase Function Press MENU NO or p to turn off the All Erase indication z You can undo the Track Erase or All Erase Function Use the Undo Function immediately after you erased the track see page 37 Erasing a Part of a Track A B Erase Function You can specify a porti...

Страница 30: ...o shift the point by minute or second intervals press 0 or so that minute or second flashes When recording in Stereo mode you can shift the starting point by 2 frame intervals in LP2 Stereo mode or by 4 frame intervals in LP4 Stereo mode 5 If point A is still incorrect repeat step 4 until it is correct 6 Press AMS or YES if point A is correct Point B set appears in the display and playback for set...

Страница 31: ... second flashes When recording in Stereo mode you can shift the starting point by 2 frame intervals in LP2 Stereo mode or by 4 frame intervals in LP4 Stereo mode 5 Press AMS or YES when the position is correct Complete appears for a few seconds and the newly created track begins playing The new track will have no track title even if the original track was labeled To cancel the Divide Function Pres...

Страница 32: ...he deck repeats the portion where the two tracks will join i e the end of the first track and the beginning of the succeeding track 4 Turn AMS to select the second track of the two to be combined and press AMS or YES Complete appears for a few seconds If both of the combined tracks have track titles the title of the second track is erased To cancel the Combine Function Press MENU NO or p z You can...

Страница 33: ...a track or an MD see Labeling tracks and MDs with the remote on page 35 AMS MENU NO YES 0 TIME CHAR CLEAR Use the following procedure to label a track or an MD You can label a track while it is playing pausing recording or stopped If the track is recording be sure to finish labeling before the track ends If the track ends before you ve completed the labeling procedure the characters already entere...

Страница 34: ...ype at any time during step 7 see step 6 above 8 Press AMS to enter the selected character The selected character stops flashing and the cursor flashes waiting for the input of the next character 9 Repeat steps 7 and 8 until you have entered the entire title If you entered the wrong character Press 0 or until the character to be corrected starts flashing and repeat steps 7 and 8 to enter the corre...

Страница 35: ... the title copying press AMS or YES If the track has been recorded in MD LP mode with the LPstamp On setting page 23 Overwrite also appears even if a track name is not assigned In this case if you copy the track name the LP indication disappears from the track name To cancel the Name Copy Function Press MENU NO or p Labeling tracks and MDs with the remote Z 1 u NAME EDIT SELECT CLEAR 0 1 Press NAM...

Страница 36: ...ure that the deck is A track title Playing pausing or recording the track whose title is to be changed or stopped after locating the track whose title is to be changed A disc name Stopped with no track number appearing in the display 2 Press down CLEAR until the current title is erased 3 Enter the new title Do steps 6 to 9 of Labeling Recordings on page 33 or steps 2 to 4 of Labeling tracks and MD...

Страница 37: ...ll recorded tracks and titles See Erasing all tracks on an MD on page 29 Undoing the Last Edit Undo Function You can use the Undo Function to cancel the last edit and restore the contents of the MD to the condition that existed before editing was done Note however that you cannot undo an edit if you do any of the following after the edit Do another edit Press REC r on the front panel of the deck o...

Страница 38: ...me of recorded tracks using S F Scale Factor Edit The original track is recorded over at the new recording level When changing the recording level you can select Fade in Recording to gradually increase the signal level at the start of recording or Fade out Recording to gradually decrease the signal level at the end of recording AMS MENU NO YES Changing the overall recording level 1 While the deck ...

Страница 39: ...t any value between 1 second and 15 seconds in 0 1 second increments You cannot set the time longer than the track 6 Press AMS or YES Edit OK appears in the display 7 Press AMS or YES The deck starts recording over the existing track S F Edit appears while the track is being recorded When the recording finishes Complete appears in the display for a few seconds To cancel the operation Press MENU NO...

Страница 40: ...urned on for about an hour until the moisture evaporates On handling CDs To keep the CD clean handle the CD by its edge Do not touch the surface Do not stick paper or tape onto the CD Do not expose the CD to direct sunlight or heat sources such as hot air ducts nor leave it in a car parked in direct sunlight as there can be a considerable rise in temperature inside the car Sticky adhesives or inks...

Страница 41: ...d leave S F Edit mode before turning off the deck Impossible The deck cannot do the specified editing operation see pages 30 and 32 Incomplete The S F Edit changing the recording level after recording Fade in Fade out operation was not performed properly because the deck was moved while recording was in progress or the MD is damaged or dirty Message Meaning Retry The deck is retrying reading data ...

Страница 42: ...bed below Note however that these limitations are due to the inherent nature of the MD recording system itself and not to mechanical causes Disc Full lights up even before the MD has reached the maximum recording time When 255 tracks have been recorded on the MD Disc Full lights up regardless of the total recorded time More than 255 tracks cannot be recorded on the MD To continue recording erase u...

Страница 43: ...erted Replace it with a recordable MD There is not enough time left on the MD Replace it with another recordable MD with fewer recorded tracks or erase unnecessary tracks There has been a power failure or the AC power cord has been disconnected during recording Data recorded to that point may be lost Repeat the recording procedure The deck does not edit Press PLAY MODE repeatedly until PROGRAM and...

Страница 44: ...anced Cross Interleave Reed Solomon Code ACIRC Sampling frequency 44 1 kHz Coding Adaptive TRansform Acoustic Coding ATRAC ATRAC 3 Modulation system EFM Eight to Fourteen Modulation Number of channels 2 stereo channels Frequency response 5 to 20 000 Hz 0 5 dB Signal to noise ratio Over 98 dB during playback Wow and flutter Below measurable limit Inputs General Power requirements Where purchased Po...

Страница 45: ...DAT deck or MD deck First generation DAT tape or MD recorded via digital to digital connection Playback Recording DAT deck or MD deck Digital input jack Digital output jack Digital input jack Optical cable or coaxial digital connecting cable DAT or MD Second generation DAT tape or MD recorded via digital to digital connection Playback DAT deck or MD deck DAT deck or MD deck Audio connecting cord O...

Страница 46: ...analog output jacks Audio connecting cord Recording Playback Recording Playback Digital output jack DAT deck or MD deck DAT deck or MD deck DAT deck or MD deck Recording DAT deck or MD deck DAT deck or MD deck Microphone amplifier DAT or MD Optical cable or coaxial digital connecting cable DAT or MD First generation DAT tape or MD recorded via digital to digital connection Line analog output jacks...

Страница 47: ...emote 35 Locating a particular point in a track 15 a specific track 14 M N MD inserting 7 premastered 13 recordable 8 10 taking out 7 Moving 32 O Optical cable 4 45 P Q PC LINK 5 Pitch control 18 Playing CD 6 MD 7 normal play 6 7 program play 16 repeat play 15 shuffle play 16 R Recording CD MD synchro recording 8 erasing tracks 28 high speed CD MD synchro recording 10 level 23 manual recording 21 ...

Страница 48: ...ding 20 REC IT 25 REC LEVEL 24 REC MODE 22 REPEAT 15 SCROLL 12 SLEEP 17 TIME CHAR 12 20 33 T REC 26 YES 28 play 6 7 14 21 P pause 6 7 21 p stop 6 7 15 20 29 0 manual search 15 29 AMS Automatic Music Sensor 6 14 10 14 Connector DIGITAL OPTICAL IN 21 44 Controls AMS 6 7 12 20 28 PHONE LEVEL 6 7 Indicators MD LP 22 STANDBY 6 Jacks ANALOG IN OUT 5 21 44 PHONES 6 7 44 Switches SELECT 6 7 14 26 1 u powe...

Страница 49: ...ction 72 to 0dB 50dB page 25 S Space Sets the Smart Space and Auto Cut Functions On Off On page 20 F in Sets the fade in time 1 0s to 15 0s 5 0s page 27 F out Sets the fade out time 1 0s to 15 0s 5 0s page 27 Pfine Fine controls the playing speed 87 5 to 0 0 0 0 page 18 Pitch Changes the playing speed by auto steps 36 to 0 0 page 18 CD Adjusts the input level from the CD player section dB to 12 0d...

Страница 50: ... the MD properly Insert another disc If possible erase all tracks on the MD using the All Erase Function on page 29 While recording from a digital component connected through the DIGITAL OPTICAL IN connector the digital connecting cable was unplugged or the digital component turned off Connect the cable or turn the digital component back on C12 Cannot Copy An attempt was made to play a disc that i...

Страница 51: ... benzene thinner commercially available cleaners or antistatic spray intended for vinyl LPs Note on High Speed CD MD Synchro Recording Certain CD conditions may cause sound dropout or noise in the recording results or even create unwanted tracks on the MD If this happens clean the CD as instructed on On cleaning above and record material to the MD using normal speed CD MD Synchro Recording only Pr...

Страница 52: ...Sony Corporation Printed in Malaysia ...

Отзывы: