1-4
10
Using the stereo speaker
You can listen to music, sounds, and other audio files using the
stereo speaker of your monitor.
Connect the AUDIO IN jack to the audio output jack of your
computer or other audio equipment using the supplied audio cord
(stereo miniplug).
Adjusting the volume
Volume adjustments are made using a separate VOLUME menu
from the main menu (page 11).
1 Press the
2
+/– buttons.
The VOLUME menu appears on the screen.
2 Press the
2
+/– button to adjust the volume.
The menu automatically disappears after about 3 seconds.
Using the headphones jack
You can listen to the audio signals from your computer or other
audio equipment using headphones. Connect your headphones to
the headphones jack. The speaker turns off when headphones are
connected to the headphones jack. Adjust the volume of the
headphones using the VOLUME menu.
Notes
• You cannot adjust the volume when displaying the main menu on the
screen.
• When your monitor is in low power consumption mode or power
saving mode, no sound comes from the speaker.
Selecting the input signal
You can connect two computers to this monitor using the INPUT
1 and INPUT 2 connectors. To select one of the two computers,
use the INPUT button.
Press the INPUT button.
The input signal and corresponding input indicator, “1” (INPUT
1) or “2” (INPUT 2) change each time you press this button.
Notes
• You cannot select the input signal when displaying the main menu on
the screen.
• If no signal is input to the selected connector, NO INPUT SIGNAL
appears on the screen. After a few seconds, the monitor enters the
power saving mode. If this happens, select the other connector using the
INPUT button.
VOL UME
4 0
INPUT
OK
1
2
11
US
Customizing Your Monitor
You can make numerous adjustments to your monitor using the
on-screen menu.
Navigating the menu
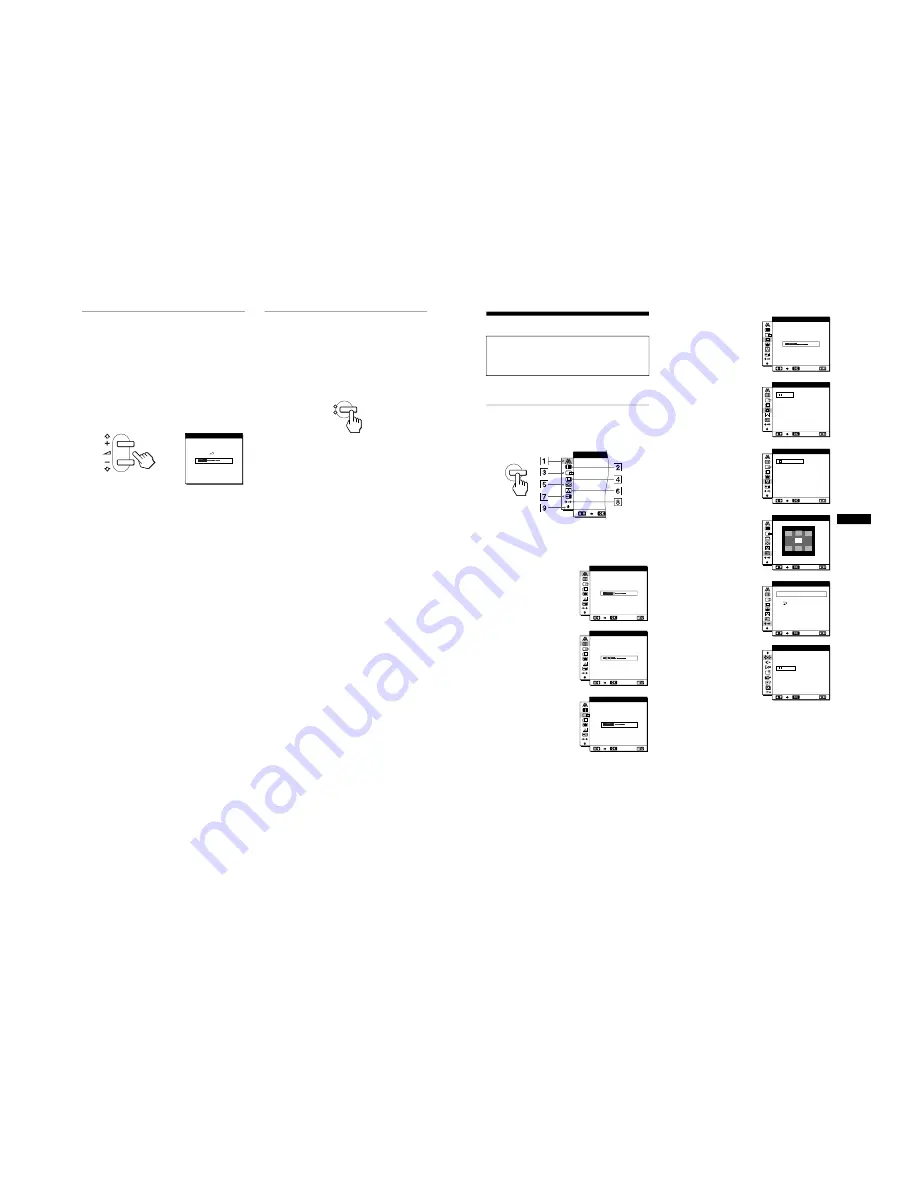
Press the MENU button to display the main menu on your screen.
See page 12 for more information on using the MENU button.
Use the
M
(+)/
m
(–) and OK buttons to select one of the following
menus. See page 12 for more information on using the
M
(+)/
m
(–) and OK buttons.
Before making adjustments
Connect the monitor and the computer, and turn them on.
Wait for at least 30 minutes before making adjustments for the
best result.
1
PHASE (page 13)
Select the PHASE menu to
adjust the phase when the
characters or pictures appear
fuzzy throughout the entire
screen. Adjust the phase after
adjusting the pitch.
2
PITCH (page 13)
Select the PITCH menu to
adjust the pitch when the
characters or pictures are
unclear in some areas of the
screen.
3
H CENTER (page 13)
Select the H CENTER menu
to adjust the picture’s
horizontal centering.
MENU
PHA SE
1 6
EX I T
PHA S E
0
EX I T
P I T C H
5 0
EX I T
H C ENT E R
4
V CENTER (page 13)
Select the V CENTER menu
to adjust the picture’s vertical
centering.
5
ZOOM (page 14)
Select the ZOOM menu to
adjust the picture’s sharpness
according to the input
signal’s aspect ratio or
resolution.
6
COLOR (page 14)
Select the COLOR menu to
adjust the color temperature
of the picture. This adjusts
the tone of the screen.
7
MENU POSITION
(page 14)
Select the MENU
POSITION to change the on-
screen menu position.
8
RESET (page 15)
Select the RESET menu to
reset the adjustments.
9
Option (page 15)
Select
m
(option) menu to
adjust the monitor’s options.
The options include:
• WIDE STEREO
• BASS BOOST
• BACKLIGHT
• LIGHT SENSOR
• POWER SAVE
• USER SENSOR
• LANGUAGE
• MENU LOCK
2 5
EX I T
V C ENT E R
ON
OF F
ZOOM
EX I T
9 3 0 0 K
0 K
6 5 0
5 0 0 0 K
USER
A
L D J U ST
COLOR
EX I T
MEN
N
U POS I
I O
T
EX I T
S CREEN
A L L
RESE T
RESE T
RESE T
EX I T
1
2
O
F F
W I D E
S T E R E O
EX I T
(continued)


