background image

model name [MHC-GTR888/GTR777/GTR555/GTR333]

[4-270-420-

12

(1)] GB

11

GB

filename[D:\NORM'S JOB\SONY HA\SO0154\MHC-GTR888_PMRF 
03\4270420121_GB\GB05CON.fm]

masterpage:Right

Gett

ing St

ar
te

d

3

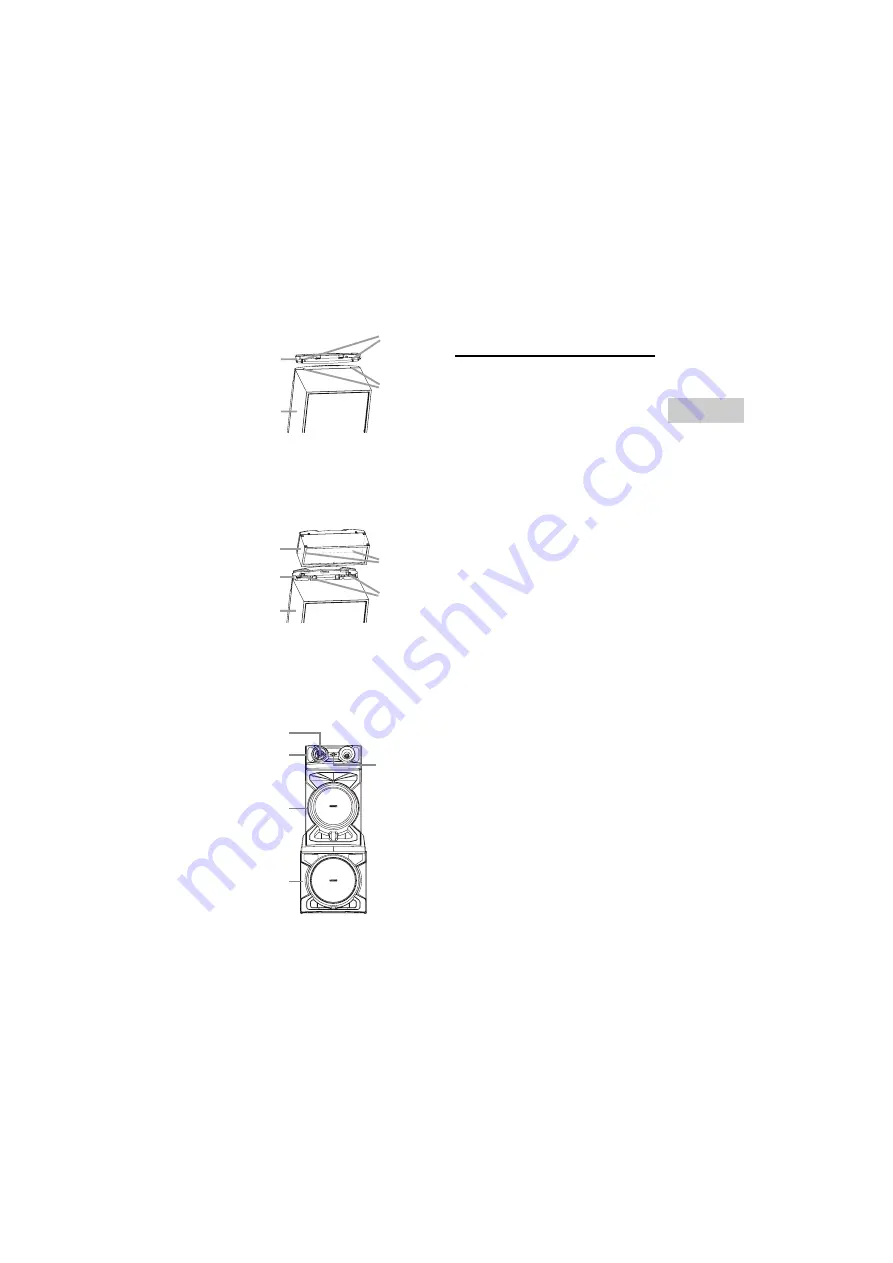
Insert the pins of the Spacer B 
(supplied) to the catcher holes on 
the front right speaker.

4

Stack the satellite right speaker on 
the front right speaker. Make sure 
the catcher holes of the satellite 
right speaker is inserted to the pins 
of the Spacer B.

5

Check that the woofer of the 
satellite right speaker is near to the 
unit.
Turn the SONY emblem on the 
satellite right speaker to horizontal 
position.

6

Repeat steps 1 to 5 to install 
another subwoofer, front left 
speaker and satellite left speaker.

Setting the clock

You cannot set the clock in Power Saving 
Mode.
Use the buttons on the remote control to 
perform this operation.

1

Press 

"/1

 to turn on the system.

2

Press CLOCK/TIMER SET.

If “PLAY SET” appears in the display 
panel, press 

.

/

>

 repeatedly to

select “CLOCK SET”, then press
ENTER.

3

Press 

.

/

>

 repeatedly to set 

the hour, then press ENTER.

4

Press 

.

/

>

 repeatedly to set 

the minutes, then press ENTER.

Front right 
speaker

S

pacer B

Pin

Catcher 
hole

S

atellite 

right 
speaker

S

pacer B

Front right 
speaker

Pin

Catcher 
hole

S

atellite right 

speaker

Front right 
speaker

S

ubwoofer

S

ONY 

emblem

Woofer

Содержание MHC-GTR333

Страница 1: ...onent System Operating Instructions D NORM S JOB SONY HA SO0154 MHC GTR888_PMRF 03 4270420121_GB GB01COV fm masterpage Cov MHC GTR888 GTR777 GTR555 GTR333 4 270 420 12 1 Getting Started Tuner USB Device Sound Adjustment Other Operations Disc Additional Information ...

Страница 2: ... install the appliance in a confined space such as a bookcase or built in cabinet Do not expose batteries or apparatus with battery installed to excessive heat such as sunshine fire or the like The unit is not disconnected from the mains as long as it is connected to the AC outlet even if the unit itself has been turned off CAUTION The use of optical instruments with this product will increase eye...

Страница 3: ... USB Device Before using the USB device with this system 15 Transferring music 16 Playing a file 19 Sound Adjustment Adjusting the sound 20 Creating your own sound effect 21 Creating a party atmosphere DJ EFFECT 21 Other Operations Singing along 22 Changing the lighting pattern on the speakers 22 Using the timers 22 Changing the display 23 Using optional equipment 24 Deactivating the buttons on th...

Страница 4: ...F 03 4270420121_GB GB04PLA fm masterpage Left Guide to parts and controls This manual mainly explains operations using the unit but the same operations can also be performed using the buttons on the remote control having the same or similar names Unit MHC GTR888 MHC GTR777 only 3 2 1 4 5 6 7 8 9 q 9 qa qd qs qf 7 qg ...

Страница 5: ...e VOLUME button has a tactile dot Use the tactile dot as a reference when operating the system F Unit Select the menu items select folder Select a folder on an MP3 disc or a USB device m M rewind fast forward Hold down to find a point in a track or file during playback go back go forward Select a track or file Unit TUNING Remote control tuning Tune to the station you want ENTER Enter the settings ...

Страница 6: ... the TV function Remote control TUNER BAND Select the TUNER function Select the FM or AM band during TUNER function J EX CHANGE Exchange other discs during playback K Unit PRESET EQ Remote control EQ Select the sound effect page 20 Unit GROOVE Reinforce the bass Unit DJ EFFECT page 21 Activate the DJ EFFECT Unit FLANGER ISOLATOR SOUND FLASH PHASER page 21 Select the DJ EFFECT type Unit OPTIONS Ent...

Страница 7: ...T FM MODE Listen to a disc a USB device a single track or file repeatedly page 13 20 Select the FM reception mode monaural or stereo page 14 R CLEAR Delete the last step from the program list S TUNER MEMORY page 14 Preset the radio station T PLAY MODE TUNING MODE Select the play mode of an AUDIO CD MP3 disc or a USB device page 12 19 Select the tuning mode page 14 U DISPLAY Change the information ...

Страница 8: ...SE 8Ω FM AM SUBWOOFER TV IN DVD PC IN AUDIO IN AUDIO IN R L R L ANTENNA R L R L R L B 2 1 6 5 FRONT R L R L SPEAKER LED B D E C F A 1 To front speaker right 2 To front speaker left 3 To satellite speaker right 4 To satellite speaker left 5 To subwoofer right 6 To subwoofer left 7 To subwoofer B is different depending on the model See below MHC GTR888 MHC GTR777 only B FRONT SPEAKERS FRONT SPEAKERS...

Страница 9: ...attern according to your preference page 22 Example D TV IN L R jacks Use an audio cord not supplied to connect to the audio output jacks of a TV The TV sound is output through this system E DVD PC IN L R jacks Use an audio cord not supplied to connect to the audio output jacks of an audio video equipment The audio is output through this system F Power Plug the power cord into a wall socket The de...

Страница 10: ...fer See step 1 of Installing page 10 on how to install the Spacer A MHC GTR555 MHC GTR333 only MHC GTR555 only Line Array Speaker System MHC GTR888 only To create a party environment we recommend that you install your speakers using Line Array Speaker System Line Array Speaker System provides a wide sound space that suitable for large room like a hall Positioning Installing 1 Insert the pins of th...

Страница 11: ...em on the satellite right speaker to horizontal position 6 Repeat steps 1 to 5 to install another subwoofer front left speaker and satellite left speaker Setting the clock You cannot set the clock in Power Saving Mode Use the buttons on the remote control to perform this operation 1 Press 1 to turn on the system 2 Press CLOCK TIMER SET If PLAY SET appears in the display panel press repeatedly to s...

Страница 12: ...cs The system can recognize up to 999 folders including root folder 999 MP3 files 250 MP3 files on a single folder 8 folder levels tree structure of files CD TEXT information is not supported Using play mode Press PLAY MODE on the remote control repeatedly when playback is stopped ALL DISC all discs 1 DISC a disc all MP3 files in the folder on the disc When playing an AUDIO CD performs the same op...

Страница 13: ...ppears when the total playing time exceeds 100 minutes for an AUDIO CD or when you program an audio file 6 Repeat steps 3 to 5 to program additional tracks or files 7 Press N to start Program Play To cancel Program Play When playback is stopped press PLAY MODE on the remote control repeatedly until PGM disappear from the display panel To delete the last step from the program list Press CLEAR on th...

Страница 14: ...station press FM MODE repeatedly until MONO lights up in the display panel To change the AM tuning interval The default setting for AM tuning interval is 9 kHz or 10 kHz for some areas You cannot change the AM tuning interval in Power Saving Mode Use the buttons on the unit to perform this operation 1 Press FUNCTION repeatedly to select AM band 2 Press 1 to turn off the system 3 While holding down...

Страница 15: ... RDS signal or if the signal strength is weak Before using the USB device with this system Check the websites below for the information about compatible USB devices For customers in Latin America http www sony latin com index crp For customers in other countries regions http www sony asia com support Note on the maximum number of audio files and folders on a USB device This system cannot transfer ...

Страница 16: ...the original audio files When transferring from TUNER TV and DVD PC function the music are transferred as 128 kbps MP3 files USB transferring and erasing is disabled while the disc tray is open Note on copyright protected content The transferred music is limited to private use only Use of the music beyond this limit requires permission of the copyright holders You can easily transfer all the music...

Страница 17: ...file Press REC TO USB B NEW TRACK appears in the display panel If you press REC TO USB B again after a few seconds a new MP3 file cannot be created Note When a new MP3 file is created transferring is disabled for the time being Tip A new MP3 file is created automatically after approximately 1 hour of transferring You can easily transfer the audio files from a USB device to another USB device USB A...

Страница 18: ...d in the created MP3 files Transferring stops automatically if the USB device runs out of space during transferring the number of audio files and folders on the USB device reaches the limit for the number that the system can recognize the function or tuner band is changed If a folder or file that you are trying to transfer already exists on the USB device with the same name a sequential number is ...

Страница 19: ...o file TRACK SEARCH 1 Press SEARCH 2 Press to select the folder you want then press ENTER or NX 3 Press to select the audio file you want then press ENTER or NX The selected file starts playback To erase audio files or folders from the USB device 1 Connect a USB device to the A or B port on the unit 2 Press USB USB SELECT repeatedly to select USB A or USB B when playback is stopped 3 Press or repe...

Страница 20: ...he system is turned on may corrupt the data on the USB device You cannot erase audio files and folders in Shuffle Play or Program Play Adjusting the sound To select a preset sound effect Press PRESET EQ or EQ on the remote control repeatedly The type of sound effects varies depending on the selected function as below TV function SPORTS DRAMA NEWS MOVIE REGGAETON FLAT USER EQ DVD PC function MOVIE ...

Страница 21: ...PRESET EQ or EQ on the remote control repeatedly to select USER EQ Creating a party atmosphere DJ EFFECT 1 Press DJ EFFECT The DJ EFFECT button lights up and the last selected effect is activated 2 Press the following button to select the effect type FLANGER Create a deep flanging effect that is similar to the roar of a jet plane ISOLATOR Isolate a specific frequency band by adjusting the other fr...

Страница 22: ...t then press ENTER To turn off the lighting select PATTERN OFF To exit the OPTIONS menu press OPTIONS Using the timers The system offers three timer functions You cannot activate both the Play Timer and the Recording Timer at the same time If you use either with the Sleep Timer the Sleep Timer has priority You can fall asleep to music The system turns off after the preset time Press SLEEP on the r...

Страница 23: ...SELECT press repeatedly to select TIMER OFF then press ENTER Notes The system turns on before the preset time If the system is turned on at the preset time or if STANDBY flashes in the display panel the Play Timer and the Recording Timer will not play or transfer Do not operate the system from the time the system turns on until the playback or transferring starts Changing the display Press DISPLAY...

Страница 24: ...t and album information Note The elapsed playing time of an audio file encoded using a VBR variable bit rate is not displayed correctly Using optional equipment 1 Connect an optional equipment page 8 2 Turn VOLUME counterclockwise to reduce the volume 3 Press FUNCTION repeatedly to select the function which corresponds to the connected equipment 4 Start playing the connected equipment Deactivating...

Страница 25: ... tape paper or sticker attached to them Rental or used discs with attached seals where the glue extends beyond the seal Discs that have labels printed using ink that feels tacky when touched Note on DualDiscs A DualDisc is a two sided disc product which mates DVD recorded material on one side with digital audio material on the other side However since the audio material side does not conform to th...

Страница 26: ...nit away from the source of noise Connect the unit to a different wall outlet Install a noise filter commercially available to the power cord Turn off surrounding electrical equipment The timer does not function Check the timer setting and set the correct time page 22 Cancel the Sleep Timer function page 22 The remote control does not function Remove the obstacles between the remote control and th...

Страница 27: ...disc and wipe away the moisture on the disc then leave the system turned on for a few hours until the moisture evaporates The sound skips Wipe the disc clean page 31 Reload the disc Move the unit to place without vibration e g on top of a stable stand Move the speakers away from the unit or place them on separate stands When you listen to a track with bass sounds at high volume the speaker vibrati...

Страница 28: ...ion on the websites about compatible USB devices page 15 Turn off the system and reconnect the USB device then turn on the system The music data itself contains noise or the sound is distorted Noise may have entered during the transferring process Delete the file and try transferring again The bit rate used when encoding audio files was low Send audio files with higher bit rate to the USB device R...

Страница 29: ...be played back Files with copyright protection Digital Rights Management cannot be played back by this system This system supports FAT16 and FAT32 but some USB device may not support all of these FAT For details refer to the operating instructions of each USB device or contact the manufacturer Tuner Severe hum or noise or stations cannot be received TUNED or ST flashes in the display panel Connect...

Страница 30: ... Timer or Recording Timer is set STEP FULL You tried to program more than 25 steps UNLOCK The disc theft preventive function is released USB device DATA ERROR You tried to play back a file that is not playable DEVICE ERROR The USB device could not be recognized or an unknown device is connected DEVICE FULL The memory of the USB device is full FATAL ERROR The USB device was removed during transferr...

Страница 31: ...Never pull the cord itself Should any solid object or liquid get into the system unplug the system and have it checked by qualified personnel before operating it again AC power cord must be changed only at the qualified service shop On placement Do not place the system in an inclined position or in locations that are extremely hot cold dusty dirty or humid or lacking adequate ventilation or subjec...

Страница 32: ... speaker RMS output power reference 110 W 110 W per channel at 12 1 kHz Subwoofer RMS output power reference 170 W 170 W 8 100 Hz MHC GTR555 Front speaker Power Output rated 160 W 160 W at 5 1 kHz 1 THD RMS output power reference 250 W 250 W per channel at 5 1 kHz Subwoofer RMS output power reference 250 W 5 100 Hz MHC GTR333 Front speaker Power Output rated 130 W 130 W at 4 1 kHz 1 THD RMS output...

Страница 33: ...nna AM loop antenna FM tuner section Tuning range 87 5 MHz 108 0 MHz 50 kHz step AM tuner section Tuning range Pan American models 530 kHz 1 710 kHz 10 kHz step 531 kHz 1 710 kHz 9 kHz step Other models 530 kHz 1 610 kHz 10 kHz step 531 kHz 1 602 kHz 9 kHz step Speakers Front speaker SS GTR888 for MHC GTR888 SS GTR777 for MHC GTR777 SS GTR555 for MHC GTR555 SS GTR333 for MHC GTR333 Speaker system ...

Страница 34: ...m cone type SS WGR777 200 mm cone type Rated impedance SS WGR888 SS WGR777 8 ohms SS WGR555 5 ohms Dimensions w h d Approx SS WGR888 390 mm 365 mm 335 mm SS WGR777 330 mm 365 mm 325 mm SS WGR555 390 mm 365 mm 295 mm Mass Approx SS WGR888 7 9 kg SS WGR777 6 9 kg SS WGR555 8 2 kg General Power requirements AC 120 V 240 V 50 60 Hz Power consumption MHC GTR888 220 W MHC GTR777 160 W MHC GTR555 150 W M...

Страница 35: ......

Страница 36: ... 2011 Sony Corporation Printed in Malaysia D NORM S JOB SONY HA SO0154 MHC GTR888_PMRF 03 4270420121_GB GB090BPG fm masterpage Bcov MHC GTR888 GTR777 GTR555 GTR333 4 270 420 12 1 ...

Отзывы: