background image

29

EN

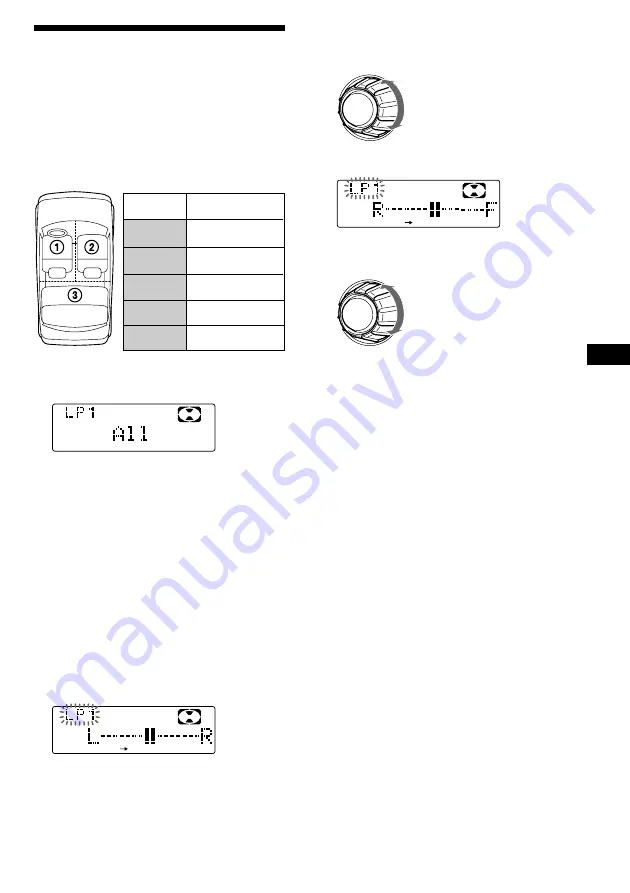
Selecting the listening
position

You can set a delayed time for the sound to
reach the listeners from the speakers.
In this way, the unit can simulate a natural
sound field so that you feel as if you are in the
center of the sound field no matter where you
sit in the car.

1

Press 

(SOUND)

 momentarily until “LP1”

appears.

2

Rotate the dial to select the desired
listening position.

The listening positions appear in the order
shown above.

After three seconds, the display returns to
the normal playback mode.

Adjusting the listening position

1

Press 

(SOUND)

 for two seconds.

2

Press 

(SOUND)

 repeatedly until the

desired listening position appears.

3

Press 

(5)

 (

n

).

DSP

4

Rotate the dial to adjust the center of
the sound field to the left or right. Then
set the center of the sound field.

5

Press 

(5)

 (

n

).

6

Rotate the dial to adjust the center of
the sound field to the front or rear.

7

Press 

(SOUND)

 for two seconds.

When the effect setting is complete, the
normal playback mode appears.

Center moves to the R (rear).

Center moves to the F (front).

Center moves to the L (left).

Center moves to the R (right).

Display
window
LP1
All

LP2
Front

LP3
Front R
LP4
Front L
LP5
Rear

Center of sound
field

Normal setting
(

1

 + 

2

 + 

3

)

Front part
(

1

 + 

2

)

Right front (

2

)

Left front (

1

)

Rear part (

3

)

Содержание MDX-C8900

Страница 1: ...tions see the supplied installation connections manual Owner s Record The model and serial numbers are located on the bottom of the unit Record the serial number in the space provided below Refer to these numbers whenever you call upon your Sony dealer regarding this product Model No MDX C8900 Serial No R EN ...

Страница 2: ...s The BBE reproduces as close as is possible the original sound by adjusting the sound balance of the bass The BBE is manufactured by Sony Corporation under license from BBE Sound Inc It is covered by U S Patent No 4 638 258 and No 4 482 866 The word BBE and the BBE Symbol are the trademarks of BBE Sound Inc Warning This equipment has been tested and found to comply with the limits for a Class B d...

Страница 3: ...peatedly Repeat Play 21 Playing tracks in random order Shuffle Play 21 Creating a program Program Memory 22 Labeling a CD Disc Memo 24 Locating a disc by name List up 26 Selecting specific tracks for playback Bank 26 DSP Selecting a surround menu 27 Storing a surround effect onto the CDs Digital Signal Processor DSP Custom File 28 Selecting the listening position 29 Adjusting the fader FAD 30 Adju...

Страница 4: ...the unit behind by the front panel 6 º OPEN button 6 8 36 LIST button Disc Memo 24 25 DSP Custom File 28 List up 16 26 33 Station Memo 15 33 OFF button 6 8 Sensor for the optional wireless remote SHIFT button PLAY MODE 10 11 12 13 14 21 22 23 24 26 27 28 32 REP 10 21 SET UP 7 9 19 20 31 SHUF 10 21 POWER SELECT switch located on the bottom of the unit See POWER SELECT Switch in the Installation Con...

Страница 5: ...SET DISC button You cannot do manual search and manual tuning with the remote 8 SOURCE button 9 MODE button MODE controls the same function on this unit When the POWER SELECT switch is set to the B position the unit cannot be operated with the wireless remote unless SOURCE on the unit is pressed or an MD is inserted to activate the unit first OFF SOURCE DIR SEL FF REW SOUND ATT DSPL SEEK AMS PRESE...

Страница 6: ...re operating the unit for the first time or after replacing the car battery you must reset the unit Press the reset button with a pointed object such as a ball point pen Note Pressing the reset button will erase the clock and some memorized functions Detaching the front panel You can detach the front panel of this unit to protect the unit from being stolen 1 Press OFF 2 Press OPEN to open up the f...

Страница 7: ...kward to go forward to go backward Getting Started Caution alarm If you turn the ignition key switch to the OFF position without removing the front panel the caution alarm will beep for a few seconds only when the POWER SELECT switch on the bottom of the unit is set to the A position Preparing the rotary commander When you mount the rotary commander attach the label as shown in the illustration be...

Страница 8: ...until MD appears The title of the MD and the track title will be displayed on the display window then the playing time will appear Only if these titles are prerecorded on the MD Tip If the name of the MD is too long you can scroll it across the display window by pressing SHIFT then press 2 N while the disc name or track name is displayed When the last track on the MD is over The track number indic...

Страница 9: ... name is selected The disc or track name appears depending on the setting when you press SOURCE to select an MD If you press DSPL to change the display item the disc or track name of the MD is scrolled automatically whether you set the function on or off 1 During playback press SHIFT 2 Press 3 SET UP repeatedly until A Scrl appears 3 Press 5 n to select A Scrl on 4 Press SHIFT To cancel Auto Scrol...

Страница 10: ...step 2 above Playing an MD in various modes You can play MDs in various modes Intro Intro Scan lets you play the first 10 seconds of all the tracks Repeat Repeat Play repeats the current track Shuf Shuffle Play plays all the tracks in random order Searching for the desired track Intro Scan 1 During playback press SHIFT Every time you press SHIFT only the items you can select light up 2 Press 4 PLA...

Страница 11: ...n the display while the unit is reading the data Mem Full appears in the display when you try to enter more than 12 tracks into a program µ Playing the stored program You can select PGM 1 to play Program 1 PGM 2 to play Program 2 PGM 1 2 to play Programs 1 and 2 1 Press SHIFT 2 Press 4 PLAY MODE repeatedly until PGM appears 3 Press 5 n repeatedly until the desired program appears Program 1 playbac...

Страница 12: ...ng tracks repeat steps 2 through 4 Note Once all 12 slots have been filled Mem Full appears in the display and you cannot insert more tracks 6 When you finish inserting tracks press 4 PLAY MODE for two seconds 7 Press SHIFT Erasing an entire program 1 Press SHIFT then press 4 PLAY MODE for two seconds P 1 indicates Program 1 is selected 2 Press 2 N repeatedly until DEL appears To delete Program 2 ...

Страница 13: ...quencies You can store up to 10 stations on each band FM1 FM2 and AM Caution When tuning in stations while driving use Best Tuning Memory to prevent accidents 1 Press SOURCE repeatedly to select the tuner Each time you press SOURCE the source changes as follows MD TUNER 2 Press MODE repeatedly to select the band Each time you press MODE the band changes as follows z FM1 z FM2 z AM 3 Press SHIFT th...

Страница 14: ...ception 2 Press 4 PLAY MODE repeatedly until IF Auto appears 3 Press 5 n repeatedly to select desired setting z IF Auto z Wide Narrow Z 4 Press SHIFT Memorizing only the desired stations You can preset up to 20 FM stations 10 for FM1 and 10 for FM2 and up to 10 AM stations in the order of your choice 1 Press SOURCE repeatedly to select the tuner 2 Press MODE repeatedly to select the band FM1 FM2 o...

Страница 15: ...ng cursor moves to the left 3 Repeat steps 1 and 2 to enter the entire name 4 To return to the normal radio reception press LIST for two seconds Tip To erase or correct a name enter _ under bar for each character R a d i o Displaying the station name Press DSPL during radio reception Each time you press DSPL the item changes as follows Station name 1 Frequency Clock MOTION DISPLAY 2 1 If the stati...

Страница 16: ...uner FM1 n FM2 n AM CD unit CD1 n CD2 n MD unit MD1 n MD2 n TV Video TV n VIDEO1 n VIDEO2 n Tip When the POWER SELECT switch is set to position B you can turn on this unit by pressing SOURCE on the rotary commander SOURCE MODE Locating a station by name List up 1 Press LIST momentarily The name assigned to the station currently playing appears in the display 2 Press LIST repeatedly until you find ...

Страница 17: ... number buttons Change the disc Other operations Rotate the VOL control to adjust the volume Press ATT to attenuate the sound Press OFF to turn off the unit OFF Radio Other Functions Changing the operative direction The operative direction of controls is factory set as in the illustration below If you need to mount the rotary commander on the right side of the steering column you can reverse the o...

Страница 18: ... to change the illumination color to amber or green Dimmer to change the brightness of the display Select Auto to dim the display only when you turn the lights on Select on to dim the display Select off to deactivate Dimmer Contrast to adjust the contrast if the indications in the display are not recognizable because of the unit s installed position Voice guide function for vocalized comments Sele...

Страница 19: ...ncy setting is complete the display returns to the normal playback mode Other Functions SET UP 1 Press SHIFT 2 Press 3 SET UP repeatedly until the desired item appears Each time you press 3 SET UP the item changes as follows Clock n D Info n Amber Green n Dimmer n Contrast n Voice n Beep n RM n BBE n LPF n A Scrl When the radio is off or when there is no CD or MD being played these items will not ...

Страница 20: ...l A Scrl appears 3 Press 5 n to select A Scrl on 4 Press SHIFT To cancel Auto Scroll select A Scrl off in step 2 above Note For some CD TEXT discs with a lot of characters the following cases may happen Some of the characters are not displayed Auto Scroll does not work With Optional Equipment CD MD Unit You can control up to 7 CD and MD units with this unit If you connect an optional CD unit with ...

Страница 21: ... step 2 above To locate succeeding tracks To locate preceding tracks To search forward To search backward Locating a specific track Automatic Music Sensor AMS During playback push the SEEK AMS control up or down once for each track you want to skip Locating a specific point in a track Manual Search During playback push the SEEK AMS control up or down and hold Release when you have found the desire...

Страница 22: ...m Program Memory CD MD unit with the program memory function You can play tracks in any order you want by creating and storing programs in the unit s memory You can make two programs Program 1 and Program 2 You can select up to 12 tracks for each program You can store the programs in memory 1 Press SHIFT then press 4 PLAY MODE for two seconds Program edit mode P 1 indicates Program 1 is selected I...

Страница 23: ...ack slot number Notes If you press a number button during program memory play program memory play is interrupted and playback of the selected disc starts NO Data appears in the display if no track is stored in the program If a track stored into the program memory is not in the disc magazine the track will be skipped When the disc magazine contains no tracks stored into the program memory or when t...

Страница 24: ...Repeat steps 1 and 2 to enter the entire name 3 To return to the normal CD playback mode press LIST for two seconds Tip To erase or correct a name enter _ under bar for each character Erasing tracks in a program 1 Press SHIFT then press 4 PLAY MODE for two seconds P 1 indicates Program 1 is selected If you have labeled the disc the bank edit mode appears Press 4 PLAY MODE to display P 1 above To s...

Страница 25: ...mal CD playback mode Note When the personalized label is erased the original CD TEXT information will appear in the display Displaying the disc memo name Press DSPL during CD or CD TEXT disc playback Each time you press DSPL during CD or CD TEXT playback the item changes as follows Elapsed playback time Disc memo name Track name 1 Clock MOTION DISPLAY 2 1 If you connect an optional CD unit with th...

Страница 26: ...tom file function or MD unit You can use this function for discs that have been assigned a custom name For more information on disc names refer to Labeling a CD page 24 1 Press LIST momentarily The name assigned to the current disc appears in the display When you assign a disc memo label to a CD TEXT disc it takes priority over the original CD TEXT information 2 Press LIST repeatedly until you fin...

Страница 27: ...ollowingsaretheoperatinginstructions fortheXDP U50D WhentheXDP 210EQisconnectedtotheunit refertotheinstructionsmanualsuppliedtothe XDP 210EQ Note If you connect the optional digital preamplifier XDP U50D 210EQ the voice guide function will not work Selecting a surround menu Youcanselectadesiredsurroundmenuto bestfittheaudiosource Thefollowingmenus cansimulatedifferentsoundfieldsand enhancethesound...

Страница 28: ...turnsto thenormalplaybackmode 3 Press SHIFT Tocanceltoplaythediscwithstoredsurround menu select D Fileoff instep2above Changing the stored surround effect Playthediscwhosesurroundmodeyouwant tochange andfollowthestepsof Storingthe surroundeffectontotheCDs Erasing the stored surround effect Select DEFEAT instep3of Storingthe surroundeffectontotheCDs 1 Press SOURCE to select a source tuner CD or MD ...

Страница 29: ...ess SOUND for two seconds 2 Press SOUND repeatedly until the desired listening position appears 3 Press 5 n DSP 4 Rotate the dial to adjust the center of the sound field to the left or right Then set the center of the sound field 5 Press 5 n 6 Rotate the dial to adjust the center of the sound field to the front or rear 7 Press SOUND for two seconds Whentheeffectsettingiscomplete the normalplayback...

Страница 30: ...n subwoofer volume adjusting mode and the cut off frequency adjusting mode Level Cut off frequency Frequency Hz Adjusting the fader FAD Normally withtheDSPmodeon thevolume oftheoutputsoundfromtherearspeakersis loweredautomaticallytoimprovethe efficiencyofthelisteningpositionsetting If youwanttoraisetherearspeakervolume adjustthefader 1 Follow steps 1 to 3 of Selecting a surround menu page 27 2 Pre...

Страница 31: ...the turn over frequency adjusting mode and the bass and treble volume adjusting mode Frequency Hz Turn over frequency 4 Rotate the dial to select the turn over frequency Theturn overfrequencieschangeas follows Bass 198 Hz n 250 Hz n 314 Hz n 396 Hz Treble 2 0 kHz n 3 1 kHz n 4 0 kHz n 5 0 kHz Factory set frequency 5 Press SOUND for two seconds Thedisplayreturnstothenormalplayback mode Listening to...

Страница 32: ... tone The number button indication appears in the display N o t e If you try to store another program on the same number button the previously stored program will be erased With Optional Equipment TV Video You can connect an optional TV tuner and TV monitor to this unit Watching the TV 1 Press SOURCE repeatedly until TV appears 2 Push the SEEK AMS control up or down to select the desired TV band W...

Страница 33: ...3 TV Video FM 1 2 3 4 5 6 7 9 1 0 8 W W W W W C B K E R B T V F S U M S WR K I S 1 S L D W W P Y L N Y J 0 1 9 0 2 7 1 1 Displaying the information stored on discs Press LIST momentarily during CD MD playback Example When CD unit 1 is selected 1 Disc numbers 2 Titles stored as custom files 3 No disc is loaded 1 4 No stored titles 2 5 TOC information has not been identified yet 3 1 A blank space is...

Страница 34: ...r video 6 Press SOURCE for two seconds Simultaneous Play starts If you are already watching the TV or video and want to listen to a CD or MD follow the same above steps except press 5 n in step 2 and press 2 N in step 4 Returning to normal mode To cancel the CD or MD follow the steps above and select in step 3 To cancel the TV or video follow the steps above and select in step 5 Notes If you press...

Страница 35: ... about an hour until the moisture evaporates Notes on MDs Since an MD itself is housed in a cartridge free from accidental contact with your fingers and dust etc it can withstand a certain degree of the rough handling However dirt or dust on the surface of the cartridge or a warped cartridge may cause a malfunction quality observe the following Never touch the surface of the MD itself by deliberat...

Страница 36: ...his open the front panel by pressing OPEN then detach it and clean the connectors with a cotton swab dipped in alcohol Do not apply too much force Otherwise the connectors may be damaged Notes For safety before cleaning the connectors turn off the engine and remove the key from the ignition switch Never touch the connectors directly with your fingers or any metal device Fuse 10 A Main unit Back of...

Страница 37: ...t cover free 2 Repeat step 1 on the left side The front cover is removed 3 Use a thin screwdriver to push in the clip on the left side of the unit then pull out the left side of the unit until the catch clears the mounting 4 Repeat step 3 on the right side 5 Slide the unit out of the mounting Additional Information ...

Страница 38: ...t 4 ohms AUDIO POWER SPECIFICATIONS POWER OUTPUT AND TOTAL HARMONIC DISTORTION 19 watts per channel minimum continuous average power into 4 ohms 4 channels driven from 20 Hz to 20 kHz with no more than 1 total harmonic distortion General Outputs Line outputs 3 Power antenna relay control lead Power amplifier control lead Telephone ATT control lead Illumination control lead Tone controls Bass 8 dB ...

Страница 39: ...ed at an angle of more than 20 The unit is not installed in a sturdy part of the car Problem A disc cannot be loaded Play does not begin The operation buttons do not function The sound skips due to vibration CD MD playback Additional Information continue to next page n Radio reception Problem Preset tuning is not possible Automatic tuning is not possible The ST indication flashes Interference occu...

Страница 40: ...ted upside down 2 An MD does not play because of some problem 2 No tracks have been recorded on an MD 2 The CD MD unit cannot be operated because of some problem The lid of the MD unit is open or MDs are not inserted properly The ambient temperature is more than 50 C 1 1 Error displays when an optional CD MD unit is connected The following indications will flash for about five seconds and an alarm...

Отзывы: