Sony Mavica MVC-FD83 Скачать руководство пользователя страница 73

7-ES

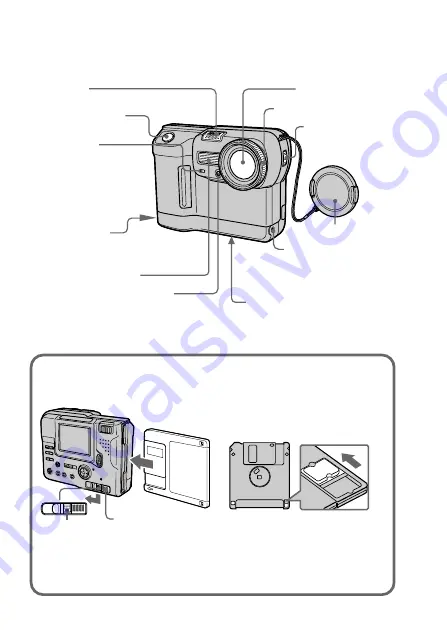
Identificación de partes

Para más detalles, consulte las páginas de (    ).

Para insertar el disquete

Inserte el disquete hasta que chasquee.

Antes de insertarlo, cerciórese de

que la lengüeta de seguridad esté

en la posición de posibilidad de

grabación.

Para extraer el disquete

Manteniendo EJECT hacia abajo, deslice DISK EJECT en el sentido de la

flecha.

Palanca de expulsión del disco (DISK EJECT)

Botón disparador 

(15, 16)

Lámpara del 
autodisparador

La lámpara parpadeará 
hasta que comience la 
grabación después de 
haber presionado el 
botón disparador.

Emisor del flash 

(9)

Objetivo

Selector de enfoque 
automático/manual  
(FOCUS AUTO/ 
MANUAL) 

(25)

Toma de salida de 
audio/vídeo (A/V OUT) 

El sonido será 
monoaural.

Rosca para trípode

Cerciórese de que la longitud 
del tornillo del trípode sea 
inferior a 6,5 mm.

Anillo de enfoque 

(25)

Ranura para el 
cable del adaptador 
de alimentación de CA

Ventanilla de la fotocélula 
para flash

No la bloquee cuando 
fotografíe. 

Tapa del objetivo

Micrófono

No lo toque durante la grabación.

Mando de
bloqueo de expulsión (EJECT)

Содержание Mavica MVC-FD83

Страница 1: ...3 866 779 13 1 1999 by Sony Corporation MVC FD83 FD88 Digital Still Camera Operating Instructions Manual de instrucciones GB ES MVC FD88 ...

Страница 2: ...ture accompanying the appliance English Operating instructions Before operating the unit please read this manual thoroughly and retain it for future reference The instructions in this manual are for the two models MVC FD83 MVC FD88 The MVC FD88 is the model used for illustration purposes Otherwise the model name is indicated in the illustrations Any differences in operation are clearly indicated i...

Страница 3: ...ss B digital device pursuant to Part 15 of the FCC Rules These limits are designed to provide reasonable protection against harmful interference in a residential installation This equipment generates uses and can radiate radio frequency energy and if not installed and used in accordance with the instructions may cause harmful interference to radio communications However there is no guarantee that ...

Страница 4: ... this equipment for your safety and convenience Should the fuse in the plug supplied need to be replaced a 5 AMP fuse approved by ASTA or BSI to BS 1362 i e marked with or mark must be used If the plug supplied with this equipment has a detachable fuse cover be sure to attach the fuse cover after you change the fuse Never use the plug without the fuse cover If you should lose the fuse cover please...

Страница 5: ...ing high precision technology However there may be some tiny black spots and or bright spots red blue or green in color that constantly appear on the LCD screen These spots occur normally in the manufacturing process and do not affect the recorded picture in any way Effective number of pixels is 99 99 or more Do not place your camera so as to point the LCD screen toward the sun The inside of the L...

Страница 6: ...an be recorded played back 23 Viewing images using a personal computer 25 Playing back JPEG files with Microsoft Office 26 Advanced operations Various recording 27 Focusing manually 27 Recording images in macro 28 Adjusting the white balance 29 Enjoying Picture Effect 30 Using the PROGRAM AE function 31 Selecting image quality QUALITY 33 Selecting image size 34 Selecting recording mode REC MODE 35...

Страница 7: ...her countries All other product names mentioned herein may be the trademarks or registered trademarks of their respective companies Furthermore TM and are not mentioned in each case in this manual Copying images COPY 46 Copying all the infomation in your floppy disk DISK COPY 48 Formatting a floppy disk FORMAT 49 Writing a print mark on an image 50 Using image data with other equipment 52 Changing...

Страница 8: ...o not get the unit wet When taking pictures outdoors in the rain or under similar conditions be careful not to get the unit wet If moisture condensation occurs refer to page 61 and follow instructions on how to remove it before using Do not insert the floppy disk forcefully Insert the floppy disk carefully into the digital still camera You may not be able to remove the floppy disk if you insert it...

Страница 9: ...n of the arrow DISK EJECT lever Shutter button 17 18 Self timer lamp The lamp keeps on blinking until recording starts after the shutter button is depressed Flash emitter 11 Lens FOCUS AUTO MANUAL switch 27 A V OUT Jack Audio is monaural Tripod receptacle Make sure that the length of the tripod screw is less than 7 32 inch 6 5 mm Focus ring 27 Slot for AC power adaptor cord Photocell window for fl...

Страница 10: ...he LCD screen The indicators do not go off in the following modes Program AE Picture effect Manual focus Zoom AE Lock Self timer Flash Adjusting the exposure Flash level and White balance Battery cover PUSH button 13 POWER switch Slide down to turn on off the power Control button LCD screen LCD BACK LIGHT switch Normally select ON Set to OFF to save the battery DISK EJECT lever 8 Hooks for strap A...

Страница 11: ...LCD screen becomes brighter when exposed to sunlight VOLUME button Press to adjust the volume of the speaker Speaker Self timer Select SELFTIMER from the menu bar with the control button then press z About 10 seconds after you press the shutter button the subject is recorded Floppy disk slot POWER lamp 17 20 Control button Upper side Left side Press to execute Lower side Right side Function of the...

Страница 12: ...it down until it clicks Battery charger CHARGE lamp orange The CHARGE lamp orange lights up Charging begins To remove the battery pack Slide up the battery pack Charging time Battery Full charge Normal charge NP F330 Supplied 210 min 150 min NP F550 240 min 180 min Approximate minutes to charge a discharged battery pack using the battery charger BC V615 BC V615A Lower temperatures require a longer...

Страница 13: ...nstall the battery pack Insert the battery pack with the V mark facing toward the battery compartment 3 Close the cover Press the cover until it clicks base To remove the battery pack Open the battery cover While sliding the battery release lever rightward remove the battery pack Be careful not to drop the battery pack when removing Battery release lever ...

Страница 14: ...the power is on the camera turns off automatically to prevent wearing down the battery About the power source This camera can be powered from the following three power sources InfoLITHIUM battery NP F330 supplied F550 not supplied AC power adaptor AC VQ800 not supplied DC power adaptor DC VQ800 not supplied When you use the camera for a long time we recommend you to power the camera from a wall ou...

Страница 15: ...ch down to turn on the power The POWER lamp lights up 2 Press v of the control button The menu bar appears on the LCD screen 3 Select SETUP with the control button then press z 4 Select CLOCK SET from the menu bar with the control button then press z INDEX FILE DELETE SETUP SELECT OK CLOCK SET VIDEO OUT LANGUAGE BEEP 1999 JAN AM 1 12 00 D M Y ENTER CANCEL M D Y Y M D CLOCK SET BEEP CLOCK SET INDEX...

Страница 16: ... enter the number After entering the number v V moves to the next item When D M Y is selected set the time on a 24 hour cycle 7 Select ENTER with the control button then press z at the desired moment to begin clock movement To cancel setting the date and time Select CANCEL with the control button then press z 1999 AM 1 1 12 00 D M Y ENTER CANCEL M D Y Y M D CLOCK SET SELECT ADJUST OK 1999 PM 7 4 1...

Страница 17: ... and AF auto focus are frozen the AE lock indicator stops flashing 3 Press the shutter button fully down The image is recorded on the disk The number of images you can record on a floppy disk About 8 12 images FD83 6 10 images FD88 with all default settings p 36 Note When the image is recorded on the disk the ACCESS lamp flashes When the ACCESS lamp is flashing never shake or strike the unit Also ...

Страница 18: ...sults in better looking recordings T side for telephoto subject appears closer W side for wide angle subject appears farther away If you cannot get a sharp focus move the power zoom lever to the W side until the focus is sharp You can shoot a subject that is at least about 25 cm FD83 90 cm FD88 away from the lens surface in the telephoto position or about 25 cm away in the wide angle position When...

Страница 19: ... indicator Remaining battery time indicator Flash level indicator Picture effect LCD bright level indicator Volume level indica tor Zoom indicator MACRO Image quality indicator Remaining disk capacity indicator Self diagnosis function indicator Recording time indicator Recording time indicator Menu bar Guide menu They appears by pressing v of the control button and disappears by pressing V of the ...

Страница 20: ... last recorded image appears on the LCD screen 2 Press v of the control button The menu bar appears on the LCD screen 3 Select the recorded image with the control button Select the button on the LCD screen with the control button then press z b To display the preceding recorded image B To display the next image INDEX To display six recorded images at a time INDEX screen You can select the image wi...

Страница 21: ...press z b To display the preceding recorded image B To display the next image INDEX To display six recorded images at a time INDEX screen Select the image with b B of the control button and then press z to play back moving images and sounds if you turn off the menu bar 4 Select the B playback button on the screen with the control button then press z Moving images and sound are played back Note The...

Страница 22: ...isk Print mark indicator Protect indicator Recording date of the playback image Menu bar Guide menu File name 320 INDEX FILE DELETE SETUP MENU BAR OFF SELECT OK 120min 6 8 0 10 Moving image file indicator Image size indicator Remaining disk capacity indicator Image number Number of stored image in a floppy disk Counter Playback image Play bar Menu bar and guide menu Fast forward rewind buttons Pla...

Страница 23: ...40 130 3600 3200 Approximate battery life and no of images that can be recorded played back at a temperature of 77 F 25 C 640 480 image size in NORMAL recording and STANDARD quality mode Numbers in parentheses indicate the time when using a normally charged battery If you record other than 640 480 size images or use the flash the no of images that can be recorded is reduced from the above figures ...

Страница 24: ...a temperature of 77 F 25 C and 160 112 image size Numbers in parentheses indicate the time when you use a normally charged battery Battery life and no of images will be decreased if you use the camera in a cold environment or while you repeat turning the power on off and zooming The capacity of a floppy disk is limited The above figures are a guide when continuously recording playing back while re...

Страница 25: ...tion manual Example personal computer with Windows 95 98 installed 1 Start up personal computer and insert the floppy disk into the disk drive of the personal computer 2 Open My computer and double click 3 5 inch FD A 3 Double click the desired data file Recommended OS applications example OS Windows 3 1 Windows 95 98 or later Windows NT 3 51 or later etc applications Microsoft Internet Explorer 4...

Страница 26: ...floppy disk recorded with this camera using the PC Exchange with Mac OS system 7 5 or higher A viewing application for Macintosh is also necessary for viewing images To play back an MPEG file install Quick Time 3 0 Playing back JPEG files with Microsoft Office kRecording and playing back images Example Using Excel 1 Select Insert on the main menu 2 Point to Picture to display the popup menu 3 Sele...

Страница 27: ...rs on the LCD screen 2 Turn the focus ring to achieve a sharp focus 9 changes as follows when recording a distant subject when the subject is too close to focus on To reactivate auto focusing set FOCUS AUTO MANUAL to AUTO Note When recording in relatively dark environment it is recommended to record after focusing manually or set PROGRAM AE to Panfocus mode ...

Страница 28: ...y from the lens surface in the wide angle position To cancel the macro mode Select MACRO from the menu bar again with the control button then press z disappears Note You cannot record images in macro with following PROGRAM AE modes appears on the LCD screen Sunset Moon mode Landscape mode Panfocus mode SETUP CAMERA FILE MACRO MENU BAR OFF SELECT OK SELF TIMER MACRO kVarious recording ...

Страница 29: ... z 3 Select WHITE BALANCE with control button then press z 4 Select desired white balance then press z AUTO to adjust the white balance automatically IN DOOR n if the lighting conditions like those at a party are changing if the picture is being taken in a studio lit by TV lighting if the subject is being lit by sodium or mercury vapor lamps OUT DOOR at night time with neon or fireworks in the pic...

Страница 30: ...e picture is sepia B W The picture is monochrome black and white SOLARIZE The light intensity is more clear and the picture looks an illustlation To cancel picture effect Press PICTURE EFFECT repeatedly until the indicator on the LCD screen goes out When you turn the power off or set PLAY STILL MOVIE to PLAY the picture effect is automatically cancelled kVarious recording ...

Страница 31: ...cus on Low Lux 1 mode For making subjects brighter in insufficient light Low Lux 2 mode For recording a dark picture more brightly or making the movement of the subject brighter seem lively Sunset Moon mode For recording subjects in dark environments such as sunsets fireworks neon signs or general night views Landscape mode For distant subjects such as mountains behind an obstacle such as a window...

Страница 32: ...on and focus are fixed When you record in the Low Lux 1 Low Lux 2 mode we recommend that you use a tripod to compensate for camera shake Set the flash mode to forced flash when you use flash in the following mode Low Lux 1 mode Low Lux 2 mode Sunset Moon mode or Landscape mode When you record in the Low Lux1 Low Lux2 mode the picture may become coarse momentarily just before your camera focuses on...

Страница 33: ... v of the control button The menu bar appears on the LCD screen 2 Select FILE with the control button then press z The FILE menu appears on the screen 3 Select QUALITY with the control button then press z FINE Use this mode when giving priority to image quality STANDARD Use this mode as a standard image quality 4 Select image quality with the control button then press z 5 Press V of the control bu...

Страница 34: ...n 3 Select IMAGE SIZE with the control button then press z Items for STILL mode 1280 960 Records a 1280 960 JPEG file FD88 only 1216 912 Records a 1216 912 JPEG file FD83 only 1024 768 Records a 1024 768 JPEG file 640 480 Records a 640 480 JPEG file Items for MOVIE mode 320 240 Records a 320 240 MPEG file 160 112 Records a 160 112 MPEG file 4 Select the desired image size with the control button t...

Страница 35: ...ss z The FILE menu appears on the screen 3 Select REC MODE with the control button then press z VOICE Records a still image and sound together besides a JPEG file E MAIL Records a 320 240 JPEG file besides a selected image size E mail files are suitable for e mail transmission because they contain compressed data NORMAL Records a JPEG file in selected image size 4 Select the desired recording mode...

Страница 36: ... screen 001F 411 E MAIL 1280 JPEG 1280 960 001F JPG JPEG 320 240 001E JPG 5 10 3 6 960 For index screen 001F 411 1216 JPEG 1216 912 001F JPG JPEG 320 240 001E JPG 7 12 4 8 912 For index screen 001F 411 1024 JPEG 1024 768 001F JPG JPEG 320 240 001E JPG 9 14 5 7 768 For index screen 001F 411 640 JPEG 640 480 001F JPG JPEG 320 240 001E JPG 20 35 12 15 480 For index screen 001F 411 VOICE JPEG 1280 960...

Страница 37: ... ratio is standard and does not depend on the image quality settings When the remaining disk capacity indicator flashes image and sound data cannot be recorded JPEG 1024 768 001F JPG 1024 MPEG audio with still image 001A MPG 4 9 3 6 768 320 240 For index screen 001F 411 JPEG 640 480 001F JPG 640 MPEG audio with still image 001A MPG 5 14 4 10 480 320 240 For index screen 001F 411 If you record imag...

Страница 38: ...ontrol button then press z Six images are displayed at a time INDEX screen Moving image file Still image with sound file E mail mode file Print mark Protect mark To display other six images Select v V at the lower left on the screen with b of the control button then press v V of the control button v Displays preceding six images V Displays following six images To return to the normal playback scre...

Страница 39: ... press z INTERVAL 3 seconds 5 seconds 10 seconds 30 seconds 1 minute REPEAT ON Repeat play back until CANCEL is selected up to 20 minutes OFF Slide show ends after all images are played back 5 Select START with the control button then press z Slide show starts To turn off the indicators on the LCD screen press V of the control button or DISPLAY PROTECT PRINT MARK COPY SLIDE SHOW DISK TOOL SELECT O...

Страница 40: ...NCEL with the control button in step 5 then press z Operation during slide show Pause Select X with the control button then press z Start Select N with the control button then press z Display the preceding or next image Press b or B on the LCD screen or control panel ...

Страница 41: ...ect 2 Press v of the control button The menu bar appears on the LCD screen 3 Select FILE with the control button then press z The FILE menu appears on the screen 4 Select PROTECT with the control button then press z 5 Select ON with the control button then press z The displayed image is protected 6 Press V of the control button repeatedly appears on the protected image The menu bar disappears from...

Страница 42: ...appears on the LCD screen 3 Select ALL to protect or unprotect all images or SELECT to protect or unprotect selected images with the control button then press z When selecting ALL To protect all images Select ON with the control button then press z To release protection of all images Select OFF with the control button then press z FILE DELETE SETUP RETURN SELECT SINGLE DISPLAY OFF CANCEL ON PROTEC...

Страница 43: ...en appears on the selected image 2 After selecting all images to protect select ENTER with the control button then press z The color of the changes from green to white To release protection Select the image to unprotect in the step 1 And select ENTER with the control button then press z ENTER PROTECT CANCEL 0 0 0 1 0 0 0 6 0 0 4 0 SELECT OK ...

Страница 44: ...trol button The menu bar appears on the LCD screen 3 Select DELETE with the control button then press z 4 Select ON with the control button then press z The displayed image is deleted In INDEX mode 1 Display the INDEX screen 2 Select DELETE with the control button then press z 3 Select ALL to delete all images or SELECT to delete selected images with the control button then press z ...

Страница 45: ...ges to delete select ENTER with the control button then press z The selected images are deleted To cancel deleting Select CANCEL with the control button then press z Notes You cannot delete protected images even if you select ALL in the DELETE menu You cannot select protected images when you select SELECT in the DELETE menu ENTER DELETE CANCEL 0 0 0 1 0 0 0 6 0 0 4 0 SELECT OK FILE DELETE SETUP RE...

Страница 46: ... z 5 Select OK with the control button then press z FILE ACCESS appears and then CHANGE FLOPPY DISK is displayed 6 Eject the floppy disk INSERT FLOPPY DISK is displayed 7 Insert another floppy disk until you hear it clicks RECORDING is displayed 8 Once copying is completed the message COMPLETE is displayed To copy images to another floppy disk select CONTINUE with the control button and repeat the...

Страница 47: ... control button FILE ACCESS appears and then CHANGE FLOPPY DISK is displayed 6 Eject the floppy disk INSERT FLOPPY DISK is displayed 7 Insert another floppy disk until you hear it clicks RECORDING is displayed 8 Once copying is completed the message COMPLETE is displayed To copy images to another floppy disk select CONTINUE with the control button and repeat the procedures in steps 6 through 8 abo...

Страница 48: ...When INSERT FLOPPY DISK is displayed insert another disk RECORDING is displayed 6 Once copying is completed the message COMPLETE is displayed To copy all the infomation to another floppy disk select CONTINUE with the control button and repeat the procedures in steps 2 through 4 above To discontinue copying select EXIT with the control button Notes With copying disk all information saved on the rec...

Страница 49: ...ontrol button then press z 4 Select OK with the control button then press z To cancel formatting Select CANCEL with the control button in step 4 then press z Note When you format a floppy disk all data stored in the floppy disk will be deleted Check the contents of the floppy disk before formatting Note that even protected images will be deleted Make sure if the battery pack is charged enough befo...

Страница 50: ...MOVIE to PLAY and display the image to write a print mark 2 Press v of the control button The menu bar appears on the LCD screen 3 Select FILE with the control button then press z The FILE menu appears on the LCD screen 4 Select PRINT MARK with the control button then press z 5 Select ON with the control button then press z DISK ACCESS appears on the LCD screen 6 Press V of the control button repe...

Страница 51: ...ing ALL To cancel the all print marks Select OFF with the control button then press z When selecting SELECT To write a print mark 1 Select the image to write a print mark with the control button then press z The green appears on the selected image 2 After selecting all the images to write a print mark select ENTER with the control button then press it The color of changes from green to white To ca...

Страница 52: ...rn off each equipment After connections are completed turn on each equipment When you use the camera with connecting other equipment for a long time use the AC power adaptor charger not supplied You cannot use a TV that has an antenna aerial connector only Beep does not sound when connecting with the A V connecting cable When the audio input jack of TV is stereo type connect the audio plug of the ...

Страница 53: ...reen of step 1 To cancel changing the mode settings Press V of the control button The screen returns to the menu screen To cancel the menu screen press V of the control button repeatedly Changing the mode settings SETUP CAMERA FILE MACRO MENU BAR OFF SELECT OK SELF TIMER INDEX FILE DELETE SETUP MENU BAR OFF SELECT OK FILE DELETE SETUP 1999 7 4 12 30PM MVC 011S RETURN SELECT SINGLE DISPLAY Items in...

Страница 54: ...ord in macro To record normally To format the floppy disk loaded in the camera FORMATTING is displayed during formatting then it disappears after the completion To cancel formatting To copy all data stored in a floppy disk to another To cancel copying all data stored in a floppy disk to another To cancel formatting or copying all data stored in a floppy disk to another To put numbers into files in...

Страница 55: ...rd image quality To record a still image and sound together besides a JPEG file Press the shutter button down momentarily The sound is recorded for 5 seconds Hold the shutter button down The sound is recorded until you release it Maximum 40 seconds To record a 320 240 JPEG file E mail files are suitable for e mail transmission because they contain compressed data To record a JPEG file in selected ...

Страница 56: ... turn off your camera To make the flash level higher than normal To record normally To make the flash level lower than normal To adjust exposure To make the demonstration appear To deactivate the demonstration mode To set the video signal NTSC mode To set the video signal PAL mode To display menu items in English To display menu items in Japanese To set the date and time To turn off the beep only ...

Страница 57: ...splayed during formatting then it disappears after the completion To cancel formatting To copy all data stored in a floppy disk to another To cancel copying all data stored in a floppy disk to another To cancel formatting or copying all data stored in a floppy disk to another To set an interval between images To repeat the slide show up to about 20 minutes To start the slide show To cancel the sli...

Страница 58: ...2 Setting Meaning RETURN DELETE ALL OK CANCEL z SELECT OK CANCEL FILE DISK FORMAT OK TOOL CANCEL DISKCOPY OK CANCEL CANCEL To return to the single screen To delete all images To cancel deleting image To delete selected images To cancel deleting the images To format the floppy disk loaded in the camera FORMATTING is displayed during formatting then it disappears after the completion To cancel forma...

Страница 59: ...nt marks To write print marks on selected images To cancel writing print marks To cancel writing or deleting print marks To protect all images To release protection on all images To cancel protecting or releasing protection To protect selected images or releasing protection on selected images To cancel protecting selected images or releasing protection To cancel protecting images or releasing prot...

Страница 60: ... disks near magnets or magnetic fields such as those of speakers and televisions permanent erasure of disk data may result Avoid storing floppy disks in areas subject to direct sunlight or sources of high temperature such as a heating device Floppy disk warping or damage may result rendering the disk useless Avoid contact with the disk s surface by opening the disk shutter plate If the disk s surf...

Страница 61: ...y condense inside or outside the camera Should this occur the camera will not operate properly In this case remove the floppy disk turn off the camera and wait about an hour for the moisture to evaporate To prevent moisture condensation When bringing the camera from a cold place to a warm place put the camera in a plastic bag and allow it to adapt to room conditions over a period of time 1 Be sure...

Страница 62: ...e TV etc You are shooting a subject with the light source behind the subject or light is insufficient t Adjust brightness of the image p 56 The LCD screen adjustment is too dark t Adjust brightness p 10 The no flash mode is set t Set it to the AUTO or forced flash mode p 11 The date and time are not set t Set the date and time p 15 The smear phenomenon t The camera is not malfunctioning Should any...

Страница 63: ... turns off automatically to prevent wearing down the battery t Turn the power on VIDEO OUT setting is not correct t Change the setting p 56 58 59 The A V connecting cable is connected t Disconnect the A V connecting cable The maximum length to play back is about 20 minutes t Set REPEAT to ON again if you continue SLIDE SHOW p 39 Image size is bigger than 1600 1200 t You cannot play back the image ...

Страница 64: ...n reverse the camera malfunction yourself E ss ss C 61 ss Contact your Sony dealer or local authorized Sony service facility Self diagnosis display First three digits Cause and or Corrective Action Trouble is with the disk drive tTurn the power off and on again An unformatted disk is installed tFormat the disk p 49 An unusable disk with the camera is installed tChange the disk p 9 A camera malfunc...

Страница 65: ...ral MINI JACK Video 1 Vp p 75 ohms unbalanced sync negative Audio 327mV at termination impedance more than 47 kilohoms Output impedance with less than 2 2 kiloms LCD screen Screen size 2 5 inch LCD panel TFT Total dot number 84260 dots General Application Sony battery pack NP F330 F550 Power requirements 7 2 V battery pack Power consumption During shooting 3 8 W Operation temperature 32 F to 104 F...

Страница 66: ...ding position The disk is full No image has been recorded on the disk Trouble has occurred during playback The image is protected BC V615 V615A battery charger Power requirements 100 240 V AC 50 60 Hz Output voltage DC OUT 8 4 V 0 6 A Operation temperature 0 C to 40 C 32 F to 104 F Storage temperature 20 C to 60 C 4 F to 140 F Dimensions Approx 56 44 107 mm w h d 2 1 4 1 3 4 4 1 4 in Mass Approx 1...

Страница 67: ...oting 62 U V Using flash 11 Viewing images using a personal computer 25 VOICE 35 W Z Warning messages 66 Zoom 18 A AC power adaptor 14 Adjusting brightness LCD screen 10 Image 56 Adjusting the exposure 56 AE auto exposure 17 Auto power off function 14 B C Battery pack 12 13 Battery charger 12 BEEP 56 58 59 Charging 12 Cleaning 60 CLOCK SET 15 Control button 11 COPY 46 D E DELETE 44 DEMO MODE 56 DI...

Страница 68: ...as instrucciones de este manual son para dos modelos MVC FD83 y MVC FD88 Para fines de ilustración en este manual se utiliza el modelo MVC FD88 De lo contrario en l ilustraciones se indicará el modelo Cualquier diferencia en la operación se indicará en el texto por ejemplo MVC FD83 solamente Antes de leer este manual y de utilizar la unidad compruebe el número del modelo En este manual las teclas ...

Страница 69: ...in embargo es posible que en la pantalla de cristal líquido aparezcan constantemente puntos finos y o brillantes rojos azules o verdes Estos puntos ocurren normalmente en le proceso de fabricación y no afectan de ninguna forma las imágenes grabadas El número efectivo de pixeles elementos de imagen es del 99 99 o más No coloque la cámara de forma que la pantalla de cristal líquido quede apuntando h...

Страница 70: ...eproducirse 21 Contemplación de imágenes utilizando un PC 23 Reproducción de archivos JPEG con Microsoft OFFICE 24 Operaciones avanzadas Varias funciones para grabación 25 Enfoque manual 25 Grabación de imágenes en macro 26 Ajuste del equilibrio del blanco 27 Disfrute de efectos de imagen 28 Utilización de la función de exposición automática programada PROGRAM AE 29 Selección de la calidad de las ...

Страница 71: ...rciales o registradas de sus respectivas compañías Además TM y no se mencionan en cada caso en este manual Protección contra el borrado accidental PROTECT 39 Borrado de imágenes DELETE 42 Copia de imágenes COPY 44 Copia de toda la información en su disquete DISK COPY 46 Formateo de un disquete FORMAT 47 Escritura de una marca de impresión en una imagen 48 Utilización de datos de imágenes con otros...

Страница 72: ... la cámara se humedezca Cuando fotografíe en exteriores bajo la lluvia o en condiciones similares tenga cuidado de que no se humedezca la unidad Si se produce condensación de humedad consulte la página 59 y siga las instrucciones sobre cómo eliminarla antes de utilizar la unidad No inserte a la fuerza el disquete Inserte cuidadosamente el disquete en la cámara digital Si insertase el disquete a la...

Страница 73: ...mpara del autodisparador La lámpara parpadeará hasta que comience la grabación después de haber presionado el botón disparador Emisor del flash 9 Objetivo Selector de enfoque automático manual FOCUS AUTO MANUAL 25 Toma de salida de audio vídeo A V OUT El sonido será monoaural Rosca para trípode Cerciórese de que la longitud del tornillo del trípode sea inferior a 6 5 mm Anillo de enfoque 25 Ranura...

Страница 74: ...do Los indicadores no desaparecerán en los modos siguientes Exposición automática programada efectos de imagen enfoque manual Zoom bloqueo de la exposición automática autodisparador flash ajuste de la exposición nivel de flash y equilibrio del blanco Interruptor de alimentación POWER Deslícelo hacia abajo para conectar desconectar la alimentación Mando de control Pantalla de cristal líquido Interr...

Страница 75: ...ara el disquete Ventanilla de fotocélula para la pantalla de cristal líquido La pantalla de cristal líquido se volverá más brillante cuando la exponga al sol Mando de control Parte superior Parte izquierda Presione para ejecutar Parte inferior Parte derecha Función del mando de control Usted podrá ejecutar funciones presionando la parte superior inferior izquierda o derecha v V b B del mando de co...

Страница 76: ...rías Lámpara indicadora de carga CHARGE anaranjada La lámpara CHARGE anaranjada se encenderá Se iniciará la carga Para extraer la batería Deslice la batería hacia arriba Tiempo de carga Batería Carga completa Carga normal NP F330 suministrada 210 min 150 min NP F550 240 min 180 min Minutos aproximados para cargar una batería descargada utilizando el cargador de baterías BC V615 BC V615A A bajas te...

Страница 77: ...2 Instale la batería Insértela con la marca V encarada hacia el compartimiento de la batería 3 Cierre la cubierta Presione la cubierta hasta que chasquee base Para extraer la batería Abra la cubierta de la batería Deslizando la palanca de liberación de la batería extraiga ésta Tenga cuidado de no dejar caer la batería cuando la extraiga Palanca de liberación de la batería ...

Страница 78: ... 3 minutos con la alimentación conectada ésta se desconectará automáticamente para evitar la descarga de la batería Fuentes de alimentación Esta cámara podrá utilizarse con las tres fuentes de alimentación siguientes Batería InfoLITHIUM NP F330 suministrada F550 no suministrada Adaptador de alimentación AC VQ800 no suministrado Adaptador de alimentación de CC DC VQ800 no suministrado Cuando vaya a...

Страница 79: ...ruptor POWER hacia abajo para conectar la alimentación La lámpara POWER se encenderá 2 Presione v del mando de control En la pantalla de cristal líquido parecerá la barra de menú 3 Seleccione SETUP con el mando de control y presione z 4 Seleccione CLOCK SET de la barra de menú con el mando de control y después presione z INDEX FILE DELETE SETUP SELECT OK CLOCK SET VIDEO OUT LANGUAGE BEEP 1999 JAN ...

Страница 80: ... ENTER con el mando de control y después presione z en el momento deseado para poner en funcionamiento el reloj Para cancelar el ajuste de la fecha y la hora Seleccione CANCEL con el mando de control y después presione z 1999 AM 1 1 12 00 D M Y ENTER CANCEL M D Y Y M D CLOCK SET SELECT ADJUST OK 1999 PM 7 4 10 30 D M Y ENTER CANCEL M D Y Y M D CLOCK SET SELECT ADJUST OK 5 Seleccione la visualizaci...

Страница 81: ...e automático se congelarán y el indicador de bloqueo de AE dejará de parpadear 3 Presione a fondo el botón disparador La imagen se grabará en el disco Número de imágenes que podrán grabarse en un disquete Unas 8 12 imágenes FD83 6 10 imágenes FD88 con todos los ajustes predeterminados p 34 Nota Cuando una imagen se grabe en el disco la lámpara ACCESS parpadeará Cuando la lámpara ACCESS esté parpad...

Страница 82: ... más rápido La utilización con moderación del zoom resultará en grabaciones con mejor aspecto Lado T para telefoto el motivo aparecerá más cercano Lado W para gran angular el motivo aparecerá más alejado Si no puede enfocar bien mueva la palanca del zoom hacie al lado W hasta enfocar nítidamente Usted podrá fotografiar un motivo que esté a 25 cm FD83 90 cm FD88 por lo menos de la superficie del ob...

Страница 83: ... de la batería Indicador de nivel del flash Indicador de efecto de imagen Indicador de nivel de brillo de la pantalla de cristal líquido Indicador de volumen Indicador de zoom MACRO Indicador de calidad de la imagen Indicador de capacidad restante del disco Indicador de función de autodiagnóstico Indicador de tiempo de grabación Indicador de tiempo de grabación Barra del menú Guía del menú Aparece...

Страница 84: ...talla de cristal líquido 2 Presione v del mando de control En la pantalla de cristal líquido aparecerá la barra de menú 3 Seleccione la imagen grabada con el mando de control Seleccione la tecla de la pantalla de cristal líquido con el mando de control y después presione z b Para hacer que se visualice la imagen grabada anterior B Para hacer que se visualice la imagen grabada siguiente INDEX Para ...

Страница 85: ... z b Para hacer que se visualice la imagen previamente grabada B Para hacer que se visualice la imagen siguiente INDEX Para hacer que se visualicen seis imágenes grabadas a la vez pantalla INDEX Seleccione la imagen con b B del mando de control y después presione z para reproducir las imágenes en movimiento y los sonidos si ha desactivado la barra del menú 4 Seleccione el botón B reproducción de l...

Страница 86: ...nadas en el disquete Indicador de marca de impresión Indicador de protección Fecha de grabación de la imagen reproducida Barra de menú Menú guía Nombre de archivo Indicador de archivo de imágenes en movimiento Indicador de capacidad restante del disquete Contador Imagen en reproducción Barra de reproducción Barra de menú y menú guía Botones de avance rápido rebobinado Botón de reproducción reprodu...

Страница 87: ...ación de la batería y número de imágenes aproximados que podrán grabar reproducirse a una temperatura de 25 C tamaño de imagen de 640 480 en grabación NORMAL y en calidad STANDARD Los números entre paréntesis indican la duración cuando se utilice una batería normalmente cargada Si graba imágenes del tamaño de diferente a 640 480 o utiliza el flash el número de imágenes que podrán grabarse se reduc...

Страница 88: ...maño de imagen de 160 112 Los números entre paréntesis indican el tiempo cuando emplea una batería cargada con normalidad La duración de la batería y el número de imágenes se reducirán si utiliza la cámara en climas fríos y si repite las operaciones de conexión desconexión de la alimentación y del zoom La capacidad de un disquete es limitada Los valores indicados arriba son solamente una guía cuan...

Страница 89: ...os programas consulte el manual de instrucciones de su PC Ejemplo PC con Windows 95 98 instalado 1 Inicie su PC e insértele el disquete en la unidad de disquete 2 Abra Mi PC y haga doble clic en Disco de 3 1 2 A 3 Haga doble clic en el archivo de datos deseado Ejemplo de OS aplicaciones recomendados OS Sistema operativo Windows 3 1 Windows 95 98 o posterior Windows NT 3 51 o posterior etc Aplicaci...

Страница 90: ...e con el sistema Mac OS 7 5 o posterior También necesitará una aplicación de contemplación de imágenes para Macintosh Para reproducir un archivo MPEG instale Quick Time 3 0 Reproducción de archivos JPEG con Microsoft OFFICE kGrabación y reproducción de imágenes Ejemplo Utilizando Excel 1 Seleccione Insert en el menú principal 2 Apunte a Picture para hacer que se visualice el menú emergente 3 Selec...

Страница 91: ...recerá 9 2 Gire el anillo de enfoque hasta enfocar nítidamente 9 cambiará de la forma siguiente cuando fotografíe un motivo distante cuando el motivo esté demasiado cerca como para enfocarlo Para reactivar el enfoque automático ponga FOCUS AUTO MANUAL en AUTO Nota Cuando grabe en un lugar relativamente obscuro se recomienda hacerlo utilizando el enfoque manual O ajuste PROGRAM AE el modo de enfogu...

Страница 92: ...e la superficie del objetivo en la posición de gran angular Para cancelar el modo de macro Vuelva a seleccionar MACRO en la barra de menú y después presione z desaparecerá Nota Usted no podrá grabar imágenes en el modo macro con los modos de exposición automática programada siguientes En la pantalla aparecerá Modo de puesta del sol e iluminación solar Modo de paisaje Modo de enfoque universal SETU...

Страница 93: ...ués presione z 3 Seleccione WHITE BALANCE con el mando de control y después presione z 4 Select desired white balance then press z AUTO para ajustar automáticamente el equilibrio del blanco IN DOOR n si las condiciones de iluminación cambian como en una fiesta si fotografía en un estudio con iluminación para televisión si el motivo está iluminado con lámparas de vapor de sodio o mercurio OUT DOOR ...

Страница 94: ... SEPIA La imagen es de color sepia B W La imagen es monocroma blanco y negro SOLARIZE La intensidad de la luz es más clara y la imagen parece una ilustración Para cancelar el efecto de imagen Presione repetidamente PICTURE EFFECT hasta que el indicador desaparezca de la pantalla de cristal líquido Cuando desconecte la alimentación o ponga PLAY STILL MOVIE en PLAY el efecto de imagen se cancelará a...

Страница 95: ...ación 1 Para fotografiar motivos más brillantes con iluminación insuficiente Modo de baja iluminación 2 Para fotografiar imágenes obscuras con más brillo o para hacer que el movimiento del motivo parezca más natural Modo de puesta del sol e iluminación lunar Para fotografiar motivos en entornos obscuros como en puestas del sol fuegos artificiales letreros de neón o vistas nocturnas en general Modo...

Страница 96: ...del zoom y el enfoque estarán fijos Cuando fotografíe en el modo de baja iluminación 1 baja iluminación 2 le recomendamos que utilice un trípode para compensar las sacudidas de la cámara Ajuste el modo del flash a flash forzado cuando utilice el flash en los modos siguientes Modo de baja iluminación 1 modo de baja iluminación 2 modo de puesta de sol e iluminación lunar y modo de paisaje Cuando gra...

Страница 97: ... líquido aparecerá la barra de menú 2 Seleccione FILE con el mando de control y después presione z En la pantalla de cristal líquido aparecerá el menú FILE 3 Seleccione QUALITY con el mando de control y después presione z FINE Utilice este modo para dar prioridad a la calidad de las imágenes STANDARD Utilice este modo para elegir la calidad estándar de las imágenes 4 Seleccione la calidad de las i...

Страница 98: ...á el menú FILE 3 Seleccione IMAGE SIZE con el mando de control y después presione z Ítemes para el modo STILL 1280 960 Graba un archivo JPEG de 1280 960 FD88 solamente 1216 912 Graba un archivo JPEG de 1216 912 FD83 solamente 1024 768 Graba un archivo JPEG de 1024 768 640 480 Graba un archivo JPEG de 640 480 Ítemes para el modo MOVIE 320 240 Graba un archivo MPEG de 320 240 160 112 Graba un archiv...

Страница 99: ...de cristal líquido aparecerá el menú FILE 3 Seleccione REC MODE con el mando de control y después presione z VOICE Graba una imagen fija y sonido a la vez además de un archivo JPEG E MAIL Graba un archivo JPEG de 320 240 además del tamaño de imagen seleccionado Los archivos E MAIL son adecuados para la transmisión de correo electrónico porque contienen datos comprimidos NORMAL Graba un archivo JPE...

Страница 100: ...5 20 480 de índice 001F 411 E MAIL 1280 JPEG 1280 960 001F JPG JPEG 320 240 001E JPG 5 10 3 6 Para la pantalla 960 de índice 001F 411 1216 JPEG 1216 912 001F JPG JPEG 320 240 001E JPG 7 12 4 8 Para la pantalla 912 de índice 001F 411 1024 JPEG 1024 768 001F JPG JPEG 320 240 001E JPG 9 14 5 7 768 Para la pantalla de índice 001F 411 640 JPEG 640 480 001F JPG JPEG 320 240 001E JPG 20 35 12 15 480 Para...

Страница 101: ...presión será estándar y no dependerá de los ajustes de calidad de la imagen Cuando parpadee el indicador de capacidad restante del disco no podrán grabarse datos de imágenes y sonidos JPEG 1024 768 001F JPG MPEG audio 1024 con imagen fija 4 9 3 6 320 240 001A MPG 768 Para la pantalla de índice 001F 411 JPEG 640 480 001F JPG MPEG audio 640 con imagen fija 001A MPG 5 14 4 10 320 240 480 Para la pant...

Страница 102: ...zarán simultáneamente seis imágenes pantalla INDEX Archivos de imágenes en movimiento Archivo de imágenes fijas con sonido Archivo de modo de correo electrónico Marca de impresión Marca de protección Para hacer que se visualicen otras seis imágenes Seleccione v V de la esquina inferior izquierda de la pantalla con b del mando de control y después presione v V del mismo v Visualiza las seis imágene...

Страница 103: ...l mando de control y después presione z 4 Introduzca cada elemento con el mando de control y después presione z INTERVAL 3 5 10 30 segundos o 1 minuto REPEAT ON Repetición de la reproducción hasta 20 minutos hasta que presione CANCEL OFF La reproducción de imágenes en bucle continuo finalizará después de que se hayan reproducido todas las imágenes 5 Seleccione START con el mando de control y despu...

Страница 104: ...ntrol en el paso 5 y después presione z Operación durante la reproducción de imágenes en bucle continuo Pausa Seleccione X con el mando de control y después presione z Inicio Presione N con el mando de control y después presione z Visualización de imágenes anteriores o posteriores Presione b o B de la pantalla de cristal líquido o del panel de control ...

Страница 105: ...ando de control La barra de menú aparecerá de la pantalla de cristal líquido 3 Seleccione FILE con el mando de control y después presione z En la pantalla de cristal líquido aparecerá el menú FILE 4 Seleccione PROTECT con el mando de control y después presione z 5 Seleccione ON con el mando de control y después presione z La imagen visualizada quedará protegida 6 Presione repetidamente V del mando...

Страница 106: ...ecerá el menú FILE 3 Seleccione ALL para proteger o desproteger todas las imágenes o SELECT para proteger o desproteger las imágenes seleccionadas con el mando de control y después presione z Cuando haya seleccionado ALL Para proteger todas las imágenes Seleccione ON con el mando de control y después presione z Para desactivar la protección de todas las imágenes Seleccione OFF con el mando de cont...

Страница 107: ...parecerá verde 2 Después de haber seleccionado todas las imágenes que desee proteger seleccione ENTER con el mando de control y después presione z El color de cambiará de verde a blanco Para desactivar la protección Seleccione la imagen que desee desproteger en el paso 1 Después seleccione ENTER con el mando de control y por último presione z ENTER PROTECT CANCEL 0 0 0 1 0 0 0 6 0 0 4 0 SELECT OK ...

Страница 108: ...nú aparecerá de la pantalla de cristal líquido 3 Seleccione DELETE con el mando de control y después presione z 4 Seleccione ON con el mando de control y después presione z La imagen visualizada se borrará En el modo INDEX 1 Haga que se visualice la pantalla INDEX 2 Seleccione DELETE con el mando de control y después presione z 3 Para borrar todas las imágenes seleccione ALL o SELECT para borrar l...

Страница 109: ...s imágenes que desee borrar seleccione ENTER con el mando de control y después presione z Las imágenes seleccionadas se borrarán Para cancelar el borrado Seleccione CANCEL con el mando de control y después presione z Notas Usted no podrá borrar imágenes protegidas incluso aunque seleccione ALL en el menú DELETE Usted no podrá seleccionar protegidas cuando haya elegido SELECT en el menú DELETE ENTE...

Страница 110: ...mando de control y después presione z 5 Seleccione OK con el mando de control y después presione z Aparecerá FILE ACCESS y después se visualizará CHANGE FLOPPY DISK 6 Extraiga el disquete Se visualizará INSERT FLOPPY DISK 7 Inserte otro disquete hasta que oiga un chasquido Se visualizará RECORDING 8 Cuando haya finalizado la copia se visualizará el mensaje COMPLETE Para copiar imágenes en otro dis...

Страница 111: ...copiar y por último seleccione ENTER con el mando de control Aparecerá FILE ACCESS y después se visualizará CHANGE FLOPPY DISK 6 Extraiga el disquete Se visualizará INSERT FLOPPY DISK 7 Inserte otro disquete hasta que chasquee Se visualizará RECORDING 8 Cuando haya finalizado la copia se visualizará el mensaje COMPLETE Para copiar imágenes en otro disquete seleccione CONTINUE con el mando de contr...

Страница 112: ...a el disquete 5 Cuando se visualice INSERT FLOPPY DISK inserte otro disquete Se visualizará RECORDING 6 Cuando haya finalizado la copia se visualizará el mensaje COMPLETE Para copiar imágenes en otro disquete seleccione CONTINUE con el mando de control y repita las operaciones de los pasos 2 a 4 anteriores Para abandonar la copia seleccione EXIT con el mando de control Notas Con la copia de disque...

Страница 113: ... y después presione z 4 Seleccione OK con el mando de control y después presione z Para cancelar el formateo Seleccione CANCEL con el mando de control en el paso 4 y después presione z Notas Cuando formatee un disquete todos los datos almacenados en el mismo se borrarán Antes de formatear un disquete compruebe su contenido Tenga en cuenta que también se borrarán las imágenes protegidas Antes de fo...

Страница 114: ...imagen en la que desee escribir una marca de impresión 2 Presione v del mando de control En la pantalla de cristal líquido aparecerá la barra de menú 3 Seleccione FILE con el mando de control y después presione z En la pantalla de cristal líquido aparecerá el menú FILE 4 Seleccione PRINT MARK con el mando de control y después presione z 5 Seleccione ON con el mando de control y después presione z ...

Страница 115: ...aas las marcas de impresión Seleccione OFF con el mando de control y después presione z Cuando haya seleccionado SELECT Para escribir una marca de impresión 1 Seleccione la imagen en la que desee escribir una marca de impresión con el mando de control y después presione z En la imagen seleccionada aparecerá verdfe 2 Después de haber seleccionado todas las imágenes en las que desee escribir una mar...

Страница 116: ... de todos los equipos Una vez finalizadas la conexiones conecte la alimentación de los equipos Para utilizar la cámara durante mucho tiempo con otros equipos conectados use un adaptador de alimentación de CA cargador no suministrado Usted no podrá utilizar un televisor que posea solamente conector para antena Cuando conecte el cable conector de audio vídeo no sonarán pitidos Cuando la toma de entr...

Страница 117: ... 2 Seleccione el elemento deseado con el mando de control y después presione z Cuando seleccione un elemento su color cambiará de azul a amarillo 3 Cambie el ajuste con el mando de control y después presione z Cuando haya finalizado el ajuste el menú volverá al de la pantalla del paso 1 Para cancelar el cambio de los ajustes de los modos Presione V del mando de control La pantalla volverá a la del...

Страница 118: ...autodisparador p 9 Para fotografiar en macro Para fotografiar normalmente Para formatear el disquete cargado en la cámara Durante el formateo se visualizará FORMATTING y al finalizar desaparecerá Para cancelar el formateo Para copiar todos los datos almacenados en disquete en otro Para cancelar la copia de todos los datos de un disquete en otro Para cancelar el formateo o copiar todos los datos al...

Страница 119: ... vez además de un archivo JPEG Presione momentáneamente el botón del obturador El sonido se grabará durante 5 segundos Mantenga presionado el botón del obturador El sonido se grabará hasta que lo suelte 40 segundos como máximo Para grabar un archivo JPEG de 320 240 Los archivos E mail son adecuados para transmisión de correo electrónico porque contienen datos comprimidos Para grabar un archivo JPE...

Страница 120: ...á Para aumentar más de lo normal el nivel del flash Para grabar normalmente Para reducir más de lo normal el nivel del flash Para ajustar la exposición Para hacer que aparezca la demostración Para desactivar el modo de demostración Para activar el modo de videoseñal NTSC Para activar el modo de videoseñal PAL Para hacer que las indicaciones aparezcan en inglés Para hacer que las indicaciones apare...

Страница 121: ...parecerá Para cancelar el formateo Para copiar todos los datos almacenados en disquete en otro Para cancelar la copia de todos los datos de un disquete en otro Para cancelar el formateo o copiar todos los datos almacenados de un disquete a otro Para ajustar el intervalo entre imágenes Para repetir la reproducción de imágenes en bucle continuo hasta unos 20 minutos Para iniciar la reproducción de i...

Страница 122: ...tem 1 Ítem 2 Ajuste Significado RETURN DELETE ALL OK CANCEL z SELECT OK CANCEL FILE DISK FORMAT OK TOOL CANCEL DISK OK COPY CANCEL CANCEL COPY ALL OK CANCEL Para volver a la pantalla única Para borrar todas las imágenes Para cancelar el borrado de imágenes Para borrar las imágenes seleccionadas Para cancelar el borrado de imágenes Para formatear el disquete cargado en la cámara Durante el formateo...

Страница 123: ...a cancelar la escritura de marcas de impresión Para cancelar la escritura o para borrar marcas de impresión Para proteger todas las imágenes Para desactivar la protección de todas las imágenes Para cancelar la protección Para proteger las imágenes seleccionadas o desactivar su protección Para cancelar la protección de las imágenes seleccionadas Para cancelar o desactivar la protección de imágenes ...

Страница 124: ...ente Evite guardar los disquetes cerca de imanes o campos magnéticos como los de altavoces y televisores ya que podrían borrarse permanentemente los datos Evite guardar los disquetes en lugares sometidos a la luz solar directa o a gran temperatura como cerca de un dispositivo de calefacción Los disquetes podrían alabearse y quedar inservibles Evite el contacto con la superficie del disquete al abr...

Страница 125: ...a esto la cámara no funcionará adecuadamente En este caso extraiga el disquete desconecte la alimentación de la cámara abra la cubierta del disquete y espere aproximadamente una hora para que se evapore la humedad Para evitar la condensación de humedad Cuando tenga que trasladar la cámara de un lugar frío a otro cálido métala en una bolsa de plástico y deje que se adapte a las condiciones de la sa...

Страница 126: ... la iluminación es insuficiente t Ajuste el brillo de la imagen p 54 La pantalla de cristal líquido esta ajustada a un nivel demasiado obscuro t Ajuste el brillo p 8 El flash está ajustado el modo sin flash t Ajuste la unidad al modo auto o al de flash forzado p 9 La fecha y la hora no están ajustadas t Ajuste la fecha y la hora p 13 Éste es el fenómeno de borrosidad t La cámara no está funcionand...

Страница 127: ... que la batería se descargue t Conecte la alimentación El ajuste de VIDEO OUT no es correcto t Cambie el ajuste p 54 56 57 El cable conector de audio vídeo está conectado t Desconéctelo La duración de reproducción máxima es de unos 20 minutos t Si desea continuar la reproducción de imágenes en bucle continuo ponga de nuevo REPEAT en ON p 37 El tamaño de la imagen es superior a 1600 1200 t Usted no...

Страница 128: ... unidad de disquete tDesconecte y vuelva a conectar la alimentación Ha instalado un disquete sin formatear Formatee el disquete p 47 Ha insertado un disquete que no puede utilizarse con esta cámara tCambie el disco p 7 Ha ocurrido un mal funcionamiento en la cámara que usted no puede reparar tPóngase en contacto con su proveedor Sony o con un centro de reparaciones Sony y notifíqueles los cinco dí...

Страница 129: ...mitación de distancia de grabación 0 5 2 5 m Conector de salida Toma A V OUT MINI JACK monoaural Video 1Vp p 75 ohmios desequilibrada sincronismo negativo Audio 327 mV impedancia de salida de más de 47 kiloohmios lmpedancia de salida inferior a 2 2 kiloohmios Pantalla de cristal líquido Tamaño de la pantalla 2 5 pulgadas Panel de cristal líquido TFT transistor de película fina Número total de punt...

Страница 130: ...disquete está en la posición de protección contra grabación El disco está lleno No hay imágenes grabadas en el disquete Se ha producido un problema durante la reproducción La imagen está protegida kEspecificaciones Cargador de baterías BC V615 V615A Alimentación 100 240 V CA 50 60 Hz Tensión de salida DC OUT 8 4 V 0 6 A Temperatura de funcionamiento 0 a 40 C Temperatura de almacenamiento 20 a 60 C...

Страница 131: ... 18 SLIDE SHOW 37 Solución de problemas 60 Utilización del flash 9 Ventanilla de fotocélula 9 Visualización de autodiagnóstico 62 VOICE 33 Zoom 16 A Adaptador de alimentación de CA 12 AE Exposición automática 15 Ajuste de la exposición 54 Ajuste del brillo Imagen 54 Pantalla de cristal líquido 8 Autodisparador 9 B Batería 10 11 Batería InfoLITHIUM 12 BEEP 54 56 57 C Carga 10 Carga completa 10 Carg...

Страница 132: ...Sony Corporation Printed in Japan ...

Отзывы: