background image

3

Εγκατάσταση

Εγκατάσταση

Εγκατάσταση

Εγκατάσταση

3. 

Σύνδεση


της


τηλεόρασης

3. 

Σύνδεση


της


τηλεόρασης

3. 

Σύνδεση


της


τηλεόρασης

3. 

Σύνδεση


της


τηλεόρασης

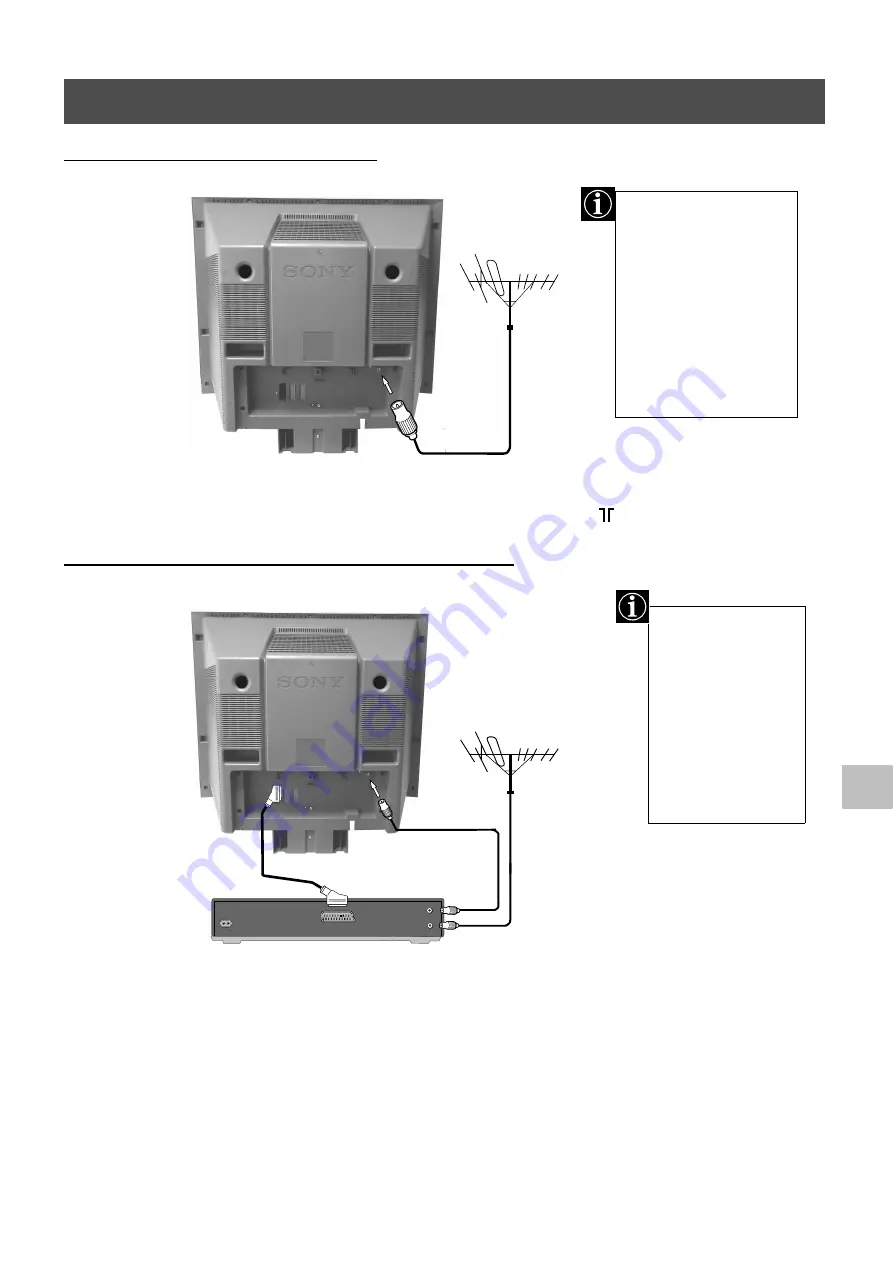
1. Συνδέστε το υπάρχον βύσ`α της κεραίας στην υποδοχή RF IN του βίντεο πως φαίνεται στην 

εικνα.  

2. Συνδέστε το καλώδιο κεραίας του βίντεο απ την υποδοχή RF OUT στο πίσω µέρος του βίντεο στην 

υποδοχή της κεραίας στο πίσω µέρος της τηλερασης πως φαίνεται στο σχέδιο.

3. Συνδέστε το καλώδιο scart (εάν χρησιµοποιείται) στην υποδοχή AV2 στο πίσω µέρος της συσκευής.

4. Συνδέστε το βίντεο στην πρίζα και ανοίξτε το.

5. Τοποθετήστε µια γραµµένη κασέτα στο βίντεο και πιέστε το πλήκτρο 'PLAY'. ∆ίνεται έτσι η 

δυναττητα στην τηλερασή σας να εντοπίσει και να αποθηκεύσει το κανάλι του βίντεο κατά την 
διαδικασία ‘Συντονισµού της τηλερασής σας’, η οποία αναφέρεται στην σελίδα 5.

1. Συνδέστε το καλώδιο της κεραίας που διαθέτετε στον ακροδέκτη µε το σηµείο 

 στο πίσω µέρος της τηλερασης.

Σύνδεση


κεραίας


στην


τηλεόραση

Σύνδεση


κεραίας


στην


τηλεόραση

Σύνδεση


κεραίας


στην


τηλεόραση

Σύνδεση


κεραίας


στην


τηλεόραση

Σύνδεση


κεραίας


και


βίντεο


στην


τηλεόρασή


σας

Σύνδεση


κεραίας


και


βίντεο


στην


τηλεόρασή


σας

Σύνδεση


κεραίας


και


βίντεο


στην


τηλεόρασή


σας

Σύνδεση


κεραίας


και


βίντεο


στην


τηλεόρασή


σας

Το καλώδιο scart 
είναι προαιρετικ . Σε 
περίπτωση  µως που 
µπορεί να 
χρησιµοποιηθεί, 
αυτή η πρ σθετη 
σύνδεση µπορεί να 
βελτιώσει την 
ποι τητα της εικ νας 
και του ήχου της 
τηλε ρασης.

Αν δε συνδέσετε την 
τηλε ρασή σας µε ένα 
βίντεο, συνδέστε το 
καλώδιο της κεραίας 
( πως φαίνεται αριστερά) 
και προχωρήστε στο 
στάδιο '4. Ανοίγοντας 
την τηλε ραση'.

Αν συνδέσετε την 
τηλε ρασή σας µε ένα 
βίντεο, παρακαλούµε 
ανατρέξτε στο παρακάτω 
στάδιο.

OUT

IN

AERIAL
ANTENNA

AC IN

(καλώδιο scart - δεν 
παρέχεται)

(καλώδιο υπάρχουσας κεραίας)

Содержание KV-34FQ75D

Страница 1: ...Trinitron Colour Television 2000 by Sony Corporation Printed in U K Instruction Manual Manuale di istruzioni Kullanõm Kõlavuzu Kullanõm Kõlavuzu Kullanõm Kõlavuzu Kullanõm Kõlavuzu Οδηγίες Χήσης FR GB IT TR GR Bedienungsanleitung DE 420568513 ...

Страница 2: ...Die geforderte Stückprüfung hat ergeben daß die gemessene Ortsdosis Leistung unter dem in Prüfungsschein Nr 6 32 F 1578 der PTB genannten Wert von 0 2 µ Sv h liegt ...

Страница 3: ...DE ...

Страница 4: ...ls Vorsichtsmassnahme stecken sie das Fernsehgerät vor dem Reinigen aus Ziehen das Netzkabel nur am Stecker heraus Ziehen Sie nicht am Kabel Achten Sie darauf das keine schweren Gegenstände auf dem Netzkabel liegen und es dadurch beschädigt wird Darum empfehlen wir Ihnen das Kabel zu straffen wickeln sie es um die auf der Rückseite des Fernsehgerätes angebrachten Kabelhalter Stellen Sie das Fernse...

Страница 5: ...bedienung NexTView Videotext Multi PIP Picture in Picture PAP Picture and Picture Das Fernsehmenüsystem Einstellen des Bildes Einstellen des Tons Das Menü Sonderfunktionen Einstellen des Bildschirmformats Ändern der Reihenfolge der Fernsehkanäle Manuelles Einstellen des Fernsehgeräts Eingeben eines Namens für einen Kanal Überspringen von Programmpositionen Das Menü Zusatzfunktionen Aufrufen der De...

Страница 6: ... Fernsehkanäle Programme einstellen können Installation 1 Überprüfen des mitgelieferten Zubehörs 2 Einlegen von Batterien in die Fernbedienung Batterien Die mitgelieferten Batterien polaritätsrichtig einlegen Entsorgen Sie verbrauchte Batterien bitte umweltgerecht Fernbedienung ...

Страница 7: ...l während der Programmsuche empfangen und speichern wie auf Seite 5 1 Schließen Sie Ihr Antennenkabel an die Buchse mit der Markierung an der Rückseite des Fernsehgeräts an Anschließen des Fernsehgeräts an die Antenne Anschließen des Geräts an eine Antenne und einen Videorecorder Wenn Sie das Fernsehgerät nicht mit einem Videorecorder verbinden wollen schließen Sie das Antennenkabel wie auf der Ab...

Страница 8: ...e an der Vorderseite des Fernsehgeräts leuchtet drücken Sie die Taste TV auf der Fernbedienung um das Fernsehgerät einzuschalten Es kann einige Momente dauern bis das Bild auf dem Fernsehschirm erscheint 4 Einschalten des Fernsehgeräts 5 Der Joystick Zum Auswählen eines Punktes innerhalb des Menüs die OK Taste in der Mitte niederdrücken Drücken Sie die entsprechende Pfeiltaste um sich in den Menüs...

Страница 9: ...eihenfolge der Kanäle ändern wollen drücken Sie die Taste v oder V bis der Kanal den Sie verschieben wollen auf dem Fernsehschirm erscheint und drücken Sie dann B Wählen Sie mit der Taste v oder V die neue Programmnummer aus unter der Sie den Kanal speichern wollen und bestätigen Sie mit OK Der ausgewählte Kanal rückt an die neue Programmposition und die anderen Kanäle werden entsprechend verschob...

Страница 10: ...der usw Tasten PROGR oder Zum Auswählen von Fernsehkanälen Hauptnormierungstaste Drücken Sie diese Taste wenn das Bild und der Klang auf die produktionsseitig vorgegebenen Normwerte zurückgesetzt werden soll Gegen die Bedienteilklappe drücken wie im Bild gezeigt um an die vorderen Eingangsbuchsen und die Tastatur zu gelangen Die Bedienteilklappe schwenkt nach unten ...

Страница 11: ...chseln Sie vom Videotext oder Bereitschaftsmodus wieder zum normalen Betrieb Auswählen von Videotext Mit dieser Taste schalten Sie den Videotext ein oder aus Auswählen der elektronischen Programmführung Mit dieser Taste schalten Sie die elektronische Programmführung ein oder aus Einfrieren des Bildes Mit dieser Taste halten Siedas Bild an so daß Sie sich zum Beispiel eine eingeblendete Telefonnumm...

Страница 12: ...filme Sportsendungen Unterhaltung Kinderprogramm zurück zum vorigen Menü Das Menü Individuelle Themenauswahl Sie können im Programmführer eine eigene Liste aus den programmsparten erstellen die Sie sehen wollen 1 Wählen Sie mit v oder V das Symbol aus und rufen Sie mit B das Menü Individuelle Themenauswahl auf 2 Wählen Sie mit v oder V die gewünschte Sparte aus und bestätigen Sie Ihre Auswahl mit ...

Страница 13: ... auch wenn sich die Anfangszeit verschiebt Das funktioniert allerdings nur dann wenn der entsprechende Sender VPS PDC Signale sendet Aufnahmegeschwindigkeit Wählen Sie mit V die Option Geschwindigk aus und wählen Sie dann mit OK als Aufnahmegeschwindigkeit SP Standardplay oder LP Longplay Bei LP können Sie auf eine Videokassette doppelt so lange aufnehmen wie bei SP Allerdings ist die Bildqualität...

Страница 14: ...deotextfunktionen Auswählen der nächsten oder vorhergehenden Seite Wählen Sie mit der Taste oder auf der Fernbedienung die vorhergehende bzw die nächste Seite aus Auswählen einer Unterseite Eine Videotextseite kann aus mehreren untergeordneten Seiten Unterseiten bestehen In diesem Fall erscheint eine Informationszeile mit der Anzahl der Unterseiten Wählen Sie die Unterseite indem Sie auf v oder V ...

Страница 15: ...extmenü 1 Um das Menü auf den Bildschirm zu bekommen ist erst der Videotext zu aktivieren Dann drücken Sie die Taste MENU auf der Fernbedienung 2 Wählen Sie mit v oder V die gewünschte Option aus und rufen Sie dann mit B das entsprechende Untermenü auf 3 Um das Videotextmenü wieder auszublenden drücken Sie nochmals die Taste MENU Oben Unten Ganz Mit diesem Untermenü können Sie sich einzelne Teile ...

Страница 16: ... v V b oder B können Sie zwischen den 13 angezeigten Programmen wechseln 4 Mit OK können Sie jeweils das eingerahmte Programm auswählen Das ausgewählte Programm wird daraufhin in der Mitte angezeigt 5 Sie können nun mit OK das ausgewählte Programm anzeigen lassen oder mit den Modus Multi PIP beenden Ein und Ausschalten von PAP Drücken Sie einmal um die beiden PAP Bilder anzeigen zu lassen Drücken ...

Страница 17: ...ktionen finden Sie in der Tabelle unten 4 Stellen Sie mit den Tasten v V B oder b die ausgewählte Option ein 5 Wenn die Option eingestellt ist speichern Sie mit der Taste OK die neue Einstellung 6 Gehen Sie wie in Schritt 3 bis 5 erläutert vor um weitere Optionen einzustellen 7 Blenden Sie mit der Taste MENU das Menü auf dem Fernsehschirm aus Einstellen des Bildes Funktion Optionen Bedienung Bild ...

Страница 18: ...ird zum Beispiel beiWerbung nicht lauter Zweiton Bei einer Sendung in Zweikanalton V A für Kanal 1 v B für Kanal 2 Bei einer Sendung in Stereoton V Mono v Stereo Bei einer Stereosendung im NICAM Format wird kurz NICAM auf dem Bildschirm eingeblendet Kopfhörer i Lautstärke Verändert die Kopfhörerlautstärke Damit kann auch die Lautstärke der über die rückseitigen Cinch Buchsen angeschlossenen Geräte...

Страница 19: ...ie Bedienelemente am Fernseher ab wenn dieser sich im Standby Modus befindet Es ist dann nur möglich das Gerät über eine Taste der Fernbedienung einzuschalten AV2 Ausgang V TV Audio Videosignal von der Antenne AV1 Audio Videosignal von Euro AV Buchse Scart Buchse 1 AV2 Audio Videosignal von Euro AV Buchse Scart Buchse 2 AV3 Audio Videosignal von Euro AV Buchse Scart Buchse 3 v AV4 Audio Videosigna...

Страница 20: ...das Menü auf dem Fernsehschirm auf 2 Wählen Sie mit V das Symbol auf dem Menübildschirm und wechseln Sie dann mit B in das Menü Grundeinstellungen 3 Wählen Sie mit V die Option Manuelle Einstellungen auf dem Menübildschirm und wechseln Sie dann mit B in das Menü Manuelle Einstellungen 4 Wählen Sie mit V die Option Manuell Abspeichern auf dem Menübildschirm und wechseln Sie dann mit B in das Menü M...

Страница 21: ...auf dem Fernsehschirm aus 1 Rufen Sie mit der Taste MENU auf der Fernbedienung das Menü auf dem Fernsehschirm auf 2 Wählen Sie mit V das Symbol auf dem Menübildschirm und wechseln Sie dann mit B in das Menü Grundeinstellungen 3 Wählen Sie mit V die Option Manuelle Einstellungen und wechseln Sie dann mit B in das Menü Manuelle Einstellungen 4 Wählen Sie mit V die Option Manuell Abspeichern und wech...

Страница 22: ...für weitere Kanäle können Sie wie in Schritt 5 und 6a erläutert einstellen b VOL Lautstärkeeinstellung Stellen Sie mit v oder V den Lautstärkepegel des betreffenden Kanals ein von 7 bis 7 Speichern Sie die Einstellung mit OK Den Lautstärkepegel für weitere Kanäle können Sie wie in Schritt 5 und 6b erläutert einstellen c AFT Automatische Feinabstimmung Mit den Tasten v oder V können Sie die Kanalfr...

Страница 23: ...e mit B die Option Größe und stellen Sie dann mit v oder V die horizontalen Koordinaten ein von 10 bis 10 Speichern Sie die neue Einstellung mit der Taste OK 8 Blenden Sie mit der Taste MENU das Menü auf dem Fernsehschirm aus 1 Einstellen der Bildrotation Wenn das Bild aufgrund des Magnetfelds der Erde schräg angezeigt wird können Sie das Bild mit dieser Funktion neu einstellen 1 Rufen Sie mit der...

Страница 24: ...ls einzugeben 8 Drücken Sie nochmals OK um den Code endgültig zu speichern oder brechen Sie den Vorgang mit b ab 9 Blenden Sie mit der Taste MENU das Menü auf dem Fernsehschirm aus Einstellen und Benennen der Eingangsquellen In diesem Menü können Sie Signaleingangsquellen automatisch definieren und benennen 1 Rufen Sie mit der Taste MENU auf der Fernbedienung das Menü auf dem Fernsehschirm auf 2 W...

Страница 25: ...s angeschlossen wird angezeigt 4 Schalten Sie mit zurück zum normalen Fernsehbild Hinweis Schließen Sie nicht gleichzeitig Geräte an die Buchsen F und G an Andernfalls kann es zu Bildstörungen kommen Anschließen des Kopfhörers Ihren Kopfhörer schließen Sie über die Buchse E auf der Vorderseite an Anschließen von Hi fi Geräten Ihr externes Audiogerät schließen Sie über die Ausgangsbuchsen D auf der...

Страница 26: ...rtragen Mit NexTView können Sie den Videorecorder mühelos programmieren Direktaufnahmen vom Fernsehgerät Wenn Sie ein Fernsehprogramm ansehen können Sie dieses Programm mit einem einzigen Tastendruck direkt auf dem Videorecorder aufzeichnen Weitere Erläuterungen zu Smartlink finden Sie in der Bedienungsanleitung zu Ihrem Videorecorder Smartlink 2 s 2 Mit den Tasten die sich unter der Abdeckung auf...

Страница 27: ...ideoeingang Cinchbuchsen Audioeingänge Cinchbuchsen S Videoeingang 4polig DIN Kopfhörerbuchse Stereominibuchse 1 s 1 2 s 2 3 s 3 4 4 s 4 Tonausgang Links Rechts 2x20W Musikleistung 2x10W RMS Sub woofer 30W Musikleistung 15W RMS Leistungsaufnahme 170 W Abmessungen BxHxT ca 892x727x620mm Gewicht ca 82kg Mitgeliefertes Zubehör Fernbedienung RM 893 1 Batterien der Größe AA mit IEC Kennzeichnung 2 Weit...

Страница 28: ...n Sie im Menüsystem das Menü Bild Einstellung auf Stellen Sie die Helligkeit und die Bild und Farbbalance ein Wählen Sie im Menü Bild Einstellung RESET um das Bild auf die werkseitigen Einstellungen zurückzusetzen Gutes Bild kein Ton Drücken Sie auf der Fernbedienung Wenn auf dem Bildschirm angezeigt wird drücken Sie auf der Fernbedienung Sendungen in Farbe werden schwarzweiß angezeigt Rufen Sie i...

Страница 29: ...FR ...

Страница 30: ...autour de l appareil surtout si vous l encastrez dans un meuble Ne posez jamais le téléviseur dans un endroit chaud humide ou trop poussiéreux Ne l installez pas dans un endroit où il pourrait être soumis à des vibrations mécaniques Pour ne pas risquer un incendie éloignez du téléviseur tout objet inflammable ou lumière incandescente par exemple des bougies Nettoyez le téléviseur avec un chiffon d...

Страница 31: ...tique des chaînes 7 Recherche du canal vidéo 2 2 3 4 4 5 5 Utilisation Fonctions du téléviseur Descriptif des touches de la télécommande NexTView Télétexte Utilisation de la fonction Multi PIP Utilisation de la fonction PAP Picture and Picture Utilisation du système de menus Contrôle de l image Contrôle du son Utilisation du menu Caractéristiques Modification de la taille de l écran Modification d...

Страница 32: ...s Installation 1 Vérification des accessoires fournis 2 Insertion des piles dans la télécommande Piles Veillez à faire correspondre la polarité des piles comme indiqué dans le boîtier de la télécommande Jetez les piles usagées dans les réceptacles prévus à cet effet Télécommande ...

Страница 33: ...ment du téléviseur à l antenne Raccordement d une antenne et d un magnétoscope au téléviseur Le câble Péritel n est pas fourni avec le téléviseur Cependant si vous disposez de ce câble son raccordement au téléviseur peut améliorer la qualité de l image et du son en mode de lecture Certaines prises d antenne nécessitent un adaptateur pour une connexion de qualité Dans ce cas nous vous remercions d ...

Страница 34: ...ur la touche TV de la télécommande pour allumer le téléviseur Soyez patient car l image peut prendre quelques secondes avant d apparaître à l écran 4 Mise sous tension du téléviseur 5 Utilisation du sélecteur de la télécommande Pour sélectionner une option dans un menu appuyez au centre du sélecteur sur OK Pour vous déplacer dans les menus appuyez sur la touche fléchée appropriée Déplacement du sé...

Страница 35: ...re de trier les numéros de chaînes selon un ordre préférentiel Si vous souhaitez changer l ordre des chaînes utilisez v ou V afin de sélectionner la chaîne à déplacer puis appuyez sur B A l aide de v ou V sélectionnez le nouveau numéro de chaîne que vous souhaitez utiliser pour la chaîne sélectionnée et appuyez sur OK pour confirmer votre choix Le nouveau numéro est enregistré pour la chaîne sélec...

Страница 36: ...ouche de Remise à Zéro Appuyez sur cette pour touche pour revenir aux réglages d image et de son réalisés en usine Le logo SONY apparaît sur l écran suivi de l écran de réglage automatique des chaînes Si vous ne désirez pas régler à nouveau les chaînes de votre téléviseur appuyez sur la touche b de la télécommande Appuyez sur le cache en façade comme indiqué sur la figure pour accéder aux entrées ...

Страница 37: ...ver les menus de réglage du téléviseur Pour arrêter le son Appuyez pour activer ou désactiver le son Pour restaurer l image Appuyez pour désactiver le télétexte ou le mode veille Pour utiliser le télétexte Appuyez pour activer et désactiver le télétexte Utiliser le guide électronique NexTView Appuyez pour activer ou désactiver le guide électronique NexTView Pour arrêter sur une image Appuyez si vo...

Страница 38: ...INGIER Tue 07 04 98 Légende des icônes liste complète de la sélection sélection personnelle actualités films sports divertissements enfants retour au dernier menu Utilisation du menu Réglage individuel L icône vous permet de sélectionner vos propres thèmes de recherche 1 Sélectionner à l aide de v ou V puis appuyez sur B pour afficher le menu Réglage individuel 2 A l aide de v ou V sélectionnez l ...

Страница 39: ... émission uniquement avec un magnétoscope Smartlink NexTView Download connecté sur la prise Péritel AV2 Utilisation NexTView 1 Connectez votre magnétoscope Smartlink avec le cordon Péritel complet approprié 2 Appuyez sur b ou B pour sélectionner et appuyez sur OK pour transmettre les informations à votre magnétoscope Smartlink NexTView Download 3 Pour régler votre magnétoscope VPS PDC Sélectionner...

Страница 40: ...n d autres fonctions télétexte Accès à la page suivante ou à la page précédente Appuyez sur les touches ou de la télécommande pour sélectionner la page précédente ou suivante Accès à une sous page Une page télétexte peut composer plusieurs sous pages Dans ce cas une ligne d information s affiche indiquant le nombre de sous pages Sélectionnez la sous page à l aide de v ou V Arrêt sur une page télét...

Страница 41: ...e de votre écran 5 Appuyez sur la touche de la télécommande pour visionner cette page Afficher les informations cachées Voir Certaines pages télétexte contiennent des informations cachées des réponses à un questionnaire par exemple que vous pouvez afficher Après avoir sélectionné la fonction le texte caché apparaît Pour afficher ces informations appuyez sur B Le texte caché apparaît Page temps La ...

Страница 42: ... sélectionner les 12 numéros suivants ou précédents 3 Appuyez sur v V b ou B pour vous déplacer parmi les 13 chaînes affichées 4 Appuyez sur OK pour sélectionner une des chaînes Cette chaîne est alors déplacée au centre de l écran 5 Appuyez à nouveau sur OK pour afficher la chaîne sélectionnée ou sur désactiver le mode Multi PIP Activation et désactivation de la fonction PAP Appuyez une fois sur p...

Страница 43: ...la description des options du menu et leur effet reportez vous au tableau ci dessous 4 Utilisez v V B ou b pour régler le paramètre choisi 5 Une fois le réglage effectué appuyez sur OK pour l enregistrer 6 Répétez les étapes 3 à 5 pour régler d autres paramètres 7 Appuyez sur la touche MENU pour revenir à l image télévisée Contrôle de l image Paramètre Effet Réglage de l image V Studio pour les ém...

Страница 44: ... changements de mode suivants Balance b Plus à gauche B Plus à droite Loudness V Non Normal v Oui Lorsque le son est faible Spacial V Non Normal v Oui Donne un effet acoustique spécial au son Contrôle vol auto V Non le volume sur un chaînes varie selon le signal émis v Oui le volume sur un chaînes reste le même quelque soit le niveau du signal émis au moment des publicités par exemple Son stéréo L...

Страница 45: ...lage parental V Non Normal v Oui Cette fonction bloque l utilisation des touches du téléviseur lorsqu il est en mode veille Le téléviseur peut être utilisé uniquement avec la télécommande Sortie AV2 V TV Signal audio vidéo provenant de la prise d antenne AV1 Signal audio vidéo provenant de la prise 1 AV2 Signal audio vidéo provenant de la prise 2 AV3 Signal audio vidéo provenant de la prise 3 v AV...

Страница 46: ...ur V pour sélectionner le symbole dans le menu puis appuyez sur B 3 Appuyez sur V pour sélectionner l option Mise en Service du menu puis appuyez sur B pour accéder au menu correspondant 4 Appuyez sur V pour sélectionner l option Mémorisation manuelle dans le menu puis sur B pour accéder au menu correspondant 5 Orientez le sélecteur sur v ou V pour sélectionner un numéro de chaîne PROGR 1 pour TF1...

Страница 47: ...z sur la touche MENU pour revenir à l image télévisée 1 Appuyez sur la touche MENU de la télécommande pour afficher le menu 2 Appuyez sur V pour sélectionner le symbole dans le menu puis appuyez sur B pour accéder au menu Réglage 3 Appuyez sur V pour sélectionner l option Mise en Service puis appuyez sur B pour accéder au menu correspondant 4 Appuyez sur V pour sélectionner l option Mémorisation m...

Страница 48: ...apes 5 et 6a pour régler l atténuation des autres chaînes b VOL Orientez le sélecteur sur v ou V pour régler le niveau de volume de la chaîne dans une plage comprise entre 7 et 7 Appuyez sur OK pour enregistrer les données Répétez les étapes 5 et 6b pour régler le niveau de volume d autres chaînes c AFT Orientez le sélecteur sur v ou V pour régler finement la chaîne sélectionnée comprise entre 15 ...

Страница 49: ... mémoriser les nouvelles coordonnées 7 Appuyez sur B pour sélectionner Taille puis sur v ou V pour modifier la taille de l image horizontale de 10 to 10 Appuyez sur OK pour mémoriser les nouvelles coordonnées 8 Appuyez sur la touche MENU pour revenir à l image télévisée 1 Réglage de la rotation de l image Du fait du magnétisme exercé par la terre il peut arriver que l image soit inclinée Dans ce c...

Страница 50: ...ez sur b pour annuler 9 Appuyez sur la touche MENU pour revenir à l image télévisée Préréglage et dénomination des sources d entrée Cette fonction permet de sélectionner le format automatique ou attribuer un nom aux sources d entrée 1 Appuyez sur la touche MENU de la télécommande pour afficher le menu 2 Appuyez sur V pour sélectionner le symbole dans le menu puis appuyez sur B pour accéder au menu...

Страница 51: ... il est en cours de fonctionnement apparaîtra sur l écran du téléviseur 4 Appuyez sur pour revenir à l image télévisée normale Remarque Pour éviter les cas de distorsion d image ne raccordez pas simultanément plusieurs équipements aux prises F et G du téléviseur Connexion d un casque Branchez votre casque sur la prise E en façade du téléviseur Connexion d un appareil Hi Fi tel qu un amplificateur ...

Страница 52: ... vous permet de télécharger les informations telles que la liste des programmes d une chaîne du téléviseur vers le magnétoscope d utiliser NexTView pour simplifier la programmation de votre magnétoscope d enregistrer directement de la télévision pendant que vous regardez la télévision il vous suffit d appuyer sur une touche du magnétoscope pour enregistrer le programme en cours Pour obtenir des in...

Страница 53: ... Entrée audio prise cinch Entrée S vidéo prise DIN 4 broches Prise casque minijack stéréo 1 s 1 2 s 2 3 s 3 4 4 s 4 Sortie son Haut parleurs droite et gauche 2x20 W puissance musicale 2x10W RMS Caisson de graves 30 W puissance musicale 15W RMS Consommation 170W Dimensions Env 892 l x 727 h x 620 p mm Poids Env 82kg Accessoires fournis 1 Télécommande RM 893 2 Piles Autres fonctionnalités Ecran plat...

Страница 54: ... Réglez la luminosité le contraste et les couleurs A partir des options de réglage de l image sélectionnez RAZ pour réinitialiser les paramètres d origine réglés en usine Bonne image mais pas de son Appuyez sur la touche de la télécommande Si le symbole est affiché à l écran appuyez sur la touche de la télécommande Pas de couleur programmes cou leurs Appuyez sur MENU sélectionnez l option de régla...

Страница 55: ...GB ...

Страница 56: ...ilation leave a space of at least 10cm all around the set Never place the TV in hot humid or excessively dusty places Do not install the TV where it may be exposed to mechanical vibrations To prevent fire keep inflammable objects or naked lights eg candles away from the TV Clean the TV with a soft lightly dampened cloth Do not use benzine thinner or any other chemicals to clean the TV Do not scrat...

Страница 57: ...4 5 5 Operation Overview of the TV set buttons Overview of the remote control buttons NexTView Teletext Using Multi PIP Operating PAP Picture and Picture Using the TV menu system Adjusting the picture and sound Using the Features menu Changing the screen size Re arranging the TV channels Manually tuning the TV Naming a channel Skipping programme positions Using the Further Programme Preset feature...

Страница 58: ... Installation 1 Checking the accessories supplied 2 Inserting batteries into the remote control Batteries Always observe the correct polarity when inserting batteries Always remember to dispose of used batteries in an environmentally friendly way Remote control ...

Страница 59: ... lead from the RF OUT socket on the back of the VCR to the aerial socket on the back of the TV as shown 3 Connect the scart lead if used to the AV2 socket on the rear of the TV set 4 Connect the VCR set to the mains and switch on 5 Insert a pre recorded tape into the VCR and press the PLAY button This enables the TV set to locate and store the video channel during the Tuning your TV procedure on p...

Страница 60: ... the TV is lit press the TV button on the remote control to switch on the TV set Please be patient as the picture may take a few moments to appear on the TV screen 4 Switching on the TV 5 Using the joystick To select an item in a menu press the OK button down in the middle To move around the menus press the relevant arrow button Moving the joystick Pressing the joystick ...

Страница 61: ...u to change the order of the channels on your TV If you wish to change the channel order press the v or V buttons to select the channel you want to move then press B Press the v or V buttons to select the new programme number position for your selected channel then press the OK button to confirm The selected channel now moves to its new programme position and the other channels move accordingly Re...

Страница 62: ... buttons Press to select TV channels Master Reset button Press to return the picture and sound levels to factory settings The Sony logo will appear on the screen followed by the Autotune screen If you do not wish to retune your TV press the b button on your remote control Push up on the control panel as shown to access the front input sockets and TV buttons The control panel drops down ...

Страница 63: ... the normal operation from teletext mode or standby mode To select Teletext Press to switch Teletext on and off To select Electronic Programme Guide EPG Press to switch EPG on and off To freeze the picture Press if you wish to make a note of some information on the TV screen eg a telephone number Press again to return to normal TV mode To select channels Press the numbered buttons to select channe...

Страница 64: ...rol to switch NexTView on and off In some cases you may also need to press the b button to display the Sony electronic programme guide 2 Press the v V b or B buttons to move the cursor around the screen 3 Press the OK button to confirm a selection a If you press the OK button in the date time or icon themes columns you change the programme list according to the selection b If you press the OK butt...

Страница 65: ...If other values are set the complete combination will be scrolled Example if the DPWC is set to 63 the char Speed Timer Prog VPS PDC SP VCR1 On This channel has been set for a timer First nextTView EPG Providers in Europe SWISS TXT TPS RINGIER nexTView Tue 07 04 98 To record programmes only with Smartlink VCRs 1 Connect your Smartlink VCR to the AV2 socket on your TV 2 Press b or B to select then ...

Страница 66: ...r Teletext Functions Selecting the next or preceding page Press the or buttons on the remote control to select the previous or next page Selecting a sub page A teletext page may consist of several sub pages In this case an information line is displayed showing the number of subpages Select the sub page by pressing v or V To freeze a Teletext page Press the button to freeze the page Press again to ...

Страница 67: ...t full screen text 2 Press the MENU button to display the Teletext menu 3 Press v or V to highlight Text Clear and press B to select 4 The current TV channel is displayed Once the text page has been found a blue symbol will appear in the top left hand corner of the screen 5 Press the button on the remote control to view the page 1 In text mode press the MENU button on the remote control to access ...

Страница 68: ...select the next or preceding 12 programme positions 3 Press the v V b or B buttons to move within the 13 displayed channels 4 Press the OK button to select the framed channel This channel now moves to the centre 5 Press the OK button again to display the selected channel or press to remove Multi PIP mode from the TV screen Switching PAP on and off Press once to display the screens and twice to swi...

Страница 69: ... see the table below 4 Press the v V B or b buttons to adjust your selected item 5 As soon as you have adjusted the item press the OK button to store the new setting 6 Repeat steps 3 5 if you wish to adjust any of the other items 7 Press the MENU button to remove the menu from the TV screen Picture Control Item Effect Operation Picture Mode V Live for live broadcasts Personal for individual settin...

Страница 70: ...ently stores the setting all other modes Vocal Jazz Rock Pop store only until the next mode change Balance b More left B More right Loudness V Off Normal v On For music broadcasts Space V Off Normal v On Spatial acoustic effect Auto Vol Control V Off Volume level changes according to the broadcast signal v On Volume level of the channels will stay the same independent of the broadcast signal eg in...

Страница 71: ...ndby mode V Off v 90 min Parental Lock V Off No parental lock v On This feature disables the TV buttons when the set is in standby mode It is only possible to switch the set back on by pressing a button on the remote control AV2 Output V TV audio video signal from the aerial AV1 audio video signal from scart 1 AV2 audio video signal from scart 2 AV3 audio video signal from scart 3 v AV4 audio vide...

Страница 72: ...t Up menu 3 Press the V button to select Manual Set Up on the menu screen then press B to enter the Manual Set Up menu 4 Press the V button to select Manual Programme Preset on the menu screen then press B to enter the Manual Programme Preset menu 5 Press the v or V buttons to select a programme number for your channel eg PROGR 1 for BBC1 then press B to highlight the SKIP column 6 Press v to sele...

Страница 73: ...e V button to select the symbol on the menu screen then press B to enter the Set Up menu 3 Press the V button to select Manual Set Up then press B to enter the Manual Set Up menu 4 Press the V button to select Manual Programme Preset then press B to enter the Manual Programme Preset menu 5 Press the v or V buttons to select the programme position then press B to highlight the SKIP column 6 Press t...

Страница 74: ...channels b VOL Volume Offset Press the v or V buttons to adjust the volume level range 7 to 7 of the channel Store by pressing the OK button Repeat steps 5 and 6b if you wish to adjust the volume level of the other channels c AFT Automatic Fine Tuning Press the v or V buttons to fine tune the channel frequency over a range of 15 to 15 Press the OK button to confirm Repeat steps 5 and 6c if you wis...

Страница 75: ...B to select H Size then press v or V to adjust the horizontal coordinates over a range of 10 to 10 Store the new range by pressing the OK button 8 Press the MENU button to remove the menu from the TV screen 1 Adjusting the picture rotation Because of the earth s magnetism the picture might slant In this case you can readjust the picture 1 Press the MENU button on the remote control to display the ...

Страница 76: ...e or press b to cancel 9 Press the MENU button to remove the menu from the TV screen Presetting and naming input signals Using this feature you can label input sources 1 Press the MENU button on the remote control to display the menu on the TV screen 2 Press the V button to select the symbol on the menu screen then press B to enter the Set Up menu 3 Press the V button to select AV Preset on the me...

Страница 77: ...turn to the normal TV screen Note To avoid picture distortion do not connect equipment to the F and G sockets at the same time Symbol on the TV screen Input signals from connector Audio video input signal through scart connector A or RGB through scart connector A Audio video input signal through scart connector B or S video through scart connector B Audio video input signal through scart connector...

Страница 78: ... as the channel overview are downloaded from the TV set to the VCR With NexTView you can programme your VCR easily Direct TV recording while watching TV you need to press just one button on the VCR to record this programme For more information on Smartlink please refer to your VCR instruction manual Smartlink 2 s 2 Using the buttons underneath the cover of the remote control you can control other ...

Страница 79: ...ut 4 pin DIN Headphones jack minijack stereo 1 1 2 s 2 3 s 3 4 4 s 4 Sound output Left Right 2x20W Music Power 2x10W RMS Sub woofer 30W Music Power 15W RMS Power consumption 170W Dimensions wxhxd Approx 892x727x620mm Weight Approx 82kg Accessories supplied RM 893 remote control 1 IEC designated size AA batteries 2 Optional accessory TV Stand SU 34FQ1 Other features Flat display Trinitron tube nois...

Страница 80: ...Picture Adjustment display Adjust the brightness picture and colour balance levels From the Picture Adjustment display select RESET to return to the factory settings Good picture no sound Press the button on the remote control If is displayed on the screen press the button on the remote control No colour on colour programmes Using the MENU system select the Picture Adjustment display and adjust th...

Страница 81: ...IT ...

Страница 82: ...eno 10 cm tutto attorno all apparecchio Mai posizionare il televisore in luoghi troppo caldi umidi o eccessivamente polverosi Non installare il televisore dove potrebbe essere esposto a vibrazioni meccaniche Per prevenire rischi di incendio mantenere lontano dal televisore oggetti e sostanze infiammabili o fiamme vive es candele Pulire il televisore con un panno morbido e leggermente inumidito Non...

Страница 83: ...e Descrizione dei tasti del telecomando NexTView Televideo Utilizzo di Multi PIP Utilizzo di PAP Picture and Picture Utilizzo del sistema di menu del televisore Regolazione dell immagine e dell audio Utilizzo del menu Caratteristiche Modifica delle dimensioni dello schermo Ordinamento dei canali Preselezione manuale dei canali Assegnazione di un nome ad un canale Esclusione di posizioni di program...

Страница 84: ...mpianto 1 Controllo degli accessori in dotazione 2 Inserimento delle batterie nel telecomando Pile Rispettare sempre la corretta polarità nell inserire le pile Nel rispetto dell ambiente depositare le pile scariche negli appositi contenitori adibiti alla raccolta differenziata Telecomando ...

Страница 85: ...anale del videoregistratore durante l operazione di sintonizzazione a pag 5 1 Inserire il connettore dell antenna nella presa contrassegnata con sul retro del televisore Collegamento dell antenna al televisore Collegamento dell antenna e del videoregistratore al televisore Il cavo Scart è opzionale Tuttavia se è disponibile questo collegamento aggiuntivo è in grado di migliorare la qualità dell im...

Страница 86: ...televisore è illuminato premere il tasto TV sul telecomando per accendere il televisore Attendere qualche attimo fino alla visualizzazione dell immagine sullo schermo 4 Accensione del televisore 5 Utilizzo del joystick Per selezionare una voce di menu premere il tasto OK nella parte centrale Per spostarsi tra i menu premere la freccia appropriata Spostamento del joystick Pressione del joystick ...

Страница 87: ... di programma diversi Se si desidera modificare l ordine dei canali premere i tasti v o V per selezionare il canale da spostare e quindi premere B Premere i tasti v o V per selezionare la nuova posizione di programma del canale selezionato e quindi premere OK per confermare Il canale selezionato viene in tal modo trasferito nella nuova posizione di programma mentre le posizioni degli altri canali ...

Страница 88: ...er selezionare i canali TV Tasto di ripristino generale Premere per tornare alle impostazioni d immagine e suono prestabilite in fabbrica Il logo Sony apparirà sullo schermo seguito dal menu di sintonizzazione automatica Se non si desidera ri sintonizzare il TV premere il b sul telecomando Premere verso l alto il pannello di controllo come indicato in figura per accedere alle prese frontali e ai c...

Страница 89: ...menu dallo schermo del televisore Per escludere l audio Questo tasto esclude l audio del televisore Per ripristinare l audio premerlo nuovamente Per tornare alla visualizzazione normale Questo tasto riporta alla visualizzazione normale dalla modalità Televideo o standby Per visualizzare il Televideo Premere per attivare o disattivare il Televideo Per utilizzare la guida TV elettronica Premere per ...

Страница 90: ...re sullo schermo 3 Premere OK per confermare una selezione a premendo OK nell elenco della data dell ora o delle icone generi è possibile modificare l elenco di programmi in base alla scelta b premendo OK nell elenco di programmi è possibile passare direttamente al canale se il programma è in corso di trasmissione oppure è possibile visualizzare il menu Long Info se il programma verrà trasmesso in...

Страница 91: ...ogramma verrà registrato per intero anche in caso di cambiamenti nella programmazione TV Questa funzione è disponibile soltanto se il canale selezionato trasmette un segnale VPS PDC Velocità Premere V per selezionare Velocità e quindi premere OK per selezionare la modalità standardplay SP o la modalità longplay LP Nella modalità longplay si dispone di un tempo doppio di registrazione sulla cassett...

Страница 92: ...einserire il numero di pagina corretto Utilizzo di altre funzioni del Televideo Selezione della pagina precedente o successiva Premere o sul telecomando per selezionare la pagina precedente o quella successiva Selezione di una sottopagina Una pagina del Televideo può essere costituita da più sottopagine In questo caso viene visualizzata una riga di informazioni nella quale è indicato il numero di ...

Страница 93: ... due colonne la prima contiene i blocchi la seconda i gruppi di pagine Televideo 1 Premere b o B per selezionare la prima o la seconda colonna 2 Premere v o V per selezionare il blocco o il gruppo di pagine desiderato 3 Premere OK per visualizzare le pagine scelte Ora pagina PAGINA TEMPO Selez Pagina 0 9 Successivo Impostazione Televideo Alto Basso Pieno Annulla il Testo Rivela Ora pagina Pagina T...

Страница 94: ...posizioni di programma precedenti o successive 3 Premere v V b o B per spostarsi tra i 13 canali visualizzati 4 Premere OK per selezionare il canale evidenziato Questo canale viene in tal modo collocato al centro 5 Premere nuovamente OK per visualizzare il canale selezionato o premere per disattivare la modalità Multi PIP Attivazione e disattivazione del PAP Premere una volta per suddividere lo sc...

Страница 95: ...asmissioni dal vivo Personale per impostazioni individuali Film per film v Giochi per videogiochi Contrasto Minore b B Maggiore Luminosità Più scuro b B Più chiaro Colore Meno b B Più Tonalità Più rosso b B Più verde Nitidezza Più morbida b B Più dettagliata Disponibile solo se in Modalità Immagine è selezionato personale Disponibile solo per i segnali nel sistema di colore NTSC Es videocassetta A...

Страница 96: ...ali Spazio V No Normale v Si Per effetti acustici particolari Contr Vol Auto V No il livello del volume cambia secondo il segnale di trasmissione v Sì il livello di volume dei canali rimane invariato indipendentemente dal segnale di trasmissione ad esempio nel caso della pubblicità Doppio audio Per una trasmissione bilingue V A per il canale 1 v B per il canale 2 Per una trasmissione stereo V Mono...

Страница 97: ... Questa funzione disabilita i tasti del televisore quando l apparecchiatura è in modalità standby Sarà possibile accendere il televisore solo premendo un tasto del telecomando Uscita AV2 V Segnale audio video TV dall antenna Segnale audio video AV1 da Scart 1 Segnale audio video AV2 da Scart 2 Segnale audio video AV3 da Scart 3 v Segnale audio video AV4 dai connettori sul frontale del televisore U...

Страница 98: ...r selezionare il simbolo sulla schermata del menu e quindi premere B per accedere al menu Impostazione 3 Premere V per selezionare Impostazione manuale sulla schermata del menu e quindi premere B per accedere al menu Impostazione manuale 4 Premere V per selezionare Programmazione Manuale sulla schermata del menu e quindi premere B per accedere al menu Programmazione Manuale 5 Premere v o V per sel...

Страница 99: ...arire il menu sullo schermo del televisore 2 Premere V per selezionare il simbolo sulla schermata del menu e quindi premere B per accedere al menu Impostazione 3 Premere V per selezionare Impostazione manuale e quindi premere B per accedere al menu mpostazione manuale 4 Premere V per selezionare Programmazione Manuale e quindi premere B per accedere al menu Programmazione Manuale 5 Premere v o V p...

Страница 100: ...ttenuatore ATT RF Premere v o V per attivare o disattivare l attenuatore Premere OK per confermare la selezione Ripetere i punti 5 e 6a se si desidera regolare l attenuazione degli altri canali b VOL Volume personalizzato Premere v o V per regolare il livello del volume entro i valori 7 e 7 del canale Memorizzare l impostazione premendo OK Ripetere i punti 5 e 6b se si desidera regolare il livello...

Страница 101: ...are il nuovo intervallo di valori 7 Premere B per selezionare Dimensione e quindi premere v o V per regolare le coordinate orizzontali entro i valori 10 e 10 Premere OK per memorizzare il nuovo intervallo di valori 8 Premere MENU per rimuovere il menu dallo schermo del televisore 1 Regolazione della rotazione dell immagine A causa del campo magnetico terrestre l immagine può apparire inclinata In ...

Страница 102: ... b per annullare 9 Premere MENU per rimuovere il menu dallo schermo del televisore Preselezione e assegnazione di un nome ai segnali di ingresso Questa funzione consente di assegnare automaticamente un formato e un nome alle sorgenti di ingresso 1 Premere MENU sul telecomando per fare comparire il menu sullo schermo del televisore 2 Premere V per selezionare il simbolo sulla schermata del menu e q...

Страница 103: ...re per tornare alla normale immagine TV Nota per evitare la distorsione dell immagine non collegare contemporaneamente l apparecchio alle prese F e G Collegamento delle cuffie Inserire il connettore delle cuffie nella presa E sulla parte frontale del Televisore Per collegare un apparecchiatura Hi Fi Collegare la vostra apparecchiatura audio ai connettori di uscita D posti sul retro del televisore ...

Страница 104: ...ando NexTView è possibile programmare facilmente il videoregistratore Registrazione TV diretta mentre si guarda un programma TV è sufficiente premere un solo tasto del videoregistratore per registrare Per ulteriori informazioni su Smartlink consultare il manuale di istruzioni del VCR Smartlink 2 s 2 Utilizzando i tasti posti sotto lo sportellino del telecomando è possibile azionare un altro appare...

Страница 105: ...Prese fono per ingresso audio DIN a 4 poli per ingresso S video Presa cuffia minipresa stereo 1 s 1 2 s 2 3 s 3 4 4 s 4 Uscita audio Destra Sinistra 2x20W Potenza Musicale 2x10W RMS Sub woofer 30W Potenza Musicale 15W RMS Potenza assorbita 170 W Dimensioni largh x alt x prof Circa 892x727x620 mm Peso Circa 82kg Accessori in dotazione Telecomando RM 893 1 Pile AA IEC 2 Accessori opzionali Mobili pe...

Страница 106: ...e regolare i livelli di luminosità contrasto e colore Dalla schermata di regolazione dell immagine selezionare RESET per ripristinare le impostazioni di fabbrica Immagine buona ma assenza di audio Premere sul telecomando Se sullo schermo appare premere sul telecomando Assenza di colore nei programmi a colori Mediante il MENU selezionare la schermata di regolazione dell immagine e regolare il bilan...

Страница 107: ...TR ...

Страница 108: ... nin havalandõrmalarõnõ örtmeyiniz Hava akõmõ sağlamak için cihaz çevresinde en az 10cm lik bir alanõ boş bõrakõnõz TV yi asla sõcak nemli yada aşõrõ tozlu mekanlarda bõrakmayõnõz TV yi mekanik tireşime maruz kalabileceği mekanlarda kurmayõnõz Yangõnõ önlemek için yanõcõ yada açik alevli örneğin mum objeleri TV den uzak tutunuz TV yi yumuşak hafif nemli bez ile temizleyin Temizlik için benzin tine...

Страница 109: ...yon seti düğmelerinin genel görünümü Uzaktan kumanda düğmelerinin genel görünümü NexTView Program Kõlavuzu Teletekst Multi PIP Kullanõmõ PAP Görüntü ve Görüntü fonksiyonunun kullanõmõ Televizyon menü sisteminin kullanõmõ Görüntü ve sesin ayarlanmasi Özellikler menüsünün kullanõmõ Ekran ebatõnõn değiştirilmesi Televizyon kanallarõnõn yeniden düzenlenmesi Televizyon kanallarõnõn manuel olarak elle a...

Страница 110: ...iz Montaj Montaj Montaj Montaj 1 Beraberinde verilen aksesuarlarõn kontrol edilmesi 1 Beraberinde verilen aksesuarlarõn kontrol edilmesi 1 Beraberinde verilen aksesuarlarõn kontrol edilmesi 1 Beraberinde verilen aksesuarlarõn kontrol edilmesi 2 Uzaktan kumanda aletine pillerin takõlmasõ 2 Uzaktan kumanda aletine pillerin takõlmasõ 2 Uzaktan kumanda aletine pillerin takõlmasõ 2 Uzaktan kumanda alet...

Страница 111: ...televizyonunuzu bir Eğer televizyonunuzu bir Eğer televizyonunuzu bir VCR ye yani videoya VCR ye yani videoya VCR ye yani videoya VCR ye yani videoya takõyorsanõz lütfen takõyorsanõz lütfen takõyorsanõz lütfen takõyorsanõz lütfen aşağõdaki bölümü aşağõdaki bölümü aşağõdaki bölümü aşağõdaki bölümü okuyunuz okuyunuz okuyunuz okuyunuz Scart giriş kablosu Scart giriş kablosu Scart giriş kablosu Scart ...

Страница 112: ...üntünün televizyon ekranõnda belirmesi bir kaç dakika sürebilir 4 Televizyonun çalõştõrõlmasõ 4 Televizyonun çalõştõrõlmasõ 4 Televizyonun çalõştõrõlmasõ 4 Televizyonun çalõştõrõlmasõ 5 Joystik kullanõmõ 5 Joystik kullanõmõ 5 Joystik kullanõmõ 5 Joystik kullanõmõ Menüdeki bir şeyi seçmek için ortadaki OK düğmesine basõn Menüler arasõnda geçiş yapmak için ilgili ok tuşuna basõnõz Joystikin hareket ...

Страница 113: ... kanallarõn sõrasõnõ değiştirebilmenizi sağlamak için Programme Sorting Program Değiştirme menüsü televizyonun ekranõnda belirir Kanal sõrasõnõ değiştirmek isterseniz numarasõnõ değiştirmek istediğiniz kanalõ seçmek için v ya da V düğmelerini kullanõnõz daha sonra da B düğmesine basõnõz Seçmiş olduğunuz kanal için yeni bir program numarasõ atamak için v ya da V düğmelerine basõnõz daha sonra da on...

Страница 114: ... sinyallerini seçmek için bu düğmeye basõnõz Program Yukarõ veya Program Yukarõ veya Program Yukarõ veya Program Yukarõ veya Aşağõ düğmeleri Aşağõ düğmeleri Aşağõ düğmeleri Aşağõ düğmeleri Televizyon kanallarõnõ seçmek için bu düğmeye basõnõz Ana Reset Menüsü Ana Reset Menüsü Ana Reset Menüsü Ana Reset Menüsü Resim ve ses düzeyini fabrika ayarlarõna döndürmek için basõnõz Ekranda Sony logosu ve ta...

Страница 115: ...duna geri dönmek için Teletekst modundan veya bekleme standby modundan tekrar normal çalõşõm moduna geri dönmek için bu düğmeye basõnõz Teleteksti seçmek için Teleteksti seçmek için Teleteksti seçmek için Teleteksti seçmek için Teleteksti açmak ve kapatmak için bu düğmeye basõnõz Elektronik Program Kõlavuzunu EPG seçmek Elektronik Program Kõlavuzunu EPG seçmek Elektronik Program Kõlavuzunu EPG seç...

Страница 116: ...vamlõ olarak basõnõz 2 Kursörü imgeci ekranda oynatmak için v V b veya B düğmelerine basõnõz 3 Bir seçimi onalamak için OK düğmesine basõnõz a Eğer OK düğmesine tarih zaman veya ikon temalar üzerindeyken basarsanõz program listesini seçime göre değiştirirsiniz b Eğer OK düğmesine program listesindeyken basarsanõz eğer yayõn o an yapõlmaktaysa kanalõ direk olarak görüntülersiniz ya da eğer yayõn da...

Страница 117: ...mesine devamlõ basarak VPS PDC yi seçiniz ve daha sonra On veya Off konumunu seçmek için OK düğmesine basõnõz Bu ayarõn açõk durumda getirilmesiyle birlikte Televizyon programõnda bir değişiklik olmadõğõ sürece bütün yayõnõn kaydedilmesi işlemini garantilemiş olursunuz Bu işlem sadece eğer seçilmiş olan kanal bir VPS PDC sinyali yayõnlamakta ise geçerlidir Hõz Hõz Hõz Hõz V düğmesine basarak Speed...

Страница 118: ...ir sonraki sayfayõ seçmek için veya düğmelerine basõnõz Bir alt sayfanõn seçilmesi Bir alt sayfanõn seçilmesi Bir alt sayfanõn seçilmesi Bir alt sayfanõn seçilmesi Bir teletekst sayfasõ bir kaç alt sayfaya sahip olabilir Bu durumda alt sayfalarõn adedini gösteren bir bilgi satõrõ görüntüye gelir v ve V tuşlarõ ile istediğiniz alt sayfayõ seçiniz Bir teletekst sayfasõnõn dondurulmasõ Bir teletekst ...

Страница 119: ...köşesinde sembolü görünür 5 Uzaktan kumanda üzerinde düğmesine basarak sayfayõ görebilirsiniz Kanal Kanal Kanal Kanal Bazõ teletekst sayfalarõ görüntülenebilir gizli bilgiler taşõyabilirler örneğin bir soru Sayfa Zamanlayõcõ Sayfa Zamanlayõcõ Sayfa Zamanlayõcõ Sayfa Zamanlayõcõ Hizmetin mevcudiyetine göre Sayfa Zamanõ Yalnõzca Teletekst ve Mix konumlarõnda varolabilir Sayfa Zamanõ zaman ayarlõ bir...

Страница 120: ...olarak basõnõz 3 v V b veya B düğmelerine basarak gösterilmekte olan 13 kanal arasõnda geziniz 4 Çerçeveye alõnmõş olan kanalõ seçmek için OK düğmesine basõnõz Bu kanal böylelikle merkeze gelir 5 Seçilmiş olan kanalõ görüntülemek için OK düğmesine basõnõz veya düğmesine basarak Multi PIP modunu televizyonun ekranõndan kaldõrõnõz PAP fonksiyonunun açõlmasõ ve kapatõlmasõ PAP fonksiyonunun açõlmasõ ...

Страница 121: ...õ için aşağõdaki tabloya bakõnõz 4 Seçmiş olduğunuz bölümü ayarlamak için v V B veya b düğmelerine basõnõz 5 Seçtiğiniz bölümü ayarlar ayarlamaz yeni ayarõ hafõzaya kaydetmek için OK düğmesine basõnõz 6 Diğer bölümlerden herhangi birisini ayarlamak istediğiniz zaman 3 5 ile numaralandõrõlmõş olan aşamalarõ tekrarlayõnõz 7 Menüyü televizyon ekranõndan kaldõrmak için MENU düğmesine basõnõz Görüntü K...

Страница 122: ...hafõzaya alõr fakat diğer bütün modlar Vokal Jazz Rock Pop sadece bir sonraki mod değişikliğine kadar hafõzada tutar Hoparl ör Ayarlarõ b Daha sola B Daha sağa Loudness V Kapalõ Normal v Açõk Müzik yayõnlarõ için Boşluk V Kapalõ Normal v Açõk Özel akustik efektler Otomatik Ses Kontrolü V Kapalõ ses seviyesi yayõn sinyaline bağlõ olarak değişir v Açõk kanallarõn ses seviyesi yayõn sinyalinden örneğ...

Страница 123: ...7 Menüyü televizyonun ekranõndan kaldõrmak için MENU düğmesine basõnõz Bölüm Bölüm Bölüm Bölüm Etik İşlem Etik İşlem Etik İşlem Etik İşlem Otomatik Kapanma Televizyon kendisini standby bekleme moduna geçirdikten sonra bir zaman süre seçebilirsiniz V Kapalõ v 90 dakika Ebeveyn kilidi V Kapalõ Normal v Açõk Televizyonu standby uyku bekleme modundan çõkartmak için uzaktan kumanda cihazõnõn üzerinde b...

Страница 124: ...anallar eklemek sureti ile bu işlemi elinizle de yapabilirsiniz 1 Menüyü televizyon ekranõnda görüntülemek için uzaktan kumanda cihazõnõn üzerindeki MENU düğmesine basõnõz 2 V düğmesine basarak menü ekranõndaki sembolünü seçiniz ve daha sonra B düğmesine basarak Ayarl menüsüne giriniz 3 Manuel Ayarlar kõsmõnõ seçmek için V düğmesine basõnõz daha sonra B düğmesine basarak Manuel Ayarlar elle ayarla...

Страница 125: ...ine basarak adlandõrmak istediğiniz kanalõ seçiniz 6 ISIM Etiket kolonunun ilk elemanõ seçili duruma geçinceye kadar B düğmesine devamlõ olarak basõnõz 7 Bir harf veya sayõ seçmek için boşluk için simgesini kullanõnõz v veya V düğmelerine basõnõz daha sonra onaylamak için B düğmesine basõnõz Diğer dört karakteri de aynõ yöntemle seçiniz 8 Bütün karakterleri seçtikten sonra OK düğmesine basõnõz 9 D...

Страница 126: ... aþamalarý tekrarlayýnýz b VOL Ses Dengesi VOL Ses Dengesi VOL Ses Dengesi VOL Ses Dengesi v veya V düğmelerine basarak kanallarõn ses seviyesini 7 den 7 ye kadar olan aralõkta ayarlayõnõz OK düğmesine basarak hafõzaya kaydediniz Diğer kanallarõn da ses seviyelerini ayarlamak istiyorsanõz 5 ev 6b numaralõ aşamalarõ tekrarlayõnõz c AFT Otomatik İnce Ayar AFT Otomatik İnce Ayar AFT Otomatik İnce Aya...

Страница 127: ...aralõğõ dahilinde resmin görüntünün merkezini ayarlayõnõz Yeni değer aralõğõnõ OK düğmesine basarak hafõzaya alõnõz 7 B düğmesine basarak H ebatõnõ ayarlayõnõz daha sonra da v veya V düğmelerine basarak yatay koordinatlarõ 10 ile 10 menzili dahilinde ayarlayõnõz Yeni değer aralõğõnõ OK düğmesine basarak hafõzaya alõnõz 8 Menüyü televizyon ekranõndan kaldõrmak için MENU düğmesine basõnõz 1 Görüntü ...

Страница 128: ...du yeniden girmenizi isteyen bir durum kutusu ekranda belirir 8 Kodu son kez hafõzaya kaydetmek için OK düğmesine tekrar basõnõz veya iptal etmek için b düğmesine basõnõz 9 Menüyü televizyonun ekranõndan kaldõrmak için MENU düğmesine basõnõz Giriş sinyallerinin adlandõrõlmasõ ve ön ayarõnõn yapõlmasõ Giriş sinyallerinin adlandõrõlmasõ ve ön ayarõnõn yapõlmasõ Giriş sinyallerinin adlandõrõlmasõ ve ...

Страница 129: ...ergilenecektir 4 Normal Televizyon ekranõna dönmek için düğmesine basõnõz Not Görüntünün bozulmasõnõ önlemek için ekipmanõnõzõ F ve G soketlerine aynõ anda takmayõnõz Kulaklõklarõn bağlanmasõ Kulaklõklarõn bağlanmasõ Kulaklõklarõn bağlanmasõ Kulaklõklarõn bağlanmasõ Kulaklõklarõnõzõ TV nin ön kõsmõndaki E soketine takõn HiFi Ekipmanlarõnõn Bağlanmasõ HiFi Ekipmanlarõnõn Bağlanmasõ HiFi Ekipmanlarõ...

Страница 130: ...z Direk TV kaydõ Televizyonunuzu seyrederken bu programõ kaydetmek için sadece VCR üzerindeki bir düğmeye basmanõz yeterli olacaktõr Smartlink hakkõnda bilgi edinmek için lütfen VCR video kayõt cihazõ talimat kitapçõğõnõza bakõnõz Smartlink direk bağlantõ Smartlink direk bağlantõ Smartlink direk bağlantõ Smartlink direk bağlantõ 2 s 2 Uzaktan kumanda cihazõ kapağõnõn hemen altõndaki düğmeleri kull...

Страница 131: ...etimi Güç tüketimi Güç tüketimi Güç tüketimi 170W Ebatlar enxyükseklikxderinlik Ebatlar enxyükseklikxderinlik Ebatlar enxyükseklikxderinlik Ebatlar enxyükseklikxderinlik Yaklaşõk 892x727x620mm Ağõrlõk Ağõrlõk Ağõrlõk Ağõrlõk Yaklaşõk 82kg Beraberinde verilen aksesuarlar Beraberinde verilen aksesuarlar Beraberinde verilen aksesuarlar Beraberinde verilen aksesuarlar RM 893 uzaktan kumanda cihazõ 1 a...

Страница 132: ...kontrol ediniz Televizyonu 3 veya 4 saniyeliğine kapatõnõz ve daha sonra televizyonun ön tarafõnda bulunan düğmesini kullanarak televizyonu tekrar açõnõz Çok zayõf bir görüntü var veya hiçbir görüntü yok ekran kararmõş fakat ses geliyor MENU sistemini kullanarak Görüntü Ayarlama Picture Adjustment göstergesini seçiniz Aydõnlõğõ görüntü ve renk denge seviyelerini ayarlayõnõz Görüntü Ayarlama göster...

Страница 133: ...GR ...

Страница 134: ...γύρω απ κάθε πλευρά της συσκευής Μην τοποθετείτε ποτέ την τηλε ραση σε θερµά υγρά ή ιδιαίτερα σκονισµένα σηµεία Μην τοποθετήσετε την τηλε ραση σε σηµείο που υπ κειται σε κραδασµούς Για την αποφυγή πυρκαγιάς κρατήστε τα εύφλεκτα αντικείµενα και τις ακάλυπτες πηγές φωτ ς π χ κεριά µακριά απ την τηλε ραση Καθαρίστε την τηλε ραση µε ένα απαλ ελαφρά υγρ ύφασµα Μην χρησιµοποιείτε βενζίνη διαλυτικά χρωµά...

Страница 135: ...ν της τηλε ρασης Επισκ πηση των πλήκτρων του τηλεχειριστηρίου NexTView Teletext Χρήση της λειτουργίας Multi PIP Λειτουργία PAP Εικ νες σε Παράθεση Χρήση των µενού της τηλε ρασης Ρύθµιση της εικ νας Ρύθµιση του ήχου Χρήση του µενού Λειτουργίες Αλλαγή του µεγέθους της οθ νης Ταξιν µηση θέσεων προγραµµάτων Συντονισµ ς της τηλε ρασης µε το χέρι Τιτλοφ ρηση σταθµού Υπερπήδηση θέσεων προγραµµάτων Χρήση ...

Страница 136: ... Ελεγχος των παρεχόµενων αξεσουάρ 1 Ελεγχος των παρεχόµενων αξεσουάρ 2 Τοποθέτηση µπαταριών στο τηλεχειριστήριο 2 Τοποθέτηση µπαταριών στο τηλεχειριστήριο 2 Τοποθέτηση µπαταριών στο τηλεχειριστήριο 2 Τοποθέτηση µπαταριών στο τηλεχειριστήριο Μπαταρίες _ταν αλλάζετε µπαταρίες προσέξτε να τις τοποθετείτε µε τη σωστή πολικ τητα Απαλλαγείτε απ τις χρησιµοποιηµένες µπαταρίες µε έναν τρ πο φιλικ προς το ...

Страница 137: ...τηλε ρασής σας η οποία αναφέρεται στην σελίδα 5 1 Συνδέστε το καλώδιο της κεραίας που διαθέτετε στον ακροδέκτη µε το σηµείο στο πίσω µέρος της τηλε ρασης Σύνδεση κεραίας στην τηλεόραση Σύνδεση κεραίας στην τηλεόραση Σύνδεση κεραίας στην τηλεόραση Σύνδεση κεραίας στην τηλεόραση Σύνδεση κεραίας και βίντεο στην τηλεόρασή σας Σύνδεση κεραίας και βίντεο στην τηλεόρασή σας Σύνδεση κεραίας και βίντεο στη...

Страница 138: ...θώς για να εµφανιστεί εικ να στην οθ νη της τηλε ρασης µπορεί να χρειαστούν µερικά λεπτά 4 Ανοίγοντας την τηλεόραση 4 Ανοίγοντας την τηλεόραση 4 Ανοίγοντας την τηλεόραση 4 Ανοίγοντας την τηλεόραση 5 Χρήση του joystick 5 Χρήση του joystick 5 Χρήση του joystick 5 Χρήση του joystick Για να επιλέξετε µια λειτουργία πιέστε το πλήκτρο OK στο κέντρο Για να κινηθείτε µεταξύ των µενού πιέστε το πλήκτρο του...

Страница 139: ...ή και µην πατήσετε κάποιο πλήκτρο 6 Αφού ολοκληρωθεί ο συντονισµ ς λων των διαθέσιµων καναλιών στην οθ νη της τηλε ρασης εµφανίζεται το µενού Ταξιν µηση Προγραµµάτων που σας επιτρέπει την αλλαγή της σειράς των αποθηκευµένων καναλιών Αν θελήσετε να αλλάξετε τη θέση εν ς καναλιού πιέστε το πλήκτρο v ή το πλήκτρο V για να επιλέξετε το κανάλι που θέλετε να µετακινήσετε και στη συνέχεια πιέστε το πλήκτ...

Страница 140: ... ή άλλες πηγές εισ δου Πλήκτρα Programme Up και Down Πιέστε για να επιλέξετε κανάλι πάνω ή κάτω Πλήκτρo ανάκλησης Πιέστε τo για να επαναφέρετε τα επίπεδα εικ νας και ήχου σε ρυθµίσεις εργοστασίου Το λογ τυπο της Sony θα εµφανιστεί στην οθ νη και αµέσως µετά η οθ νη αυτ µατου συντονισµού Αν δε θέλετε να συντονίσετε ξανά την τηλε ρασή σας πιέστε το πλήκτρο b στο τηλεχειριστήριο Σπρώξτε τον πίνακα ελ...

Страница 141: ...α να κλείσει ο ήχος Πιέστε ξανά για να ανοίξει ο ήχος Επιστροφή σε λειτουργία τηλε ρασης Πιέστε για να επιστρέψετε στην κανονική λειτουργία τηλε ρασης ταν βρισκ σαστε σε λειτουργία teletext ή σε λειτουργία αναµονής Χρήση Teletext Πιέστε για να ενεργοποιήσετε ακυρώσετε τη λειτουργία Teletext Χρήση του Ηλεκτρονικού Τηλεοπτικού Οδηγού EPG Πιέστε για να ενεργοποιήσετε ακυρώσετε τη λειτουργία του EPG Π...

Страница 142: ... να κινήσετε τον κέρσορα µέσα στην οθ νη 3 Πιέστε το πλήκτρο OK για να επιβεβαιώσετε µια επιλογή α Αν ενώ βρίσκεστε στη στήλη ηµεροµηνίας ώρας ή θέµατος εικονίδια πιέσετε το πλήκτρο OK ο κατάλογος προγραµµάτων αλλάζει ανάλογα µε την επιλογή σας β Αν ενώ βρίσκεστε στον κατάλογο προγραµµάτων πιέσετε το πλήκτρο OK τ τε θα µεταφερθείτε απ ευθείας στο τηλεοπτικ πρ γραµµα αν µεταδίδεται εκείνη τη στιγµή...

Страница 143: ... ρασης Λειτουργεί µ νο αν το επιλεγµένο κανάλι µεταδίδει σήµα VPS PDC Ταχύτητα Ταχύτητα Ταχύτητα Ταχύτητα Πιέστε το V για να επιλέξετε το Ταχύτητα και στη συνέχεια πιέστε το πλήκτρο OK για να επιλέξετε το SP για κανονική ταχύτητα ή το LP για αργή ταχύτητα Με την αργή ταχύτητα µπορείτε να γράψετε το διπλάσιο χρ νο σε µια κασέτα απ τι µε τον κανονικ χρ νο Ωστ σο η ποι τητα της εικ νας µπορεί να είνα...

Страница 144: ...ούµενης σελίδας Επιλογή της επόµενης ή της προηγούµενης σελίδας Επιλογή της επόµενης ή της προηγούµενης σελίδας Πιέστε το ή το απ το τηλεχειριστήριο για να επιλέξετε την προηγούµενη ή την επ µενη σελίδα Επιλογή υποσελίδας Επιλογή υποσελίδας Επιλογή υποσελίδας Επιλογή υποσελίδας Μια σελίδα teletext µπορεί να αποτελείται απ πολλές υποσελίδες Σε αυτήν την περίπτωση εµφανίζεται µια γραµµή πληροφοριών ...

Страница 145: ... στο τηλεχειριστήριο για να δείτε την σελίδα Αποκάλυψη Αποκάλυψη Αποκάλυψη Αποκάλυψη Μερικές σελίδες Teletext περιέχουν κρυµµένες πληροφορίες π χ απαντήσεις σε κουίζ που µπορούν να αποκαλυφθούν Σελίδα χρόνου Σελίδα χρόνου Σελίδα χρόνου Σελίδα χρόνου Ανάλογα µε τη διαθεσιµ τητα της υπηρεσίας το Time Page προσφέρεται σε λειτουργίες Teletext και Mix Το Time Page επιτρέπει να εµφανιστεί σε µια προκαθο...

Страница 146: ...ι που παρακολουθείτε να εµφανίζεται στο κέντρο 2 Πιέστε επανειληµµένα τα πλήκτρα PROGR για να επιλέξετε τις επ µενες ή τις προηγούµενες 12 θέσεις προγραµµάτων 3 Πιέστε v V b ή B για να µετακινηθείτε ανάµεσα στα 13 εµφανιζ µενα κανάλια 4 Πιέστε το πλήκτρο OK για να επιλέξετε το πλαισιωµένο κανάλι Το κανάλι αυτ µετακινείται τώρα στο κέντρο 5 Πιέστε ξανά το πλήκτρο OK για να έχετε ζωντανή εικ να απ τ...

Страница 147: ...ώσετε τη ρύθµιση της λειτουργίας πιέστε το πλήκτρο OK για να αποθηκεύσετε τη νέα ρύθµιση 6 Επαναλάβετε τα στάδια 3 5 εφ σον θελήσετε να ρυθµίσετε οποιαδήποτε άλλη λειτουργία 7 Πιέστε το πλήκτρο MENU για να εξαφανίσετε την εικ να των µενού και να επανέλθετε στην κανονική τηλεοπτική εικ να Ρύθµιση της εικόνας Ρύθµιση της εικόνας Ρύθµιση της εικόνας Ρύθµιση της εικόνας Λειτουργία Λειτουργία Λειτουργί...

Страница 148: ...τουργίες Φων κά Τζαζ Ροκ Ποπ οι αλλαγές αποθηκεύονται µ νο µέχρι να αλλάξετε λειτουργία Ισορροπια V Περισσ τερο αριστερά v Περισσ τερο δεξιά Τονισµ ς V Οχι Κανονικ ς v Ναι Για µουσικές εκποµπές ιάστηµα V Οχι Κανονικ v Ναι Ειδικ ακουστικ εφέ Αυτ Ελεγχ Εντασης V Οχι η ένταση του ήχου θα αλλάζει ανάλογα µε το εκπεµπ µενο σήµα v Ναι η ένταση του ήχου θα παραµένει η ίδια ανεξάρτητα απ το σήµα εκποµπής ...

Страница 149: ...ραση Λειτουργία Επίδραση Λειτουργία Επίδραση Λειτουργία Επίδραση Λειτουργία Χρονοδιακ πτης Υπνου Μπορείτε να επιλέξετε µια χρονική περίοδο στο τέλος της οποίας η τηλε ραση θα σβήσει περνώντας σε λειτουργία αναµονής V Οχι v 90 λεπτά Κλείδωµα για παιδιά V Οχι Κανονική λειτουργία v Ναι Η λειτουργία αυτή απενεργοποιεί τα πλήκτρα χειρισµού της τηλε ρασης ταν αυτή είναι σε λειτουργία αναµονής Μπορείτε ν...

Страница 150: ...απ το τηλεχειριστήριο για να εµφανίσετε το µενού στην οθ νη της τηλε ρασης 2 Πιέστε το πλήκτρο V για να επιλέξετε το σύµβολο απ το µενού και στη συνέχεια πιέστε B για να µεταβείτε στο µενού Ρύθµιση 3 Πιέστε το πλήκτρο V για να επιλέξετε το Συντονισµ ς µε το χέρι απ το µενού και στη συνέχεια πιέστε το B για να µεταβείτε στο µενού Συντονισµ ς µε το χέρι 4 Πιέστε το πλήκτρο V για να επιλέξετε το Χειρ...

Страница 151: ...ιστεί το πρώτο στοιχείο της στήλης ΤΙΤΛΟ 7 Πιέστε το πλήκτρο v ή το V για να επιλέξετε ένα γράµµα ή ένα ψηφίο επιλέξτε για κεν και στη συνέχεια πιέστε το B για επιβεβαίωση Με τον ίδιο τρ πο επιλέξτε και τους υπ λοιπους τέσσερις χαρακτήρες 8 Αφού επιλέξετε λους τους χαρακτήρες πιέστε το πλήκτρο ΟΚ 9 Αν θελήσετε να τιτλοφορήσετε και άλλα κανάλια ακολουθήστε τα στάδια 5 ως 8 10 Πιέστε το πλήκτρο MENU...

Страница 152: ...άδια 5 και 6α β ΕΝΤ Απ κλιση στάθµης ήχου Πιέστε το v ή το V για να ρυθµίσετε τη στάθµη του ήχου του καναλιού κλίµακα απ 7 ως 7 Αποθηκεύστε τη ρύθµιση πιέζοντας το πλήκτρο OK Αν θελήσετε να ρυθµίσετε τη στάθµη του ήχου και σε άλλα κανάλια επαναλάβατε τα στάδια 5 και 6β γ AFT Αυτ µατος Μικροσυντονισµ ς Πιέστε το v ή το V για να µικροσυντονίσετε τη συχν τητα του καναλιού στα πλαίσια της κλίµακας 15 ...

Страница 153: ...κεύστε τη νέα ρύθµιση πιέζοντας το πλήκτρο OK 7 Πιέστε το B για να επιλέξετε το Οριζ ντιο Μέγεθος και στη συνέχεια πιέστε το v ή το V για να ρυθµίσετε τις οριζ ντιες συντεταγµένες σε µια κλίµακα απ 10 ως 10 Αποθηκεύστε τη νέα ρύθµιση πιέζοντας το πλήκτρο OK 8 Πιέστε το πλήκτρο MENU για να εξαφανίσετε το µενού απ την οθ νη 1 Ρύθµιση της περιστροφής εικόνας Ρύθµιση της περιστροφής εικόνας Ρύθµιση τη...

Страница 154: ...λήκτρο OK για να αποθηκεύσετε τελικά τον κωδικ ή πιέστε το b για να τον ακυρώσετε 8 Πιέστε το πλήκτρο MENU για να εξαφανίσετε το µενού απ την οθ νη Προσυντονισµός και τιτλοφόρηση των πηγών εισόδου Προσυντονισµός και τιτλοφόρηση των πηγών εισόδου Προσυντονισµός και τιτλοφόρηση των πηγών εισόδου Προσυντονισµός και τιτλοφόρηση των πηγών εισόδου Με τη λειτουργία αυτή µπορείτε να ρυθµίσετε αυτ µατα και...

Страница 155: ... τον παρακάτω πίνακα αυτ µατη ανίχνευση του σήµατος ανάλογα µε τις συνδεδεµένες συσκευές 3 Ανοίξτε τη συνδεδεµένη συσκευή Η εικ να απ τη συσκευή αν υπάρχει θα εµφανιστεί στην οθ νη της τηλε ρασης 4 Πιέστε το για να επιστρέψετε σε κανονική τηλεοπτική εικ να Σηµείωση Για να αποφύγετε παραµ ρφωση της εικ νας µη συνδέετε ταυτ χρονα συσκευές στις υποδοχές F και G Σύνδεση ακουστικών Συνδέστε τα ακουστικ...

Страница 156: ... προγραµµατίσετε εύκολα το βίντε σας Αµεση εγγραφή απ τηλε ραση Ενώ παρακολουθείτε τηλε ραση αρκεί να πιέσετε ένα µ νο πλήκτρο στο βίντε σας για να γράψετε το πρ γραµµα Για περισσ τερες πληροφορίες σχετικά µε το Smartlink παρακαλούµε ανατρέξτε στις Οδηγίες Χρήσης του βίντε σας Smartlink Smartlink Smartlink Smartlink 2 s 2 Μπορείτε να ελέγξετε άλλες τηλεχειριζ µενες συσκευές της Sony χρησιµοποιώντα...

Страница 157: ...4 4 s 4 Εξοδος ήχου Aριστερά εξιά 2x20W Mουσική ισχύς 1x10W RMS Subwoofer 30W Mουσική ισχύς 15W RMS Κατανάλωση ισχύος 170W ιαστάσεις πxυxβ 892x727x620 χιλ περίπου Βάρος 82kg περίπου Παρεχ µενα εξαρτήµατα Τηλεχειριστήριο RM 893 1 Μπαταρίες τύπου IEC µεγέθους AA 2 Αλλα χαρακτηριστικά Καθοδική λυχνία Flat display Trinitron Μείωση θορύβου εικ να 100 Hz γραφικ ς PAP PAT M PIP Μνήµη κειµένου 2000 σελίδω...

Страница 158: ...ποιώντας το σύστηµα MENU επιλέξτε το µενού Ρύθµιση Εικ νας Ρυθµίστε τη φωτειν τητα το χρώµα το κοντράστ και την οξύτητα Απ το µενού Ρύθµιση Εικ νας επιλέξτε το Μηδενισµ ς για να επαναφέρετε τις ρυθµίσεις εργοστασίου Καλή εικ να αλλά καθ λου ήχος Πιέστε το πλήκτρο απ το τηλεχειριστήριο Αν εµφανίζεται το σύµβολο στην οθ νη πιέστε το πλήκτρο απ το τηλεχειριστήριο Τα έγχρωµα προγράµµατα δεν έχουν χρώµ...

Страница 159: ...20 Freq da 175 25 a 294 25 MHz Hyperband S21 S41 Freq da 303 25 a 463 25 MHz UHF E21 E69 Freq da 471 25 a 855 25 MHz 2 Frequenza Intermedia Multi Standard FI Video 38 9 MHz FI Audio I 33 4 MHz FI Audio II 33 16 MHz 3 Oscillatore Locale Frequenza oscillatore locale superiore a quella del segnale DICHIARAZIONE DI CONFORMITA IN BASE ALL ARTICOLO 2 PARAGRAFO B DEL DM 26 03 1992 Si dichiara che il TV M...

Страница 160: ......

Отзывы: