background image

15

GB

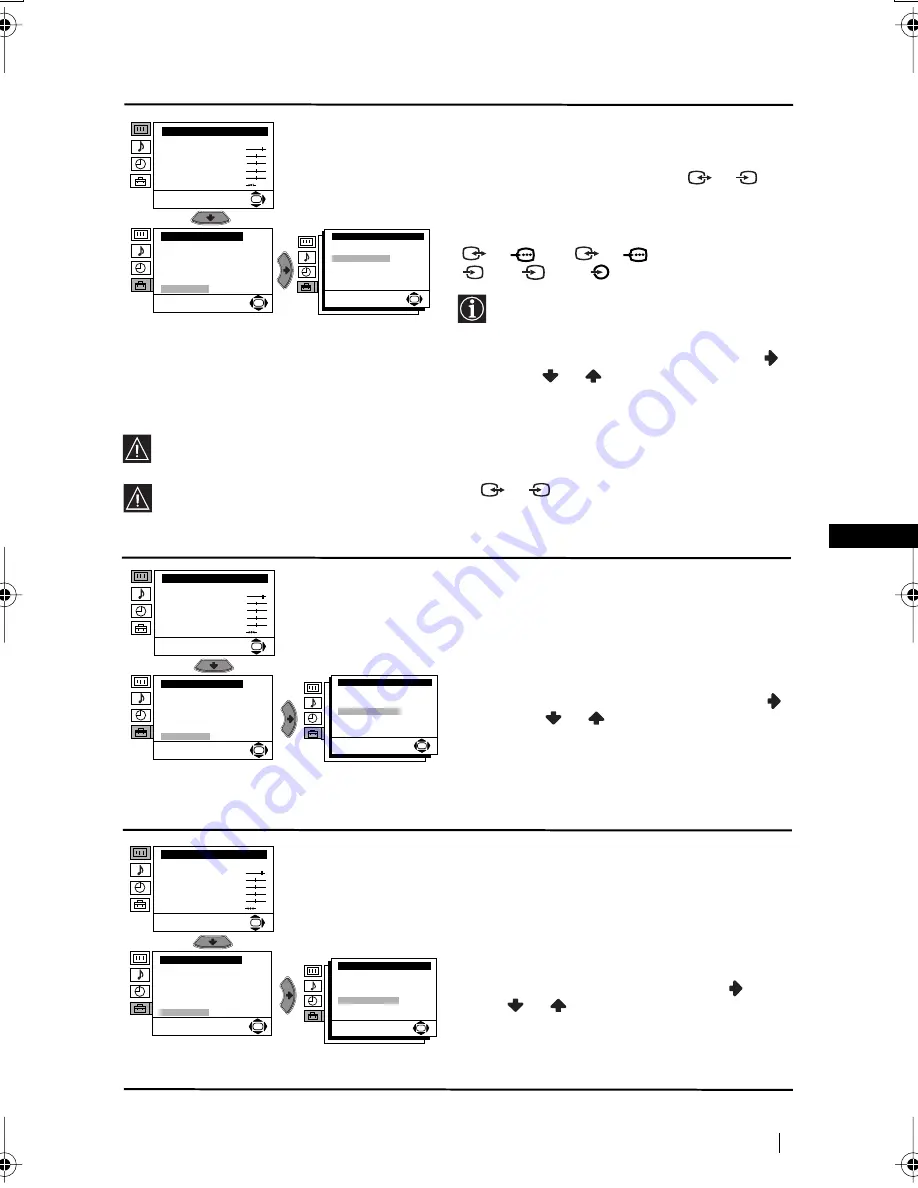
AV3 OUTPUT

The “AV3 Output” option in the “Detail Set 
Up” menu allows you to select the source to be 
output from the Scart connector  

3

/

3

 so 

that you can record  from this Scart any signal 
coming from the TV or from an external 
equipment connected to the Scart connectors  

1

/

1

 or  

2

/

2

 or side connectors 

4

 or 

4

 and 

4

.

If your VCR supports Smartlink, this 
procedure is not necessary.

To do this: after selecting the option, press

Then press

or

to select the desired 

output signal: 

TV, AV1, AV2, AV4, YC4 

or


AUTO

.

If you select “AUTO”, the output signal will always be the same one that is displayed on 
the screen.

If you have connected a decoder to the Scart  

3

/

3

 or to a VCR connected to this 

Scart, please remember to change back the “AV3 Output” to “AUTO” or “TV” for correct 
unscrambling.

TV SPEAKERS

The “TV Speakers” option in the “Detail Set 
Up” menu allows you to mute the TV speakers 
in order to listen to the TV from an external 
amplifier connected to the audio outputs on the 
rear of the TV set.

To do this: after selecting the option, press 

Then press 

or

 to select 

Off

. Finally 

press 

OK 

to confirm and store. 

To cancel this function afterwards, select “On” 
instead of “Off” in the step above.

RGB CENTRING

When connecting an RGB source, such as a 
“PlayStation”, you may need to readjust the 
horizontal position of the picture. If this is the 
case, you can readjust it through the “RGB Cen-
tring” option in the “Detail Set Up”.

To do this: while watching an RGB source select 
the “RGB Centring” option and press 

. Then 

press 

or

 to adjust the centre of the 

picture between –10 and +10. Finally press 

OK

to confirm and store. 

S

S


S

Menu System

Level 1 

Level 2 

Level 3 / Function 

continued...

Picture Adjustment

  Mode:  Personal

   Contrast

   Brightness

   Colour

   Sharpness

   Hue

   Reset

OK

Set Up

  Language

  Auto Tuning

  Programme Sorting

  Progamme Labels

  AV Preset

  Manual Programme Preset

  Detail Set Up

OK

Detail Set Up

  Auto Format:

  Noise Reduction:         

  AV3 Output:

  TV Speakers:   

  RGB Centring:            

  Picture Rotation:


On
Auto
TV
On
0
0

OK

Picture Adjustment

  Mode:  Personal

   Contrast

   Brightness

   Colour

   Sharpness

   Hue

   Reset

OK

Set Up

  Language

  Auto Tuning

  Programme Sorting

  Progamme Labels

  AV Preset

  Manual Programme Preset

  Detail Set Up

OK

Detail Set Up

  Auto Format:

  Noise Reduction:         

  AV3 Output:

  TV Speakers:   

  RGB Centring:            

  Picture Rotation:

On
Auto
TV
On
0
0

OK

Picture Adjustment

  Mode:  Personal

   Contrast

   Brightness

   Colour

   Sharpness

   Hue

   Reset

OK

Set Up

  Language

  Auto Tuning

  Programme Sorting

  Progamme Labels

  AV Preset

  Manual Programme Preset

  Detail Set Up

OK

Detail Set Up

  Auto Format:

  Noise Reduction:         

  AV3 Output:

  TV Speakers:   

  RGB Centring:            

  Picture Rotation:


On
Auto
TV
On
0
0

OK

03GBKV32LS60U.fm  Page 15  Tuesday, May 14, 2002  10:48 AM

Содержание KV-28LS60U

Страница 1: ...R FD Trinitron Colour Television KV 32LS60U KV 28LS60U 2002 by Sony Corporation Instruction Manual GB 4 090 586 11 1 ...

Страница 2: ...f and an appropriate plug fitted in accordance with the following instructions The wires in this mains lead are coloured in accordance with the following code Blue Neutral Brown Live As the colours of the wires in the mains lead of this apparatus may not correspond with the coloured markings identifying the terminals in your plug proceed as follows The wire which is coloured blue must be connected...

Страница 3: ... Menu System 9 Menu Guide Picture Adjustment 9 Sound Adjustment 10 Sleep Timer 11 Language 11 Auto Tuning 11 Programme Sorting 12 Programme Labels 12 AV Preset 12 Manual Programme Preset 13 Noise Reduction 14 Auto Format 14 AV3 Output 15 TV Speakers 15 RGB Centring 15 Picture Rotation 16 Teletext 17 Additional Information Connecting Optional Equipment 18 Using Optional Equipment 19 Remote Control ...

Страница 4: ... on the power lead as this could result in damage We recommend you wind any excess lead around the holders provided on the rear of the TV Place the TV on a secure stable stand Do not allow children to climb on to it Do not place the TV on its side or face up Do not cover the ventilation openings of the TV with items such as curtains or newspapers etc Safety Information Never push objects of any ki...

Страница 5: ...gain to switch on TV from standby mode To save energy we recommend switching off completely when TV is not in use After 15 minutes without a signal and without any button being pressed the TV switches automatically into standby mode 2 Selecting input source Press this button repeatedly until the desired input symbol of the source appears on the TV screen 3 Selecting channels If Media Selector is s...

Страница 6: ... Connecting cables are not supplied On Off switch Standby indicator Press on the mark on the door flap to reveal the control panel Programme Up or Down Buttons Selects TV channels Selecting Input source Audio Input jacks Volume control buttons Auto Start Up Button Headphones jack Video Input jack S video Input jack or Scart lead is optional For more details of VCR connection please refer to the se...

Страница 7: ...art Up Button on the TV set First Time Operation 1Connect the TV plug to the mains socket 220 240V AC 50Hz The first time that the TV set is connected it is usually turned on If the TV is off press the on off button on the TV set to turn on the TV The first time you switch on the TV a Language menu displays automatically on the TV screen 2Press the or button on the remote control to select the lan...

Страница 8: ...captured and stored the Programme Sorting menu appears automatically on the screen enabling you to change the order in which the channels appear on the screen a If you wish to keep the broadcast channels in the tuned order go to step 7 b If you wish to store the channels in a different order 1 Press the or button to select the programme number with the channel TV Broadcast you wish to rearrange th...

Страница 9: ...u to alter the picture adjustments To do this after selecting the item you want to alter press then press repeatedly or to adjust it and finally press OK to store the new adjustment This menu also allows you to customise the picture mode based on the programme you are watching Live for live broadcast programmes DVD and Digital Set Top Box receivers Personal for individual settings Movie for films ...

Страница 10: ...For a bilingual broadcast Mono for mono channel if available A for channel 1 B for channel 2 Auto Volume Off volume level changes according to the broadcast signal On volume level of the channels will stay the same independent of the broadcast signal e g in the case of advertisements If you are listening to the TV through headphones the Effect option will automatically be switched to Off If you se...

Страница 11: ... you to automatically search for and store all available TV channels To do this after selecting the option press and then proceed in the same way as in the steps 4 and 5 of the section Switching On the TV and Automatically Tuning on page 8 Level 1 Level 2 Level 3 Function Picture Adjustment Mode Personal Contrast Brightness Colour Sharpness Hue Reset OK Timer Sleep Timer Off OK Timer Sleep Timer O...

Страница 12: ...appears in the label column a If you want to use one of the 6 predefined label CABLE GAME CAM DVD VIDEO or SAT press or to select the desired label and finally press OK to store b If you want to set a different label select Edit and press Then with the first element highlighted press or to select a letter number or for a blank then press to confirm this character Select the other four characters i...

Страница 13: ...irm this character Select the other four characters in the same way After selecting all the characters press OK twice to store c Fine tune the broadcast reception Normally the automatic fine tuning AFT will give the best possible picture however you can manually fine tune the TV to obtain a better picture reception in case the picture is distorted To do this while watching the channel TV Broadcast...

Страница 14: ...e cut off Press or to adjust the position of the image on the screen e g to read subtitles NOISE REDUCTION The Noise Reduction option in the Detail Set Up menu allows you to automatically reduce the picture noise visible in the broadcast signal To do this after selecting the option press Then press or to select Auto Finally press OK to confirm and store To cancel this function afterwards select Of...

Страница 15: ...necting an RGB source such as a PlayStation you may need to readjust the horizontal position of the picture If this is the case you can readjust it through the RGB Cen tring option in the Detail Set Up To do this while watching an RGB source select the RGB Centring option and press Then press or to adjust the centre of the picture between 10 and 10 Finally press OK to confirm and store S S S Menu ...

Страница 16: ...ing the option press Then press or to correct any slant of the picture between 5 and 5 Level 1 Level 2 Level 3 Function Picture Adjustment Mode Personal Contrast Brightness Colour Sharpness Hue Reset OK Set Up Language Auto Tuning Programme Sorting Progamme Labels AV Preset Manual Programme Preset Detail Set Up OK Detail Set Up Auto Format Noise Reduction AV3 Output TV Speakers RGB Centring Pictur...

Страница 17: ... e g answer to a quiz Press Press it again to conceal the information To select a sub page A teletext page may consist of several sub pages In this case the page number that appears on the upper left corner will change from white to green and one or more arrows will appear next to the page number Repeatedly press the or buttons on the remote control to watch the desired sub page To Switch Off Tele...

Страница 18: ...e TV programme number 0 by using the Manual Programme Preset option for details of how to manually programme these presets see page 13 step a Refer to your VCR instruction manual to find out how to find the output channel of your VCR Connecting a VCR that supports Smartlink Smartlink is a direct link between the TV set and the VCR For more information on Smartlink please refer to the instruction m...

Страница 19: ...ct input symbol appears on the screen Symbol Input Signals 1 Audio video input signal through the Scart connector E 1 RGB input signal through the Scart connector E This symbol appears only if an RGB source has been connected 2 Audio video input signal through the Scart connector F 2 RGB input signal through the Scart connector F This symbol appears only if an RGB source has been connected 3 Audio...

Страница 20: ... 4 Turn on your VCR or DVD and check that the main functions work If your device is not working or some of the functions do not work please check that you entered the correct code set or try the next code listed against the brand Your brand codes may be lost if weak batteries are not replaced within a few minutes To reset your brand of DVD or VCR please repeat the above steps A small label is adde...

Страница 21: ...Design and specifications are subject to change without notice Ecological Paper Totally Chlorine Free Side Terminals 4 S Video input 4 pin DIN 4 video input phono jack 4 audio input phono jacks headphones jack Sound Output 2 x 20 W music power 2 x 10 W RMS Woofer 30 W music power 15 W RMS Power Consumption KV 32LS60U 130 W KV 28LS60U 125 W Standby Power Consumption 0 3 W Dimensions w x h x d KV 32...

Страница 22: ...t is on and press the button repeatedly on the remote control until the correct input symbol is displayed on the screen Press the button on the remote control Check that TV Speakers is On in the Detail Set Up menu Check that headphones are not connected Using the menu system select the Picture Adjustment menu and select Reset to return to factory settings Turn off any equipment connected to the Sc...

Страница 23: ... for United Kingdom Only the main transmitters are listed Information regarding the regional sub relay channel numbers can be obtained by contacting The BBC Engineering Information Dept Telephone Number 020 7852 5040 Additional Information ...

Страница 24: ...http www world sony com Printed in UK Ecological Paper Totally Chlorine Free ...

Отзывы: