


– 10 –
KP-44PX3
RM-945
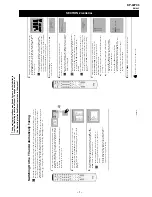
The Set Up Menu
The
“Set
Up”
menu
allows
y
ou
to
alter
various
options on
th
is TV.
To do t
h
is:
Pres
s the
MENU
button and press
v
three
ti
me
s
to
se
le
ct
,
then
pre
ss
OK
to
ent
er
thi
s
m
enu.
N
ex
t
pre
ss
v
or
V
to se
le
ct the
desire
d
option and press
OK
. Finally read below how
to operate into
each option.
LA
NGUA
GE
This op
tion allows y
ou to select the language that menus are displayed in.
To do this:
After selecting the option, pr
ess
OK
and then pr
oceed in the same wa
y as in step 2 of the section
"Switching On the TV and
Auto
matically Tuning" on pag
e 9.
COUNTR
Y
This op
tion allows y
ou to select the countr
y
in which you wish
to
operate the TV set.
To do this:
After selecting the option, pr
ess
OK
and then pr
oceed in the same wa
y as in step 3 of the section
"Switching On the TV and
Auto
matically Tuning" on pag
e 9.
AUTO TU
NIN
G
This op
tion allows y
ou to automatically sear
ch fo
r and store all available TV channels.
To do this:
After selecting the option, pr
ess
OK
and then pr
oceed in the same way as in the steps 5 and
6 of
th
e sect
ion “Swit
chin
g On the TV
and Aut
o
matical
ly
Tuning” on page 10.
PROGRAMME SORTING
This op
tion allows y
ou to chang
e the order in
wh
ich the channels (TV Broadcast) appear on the
screen.
To do this:
After
selecting
the
optio
n,
press
OK
and
then
proceed
in
th
e
same
way
as
in
t
he
st
ep
7
of
the
section
“Switching On
th
e TV and Auto
matically
Tuning”
on
page 10.
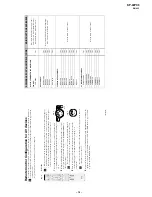
,
m
MENU
Picture
Adjustment
Select:
Enter
:
OK
Exit:
MENU
Picture
Mode:
Liv
e
Contr
ast:
Reset Noise
Reduction:
Auto
Colour
Tone:
Cold
Select:
Exit:
MENU
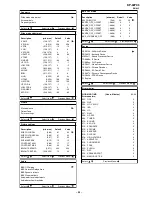
Set Up
Language
Country
Auto T
uning
P
rogramme Sorting
P
rogramme Labels
A
V
P
reset
Manual P
rogramme P
reset
Enter:
OK
Set Up
Language
Country
Auto T
uning
P
rogramme Sorting
P
rogramme Labels
A
V
P
reset
Manual P
rogramme P
reset
Select:
Bac
k:
Enter:
OK
continued...
GB
PR
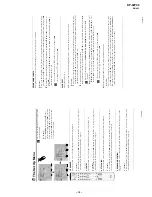
OGRAMME LABELS
This option allows you to name a channel u
sing
up
to
five characters
(letters or numbers).
To
d
o t
h
is
:
1
Once you
have entered the "Set Up" menu
as it is explained in the p
revious page and
after selectin
g the option,
press
OK
, th
en
press
v
or
V
t
o
select
the
progr
amme
number
with
the
channel
yo
u
wish
to
name.
Next
press
OK
.
2
Wi
th the
fi
rst e
le
m
en
t of the
Label
column h
ighlighted, press
OK
and
v
,
V
,
B
or
b
to
sel
ec
t
th
e
le
tt
er
,
ne
xt
press
OK
.
When you h
ave finished
, press
v
,
V
,
B
or
b
to
se
le
ct the
w
ord “
En
d
” on the scr
een and f
inally press
OK
to
turn off the menu from the screen.
• To cor
rec
t the
le
tt
er, se
lec
t "
%
" on the screen to go back an
d press
OK
.
• Fo
r a blank, select "
" on the screen and press
OK
.
AV PRESET
This option allows you to:
a)
Designate a name to
th
e external equipment you have connected
to the in
put so
ckets of the TV set.
To do this:
1
Once
y
ou
hav
e
entered
the
"Set
Up"
me
nu
as
it
is
explained
in
the
previous
pag
e
and
af
ter
s
electing
the
option,
press
OK
, t
h
en
pre
ss
v
or
V
to
select
the
in
put
source
you
wish
to
n
ame:
A
V
1,
AV2
or
AV3
for
the
rear
Scarts
and
AV4
for
right side co
nnectors. Nex
t p
ress
OK
twic
e.
2
A la
bel
a
u
tom
ati
ca
ll
y a
p
pea
rs i
n t
h
e la
bel
c
o
lum
n
:
a)
If
you
wan
t to
use
one
of
the
predef
ined
lab
els,
press
v
or
V
to
sel
ect
th
e
desi
red
label
and
finally
p
ress
OK
.
T
h
e
tot
al
pre
defi
ned
la
bel
s
are:
VIDEO, DVD, CABLE, GAME
,
CAM
(camcord
er) or
SA
T
(sa
te
lli
te)
.
b)
If
you
want
to
set
a
di
fferent
lab
el,
select
Edit
and
press
OK
. Then,
wi
th
th
e
fi
rst
e
le
m
ent
highl
ight
ed,
press
v
,
V
,
B
or
b
to
se
le
ct
the
l
et
ter,
n
ext
p
ress
OK
.
When
you
hav
e
finished,
p
ress
v
,
V
,
B
or
b
to
se
le
ct
the wor
d “
End
” on the screen and finally press
OK
to turn off the menu from the screen.
•
T
o
c
orre
ct
t
he
le
tte
r,
sel
ec
t "
%
" on the screen
to
go back and press
OK
.
• For a blank, select "
" on
th
e screen and press
OK
.
b)
Change the inpu
t sound
level o
f the optional equipment connected.
To
d
o th
is
:
Once you
have entered the "Set Up" menu
as it is explained in the p
revious page and
after selectin
g the option
press
OK
,
the
n pres
s
v
o
r
V
to select the input source y
ou wa
nt to alter the input sound level:
AV1,
AV2
or
AV
3
for the
rear
Scarts and
AV4
for
right side co
nnectors. Nex
t press twice
b
to high
light the
Sou
nd
Offset
column. Fin
ally p
ress
OK
and
v
or
V
to alter the input sound level between -9
and +9.
continued...


